Since one of our biggest fears is having to leave our homes and bug out into the woods in search of our BOLs or even just wander around until the dust settles, we need to know how to start a fire. It’s just one of those basic survival skills we cannot live without. We know we’ll one day need it.
You can argue that knowing so many ways to start a fire is overkill but the truth is, you never know what things are going to look like when you do have to make it. The thing about prepping and survival is that there are so many unknowns that it just doesn’t make sense to have only one way of doing this.
What if your Bic lighter(s) don’t work? What if you lose your 9 volt battery? Lots of bad things can happen, so it’s just best to know as many ways to start a fire as possible and be proud of it.
There are lots of ways to do this, each with its own set of challenges. It’s not hard but you do have to know and side-step the biggest mistakes unless you want to deprive yourself and your family from heat.
Wet wood, lighters that don’t work because they haven’t been checked periodically, and lack of good tinder are just a few of the mistakes you can make when starting a fire. So let’s take those mistakes one by one, shall we?
Using A Fire-Starting Device
Well, we have to start with the obvious methods simply because I’m almost sure you have at least one Bic lighter in your bug out bag if not several.
While you’re at it, make sure you stock up on them inside your home, your bug out location, your car’s get home bag and even your everyday carry kit.
There’s a small caveat here. You might wake up with all your Bic lighters not working so be sure to try them from time to time to see that they’re working. Have at least 3 at hand just to be sure.
Another way of starting a fire is to use matches or waterproof matches (which are better and should be in your bug out bag for obvious reasons).
Another thing you can use is a blastmatch, which you can see in action here:
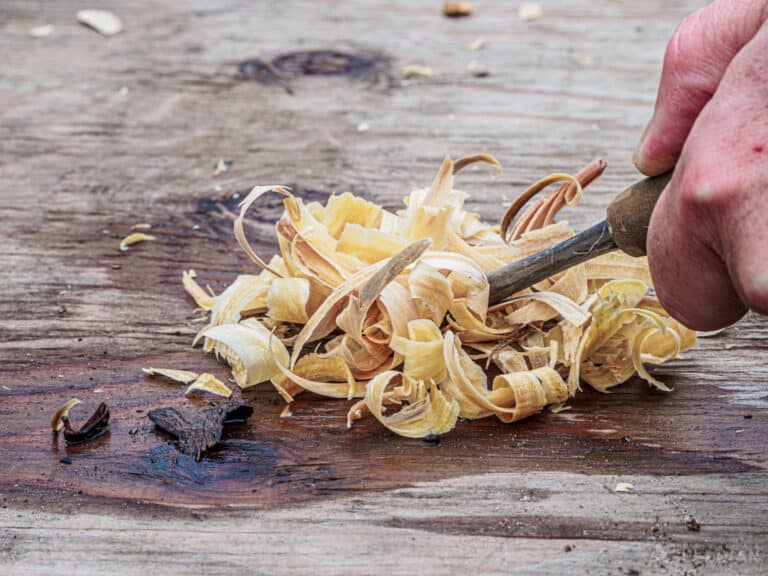
Last but not least, consider a magnesium block firestarter. To use it, simply shave off the magnesium, then run the striker by the flint to start those sparks near your pile of shavings.
Disclosure: This post has links to 3rd party websites, so I may get a commission if you buy through those links. Survival Sullivan is a participant in the Amazon Services LLC Associates Program. As an Amazon Associate, I earn from qualifying purchases. See my full disclosure for more.
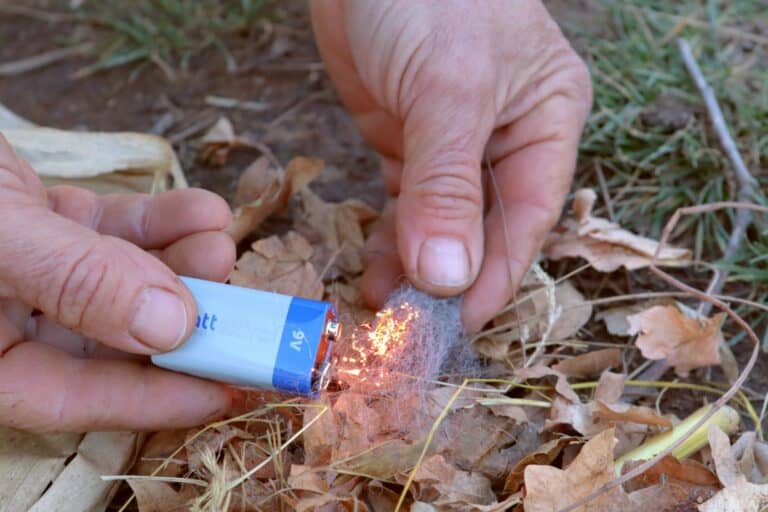
Using a 9V Battery and Steel Wool
This one is really, really easy and it works in all weather conditions. All you need is a 9V battery and some steel wool to start a fire. I suggest you get the super-fine kind because it works better.
Simply touch the 9V battery and the steel wool and witness instant sparks; just make sure you have your tinder ready:
Using a Flint and Steel
Using a flint and steel to ignite a fire is a personal favorite of a lot of preppers and survivalists. You will need a fire steel (made of high carbon or some sort of steel alloy) and a flit or a rock.
Not all rocks spark, of course, but if you’re out in the wild, finding a few (or even one) is likely if you’re near a river bed. Rocks that have quartz are always great.
What you want are rocks that have sharp edges but, if they don’t, you can take one and crack it open into smaller rocks that will, hopefully, have this characteristic.
To start the fire, you have to have your tinder ready. Start smashing your knife on the rock until sparks start flying.
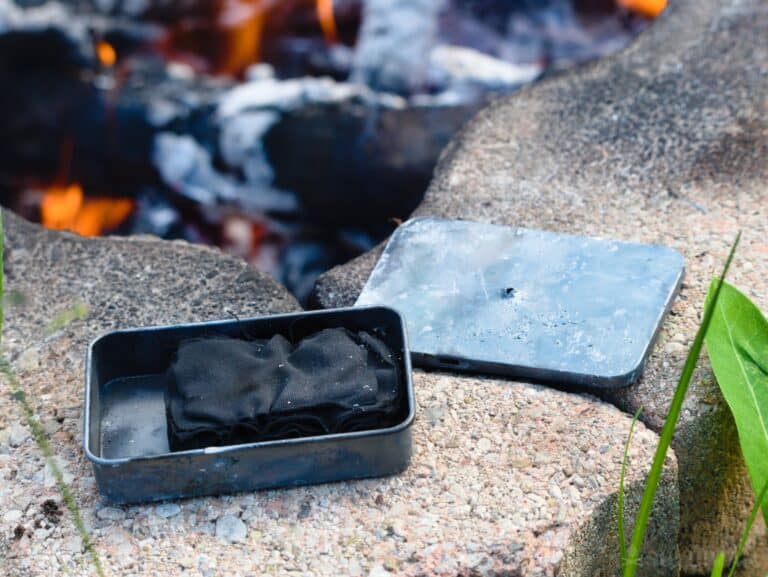
That’s when the third component of the flint & steel system comes into play, char cloth, the thing igniting from the sparks. It needs to be held tightly inside your hand along with the flint when you start doing this.
Note: if you really want to do it old-school, or you simply lost your knife, you can get those initial sparks going using nothing but rocks.
As you probably guessed, the second stone has to have iron in it (pyrite is a good example) for it to work.
Using a Lens
This type of fire-starting requires patience, good tinder and sunlight. When you focus the sun’s rays into a single point on that tinder, it will eventually start to burn. You’ll need a magnifying glass or something that will act like one such as:
- a Fresnel lens
- a condom filled with water
- a plastic bag, also filled with water
- your eyeglasses
- binoculars
- a light bulb, also filled with water (make sure it’s crystal clear)
- an ice cube (!)
- …or anything else that can focus those rays.
The cool thing about this method is that, provided that the rays are strong enough, you don’t really need tinder. A piece of paper or cardboard in black ink will ignite just as well.
Using the Hand Drill Method
There’s no guarantee this will work because there are different factors at play here but, if you keep all of them in mind, then you’re almost sure to make those first sparks after 5 minutes (plus or minus). All you need is a fireboard, and a spindle.
Step 1: choose the wood carefully. Some types of woods work better than others. Soft woods such as aspen, cedar, mullein, or willow, depending on where you’re located.
Step 2: cut up your baseboard with a knife. Make sure it’s relatively thin and flat. It’s best to make both your spindle and the board from the same wood/branch.
Step 3: create your simple. It shouldn’t be more than a quarter of an inch in diameter, though, but you don’t want it too small, either.
Step 4: cut a notch inside your fireboard that is V shaped, then create a small round depression next to it. As you rotate the spindle, the coal that is formed will stay inside the depression but the v-shaped notch will allow it to breathe.
Step 5: rotate the spindle as fast as you can with your hands, making sure you apply downward pressure and that you NEVER remove it from the hole.
A variation of this is to simply rub the two sticks together. You first have to carve one of them inside for about 10 inches in length.
The other stick should be sharpened at one end at a 45-degree angle. Secure the first stick and then start moving the second one alongside the first with both hands.
Using the Bow Drill Method
The bow drill method is very similar to the hand drill, though a little more complex.
The benefit is that the rotation speed of the spindle is higher, meaning you have a better chance of getting that wood dust turn into coal and get your fire going.
Since the spindle is going to rotate a lot faster using our bow, we’re gonna need something with as little friction as possible at the top.
The reason is, we want the friction to happen at the bottom, not at the top of the spindle where you’ll be placing your other hand to secure it into place and apply pressure.
This is called a hand-hold or a bearing block and it should be a small piece of hardwood that’s carved a little on the inside or anything else that has low friction, such as a stone or a shell (not that you might have one handy but still).
The bow is the obvious star of this show. You’re gonna need a string that’s at least twice the size of the resulting length, after you tie it securely to the wooden component.
You can make it from pretty much any material you want: nylon, leather, cotton… even Paracord will do.
Tip: don’t cut your Paracord, just let it hang or tie it around the wooden section of the bow. If you keep cutting it, your paracord will only fragment and become unusable for future tasks.
As for the actual bow, a green branch the girth of one of your fingers will do.
If it’s too rigid, you won’t be able to assemble your bow; if it’s too flexible, it might break. It doesn’t have to bend too much, 2 inches from the initial straight line will suffice.
More on starting a fire with sticks here.
Using a Parabolic Mirror
The principle is the same with our previous fire-starting method: the mirror takes the sun’s rays and focus them into a single point until its temperature rises enough to allow the tinder located in that point to combust.
Any number of objects can work as a parabolic mirror, such as:
- a flashlight
- a parabolic dish of any size (obviously)
- and even the bottom of a can of beer or soda!
Using a Regular Mirror and a Piece of Paper
This one is really easy and proves just how useful some of the stuff you pack in your bug out bag can be.
This is a really clever and easy way of starting a fire. Use the mirror to reflect the sun’s rays back up where they came from, meaning the semi-transparent folded piece of paper (in this case) will get hit by light from both directions.
Potassium Permanganate and Glycerine (chemical reaction)
You’re probably not going to have the two on you when you’ll need them to start a fire but… they do work!
Chlorine and Brake Fluid (chemical reaction)
This may seem like an unusual combination but the reason it works is that the two react with each-other chemically. Just mix them up and stand back for about 30 seconds.
If you don’t see anything happening, I suggest you keep waiting, else you risk getting injured once you approach.
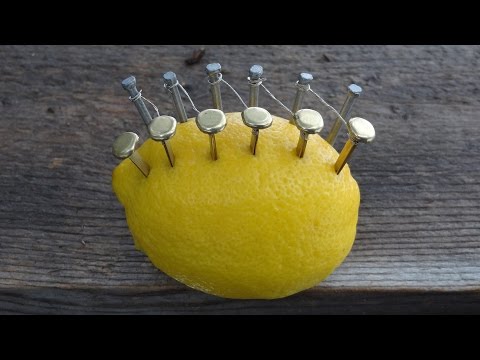
Using a… Lemon
Ok, you need more than the lemon, but it’s a pretty cool trick that you could teach it to your kids the next time you decide to do something practical pertaining to survival.
Shoot a Rock
I’m only adding this one because it’s possible, not because you should try it. Don’t. The way it works is straightforward: as the bullet hits the rock, sparks will start flying. As one reader suggested, it’s not a safe way to do it.
What Can You Use as Tinder?
Lots of things make good tinder so let’s not beat around the bush and see the full list:
- straws
- bark
- dryer lint
- cotton balls and Vaseline
- waxed cotton balls
- coconut husk
- sawdust
- grass
- dry leaves
- cattails
- petroleum gauze dressing (from your first aid kit)
- birds’ and bees’ nests (if you can find one)
- steel wool
- and even powder obtained from a bullet (really helpful under damp conditions)
How to Keep A Fire Going
Now that you know how to start a fire, you’re definitely gonna want it to keep burning for as long a time as possible. If you’re out in the wild, you might want to keep it burning throughout the entire night next to your shelter to help maintain your core body temperature.
Always use dry firewood. If you don’t, you risk your fire burning out before you have a chance to add tinder or more kindling.
Stock up. The last thing you want is to run around looking for dry wood when the fire is almost dead.
Use hardwood instead of softwood. hardwood burns for a longer period of time, which is exactly what you want.
Blow on it. You can use your mouth or a piece of cardboard to get your fire the much-needed oxygen to keep it going.
Poke it. Use a long stick to move the logs around and, hopefully, it’s going to start burning with more intensity.
Use the right type of wood. This may or may not be a choice when you’re bugging out but some types of wood burn better than the others. Chestnut, holly, or willow are bad choices while maple, oak, thorn,
Protect your fire from rain. This one is easy but a little dangerous. The idea is you put a few branches above tour fire until they form an arch to prevent most raindrops or snowflakes from reaching it.
Of course, this is more of a quick fix. If you want something more sustainable you’re gonna need a bigger and more serious shelter. After all, you’re investing time and effort in your own shelter, why not do the same for your fire?
A good way is to just make two triangle frames and stack them up with thick wooden branches on one side of both of them. Keep adding them until you’ve made sure rain can’t go through.
Of course, if you want to be smart, you can just place your tarp and get it over with. Up to you.
Misc. Questions and Issues
I’m just gonna add here a few of the things that didn’t quite fit into the previous sections of this article.
Should you keep your fire close to your shelter?
If you know how to keep your fire under control, yes. If not, it’s probably best to keep a reasonable distance between the two, unless you’re looking to wake up with your shelter on fire.
Sparks and flying embers will always be a problem, particularly if it’s windy. You can even make a Dakota fire hole to be extra safe.
Always keep your fire small.
Ideally, you want to have a bed of coal that keeps you as long as possible. That way there are no surprises.
Always have at least one way to put out your fire. Always.
Place rocks around the fire. Cover them with dirt, if you want because this will minimize the chances of the fire from spreading.
Always create a firebreak to minimize the chances of your fire spreading. Remove all vegetation and everything else around the place where you intend to build it.
If you’re camping, you always have to put out your fire before going to sleep. If it’s not a SHTF situation, then surely you’ll have other means to keep warm. Besides, you can get fined for being negligent if you don’t do this.


My dad was military. My grandfather was a cop. They served their country well. But I don’t like taking orders. I’m taking matters into my own hands so I’m not just preparing, I’m going to a friggin’ war to provide you the best of the best survival and preparedness content out there.
Dan,
Did you mean “Brake” fluid?
Also, why wouldn’t you have Potassium Permanganate and Glycerine on you? They should both be in any “self-respecting” First Aid Kit. Potassium Permanganate is a great antimicrobial if you get a cut or other injury. Just sprinkle some on. Glycerine will serve you well with burns or raw chafed skin.
Jeff
Yes, thank you for catching that. Thanks for sharing the alternative uses of PP and glycerine, too. The latter is not something people usually have in their bug out bags but if someone wants to add it..
PP and sugar works too. Crush them together thoroughly and tip onto kindling. Use caution as stated in the article, the reaction can start quickly and be intense.
You failed to mention one. I can’t remember what they call it. It works on the friction principle like the bow drill. The difference is that it works with an up and down motion instead of back and forth. It seems like it might be easier than the bow drill. I haven’t located a site that tells how to do this method.
It’s called a Pump Drill and can be found on YouTube.
Are you referring tot he hand drill method, were the guy moves his palms in a downward motion and then starts again from the top?
Dan
Would have loved to read your article, but your pop-up kept reloading the page when I closed it. Very frustrating as you usually have good information. I don’t block popups on some pages because I know they are revenue creators. but in this case it is very frustrating to try to read an article.
That’s very weird, the popup has a close button and should work seamlessly… Could it be from your browser? I never had this problem before and you’re the first one who does, that’s why I’m asking..
CX
Convection works too. Hold a taper of rolled up or twisted paper to something very hot like an exhaust manifold. When it catches transfer the flame to your kindling. You can light cigarettes directly this too which is handy since most motorcycles don’t come with cigarette lighters.
How about fire pistons?