There is no doubt that fire is a critical survival essential. After you’ve found shelter, you will need to keep yourself warm. If you don’t have easier ways of starting a fire such as lighters, matches, and ferro rods, you may need to rely on what Mother Nature has to offer to start those first sparks.
Although not as easy as it looks, knowing how to use the bow-drill method can save your life in the wilderness if nothing else works. In this article we’ll talk in-depth about wood selection, making all of the bow drill components, and then using them to start a fire.
Table of Contents
What’s the Bow Drill Method?
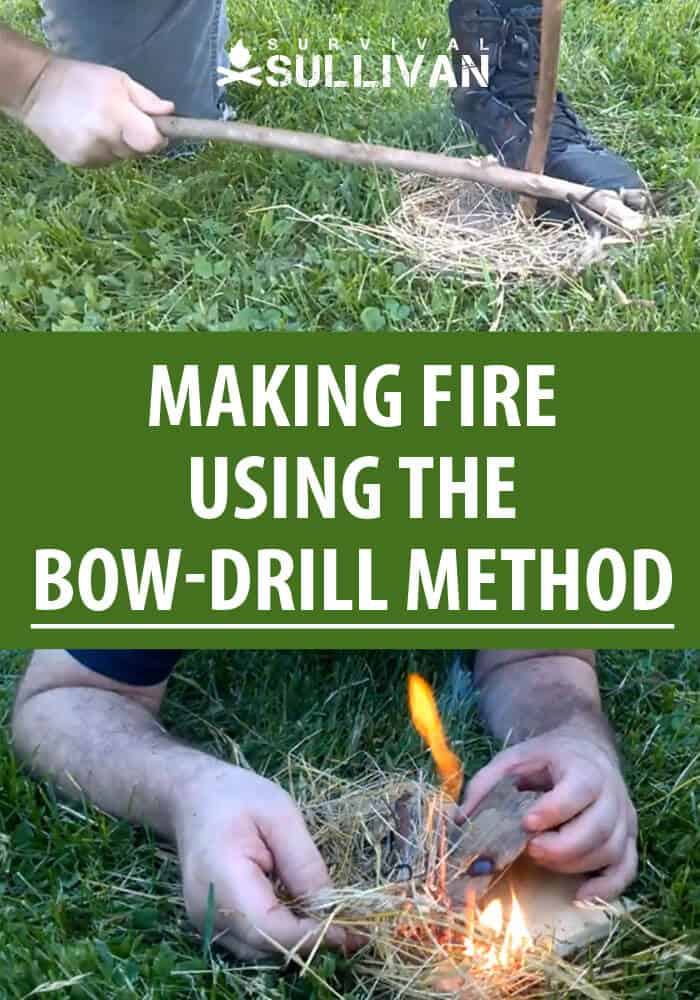
The bow-drill method is a primitive, hand-operated way of making fire making friction using a few pieces of wood, and a piece of string.
Most of us have seen it in movies or maybe an outdoor adventure reality show like Survivor. If you were a Boy Scout or spent time in the military, you learned this technique. If you can get confident in the bow-drill method, you will almost never be without warmth in a survival situation.
This primitive skill requires quite a bit of physical exertion. It is not something you can just read about or memorize the steps for, and then depend on it in wilderness survival scenarios.
Wood Selection
Start out with Maple, Birch, and Willow woods which are easy to spot. Practice identifying other softwoods. Pine, Juniper, and Spruce are found in higher elevations where other trees are scarce, so good to practice with those too as your skills advance. Hardwoods require more physical effort and should be avoided if possible.
Gather more than you need for one bow-drill kit as you will use it up quickly practicing your technique. When possible, let it dry out several days to a week in the sun or ten days in the shade.
Here is a list with all the types of wood you can use for your bow drill:
| ✅ Maple | ✅ Birch |
| ✅ Willow | ✅ Cedar |
| ✅ Cottonwood | ✅ Basswood |
| ✅ Juniper | ✅ Aspen |
| ✅ Poplar | ✅ Buckeye |
| ✅ Pine | ✅ Spruce |
| ✅ Yucca | ✅ Elderberry |
| ✅ Hau | ✅ Olomea |
Caution: Pressure-treated wood is highly toxic if heated. It gives off noxious fumes when it smolders. For this reason, use only natural wood sources.

Bow Drill Tools and Materials
These are the components of the bow drill, that you’ll be making:
- a wooden bearing block (also called a socket)
- a spindle (also called a drill)
- a fireboard (also called a hearth)
- a bow (including a bowstring)
- a tinder bundle (to help you ignite those first sparks)
- a charcoal catcher, to help collect the “dust” that will form
The Bow
Locate a lightweight stick you can’t break easily. Slightly arched and as big around as your thumb it should be as long as your hand to your chest when your arm is outstretched. It’s best if it has just recently come off its tree so it is still green. It should be strong and stiff. File or shave off any uneven bumps or knots.
The bow shouldn’t flex too easily, no more than two inches. If it snaps, choose a limb that is slightly larger in diameter.
Optionally, you can notch each end of the bow about two inches with your knife. The location and angle of the split are crucial if there’s any arching of the bow.

Tie a short piece of cordage midway up the notches using a knot that will not come loose easily. Square knots and clove hitches work well. Make a knot on one end of the string and slip it into the notch. The string should be secured in the split. Repeat this on the opposite end.

The String
You will need a string 1 ½ as long as your bow and approximately ¼ inch in diameter. What you use will depend on availability and your personal preferences.
Natural cord from plant fibers isn’t always available and can limit success if your technique is not perfect. Replace hiking boot laces with paracord to increase the odds you will have cord available if needed.
A strong leather or rawhide thong, grips the spindle more naturally so it’s a good addition to your EDC kit or BOB.
Heavy cotton laces or Paracord typically withstand repeated use well. Shoelaces can work in a pinch but aren’t durable enough for multiple uses. Paracord works well although some nylon and other synthetics can melt due to friction if not heavy enough.
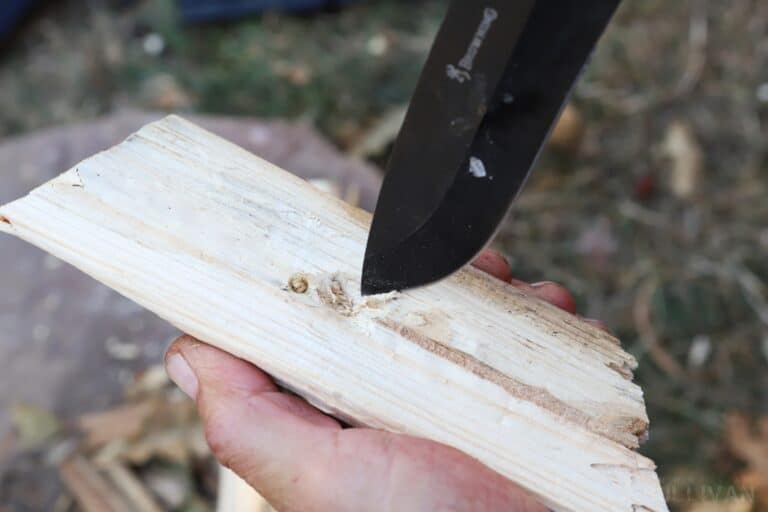
Cut Your Fireboard
The fireboard is carved from dead-standing wood. Dampness negatively affects your chances of getting charcoal. Cut to 12 inches long and 2-3 inches wide, the best thickness of about ¾ of an inch.
You should be able to make an impression in the wood with your thumb nail. Harder wood can be thinner but if it’s too thick, dust cools too quickly to create an ember.

Lastly, cut a notch next to the burned-in hole in the fireboard at a 45-degree angle so the powder can drop out of the hole. When finished it should look like a 1/8 wedge with a point originating from the center of the hole:
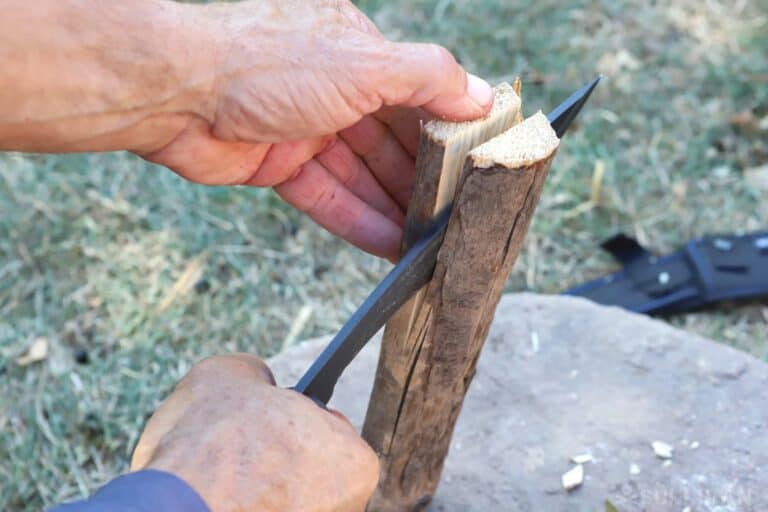
Cut Your Spindle
Cut your spindle approximately 12 inches long and a little less than 1 inch in diameter. Ideally cut from the same wood or at least the same type of tree, it must be straight and round to rotate correctly.

The top of the spindle where it fits into the handhold needs to be rounded, the opposite end will be round but flatter where it meets the fireboard.
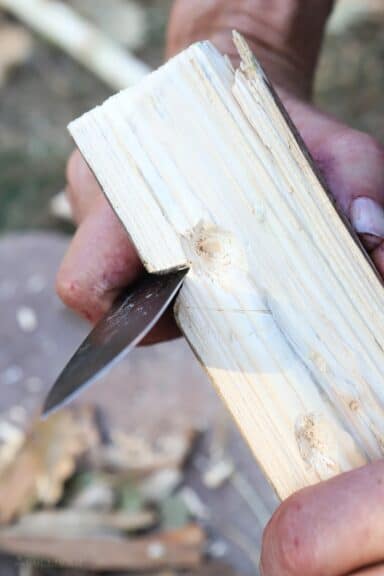
Cut and Carve the Handhold
If making your handhold from wood, harder wood is better. Greenwood will hold moisture as a natural lubricant to reduce friction for easier rotation.
Cut a section 4-5 inches long, remove uneven edges for a more comfortable grip. Cut a ½ inch sloping hole in the center on the flat side:
Your spindle will fit into this depression as you bear down, as you can see:
Many survival enthusiasts use an awl to bore a hole in a small antler or piece of bone to make a handhold that they wear around their neck or keep in their bug-out bags until needed.
Other items can include hickory nuts, a metal cup, a bottle cap, shell, your canteen cap, or even a piece of metal bent to be held in your hand.
Find a Charcoal Catcher
This can be anything, really: a piece of paper, cloth, or some other piece of wood… anything you can put underneath your fireboard to collect the charred wood dust:

Step-by-Step Bow Drill Method
Step 1. Get out your bow drill kit or gather wood and make it following the instructions above.
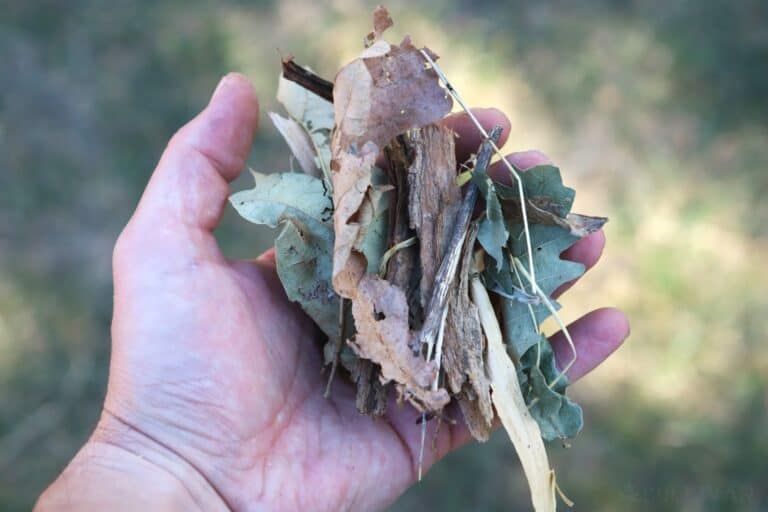
Step 2. Strip bark from wood found or collect dry grasses or leaves to make a tinder bundle or nest:
Step 3. Prepare your fire pit with kindling and other wood at the ready to fuel your fire once successful.
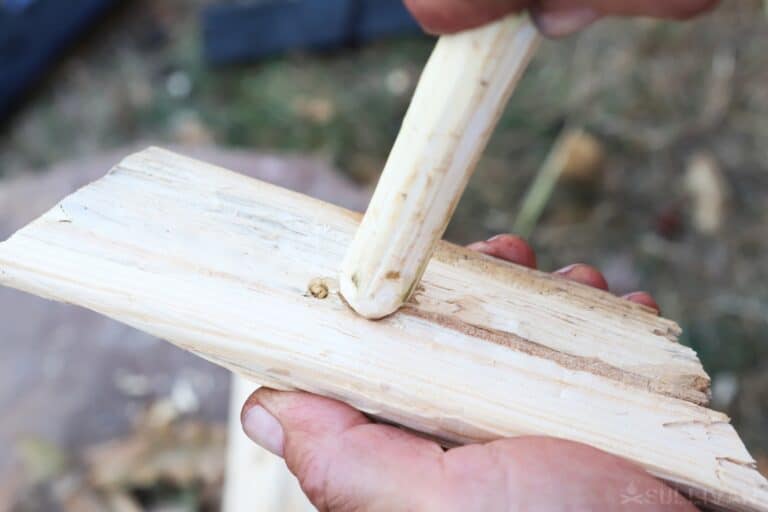
Step 4. Use the tip of your knife or sharp rock to create a pilot hole at one end of your fireboard about 1 inch from the edge.
Step 5. Use your knife to deepen the hole slightly so the tip of the spindle or drill will not slip around.
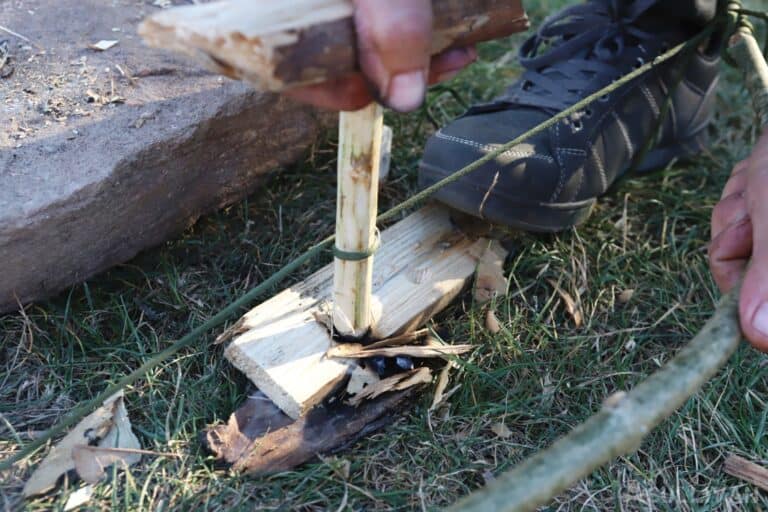
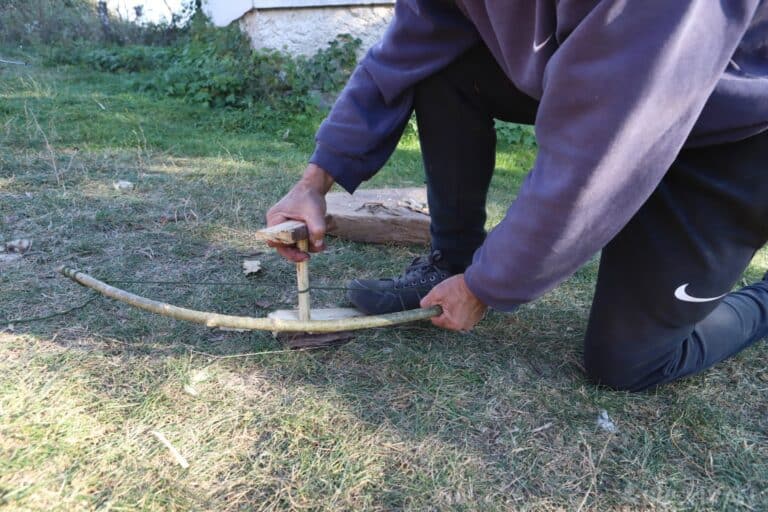
Step 6. If your right hand is dominant, kneel with your right knee on the ground and your left foot on one end of the board near the pilot hole. This will steady the fireboard. You can either sit back on your right foot or lean forward against your left knee as needed for comfort or to add pressure.
Step 7. Wrap your string around the spindle so the spindle is on the outside of the bow. It should feel like the drill is going to pop out. The tension of the string is important and may need to be adjusted through trial and error.

Step 8. Insert the bottom point of the drill in the pilot hole on your fireboard, apply your handhold to the top end, and push down to keep the drill from slipping out.
At this point when you let go of the bow, it should point up in the air. If not, you need to reload the drill so when you let go of the bow, it points up toward you.
Step 9. Brace your left hand against your knee or inner shin for more control.
Step 10. Slowly pull the bow back and forth. Use the handhold to keep pressure high until you see smoke. Increase speed until both ends are smoking. Continue until the handhold hole matches the drill point in diameter and shape and a burned-in hole is in the fireboard.
Step 11. Unload the drill, push it hard into the handhold, rotate slowly then remove any dust. Rub the top end of the spindle against your nose or through your hair to pick up those natural oils. Repeat this process.
This end will always be in the handhold and should stay dry and rounded, almost shiny so as to reduce the likelihood that it will burn during rotation.
Step 12. Lay a piece of bark beneath your notch; this is your ember pan.
Step 13. You’re ready to drill. Get into the bow drill position as described above. Left foot on your fireboard, right knee on the ground, bow in your right hand. The round lubricated end of the spindle always goes in the handhold. Brace your left hand against your left leg.
Step 14. Apply firm pressure on the handhold, and pull the bow slowly. Keep the smoke from the bottom end to a wisp and pay attention to the powder as it fills the notch. Drill speed creates color. Consistency of powder comes from downward pressure. The perfect powder is fuzzy and dark brown/black.
Step 15. When the notch is almost full of powder, reduce the pressure on the handhold and increase drilling speed significantly. This creates heat not powder, smoke should be heavy at this stage.
Step 16. Transfer charcoal. When you are engulfed in smoke, cautiously remove the drill from the hole. If it smokes for more than a few seconds, you should have your charcoal. Wave your hand over it until it glows red. Transfer the charcoal to your tinder bundle. Blow gently until you have flame.
Issues You May Encounter
- Not enough heat will give you light brown powder. Dusty, light brown powder means applying more pressure and drilling faster. Fuzzy, light brown powder indicates you are drilling too slowly. If your powder is dark brown/black but looks curled, try more pressure and less speed. Dark brown/black, crusty powder is a sign you are drilling too fast with too much pressure.
- If the spindle seems to bind up, lubricate the top of the drill using sunblock or Vaseline.
- If your spindle is not evenly carved at the base or if the spindle is crooked it may not work correctly.
- The location and size of the notch near the hole in the fireboard is important so the spindle doesn’t pop out.
- String that breaks or is used up quickly may be because your string is too tight or has more tension than needed.
Tips and Tricks
- Add a comprehensive book on tree identification to your survival kit.
- Practice identifying the trees surrounding any places where you regularly spend time.
- Get a good survival knife that can be used to do the carving needed. Practice using it regularly.
- Borrow a bow drill set from a more experienced neighbor or friend and then practice your bow drill technique until you can regularly produce charcoal.
Conclusion
It’s vital to learn the basics of the bow drill method and practice your form and technique frequently. The more you learn about how to read what the wood is indicating, the more reliable your charcoal-catching skill will become in difficult SHTF or disaster scenarios.
Fire-lighting by friction “separates the men from the boys” when it comes to bushcraft skills and the bow-drill method is the most widely accepted. Will you consider using the bow drill technique or is there another fire-making technique you rely on? Please let us know in the comments.

Born and raised in NE Ohio, with early memories that include grandpa teaching her to bait a hook and watching her mom, aunts, and grandmothers garden, sew, and can food, Megan is a true farm girl at heart.
For Megan, the 2003 blackout, the events of 911, and the increasing frequency of natural disasters like Hurricane Katrina, spurred a desire to be more prepared. Soon to be living off-grid, this mother of four and grandmother of ten is learning everything she can about preparedness, survival, and homesteading.
Magnifying glass is easier to learn . You can practice with actually building up the fire . Main problem, is no sunlight, no fire.
How about doing an article on a pump up and down fire drill? I don’t know what they call them but I think it would be easier to start a fire with one of those. I’ve seen people on survivor shows work themselves to exhaustion with the bow drill.