Drying meat has been a process used for centuries as a primitive way to preserve protein-rich food sources in times when meat was not readily available.
We tend to envision products such as jerky whenever someone mentions drying meat; However, there is so much versatility in using dried meat that goes beyond those basic products which can inspire you to dry more, cook less.

While the basic concept of drying meat stays the same in most situations, there are a variety of methods by which you can achieve a delicious result.
Methods like wood smoking or using a dehydration machine are excellent if you have the proper tools, but did you know that you can dry your meat using a conventional oven found at home?
Using an oven can be one of the most consistent methods of drying small quantities of meat, as you can control much of the variability that occurs using other methods.
Of course, this is all dependent on what type of meat you’re using. However, let’s look at what’s happening to your meat when it’s drying to give you an understanding of why using an oven is a viable solution.
It’s All About The Meat
As a general rule, you should only use meat that is lean or has all of the fat taken off beforehand. Fatty tissue on your meat harms the product once it is done drying.
If you use fatty meat for drying you will notice it going rancid afterward in storage. Look for meat where you can drop the fat content down to about 10 percent.
If you are using ground meat to dry, ensure you use it within a few days and try to find ground meat that is at least 90% lean.
Otherwise, cook the meat until the fat is rendered. Keep in mind that using this method can produce dried meat with an unusual texture that could be off-putting to some.
While this could have a detrimental effect on your health, it is mostly the flavor that suffers when deteriorating. It is also imperative that you check the meat for any signs of discoloration or parasites as it can significantly impact the final product.
When you hear about drying meat it is usually some cut from the bovine family as cows are readily available due to farming, although you can use animals from the Cervidae family (moose, deer, elk, etc.).
Beef is a popular protein used for drying as the texture and taste are enhanced, rather than altered. Beef is also an excellent vessel for flavor and relatively easy to dry without many tools.
Using birds (such as turkeys and chicken), or fish are viable options as they have relatively low-fat contents in their meat, although the texture could be off-putting for some.
If you are using a fresh carcass then be sure to process it immediately for drying as bacteria can start to work quickly. It’s best to use a whole animal if you have a drying setup that can handle a large amount of meat.
Using beef? You want lean cuts with little to no marbling. This includes:
- Top Round
- Bottom Round
- Sirloin Tip
- Eye of Round
- Flank Steak
- Any Pectoral Cut
Fatty sausages are an example of something you don’t want to try and dry in your oven as they require extra steps to cure so the fat doesn’t go rancid.
Do keep in mind that curing is a different method of drying meat that involves using salt and other chemicals to stabilize the protein.
Uncommon meats such as squirrels, rabbits, and even raccoons for drying and making jerky. As long as the protein source has a low fat you can dry it out with success.
Pre-Cook Your Meat Before Drying it
Some folks will pre-cook or boil their meat before marinating and drying in an oven. While this is viable and can help eliminate the hardening on the outside that drying can cause, some find the texture and flavor a little off-putting in the final product.
It is believed that if you don’t pre-cook your meat then the case hardening on the outside will lock moisture inside and cause the drying process to be prolonged.
As long as the meat is in a low temperature, low humidity environment, it will dry regardless of the steps taken beforehand.
One situation where pre-cooking your meat is beneficial is when you are drying wild game meat. Sometimes when processing wild game you will come across meat that is unsound.
Another similar situation could be improper storage for your wild game. These events can be due to parasitic infection or other maladies within the meat.
Boiling it beforehand will kill any pathogens and mitigate any health risks in consumption. Otherwise, use this meat for any application where it is thoroughly cooked.
Ground meat is generally pre-cooked to render any fat that’s within, which can cause it to go rancid quickly after drying. It is also home to higher counts of bacteria as there are more gaps for moisture and air to hide which is food for those organisms.
Steps to pre-cook your meat:
- Prepare your cooking liquid, whether that be just plain water or a flavored stock.
- Cut your meat into 2 inch wide strips, just like you were going to put them right in the oven.
- Add meat to the cooking liquid and bring to a boil. Keep the meat in the liquid for a minimum of 5 minutes.
- Ensure that the meat reaches a temperature of 160 degrees F.
- Remove meat strips from the cooking liquid, drain, and pat dry to get rid of any moisture.
- Immediately arrange the cooked meat on your oven rack and pop it into a preheated oven at 160 degrees F.
- Continue with the normal drying process using a conventional oven.
Tools You’ll Need To Dry Meat in an Oven
- A conventional oven (gas or electric) with a door that you can prop open
- Cookie tray
- Aluminum foil
- Tongs
- Paper towels
- Oven thermometer
Food Safety Tips for Handling Meat for Drying
Handling your meat properly is of paramount importance to prevent the introduction of harmful bacteria or parasites into your finished product, and ultimately, your body.
Some practices to be aware of for safe handling include:
- ✅ Wash your hands repeatedly throughout the process, usually before and after handing the meat.
- ✅ Always marinate your meat in the fridge, do not leave it on the counter as bacteria can grow quickly. Also, don’t reuse the marinade afterward.
- ✅ Avoid cross-contamination with raw meat and cooked meat. This includes any marinade that you are using.
- ✅ Ensure that you clean your area after preparing your meat for drying. A diluted solution of warm water and bleach is effective at killing any pathogens.
Preparing Your Meat For The Drying Process
Most of the work from drying meat in an oven comes from the preparation beforehand. This process can be done up to one day in advance of the drying; however, you can still get great results even from meat that has been resting for a couple of hours.
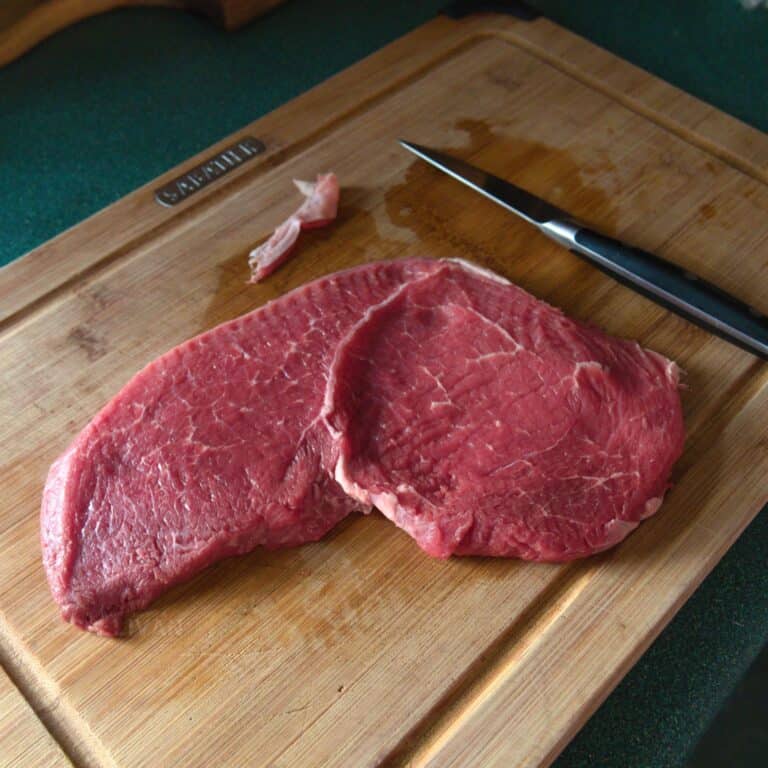
Ensure that the meat you are using has been patted dry so there is no moisture on it. Trim any and all excess fat along the meat, while checking for any imperfections or discoloration that could impact the batch.
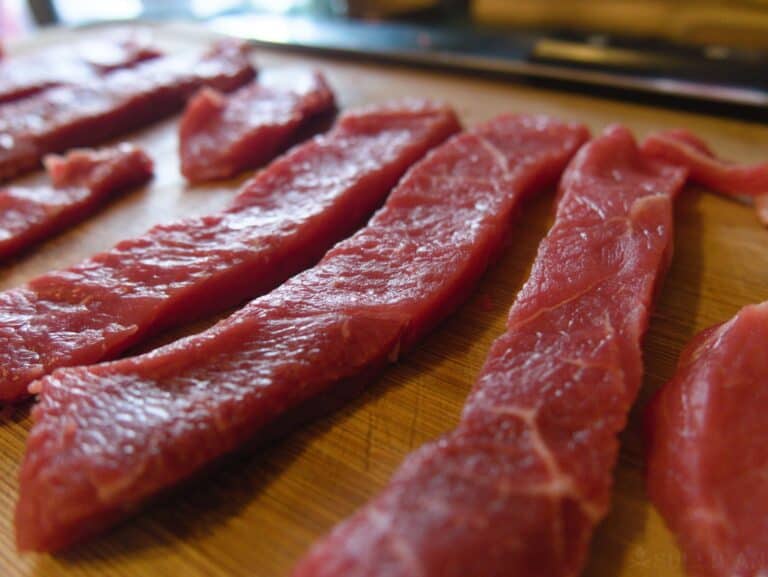
Cutting strips that are roughly half an inch wide will not only keep the drying consistent but still leave a sizable piece when all of the moisture is gone and the meat has shrunk.
Feel free to season the strips of meat with your favorite seasoning blend. If you’re using beef, using your favorite steak spice will work just fine.
Wet marinades are popular as the flavor transfer penetrates the meat and breaks down some of the connective tissues to give you a softer chew. Once marinated you can keep the meat in the fridge for anywhere between 2 hours to overnight.
Be sure to pat your meat dry before putting it in the oven as it can impede the drying process and ultimately take longer to finish in the oven.
How to Dry Meat in an Oven
Equipment
- oven
- cookie tray
- aluminum foil
- tongs
- paper towels
- oven thermometer
Instructions
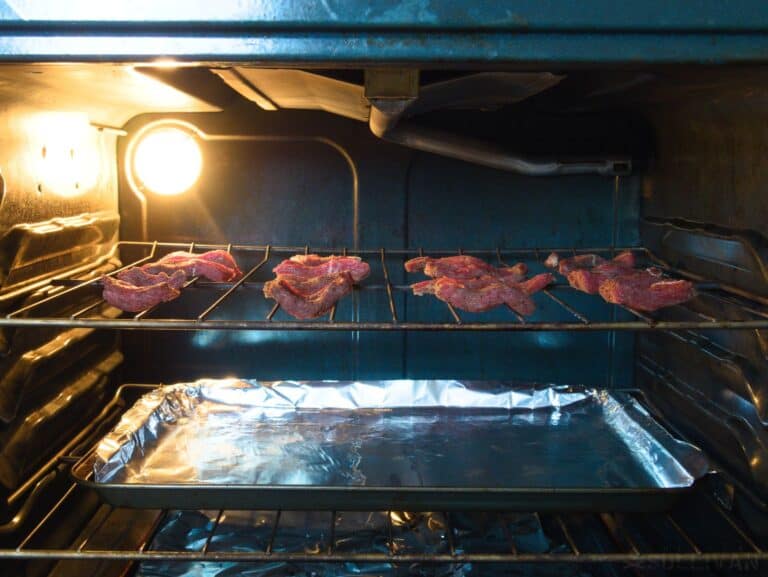
- Wrap cookie tray with aluminum foil and place on the bottom or bottom-most rack to catch any drippings.
- Place your oven thermometer about midway back on the top tray. This is to keep an eye on how accurate your temperature will be. Remove the top oven rack for now.
- Preheat the oven to 160 degrees Fahrenheit (71 Celsius). It’s okay to have it at a higher temperature at the beginning, as moisture will evaporate quickly on the surface.
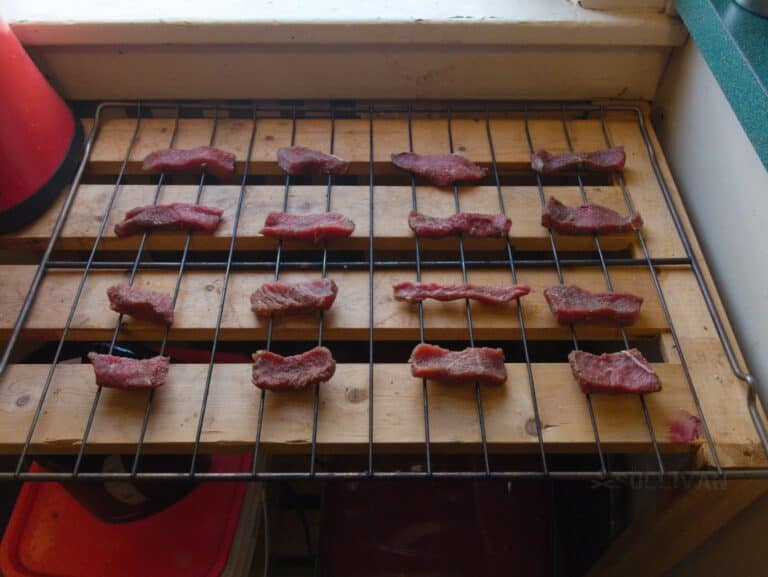
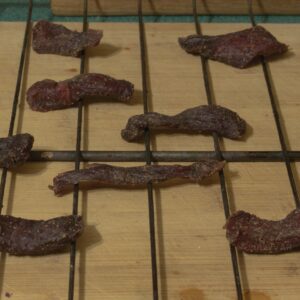
- Arrange your prepared meat strips directly on the rack with a 2 inch spacing around each piece, this will encourage even drying.

- Place in the prepared oven and keep the oven door open 5 to 6 inches to release the excess moisture (this step is important if you don’t have a fan to circulate the air around). If your oven can’t keep the door open, you can prop it open with a block of wood or another item.
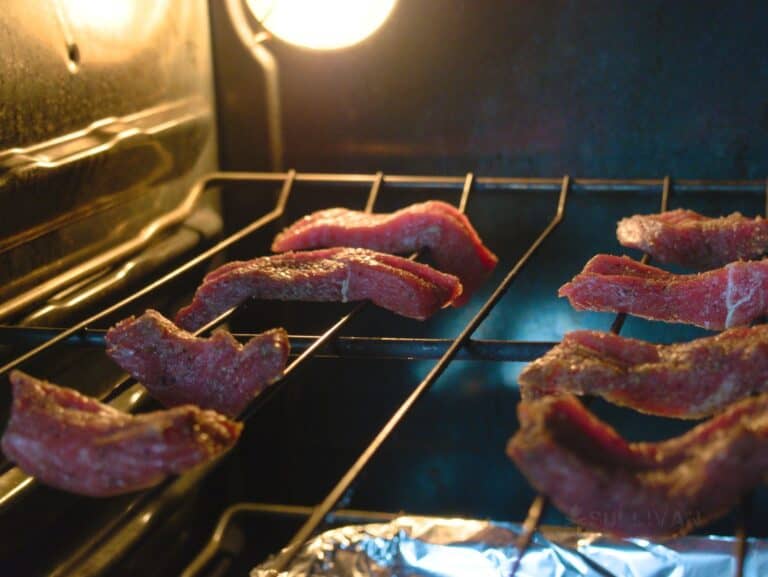
- Check on the meat every half hour until the surface of your meat looks and feels dry to the touch.

- Drop the oven temperature to 140 degrees F (60 Celsius) for the rest of the drying process.
- At this point remove the tray from the oven (carefully) and rotate your meat on the rack. This ensures even drying as some spots in your oven may not be as hot as others. You’ll want to do this every half hour.
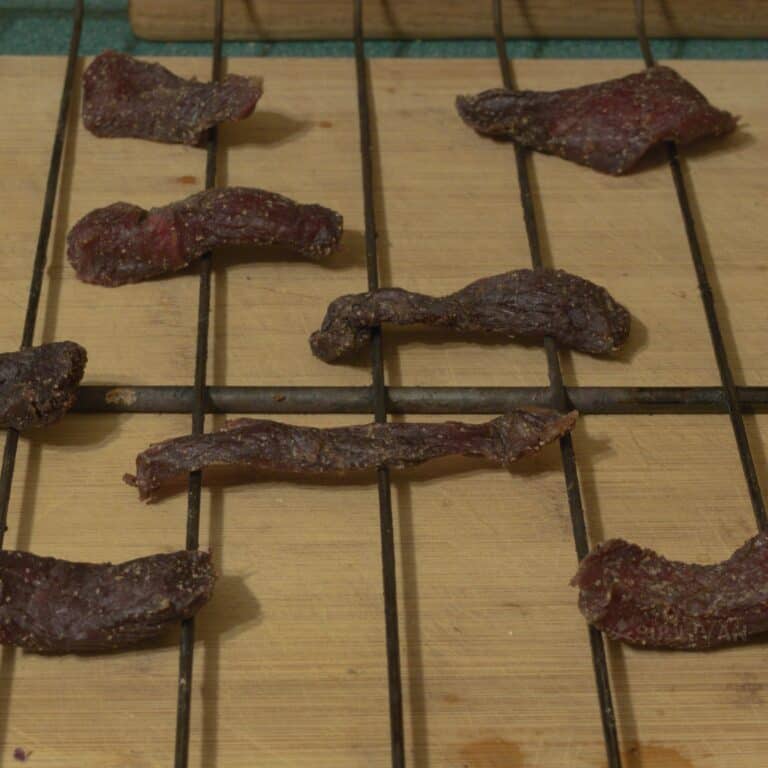
- After 10-14 hours in the oven, your dried meat should be finished. An easy way to tell is by taking a piece of the meat out of the oven and bending it. If the meat breaks with no issues then your meat is done. Keep it in the oven if it flexes but doesn’t snap, this is indicative of residual moisture within the meat.
- Take the meat out of the oven and let it sit on the wire rack for at least 24 hours in a low humidity area to promote evaporation of any remaining moisture.
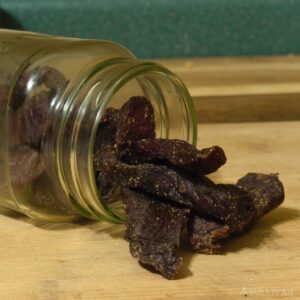
- Store in an airtight container and enjoy!
How to Dry Meat in an Oven
- Wrap cookie tray with aluminum foil and place on the bottom or bottom-most rack to catch any drippings.
- Place your oven thermometer about midway back on the top tray. This is to keep an eye on how accurate your temperature will be. Remove the top oven rack for now.
- Preheat the oven to 160 degrees Fahrenheit. It’s okay to have it at a higher temperature at the beginning, as moisture will evaporate quickly on the surface.
- Arrange your prepared meat strips directly on the rack with a 2 inch spacing around each piece, this will encourage even drying.
- Place in the prepared oven and keep the oven door open 5 to 6 inches to release the excess moisture (this step is important if you don’t have a fan to circulate the air around). If your oven can’t keep the door open, you can prop it open with a block of wood or another item.
- Check on the meat every half hour until the surface of your meat looks and feels dry to the touch.
- Drop the oven temperature to 140 degrees F for the rest of the drying process.
- At this point remove the tray from the oven (carefully) and rotate your meat on the rack. This ensures even drying as some spots in your oven may not be as hot as others. You’ll want to do this every half hour.
- After 10-14 hours in the oven, your dried meat should be finished. An easy way to tell is by taking a piece of the meat out of the oven and bending it. If the meat breaks with no issues then your meat is done. Keep it in the oven if it flexes but doesn’t snap, this is indicative of residual moisture within the meat.
- Take the meat out of the oven and let it sit on the wire rack for at least 24 hours in a low humidity area to promote evaporation of any remaining moisture.
- Store in an airtight container and enjoy!
How Does Drying Your Meat Preserve It?
Any kind of meat will spoil when introduced to moisture, which bacteria love to live in. These bacteria will eat the meat and secrete their digestive enzymes, causing the meat to spoil.
This process can be exacerbated depending on what kind of storage it’s kept in. For example, meat stored in plastic will spoil quickly due to the moisture-retaining properties in the bag.
Fully cooking your meat can also spoil as there is still moisture within that bacteria can grow in.
Drying out your meat slowly will leach out any moisture from the top layer of the meat which will cause subsequent migration of water from the deeper layers upwards to evaporate into the surrounding air.
Ensuring you have uniform cuts will keep the drying process consistent so that you don’t leave behind any moisture.
While you can flavor your meat before drying, it is always imperative that you don’t have any moisture left over from the marinade as this can cause spoilage. The result is a shelf-stable (storage method depending) product that can be eaten in emergencies or as part of your pack.
Dried meat does not need any refrigeration as long as you don’t let any moisture get at it for extended periods. This makes an excellent product for campers, preppers, and people who may want a budget-conscious source of protein.
Using a Conventional Oven versus a Smoker
Both an oven and a smoker use the same concept of circulating air and low heat to dry out the meat. Using a smoker requires care and attention, which can be intimidating for those trying out their first meat drying experience.
Conventional ovens use electricity or natural gas which are low maintenance and easier for beginners to wrap their heads around.
Smokers require a supply of wood chips and extra attention as you need to check on your dried meat often enough to see if you need a fresh infusion of wood chips.
While using a smoker is excellent for large batches, the average person starting out probably won’t want to get overwhelmed.
The nice thing about conventional ovens is that you have control over the ambient humidity and temperature in the immediate environment and they are readily available in almost any household.
Conventional ovens tend to be more cost-effective than smokers as you don’t need to purchase additional equipment such as the smoker itself, the wood chips being used, and any other gadgets that might make the job easier.
Most are familiar with their ovens and don’t have to learn an entirely new system to make dried meat. Once you get some experience under your belt with an oven, then a smoker or outdoor oven is the natural evolution.
If you are using a convection oven then you have the additional benefit of a fan to help circulate the moisture out of the oven while you are drying.
However, be careful of over-drying your meat as it can become extremely brittle and hard to eat unless you rehydrate it a little. Some convection ovens come with settings that make dehydrating easy.
How Do You Store Dried Meat to Optimize Shelf Life?
Storing your meat once it’s dried is as essential as the drying process itself. The general rule is that you don’t want to introduce moisture into your finished product or it can spoil rather quickly.
Some tips to remember for storing your dried meat are:
- Pack your dried meat into sizable portions instead of all in one package. Once you open the airtight seal your meat will begin to spoil quickly as humidity is introduced.
- Store your finished product in sealed glass jars, or better yet, vacuum seal them in plastic bags. Do not store them in Ziploc bags or plastic Tupperware as these items can harbor moisture and bacteria that can spoil your meat.
- If you store your product in a cool and dark place, like a cellar or basement, your dried meat should hold for between 10-12 months. Even longer if sealed properly. Do not store your dried meat in the freezer as moisture will get to it during the defrosting period when you take it out. No refrigeration is required.
- Use one-way humidity lowering moisture packs to eliminate any moisture within the container holding your dried meat
Other Methods To Dry Meat
Using a conventional oven in your kitchen is one way to get a delicious product. There are many ways to dry out meat, with some methods having been used for centuries. The process stays the same for a lot of other methods but there are some nuances to be aware of.
Using solar energy
This method uses the sun’s energy to dry out the meat. The easiest way to accomplish this is by setting out your meat on a rack in the sunlight where the air and heat can dry out the meat.
This takes several days to complete and the meat can be susceptible to pests and insects that can spoil the meat.
Ideally, you want to cover your meat with screens to eliminate the possibility of it being tainted. Try to keep your drying rack in an area with low amounts of wind as dirt particles could land on the product.
Using a campfire
This method is an excellent option if you do not have any equipment available and want to dry a small quantity. The process involves building a fire and using a green sapling to drape your strips of meat nearby.
Using this method is similar to a smoker in that you will be relying on the dry heat and air movement from the fire to get your finished product.
Keep in mind that this requires a lot of maintenance as you need to ensure that the fire strength is consistent and can take up to several days to fully dry out the meat.
Frequently Asked Questions
Dried meat is generally consumed in a form like jerky and is a good source of energy for any activity. In colder months you can expand on the functionality of your dried meat by rehydrating it and using it in recipes for soups and stews.
This is an excellent way to consume dried meat as it is shelf-stable and can be used whenever needed.
To rehydrate your meat for something like a stir fry, simply place it in a bowl of tepid water and let it sit for up to 2 hours and then use in whatever recipe you want.
If you’re creating a soup or stew then the above step is not needed. You can toss your dried meat in the broth and it will reconstitute on its own while the dish cooks. Remember to consume the rehydrated meat within 2 days or the potential for harmful bacteria to grow is increased.
Drying Meat in an Oven is Easy
There is a lot of information to digest when you decide to take your first steps into drying meat.
A conventional kitchen oven is an accessible means to learn the nuances and develop your own method in preserving meat.
Having a shelf-stable form of protein is a great way to stretch your meat budget and provide a high energy source without the added chemicals found in most mass-produced dried meats.

Perrin is an adventure guide and naturalist currently living a nomadic life in the Canadian wilderness. His education and expertise is in wilderness survival and wildlife tracking. He enjoys teaching people about the outdoors and has managed large groups on expeditions.
With several accredited certifications, including being a wilderness first responder and a leave no trace expert, Perrin believes it is important for all of us to reconnect with the natural world.