Keeping your meat from spoiling can be tricky in the wilderness. This is mainly because of the limited refrigeration options outside of the winter season. In most cases you won’t get more than a couple of days until it starts to spoil.
In my experience, building your own smoker is one of the best ways to preserve meat. There are many designs you can choose to build but there’s one in particular that you can make just about anywhere with minimal effort.
This DIY primitive smoker is simple to build with easy to gather materials. It has never failed me in the field and smokes small quantities of meat pretty quickly.
How Does a Primitive Smoker Work?
The main function of a smoker is to reduce the amount of moisture in food which preserves it. They also impart a distinct smoky aroma that pairs well with the flavor of the meat.
A primitive smoker does this by creating an enclosed area that captures the smoke from a small, smoldering fire. Meat is hung in that enclosure where it will be directly in contact with the rising smoke. As the moisture in the meat evaporates, it will dry out.
This smoker is considered a hot smoking method. It uses gentle heat and smoke to help dry out the meat faster.
Ideally, it is best to keep the temperature between 160° – 275° Fahrenheit (71° – 125° Celsius). Higher temperatures will start to cook the meat instead of slowly dehydrating it.
Controlling the fire is the key to success with this project. Stoke the fire too high and you risk burning your covering. Keep it burning low by reducing the oxygen availability and you’ll find that it may take longer to finish than you think.
Finding a balance between fuel and air can greatly reduce the smoking time for the meat. The key is to maintain a heat level that you can hold your hand over with a steady stream of smoke rising into the chamber.
It’s not too tricky to figure out and newcomers will figure it out by the time they’re done with the first batch.

Key Benefits of Using a Primitive Smoker
At first glance, you might be wondering what the actual benefits of using a primitive DIY smoker are. You’ll have to remember that in most cases, building one of these means that you are in a situation where you’ll need it.
Modern amenities are not available out in the wild so the benefits need to extend past the smoker itself.
1. Easy to Construct with Minimal Materials Needed
The construction of the smoker uses three types of materials: wood, coniferous boughs, and cordage.
These are readily available resources that you can find in forests across the world. Alternatively, you can improvise and substitute any of these resources if they are not in your area.
The skill level needed to build a primitive smoker is minimal. Simple knots and lashing techniques are required. Since construction is easy, this is an ideal project for beginners.
Even though the construction may be simple, you don’t want to use low-quality materials.
You don’t want to be halfway through the smoking process to have a structural failure in your smoker, causing you to lose the meat you’re trying to preserve.
2. Extends the Shelf Life of Fresh Food
Meat spoils quickly unless you can find a way to slow down bacterial growth. Even if you end up cooking it you will only get a few days to eat it until it starts to go bad.
Using a DIY smoker is one of the easier methods to get weeks out of your meat, not days. Smoking your meat eliminates moisture that is inside the meat. Moisture, heat, and light are the causes of bacterial growth.
Additionally, smoking creates an inhospitable environment for bacteria to grow as it acts like an antibacterial coating. It’s not as effective for long-term storage as curing or freezing but it takes less time and no electricity to prolong the shelf life.
3. Can be Used for Other Tasks
The base of the DIY primitive smoker is a functional tripod made out of three saplings or branches. Many bushcrafters will tell you that crafting a tripod for your camp can have many advantages in itself, such as:
- Can be used to hold suspended pots to boil water or cook
- Hang wet clothes on the tripod to slowly dry them out
- You can turn the tripod into a chair if you have a tarp or hammock
- Create two tripods and connect them with a ridgepole for a sawhorse
There are probably many other uses out there but you get the idea. You’ll learn that having something that can do multiple tasks is vital to thriving out there.
Tools You’ll Need
You could complete this project with no tools, just using stuff off the ground or using other primitive tools. However, to conserve energy it is wise to bring some simple items with you to make the job easier.
The nice thing is that these are already items that most people would have on them if they were out for an extended time in the wilderness. If you don’t, well, they are easy to pick up at local hardware stores.
Here’s what you can use to help construct the smoker:
- A small folding saw
- A small hand axe or hatchet
- A bushcraft or small folding knife
- Fire kit (tinder, Ferro rod, lighter, etc)
- Paracord
You’ll notice that a lot of the equipment you can use just makes processing wood easier, and that’s 90% of the construction. The paracord is used instead of natural cordage since it can sometimes be tricky to find and time-consuming to create.
Having a length of paracord in your survival kit is a good item to have since it can be used in many applications, aside from building a DIY smoker.
The Best Wood to Use in a Primitive DIY Smoker
Don’t go throwing any wood you find into your primitive smoker. Since the wood smoke is in direct contact with the meat, the type of wood you use will affect it.
To begin, you want to find wood that isn’t rotting or punky for smoking meat. The deteriorated wood won’t produce as much smoke as seasoned wood and will impart an undesirable flavor to your meat.
Burning a resinous wood such as pine or spruce may help get the fire going but shouldn’t be used for smoking meat. The thick, black smoke that coniferous trees produce when being burned will permeate the food and cause it to ruin the taste.
It also leaves a layer of unburned carbon in the meat which isn’t healthy for our bodies to consume.
Instead, you want to focus on getting dry, seasoned hardwood varieties. They burn hotter than softwood resin-filled trees and their coals last much longer.
Additionally, many varieties also have a great flavor in the smoke, such as hickory wood. These are the best types of wood to use in the primitive smoker:
- Maple
- Oak
- Cherry
- Applewood
- Hickory
- Birch
Avoid using wet hardwood since it will just give off steam as it smolders in the fire. This means looking for dead-standing trees instead of wood foraged off the ground.
Building a Primitive Smoker Step-by-step
The most difficult parts of the process are picking the right location, finding high-quality materials, and maintaining the fire throughout the process.
As long as you take your time and focus on one task at a time it won’t take you long to build it.
1. Picking the Location
Constructing the primitive smoker in the optimal location depends on the resources around you.
First and foremost you want to ensure that you have an ample supply of firewood near you since you’ll be stoking a fire for several hours. Don’t pick a location with wet ground or you’ll be adding time to the smoking process.
As the fire burns it will bring the moisture to the surface where it can keep the fire from burning efficiently. Once all of the water is evaporated then the fire will burn better, but it’s best to avoid wet ground to begin with.
Choose a location that is sheltered from the wind in as many directions as possible.
Too much wind will blow the smoke around and not up into the enclosed area. This can be achieved by constructing near a rock face or in a forest with larger trees.
2. Gather the Materials
You’re going to need to gather the components to build your smoker. You’ll need three saplings that are around 2-3 inches thick and between 4-6 feet tall for the tripod. You can use dead standing trees but wet wood won’t burn so close to a fire.
Ensure that the saplings are as straight as possible so that they stand upright. Use the smaller branches on the sapling for the structural support and smoking rack.
The support sticks should be no thinner than your thumb size and long enough to cross the gap between the tripods.
For the rack itself, the sticks can be as thin as a pencil, but make sure they are sturdy enough to be able to hold the strips of meat you’ll be hanging.
If you don’t have any paracord on you then inner stringy cedar bark can be woven into cordage. Nettle and thistle stems can be stripped and twisted into cordage as well but needs a bit of processing so it doesn’t sting you.
Long stemmed grasses can be collected and fashioned into primitive string for lashing.
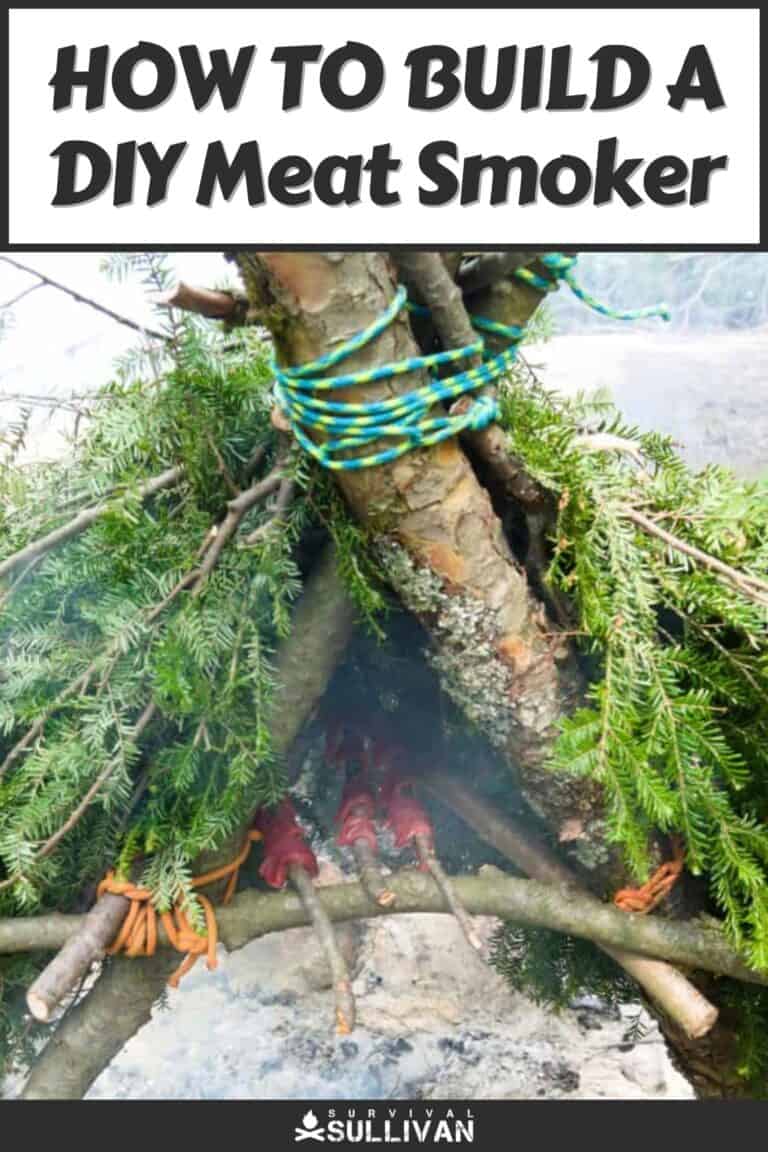
3. Build the Tripod
Cut each sapling until they are the same length, it should be roughly head height: You’ll want to cross two of the saplings and lay the third in the middle, at an angle where they will support each other.
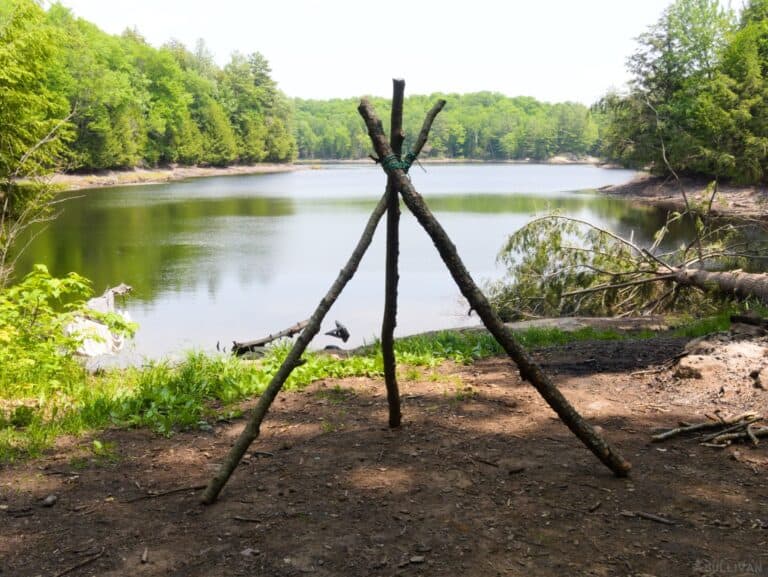
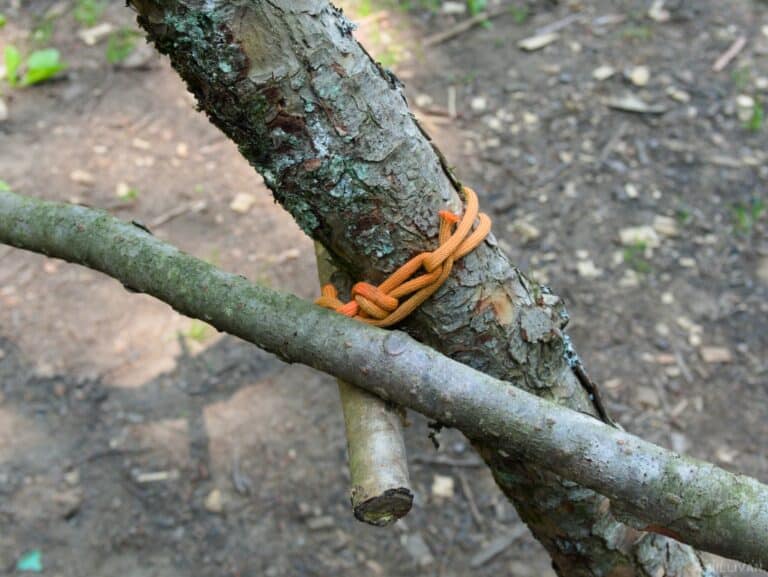
Using the cordage, lash all three of the saplings together at the top where they connect. This can be done by weakening the cord in-between them, and then securing it by wrapping the outside and tying a double overhand knot.
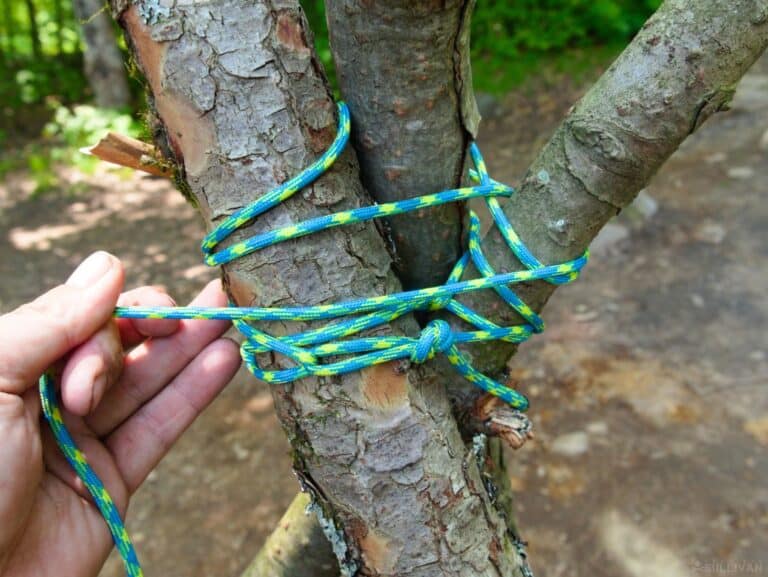
You’ll know you’ve tied it right if you’re able to grab hold of the top of the tripod and push down on it.
4. Constructing the Supports and Rack
At this point, you want to spread the tripod legs over the firepit that you plan on using. The support sticks will be tied to each tripod pole to connect them.
This adds stability and is the foundation for the rack that holds the meat.
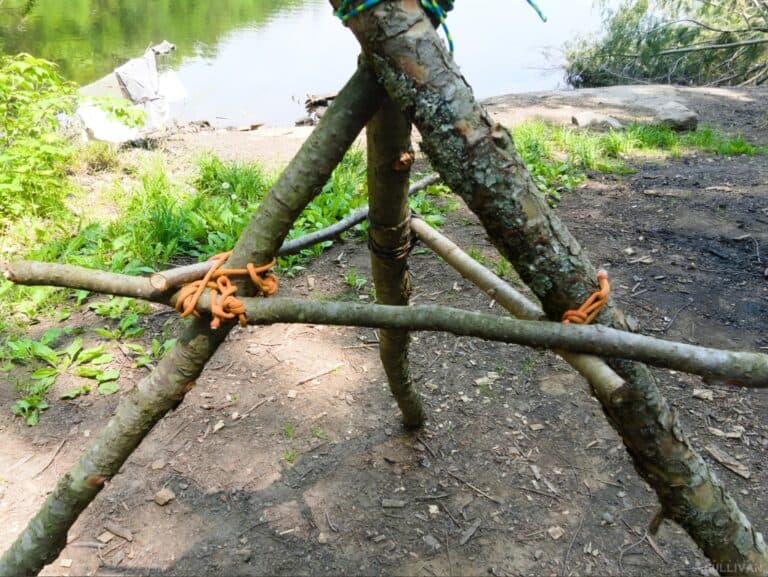
Attach the support stick between two poles and lash each side to it with cordage.
The support sticks can be on the inside or outside of the tripod, just be sure the sticks for the rack can reach them. Complete this around the tripod, and you’re ready to lay the rack.
The easiest way is to simply lay the sticks across the gap between the support sticks.
This provides an easy way to remove each rack for rotating the meat every once in a while. Be careful not to hit the smoker, or there’s a chance you could knock the rack.
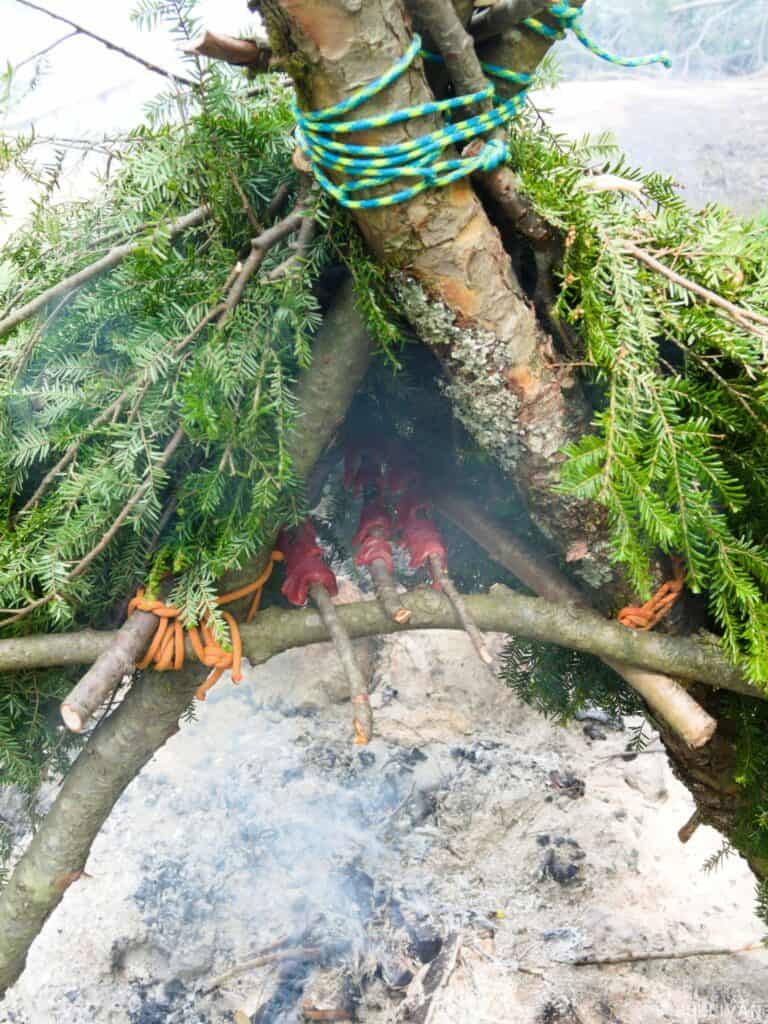
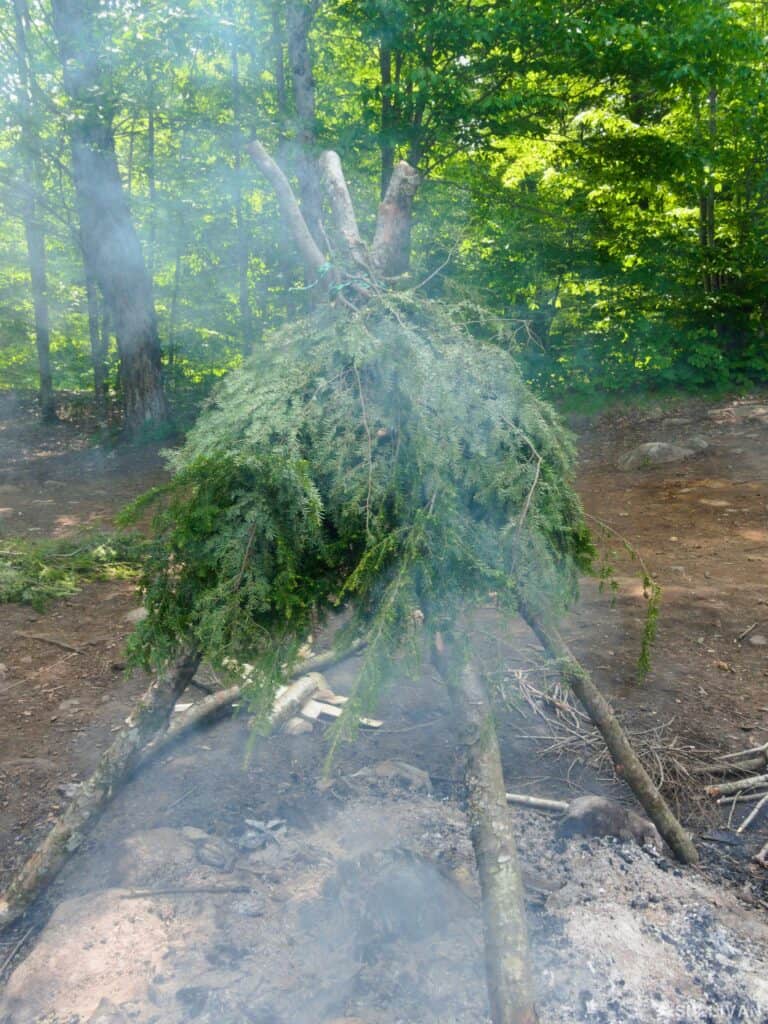
5. Covering the Smoker
Any coniferous tree that has boughs can be used as the covering. The best I’ve found is to use any kind of spruce tree as their boughs have a lot of coverage.
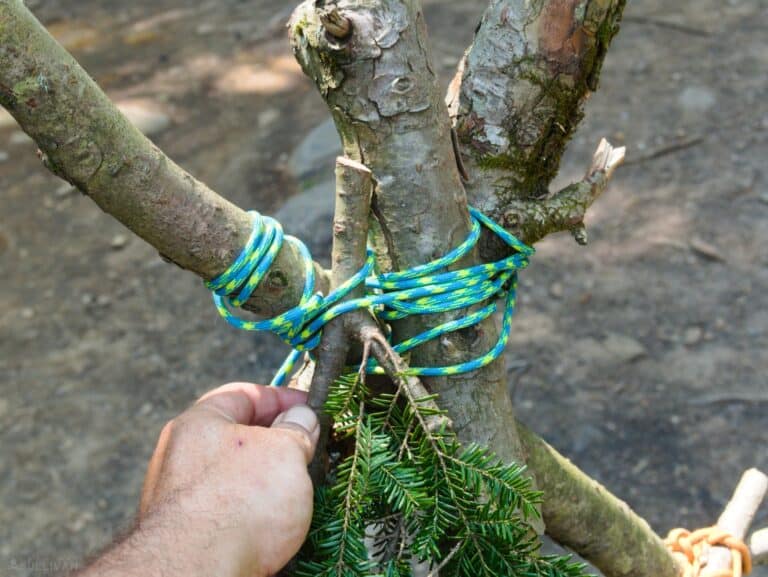
Take the lower, live boughs off the tree, eyeballing the amount you think you need to cover the entire smoker. You can always go back for more later if you need to.
Start by turning the boughs upside down so that the branch closest to the trunk is facing upwards. Then simply tuck it into the top lasting of your tripod, all the way around.
For the lower layers, you can weave the boughs into each other until you’re about 1.5-2 feet above where the flames could be.

Keep filling in the enclosed area until you can’t see any light coming through. The idea is to stop the smoke from penetrating through, at least for a few moments.
Don’t use dead spruce branches as they will go up far easier than live branches.
6. Start the Fire for Smoking
You can move the smoker to another location as you begin your fire. You’ll want to get it nice and hot at first to produce a layer of coals for the smoking wood to slowly smolder on.
After you get the initial fire started, try not to add too many small twigs because they provide quick bursts of fuel that can stoke the flame too high.
Use them sparingly and only if you need to bring the heat up a little to keep the fire going.
7. Placing the Meat
Place the smoker over top of your fire when you have a good amount of smoke coming off the hardwood base. Cut the meat into strips that are wide enough to fit several on each rack. You’ll want to hang each strip of meat over one stick on the rack.
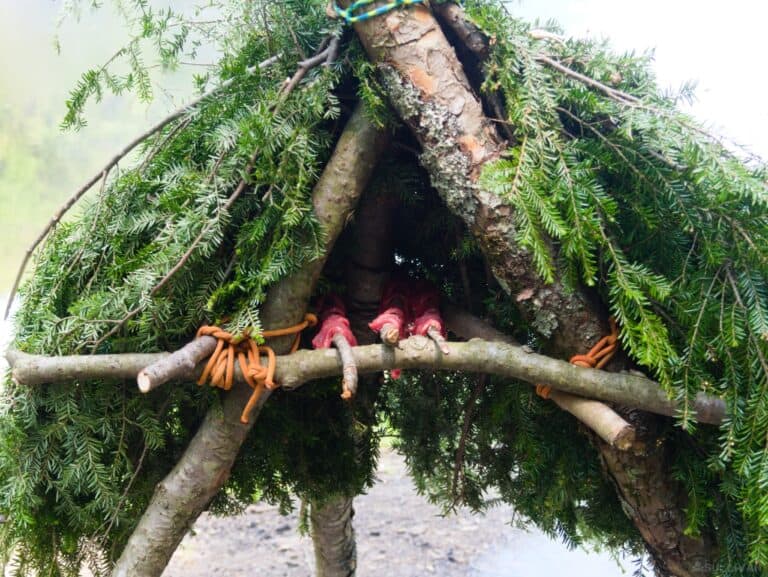
You will need to flip and rotate the meat several times during the process for even smoking. Keeping the slices thin will speed up the process even more.
8. Maintain the Fire Until the Meat is Done
Keep an eye on the smoker in case of a flare-up that could catch it on fire.
Otherwise, when the hardwood burns down, put one or two small pieces of wood on the fire. The coals should be hot enough to start burning away at the added fuel. Add small sticks as needed and don’t put any softwood onto the fire.
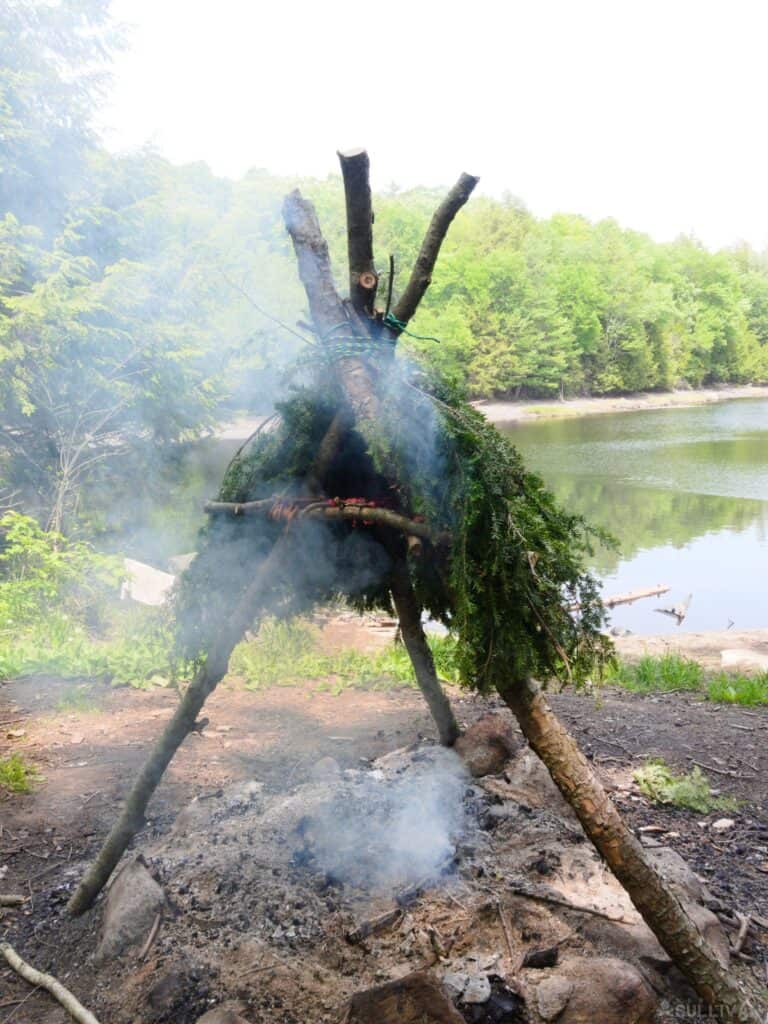
The entire smoking process should take anywhere between 4-6 hours, depending on the amount of smoke produced and the size of the meat.
You know it’ll be done when you can bend the stripes of meat and they break. If there is any flexibility then it needs some more time in the smoker.
Tips on Building a DIY Primitive Smoker
You’ll make your adjustments once you’ve used the smoker a few times and gained some experience. Here are some tips that you can use right away to help you get the most out of it.
Don’t layer the boughs too close to the fire – Doing so will risk them going up in flames. Coniferous boughs have a lot of resin inside them which is highly flammable. Never leave the smoker unattended as your covering can quickly go up in flames.
Cut the fat off the meat first – Fat does not preserve well using any method. This is because it contains a lot of moisture and will likely go rancid if kept for a long time. Cutting the fat off your meat will help increase the shelf life of the smoking process.
Turn the meat often – You’ll find that as the meat dries, it tends to become stiff. If you don’t turn the meat often you might encounter it falling off the rack as it won’t stay flexible. Rotating the meat also encourages equal smoking on either side, speeding up the process.
Is a Primitive Smoker Better than a Conventional Smoker?
Using a primitive smoker can help you preserve meat for an extended period. However, it depends on the right weather conditions and the right resources. You won’t be able to successfully smoke meat in a downpour unless you can protect the fire, for example.
A conventional smoker is a controlled environment that can keep temperatures precise while being protected from inclement weather. It can also minimize the amount of smoke that escapes the enclosed area.
Aside from that, a DIY primitive smoker does a great job at preserving small to large amounts of meat, depending on how big you build it. It also provides additional utility beyond its smoking capabilities, which cannot be said for many modern smokers.

Perrin is an adventure guide and naturalist currently living a nomadic life in the Canadian wilderness. His education and expertise is in wilderness survival and wildlife tracking. He enjoys teaching people about the outdoors and has managed large groups on expeditions.
With several accredited certifications, including being a wilderness first responder and a leave no trace expert, Perrin believes it is important for all of us to reconnect with the natural world.
If you have cooking utensils, the fat you cut from the meat can be rendered and saved separately.