As a prepper, you’ve more than likely heard about what a bug out bag is (and why it’s important). For those of you who are relatively new to prepping, first of all I’d like to extend my gratitude for entrusting your search for advice in me.
I can assure you that I won’t lead you astray, as I truly care about my readers. Bug out bags are extremely important for preppers, as they are essentially what you will rely on to sustain you (or your family) for a bare minimum of three days in potentially harsh conditions (seven days maximum).
Sadly however, there are preppers out there that haven’t really planned their bug out bags to fit their budget. Some preppers just throw together items that “look good” without really having a solid list to start with, and how much that will cost.
If you’re going to rely on something to sustain your life, why not dedicate extra time to ensure that everything you’re carrying is dependable, and worth the price/weight?
Another crucial factor when it comes to planning to put together a legitimate bug out bag, is how much weight you’ll have to carry. It’s not like you can magically teleport your BOB to your next location, you’re going to have to carry what you’ve put in there. Due to this, you’ll want to budget the weight just as much as the price.
Some of you may be thinking, “$500 is a lot of money, though.”. You’re absolutely right, but you don’t have to spend it all at once. That’s why you have a budget, even if that means putting $50 aside every month for ten months so you can afford a great baseline BOB.
If you think about it, that’s only giving up five trips to McDonald’s or any other fast food place each month. That’s not too much to ask, right?
I get it, doing research and price-checking every single item can be frustrating as well as time-consuming. For this reason, I’ve decided to do the research for you.
Through my extensive knowledge in long-term isolation survival, paired with hours of research, I’ve put together a list of items that you can use to put together a solid BOB. Every item on this list is from a brand that I trust.
You can get some products cheaper than the ones listed here in this article. However, make sure you do the proper extensive research on each product to ensure the best quality.
Table of Contents
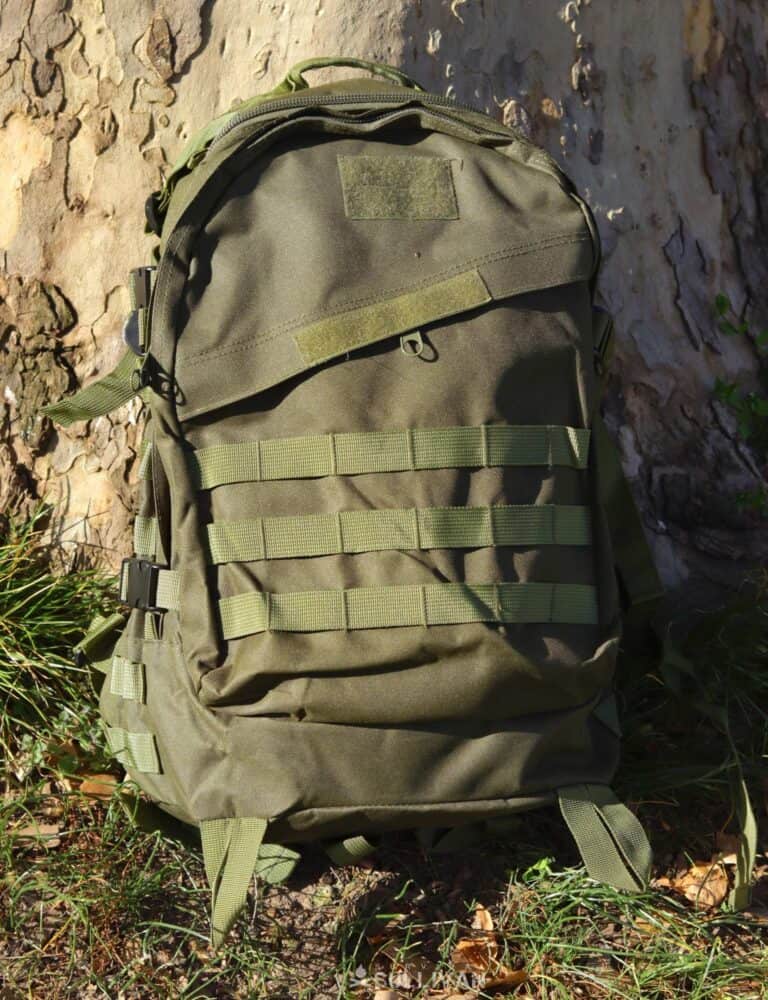
Modular Bug Out Bags
When you’re thinking about putting together a legitimate, well-thought-out bug-out bag, you should consider using the “modular” setup. Modular bug out bags are basically bug out bags that utilize pouches to keep items organized into their respective categories such as:
- Electronics
- First-Aid
- Hygiene
- Food / Hydration
- Miscellaneous
I personally love the modular set up, because I can easily grab one (or two) labeled pouches, and be able to access the items that I need to quickly.
Another reason I love the modular bug out bag set up, is the ability to grab just one or two pouches and carry those with you on a smaller expedition compared to having to carry your entire bug out bag. This gives you more agility, and ultimately speed as you step off.
When you pair a MOLLE compatible bug out bag with MOLLE pouches, and a MOLLE capable belt (or vest), you get a fantastic way to carry those valuable pouches if you need to ditch your BOB.
For example, if you are already set up in your BOL (bug out location) and you need to go out on your daily recon of the area, you don’t have to carry your entire BOB for medical supplies. Simply take the medical pouch from your BOB, and attach it to the belt or vest that you’re wearing, and you’re ready to go!
There are three types of modular BOBs when you narrow it down; internal modular, external modular, and combined.
Internal modular BOBs have the pouches inside of the BOB, making the BOB less bulky ultimately. External modular BOBs have the pouches attached outside of the BOB, giving you more space inside of your bag, but add size to the bag itself.
Combined modular BOBs have pouches inside, and attached to your BOB. This is my personal favorite set up, as it gives you accessibility, space, and options when it comes to setting up (and carrying) your bag.
Now that I’ve gone over my recommendation on your setup, let’s dive into the bug out bag itself.
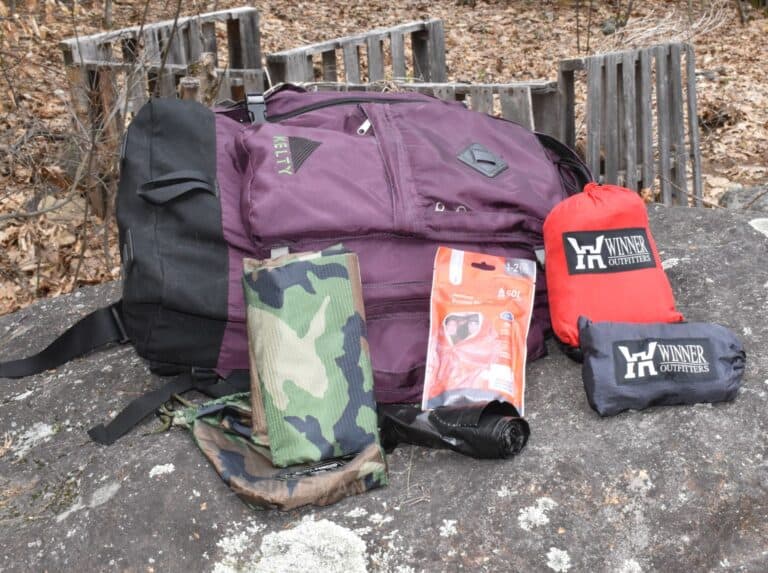
The $500 Bug Out Bag
This bag is what I would call the “basic BOB”, however, don’t think that means that this bag is generically put together. Every item in this BOB is what I would consider the bare minimum of what you should have if you should need to bug out from the comfort of your home.
Waterproofing
Rain is a very common occurrence in most parts of the world. For this reason, you’ll want a way to keep your gear dry. While waterproofing can be a tedious process, it’s well worth the time. There’s nothing worse than changing into a wet pair of clothes when you’re already soaking wet and cold, trust me.
Trash Bags / $3 / 1 Ounce
Any kind of trash bag will work for this list. However, I suggest using heavy trash bags due to their increased capacity, and durability. I wouldn’t concern yourself too much on getting drawstring trash bags, because you can tie a regular one just as tight (and multiple times).
You’ll want to place any large electronic item, clothes/socks/underwear, and boots into their own trash bags. This way, you’ll be able to organize your BOB into different sections.
Avoid placing everything into a single trash bag in your BOB, because you don’t want to be rummaging through the bag to get to one item. Another benefit of individualizing items into their own bags, is the added waterproof protection. If you want, you can place each individual bag into one bag for added protection.
Sandwich Bags / $3 / 1 Ounce
These bags serve the same purpose as the large trash bags, but for smaller items. Don’t worry about spending too much on these bags, but don’t go so cheap that you’re getting bad quality. “Ziploc” sandwich bags are relatively cheap; however, they are great quality.
I recommend having at least five spare bags in case one of yours punctures. Place any items that fit in these bags into their own category to ensure organization and accessibility (i.e. batteries with other electronics).
Wealers Emergency Rain Poncho with Hood x5 / $9 / 8 Ounces
You may be thinking, “Why so many ponchos?”. The answer is simple, backups. Ponchos have a bad reputation for tearing easily. A torn poncho is useless, so you’ll want to have backups. You never know, you may be in a position where you can assist a fellow prepper with one in a wet situation.
There’s nothing wrong with getting a little wet. However, in chilly weather, being wet can cause health complications like pneumonia. Don’t take the risk, stay dry when you can.
Hydration
LifeStraw Personal Water Filter / $20 / 2 Ounces
Water is essential for survival, there’s no debate there. Knowing this, why would you not invest in a tool that can guarantee 99.99% removal of bacteria and protozoa from up to 1,000 liters of water?
Bugging out from the safe confines of your home is stressful enough, adding a life-threatening disease caused by unfiltered water can be devastating.
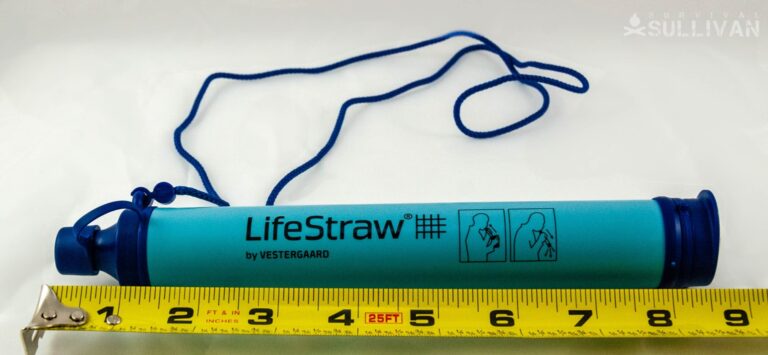
This wonderful invention has won numerous awards, including “Time Magazine’s” Invention of the Year. On “Amazon”, it even has 4.7 out of five stars from over 6,500 reviews.
The LifeStraw is the no-nonsense solution to having a safe way to drink water from most natural sources. The best part is that it requires no batteries to operate, simply place the straw into water and drink!
Sawyer Products Mini Water Filtration System / $21 / 4.8 Ounces (Alternative to the LifeStraw)
This excellent water filtration system is a great alternative to the “LifeStraw”. The biggest reason I added this alternative to my list, is its ability to filter up to 100,000 gallons of water throughout its lifetime compared to the LifeStraw’s ability to filter only up to 1,000 liters.
You may be thinking, “what’s the catch?”, there is none. Even with the most contaminated water, you’ll only need to “field backwash” the filter for every 5-10 gallons filtered through it.
Barbarians Tactical Hydration Pack Water Backpack and MOLLE / $33 / 3lbs
Although CamelBak is the preferred brand for hydration systems, this hydration pack comes in at a close second place (and for $17 cheaper). The great part about this hydration pack, is the MOLLE capability, along with two large front pockets to store additional gear for easy access.
Once you arrive at your bug out location, there might be times when you need to recon a new area. This hydration pack is perfect to bring along with a few small items, so you don’t have to carry your entire BOB with you.
With a 3L water capacity, it’ll definitely sustain you for an extended period of time in even the warmest climates. Every drinking hose comes with an “on/off” switch, ensuring that you don’t waste water unnecessarily through leakage when you’re not using it.
Another thing I love about this hydration pack is the material. Every thread of the pack itself is made from high-density 600D polyester, making it durable and water-resistant.
SHOKE Sports Collapsible Water Bottle / $10 / 5 Ounces
Even though you have a hydration pack filled with water, that doesn’t mean you don’t need some type of a water bottle. The issue with canteens, is they can take up unnecessary room in your BOB, even when they’re empty.
For this reason, I prefer collapsible water bottles as a space-friendly alternative. When you’re not using the bottle, simply collapse it down to make it small enough to fit in your pocket comfortably.
These bottles are extremely durable as well, and can withstand temperatures ranging from -40F, to 202F. Even though they may feel soft to the touch, that does not take away from the durability of these awesome bottles. Each bottle can hold up to 550mL of water, making them a great secondary source of hydration.
Mightie Aquatabs x100 / $15 / 0.6 Ounces
If you need to purify large quantities of water, your LifeStraw isn’t necessarily the best tool to use. For this reason, you’ll want to combine the effectiveness of Aquatabs with boiled water (why take the chance, right?).
I added the “Mightie” brand to this list because of their outstanding reputation, and dedication to their consumers. I’ve used a few of their products personally, and I have had no negative experiences.
Aquatabs have a shelf life of up to five years, making them a great tool to have in your regular prepping arsenal as well. To use Aquatabs, simply add one tab to 20L of clear water. If the water is dirty, use a cloth to filter as much of the debris as you can, then add two tabs to 20L.
While they won’t make the water clear, they will rid the water of major diseases like dysentery, typhoid, or cholera. All those diseases can be lethal if not treated, so you can see how they are game changers post-collapse.
Food
Grizzly Gear Emergency Food Rations x3 / $27 ($9 Each) / 1.4lbs Each
These delicious nutrition rations are my personal favorite, for multiple reasons. I love their lemon flavor, as it reminds me of lemon bars, making them much less miserable to chow down on if you should need to. They are also able to withstand extreme temperatures ranging from -22F to 149F.
Odds are, you won’t be encountering those temperatures for extended periods of time while you’re bugging out. With a shelf life of up to five years, they’re great for preppers to stock up on!
Another notable feature about these rations is that they contain zero cholesterol or tropical oil. This is a very important factor when it comes to pre-packaged rations, as well as their nutrition content. Each bar comes with nine pre-measured 400-calorie rations, making each bar able to last a grown man up to two or three days.
The reason I put three on this list, is because of “Murphy’s Law”. You’ll want backups when it comes to the essentials, especially food. You don’t want to have to depend on gathering enough food to sustain yourself in the wilderness unless absolutely necessary.
While the rations do weigh a substantial amount, I highly recommend them for your BOB. Some consumers have reported that they crumble fairly easily, but it’s not the texture that matters, it’s the nutrition.
Simply place whatever rationed amount you wish in a Ziploc bag, so if it does crumble, you can easily open the bag and pour the contents into your mouth.
Outcast Survival Fishing Kit / $16 / 3.2 Ounces
If “Murphy’s Law” ever does rear its ugly head, and you’re forced to fend for yourself for food, you’ll want the proper tools necessary to acquire nutritious food. Fish are extremely nutritious, packed with healthy fats, oils, protein, and calories.
While fishing for food can be frustrating at times, others (like me) find it relaxing. You don’t need a pole to fish, simply wrap the line around the palm of your hand or a durable stick, and throw the line into the water manually.
Each Outcast Survival Fishing Kit comes with:
- 50 feet of high strength, 20lb test line
- Six Hooks (size 4, 8, and 16)
- Two 1/16oz jig heads
- One steel leader
- Six reusable split shots
- Two toothpick bobbers
- One swirl tail grub soft plastic lure
- One baby shad soft plastic lure
- Berkley Powerbait scented fish nibbles (in case you can’t find lure)
- Internal waterproof plastic container
- Desiccant moisture protection
- One foam fishing line spool
- Metal tin container wrapped with UV protected angler band
With all of these items for only $16, you can easily tell why they made their way onto my list! If you’re going to skimp on any of the items on this list, don’t make the mistake of skimping on this one. You definitely want a backup in case of emergencies for gathering food.
CLIF BUILDER’s Protein Bar x12 / $15 / 2.2lbs
While they’re not an absolute necessity, I personally recommend having an additional protein source when it comes to your food. With all the vigorous activity you’ll be performing, a higher protein intake is an absolute necessity. This way, your muscles will feel less fatigued, you’ll lose less muscular strength, and you have a backup for a food source.
If you’re using the modular bug-out bag method, you can fit a couple of these bars into almost every pouch. This way, if you have to take the first-aid pouch with you for instance, you’ll have a food source to sustain you in case it takes you longer to make it back to your bag.
Elk Ridge ER-028 Fillet Knife with Nylon Sheath / $10 / 3.5 Ounces
If you do end up having to use your emergency fishing kit, you’ll want a straightforward way to fillet your fish, so you’re not butchering it. The cleaner cuts you have while you fillet a fish, the more meat you’ll be able to eat. Plus, who wants to pick fish bones out of their teeth, anyways?
While it’s not the best quality fillet knife, it’s an excellent value for the price. Even if you don’t end up having to use your fishing kit, fillet knives are extremely sharp, making them useful for quick and clean cuts for any fabric you might need to use it for.
RioRand Portable Cookware Backpacking Bowl/Pot/Pan Cooking Kit / $13 / 11.7 Ounces
Cookware is extremely useful when bugging out, not just for cooking food, but also for boiling water. Boiled water has many uses like: creating a Sweat Lodge, water purification, small wound sterilization, and much more.
The best part about is item set, is that they all snap onto each other, making you only have to carry one item. While they’re fitted together for carrying, they allow storage space inside of them to store spices, or whatever else you might want to include for cooking.
Columbia River Knife and Tool’s Eat N Tool / $6 / 1.4 Ounces
How are you supposed to eat hygienically without an eating utensil? Before you get all macho on me, you don’t want to eat with your hands if you’ve been touching potentially disease-filled things on your expedition.
Also, if you cook some food, hot food on your bare hands may not feel the best. If this hasn’t sold you yet, try eating a hearty soup with your bare hands. If you do try, let me know how that works out for you.
This awesome tool is made of high-strength steel, and comes with a lifetime warranty. What’s not to love about a free replacement should yours break? All these features aren’t even the best part. Here are some more badass features of the swiss-army knife of eating utensils:
- Spoon/fork “spork” eating utensil
- Bottle opener
- Flathead screwdriver
- Three hex wrench holes (variable sizes)
While this may not seem like a lot of features, it’s a freaking eating utensil! I personally had one on my kit, tied down to my body armor until it was “tactically acquired” by a fellow grunt at some point in the field. The best part? I wasn’t even mad; these suckers are only $6!
Shelter
USGI Genuine US Military Issue Foam Sleeping Pad Mat / $22 / 1.2lbs
For those of you stubborn preppers out there who think you don’t need a sleeping mat, go ahead and sleep on rocks for a week straight, and let me know how your back feels afterwards. Sometimes, you can’t choose where you bed down for the night when you’re surrounded by danger.
Wherever is the safest place, is where you’ll be bedding down. I was issued this exact same sleeping mat when I came to my first unit, and hardly used it until my squad leader called me an idiot and ordered me to. I’ve never turned back since.
While just rolling it can leave it bulky, try very tightly rolling it, and securing it with duct tape. This way, it won’t come unrolled, and you can fit it into a more confined space.
No matter what you try, you’ll more than likely end up having to strap it to the outside of your BOB. If you do, I recommend strapping it to the bottom. This way, if you must go prone, you’re not having the pad pushing your head downward.
Stansport Reinforced Multi-Purpose Tarp (8×10 foot) / $6 / 1.5lbs
Having a tarp included in your BOB is a great idea as a prepper. Tarps are the best way to set up a quick waterproof lean-to, or full tent in minimal time. All you’ll need is some parachute cord, tarp, and a couple of trees close enough together
In case of wind, simply sharpen some sturdy sticks and tie some parachute cord to them to stake the corners of the tarp to the ground. This will keep the tarp from flying away.
Tarps aren’t just used for tents, however. They’re a fantastic way to waterproof your BOB, should you have to take it off while you dig a fighting position if it’s raining. Due to their many uses, and waterproof capability, I would label a tarp as an absolute necessity for your BOB.
The Stansport tarp stands out to me because of their reinforced material, making it resistant to tears. This feature is great considering what you’re planning to use it for.
Paracord Planet Mil-Spec Commercial Grade 550lb Type III Nylon Paracord (50 feet) / $7 / 7.2 Ounces
If I have to explain to you why you need parachute cord in your BOB packing list, either you haven’t read my other survival articles featured on Survival Sullivan (and shared to hundreds of other websites), or you don’t know how to read.
Not only is it a light and durable alternative to packing rope in your bag, it can also hold your body weight with one single strand (hence, the 550lb test rating)!
When buying parachute cord, make sure that it’s rated for 550lbs, and that it’s “type III” nylon. Many companies fool their consumers by labeling their product with the name “parachute cord”, but skimp on the actual production, making it dangerous for their trusting customers.
Swiss Safe Emergency Mylar Thermal Blankets (4) + Bonus Gold Foil Space Blanket / $16 / 8.8 Ounces
These pencil-thin blankets reflect up to 90% of your natural body heat, making them a much lighter (and warmer) alternative to the traditional wool blankets many preppers have grown to love over the years.
Each blanket is individually placed in a plastic bag at roughly the size of a men’s wallet, making them small enough to barely notice when you pack them away.
I’ve personally used Mylar blankets, and loved them! While when I used them, the temperature was only about 40F, but I was wet. They were honestly a great luxury, and I’m sure you’ll like them too.
Coleman Palmetto Cool Weather Sleeping Bag / $16 / 3.5lbs
For the price, this sleeping bag is a terrific way to stay cozy and warm while you’re in the wilderness. This particular bag is rated to sustain your natural body temperature in temperatures as low as 30F (though, I would trust it down to 20F).
If the temperature gets lower than that, you can always pair it with one of the thermal blankets listed above for extra warmth. This model fits people up to 5’11 tall, while there is a bigger model able to fit people up to 6’5 tall.
Clothes
I’m not going to attempt to tell you what specific clothes to buy, as you already have your own closet full of them. I will, however, recommend what type of clothes you should pack (and how many).
Keep in mind, clothes usually take up the most space in your BOB, so roll them as tight as you possibly can, and tape them so they stay rolled tight.
After you roll them, place them in a waterproofed bag. This way, you’re not changing into wet clothes. The following brief list is my suggestion of what type of clothes you should pack away:
- Socks: Two pairs of normal socks, one pair of cold-weather socks / 1lb.
- Underwear: One pair of thermal bottoms for both males and females, two pairs of boxer/briefs for males, and two pairs of breathable panties for females / 1lb.
- Shirts: One long sleeve, one short sleeve / 1lb.
- Pants: One pair of durable pants, one pair of shorts (weather dependent) / 3lbs.
Mechanix Wear Original Insulated Gloves / $21 / 4.3 Ounces
The “Mechanix” brand is one that I’ve grown to know and love. Not only are they durable, but they are also very comfortable and affordable. These water-resistant coated fleece (and liner) gloves are a wonderful way to keep your hands dry, and warm in brisk weather.
Your hands are very susceptible to chilly weather, so you need to protect them in order to continue using them properly. The “Thermal Plastic Rubber” closure around the wrists also helps keep the gloves securely fastened to your wrists, this way they don’t “ride up” your hands during strenuous use.
M-Tac Watch Fleece Cap / $11 / 1.4 Ounces
In the Infantry, I’ve grown to love my fleece cap on cooler nights (and sometimes days). I can tell you personally, unless it’s wet, the watch fleece cap will keep your head warm in very cold weather.
Since most of your body’s head is lost through your head during cold weather, you’ll definitely want to pack one of these in case you run into it. Since it’s made of fleece without a water-resistant coating, you’ll want to waterproof it when you’re not using it, as fleece retains water easily, rendering it useless in keeping your head warm.
Explore Land Cotton Military Shemagh / $10 / 7 Ounces
Shemaghs not only look cool, but they’re a great (and versatile) tool that have multiple uses in the wilderness. You can tie it around your head or neck to keep the sun from beating down on it or sweat from dripping into your eyes, or during cold weather you can use it as a scarf.
Also, you can use it as a makeshift debris filter as you’re pouring water into a container before you use an “Aquatab” to purify it. Since they are relatively inexpensive, and have many uses, they easily made it onto my list for your BOB.
Fire Starting
UCO Titan Stormproof Match Kit / $9 / 2.6 Ounces
These incredible matches have earned my love and trust from my experiences with them. They are incredibly durable, thick matches that are windproof and waterproof, making them an excellent source of fire for preppers.
Each match kit comes with a waterproof case that floats and a cord that you can attach to various items, 12 matches, and three replaceable strikers. Another excellent feature of these matches is that each one burns for up to 25 seconds, and can relight if submerged in water!
Note: I recommend packing a couple of lighters as well, in case you run out (or lose) these matches. Make sure if you pack lighters, you waterproof them, and place them in separate compartments away from each other in case you lose one of them as well.
Überleben Zünden Bushcraft Fire Steel with a Wood Handle / $16 / 1.8 Ounces
My grueling search for a reliable flint/steel combination fire-starting tool was, for a substantial amount of time, going nowhere. Eventually, a friend recommended this one, so I tried his out. I was honestly impressed with the number of sparks that it produced and the distance they covered!
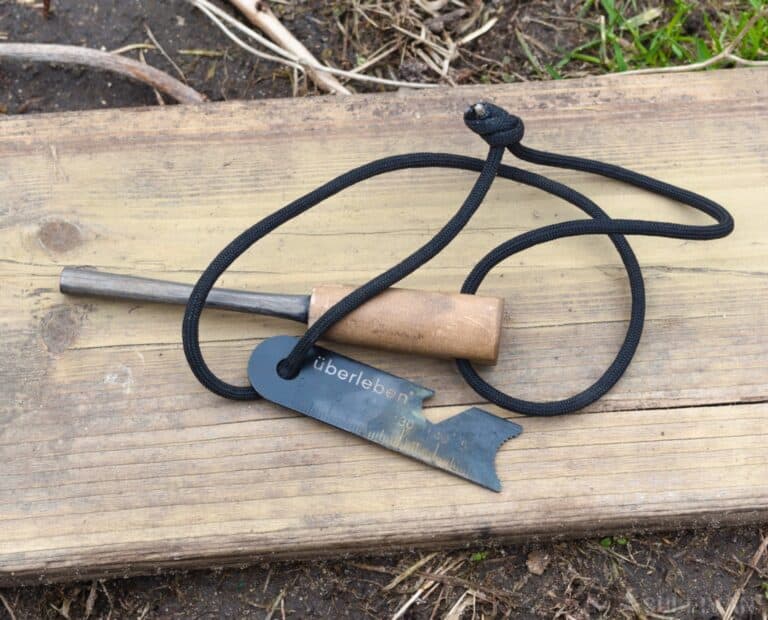
The “traditional” model (5/16”) is the one I included on this list, and even though it’s one of the smaller versions, it still works for up to 12,000 strikes! Even though the price is a bit steep compared to other flint/steel combination tools, it’s the only one I’ve used that is this impressive. I highly recommend it to any prepper who wants a backup fire starter.
Homemade Vaseline Fire Starters x20 / $10 / 10 Ounces
In my article “How to Survive Extreme Cold Away from Home”, I discuss how to make these impressive homemade fire-starters. Fire starters can play a crucial role in saving you time while you look to build any type of fire, whether it be for cooking, or simply for warmth.
Since store-bought fire-starters can be potentially unreliable (and expensive compared to homemade), I recommend just making them yourself. I’ve personally made these and used them, and had immense success every time
Best Glide ASE 3-Pack Credit Card Size Pocket Fresnel Lens / $6 / 0.5 Ounces
For those of you who don’t know what Fresnel Lenses are, they’re a thin sheet of plastic built to concentrate sunlight into a small beam of extreme heat (like a magnifying glass). While they’re excellent for starting fires, they do have a major downside.
Sunlight is a requirement for their use, so you can only use them during the daytime. If you have the time during the day (and enough sunlight) to use them, I would use these before you waste lighter fluid, or the precious stormproof matches. Each lens has unlimited uses; however, it doesn’t hurt to have three of them in case one breaks.
Hygiene
Amazon Elements Unscented 480-Count Baby Wipes (only pack 80-100) / $12 / 2lbs
Baby wipes have so many uses, especially in the wilderness. With uses ranging from bathing to toilet paper, you can see how having these handy wipes accessible is an absolute necessity. Most people neglect bathing while they’re in the wilderness, which is a big mistake.
It only takes about two minutes to hit the major areas that collect moisture on your body (armpits, chest, feet, groin). If you allow moisture to gather for prolonged periods of time in these areas, you risk contracting rashes, diseases, and infections. I don’t have to tell you why you should wipe your ass, just do it.
Dental Source Travel Toothbrush and Crest Toothpaste Kit / $5 / 1.6 Ounces
Dental hygiene is just as important as bodily hygiene while you’re in the wilderness (and at home), so make sure you devote time at least once daily to clean your mouth. Don’t bother spending money on mouthwash, as it will just take up space and weight in your BOB, and you can keep your mouth clean enough with just a toothbrush and toothpaste.
This kit comes with a foldable toothbrush that stores the brush side in its own handle to keep outside contaminants away from it while it’s stored, making it an excellent choice for your BOB.
Tools
WorkPro 2-Piece Outdoor Camping/Hunting/Survival Steel Hawk Axe and Knife Set / $30 / 2.2lbs
This incredibly inexpensive, and reliable set is great for preppers looking to spend less for excellent quality. Both blades are made from rust-resistant stainless steel, and come with their own sheaths. I haven’t personally used the set, but I’ve done a fair amount of research on them, and from what I’ve read they are both great tools for the price!
The axe is 10-5/8” in length from the handle to the tip of the blade, with the blade being 4-1/4” in length. Users have said the axe doesn’t have the best balance for throwing, and isn’t meant for cutting down larger trees, but can handle lighter work with ease.
The knife is an incredible 12-1/2” in length from the handle to the tip of the blade, with the blade being 7-1/2” in length. Personally, I would pay the $30 it costs for the set just for the blade itself! It’s incredibly sharp, and retains the sharpness well over strenuous use. With the blade being so long, it’s great for hacking at small foliage if you need to bed down in some brush, so if you’re looking to spend less for a hatchet/knife combo for good quality, this is definitely the set I recommend.
Gerber Suspension Multi-Plier Tool / $20 / 9 Ounces
While there are definitely other multi-tools on the market that have more tools, and a more rigid design, the Gerber Suspension is definitely the best quality for a low price. Each one of these multi-tools comes with 12 essential tools:
- Spring-loaded needle-nose pliers
- Regular pliers
- Wire cutter
- Fine-edge blade
- Large flathead screwdriver
- Phillips screwdriver
- Cross driver
- Saw
- Can opener
- Scissors
- Serrated blade
- Bottle opener
By now, you can see why I would include this inexpensive multi-tool! While there are other multi-tools on the market with more tools, these 12 tools are sure to sustain you in your prepping endeavors. The Gerber Suspension is an open-frame stainless steel multitool, giving it added durability. Like all Gerber multi-tools, this one also comes with its own sheath, so you can attach it to your kit/belt if you wish.
Navigation
Local Map / $5 / 3 Ounces (laminated)
For those of you who know me and my style of prepping, I will rarely suggest that you spend money on electronic navigation systems.
The whole point of prepping, is to prepare for any disaster. This includes EMPs that can potentially wipe out electronics in a large area. If you spend hundreds of dollars on a navigation system, and an EMP strikes, you’ll just be left with a $300+ paperweight.
While your options aren’t solely limited to directly local maps, I would recommend getting local at the bare minimum.
When you pair a topographical map with a Lensatic compass, a protractor (meant for maps), and paper, you get a fool-proof (unless you make a mistake) navigation method that can be accurate down to 10 yards. I highly recommend learning how to navigate manually using this method if you wish to become a serious prepper.
Once you get a map, I highly recommend that you laminate it. You don’t have to actually use laminate if it’s expensive for your area, you can also use clear packing tape.
If you do use tape, make sure you are very neat with it. Use a card of some sort (credit, driver’s license, etc.) to smooth out the layer of tape as you lay it down. Otherwise, you’ll get a very unreadable map that looks like it has bubbles all over it.
Rite in the Rain All-Weather Top-Spiral Notebook / $6 / 1.9 Ounces
I absolutely love Rite in the Rain notebooks! I’ve had to write down grid points as rain is pouring down on me, and my writing never washed away. Although, I do highly recommend you don’t use gel pens on these notebooks.
It will write fairly easily on the notebook, but the gel will smear significantly when wet (learned that one the hard way). There are special pens you can purchase for these all-weather notebooks, but it’s not an absolute necessity.
I first got introduced to these notebooks by walking into one of the tactical stores in the PX (post exchange) on base, and there was a display with a small waterfall pouring water on one of these notebooks. Granted, since I live on a military installation (and our dark humor), there was a plethora of male body parts drawn on it.
The manager encouraged me to write or draw something on it, so I picked it up. He told me to write on it as the water pours on it, so I did. Surely enough, the writing stayed! I haven’t turned back to regular notepads for the field since!
Sportneer Military Lensatic Sighting Compass with Carrying Bag / $10 / 6.4 Ounces
This compass is excellent for prepping, as it’s built very tough. Its waterproof, and shockproof design makes it ideal for whatever situation may happen should you have to bug out.
The compass’s main interface is also fluorescent, so once darkness falls, you’ll still be able to use it. This is an excellent feature, since there may be times that you have to use “light discipline” (using light sparingly to remain undetected).
The carrying case it comes with is easily tied onto MOLLE, or a belt loop, which is an absolute must when it comes to being able to navigate through difficult terrain.
This way, if you need both of your hands to brace yourself, you won’t lose your compass. Since it’s such an inexpensive, durable, and reliable compass, I would highly recommend this for your BOB.
Self-Defense
Since the $500 BOB list is meant solely for the bare minimum necessities, and most guns worth even mentioning are at least $150 (not including ammunition), I haven’t included guns in this section. While you can definitely use this list, and combine it with a weapon, I haven’t included it in this particular one solely because I’m thinking of those with a strict budget in mind. Don’t worry, we do have a fantastic firearm listed on the $750 list.
Like I said in the beginning of the article, keep an open mind. You can most definitely mix and match from the lists to fit your own specific budget, since I’ve already done the dirty work of finding the price and weight for you along with my own personal review!
Don’t forget, you already have a hatchet, and a large knife you can easily use as self-defense tools. Be creative, you can make a very lethal spear out of some parachute cord and the knife listed on the $500 list, since you have two other knives in case you need to use them. The hatchet is lethal at close quarters, so you have your own sharp arsenal on standby for the basic list alone.
Communications
Shoreline Marine Emergency Survival Whistle / $2 / 0.3 Ounces
While I would not personally suggest spending more than $5 on a whistle, I will always recommend having a whistle in your BOB. You can use them as a simple SOS for your group, as whistles have a very lout, distinct sound.
The Shoreline whistle operates wet, or dry; making it an excellent inexpensive tool for your BOB. It’s also orange in color, and comes with a lanyard, so you can see it easily if it’s stored away or simply wear it around your neck for quick use.
Lead Multi-Functional Signal Mirror / $7 / 1.8 Ounces
Signal mirrors are an absolute necessity for your BOB, and I usually recommend them for EDC as well if you’re traveling (especially flying).
The Lead signal mirror has a concentrated “eye”, allowing you to project reflected light up to 100km. Made from polycarbonate, this signal mirror is very durable, and scratch-resistant. I could go on about the uses of signaling mirrors, but I think you get the point.
Cyalume SnapLight Red Glow Sticks (Chemlights) x10 / $10 / 8 Ounces
Chemlights are a quick, efficient way to communicate silently with other people up to 150 yards (depending on how dark the night is). I recommend having red Chemlights in your BOB, because most people (especially preppers) associate red Chemlights with danger or an emergency.
Another wonderful use for Chemlights is to mark a rally-point, or meet up point, for preppers in your group who may be hanging back while you conduct a recon of an unfamiliar area.
To use Chemlights, simply bend the stick down the middle like you want to snap it in half. You’ll hear and feel a crack, then shake it vigorously. The chemicals inside will react, causing the stick to glow. Chemlights work in all weather conditions, so they are a great alternative communication method for preppers.
Medical
Be Smart Get Prepared 250-Piece First Aid Kit / $22 / 2lbs
While you can build your own very effective first aid kit, it will cost you a lot of money. In order to be cost-efficient, I’ve included this pre-packed first aid kit. Don’t let the price fool you, the contents inside are sure to sustain you or your loved ones through even serious injuries. The kit includes:
- Alcohol prep pads x21
- Antiseptic towelettes x21
- Eye wash x1
- Cotton tip applicators x10
- Finger splints x5
- First aid instruction guide x1 (to refresh your memory)
- Examination gloves x4
- Safety pins x10
- Tweezers x1
- Scissors x1
- Antibiotic ointment packets x6
- Burn cream packets x6
- Povidone iodine prep pads x3
- Sting relief prep pads x3
- Antacid tablets x8
- Aspirin tablets x10
- Non-aspirin tablets x10
- Instant cold packs (5×6 inch) x2
- Adhesive bandages (1×3 inch) x20
- Adhesive bandages (3/4×3 inch) x40
- Adhesive bandages (3/8×1 ½ inch) x30
- Butterfly closures x5
- Knuckle bandages x5
- Paper tape roll (1-inch x 5-yards) x1
- Triangular bandage (40-inch x 40-inch x 56-inch) x1
- Oval eye pads (2-inch) x2
- Sterile gauze pads (2×2 inch) x10
- Sterile gauze pads (4×4 inch) x 11
- Sterile trauma pad (5×9 inch) x1
- Gauze roll (2-inch) x1
All of these items come stored in a waterproof case (10×8 inches). You can tell by the contents, that this kit is well worth the money spent! I personally recommend spreading the kit out amongst your crew, if you have one. This way, if you lose your BOB (or some of the contents), you’re not shit out of luck.
Gorilla Super Glue Gel / $5 / 0.3 Ounces
You might be wondering why I’ve added super glue to the list for medical supplies. The answer is simple, it’s a cheap and effective way to seal a wound without stitches. Stitches can be a tricky operation, even in a clinic, so you can about imagine how tricky they can be in the wilderness. For this reason, I prefer to use superglue for a quick closure of a wound.
Gorilla Glue is a brand we all know and love, and for this reason I chose the brand. This super glue dries within 30 seconds, making it a quick and easy tool for your first aid kit. While there may be warnings against using it internally, I have never had an issue using it to seal wounds.
Miscellaneous
Trojan ENZ Non-Lubricated Condoms x12 / $6 / 1.4 Ounces
Condoms have many uses, the primary one for bugging out is waterproofing. If you do have a firearm along with you on your expedition, you should almost always have condoms. Simply slide one on the barrel of your firearm should it rain, or if you’re crossing a river.
Personally, I recommend always having one on your weapon. This way, if you fall, you won’t have to worry about dirt clogging up your barrel. Don’t worry, your weapon will still fire flawlessly should you still have a condom on the barrel once you fire it.
Foxelli Headlamp Flashlight (165 lumen white/red) / $13 / 3.2 Ounces
Headlamps are my preferred method of lighting over a traditional flashlight, for many reasons. The biggest one being that you need your hands (most of the time) to operate a flashlight, while you don’t for a headlamp. The Foxelli headlamp has many notable features, including:
- 45-degree tilt body
- Waterproof
- SOS and Strobe mode
- Up to 45 hours of run time per battery set
I’ve used Foxelli headlamps before, and I loved how comfortable they were, as well as affordable. If Foxelli can hang in the field with a bunch of grunts, I’m positive it can hang with you should you need to bug out. Remember, take care of your equipment and it’ll take care of you.
Coleman Travel Sewing Kit / $6 / 1.6 Ounces
Sewing kits have earned their place in my personal packing list whenever I go out to the field, and I am confident they’ll earn their place in yours.
If your tarp, clothes, or any type of fabric suffers a tear, it could be devastating. Another skillful use for a sewing kit is, you guessed it, stitches. If the wound is too great for superglue to hold, stitches are a great alternative. Make sure you do your research on how to apply stitches, as they can be very tricky. Each sewing kit comes standard with:
- Multi-colored spools of thread
- Scissors
- Thimble
- Threader
- Needles x5
- Buttons x8
- Straight pins x2
- Safety pins x5
- Snaps x2
TAC SHIELD Heavy Duty 100mph Tape (10 yards) / $10 / 0.3 Ounces
100mph earned its name because it can hold together in winds up to 100mph. This tape is more heavy-duty than your standard “duct tape”, therefore I highly recommend having this in your BOB. If your tarp tears, and you don’t have the time to sew it up, 100mph tape is a great temporary solution to your problem.
I recommend wrapping at least two feet worth of tape around a pen, and keeping it in your kit on you. This way, if you need it quickly, you don’t have to dig it out of your BOB.
That’s it for the $500 BOB. It’s a lot of gear, isn’t it? You may be thinking that it’s a lot of weight, but it’s really not.
Total Cost: $499
Total Weight (not including whatever bag you have): 35.6lbs
Although 35.6 lbs isn’t a lot of weight, it can begin to feel very heavy over long distances if you don’t have the proper BOB. Thankfully, Survival Sullivan has a plethora of articles on bug-out bags for you to hit up some research on. Remember, as we move on in the BOB lists, the weight will only increase (but so will your resources).
The $750 BOB
This BOB is relatively simple in its additions. The original list is still the same as the $500 BOB, but we’re adding a great self-defense/hunting 12-gauge shotgun, a cleaning kit, a sling, and some ammunition. These two items are key to survival in today’s world filled with guns, especially during a post-disaster environment when people (especially zombies) are desperate for any resources they can find.
Self-Defense
Savage Arms/Stevens 350 Security Pump-Action Shotgun / $179 (Cabela’s Sale) / 7.6lbs
Don’t let the low-price fool you, this is an outstanding shotgun for its price. Before we dive further into this shotgun, let’s get into the specs:
- 5-inch carbon-steel barrel with matte-black finish, making it reflect less light.
- Black synthetic stock.
- Bottom eject, making it ambidextrous for left-handed shooters. This way, you’re not getting sprayed with shotgun shells as they eject.
- Ghost-ring sights for easier rapid target acquisition
- Sling swivels
- Cylinder choke
- 5+1 round capacity
I absolutely love this shotgun, and yes, I’ve personally shot one. While I don’t own one at this time, I can assure you I will soon. As always, there are mixed reviews on the 350, but that’s mostly because people will find anything to complain about. Like I said before, if you take care of your equipment, it will take care of you.
AmeriGun Club 2017 Fully Adjustable Shotgun Sling and Shell Holder / $10 / 6.4 Ounces
You never want to have to navigate rugged terrain without a sling if you have a firearm. All it takes is one simple slip, and you could lose your weapon (or damage it severely) down a cliff. For this reason, I added a simple sling to the list.
The AmeriGun sling is a pretty basic two-point elastic nylon shotgun sling; however, it has a couple of decent features like a non-slip backing to keep it secure as you’re moving, 15-shell capacity, and sling swivel hooks (easily attached and detached manually with a simple click).
Hoppe’s No. 9 Cleaning Kit with Aluminum Rod / $8 / 10.1 Ounces
What good is having a gun with you in the wilderness, if you don’t have a means to take care of it? Each kit comes standard with:
- Gun bore cleaner
- Lubricating oil
- High-viscosity oil
- Aluminum rod and cleaning patches
- Clamshell package
- 12-gauge brush
For the price, you really can’t beat this deal. In addition to this kit, I would throw in a cheap washcloth (or a rag) you have lying around the house, so you can wipe the carbon from the areas you apply cleaner to. The smaller wipes should only be used sparingly, since you have a limited amount.
Remington Slugger 12-Gauge 2-3/4 Inch Rifled Slugs (5-Count) x10 / $50 / 3.35lbs
I personally follow the motto that it’s better to have it and not need it, rather than need it and not have it. This is especially true when it comes to ammunition. Remington is my most trusted brand of ammunition, and they’re very fairly priced for their quality. I prefer slugs compared to buckshot for self-defense, especially in the wilderness (as slugs have more range).
Like other important items in your BOB, I would spread out the stash of ammunition to different compartments, while keeping at least 10 extra rounds on you at all times. This way, in case you lose a compartment, you still have ammunition left.
That sums up the $750 BOB. This packing list is significantly heavier than the $500 BOB list, but a majority of the weight resides in the shotgun itself, which you will have attached to you via the sling.
- Total Cost: $746
- Total Weight: 47.55lbs

The $1000 BOB
This BOB is the end-all-be-all solution to even the most avid of preppers. Anything after these items is a mere luxury item. Even some of these items are a luxury, as they make your life in the wilderness easier.
Shelter
LYN Thermal Survival Shelter Tent Paracord 550 2-Person Tarp Tent / $25 / 10 Ounces
Like a Mylar thermal blanket, these tents can reflect up to 90% of your natural body heat, as it’s made up of the same material.
The only difference, is they’re layered with a durable outer layer, and four iron buckles so you can stake down the tent in case of wind. If you pair this tent with a tarp on the ground, you’re sure to stay dry and warm on those miserable wet and cold nights.
Each tent also comes with its own carrying case, making it easier to pack up and store in your BOB between uses. While there are other small tents on the market for around the same price, I suggest getting the LYN thermal tent because of the heat reflection. If you’re in an area with falling debris, simply use the tarp to layer over the top of the tent for added protection.
SOG Entrenching Tool / $11 / 1.5lbs
E-tools are a fantastic addition to any BOB, as they have multiple uses. Not only can you use them to dig holes (obviously), but they are a great close-range weapon. In fact, there are many documented confirmed kills in combat from service members using their e-tool in an emergency situation.
SOG e-tools are great because they also have a partially-serrated edge on one of the blades, making it simpler to cut through stubborn roots as you’re digging. Its small, lightweight design make carrying it and storing it much simpler, which is a definite necessity for preppers
Communications
Baofeng UV5RA Ham Two Way Radio 136-174/400-480 MHz Dual-Band Transceiver / $25 / 1.1lbs
If you’re a Survival Sullivan reader, you’re no stranger to HAM radios (or reading about them). They are an excellent means of communication; however, they are susceptible to EMPs. For this reason, we’re not going to worry about spending hundreds of dollars on one.
The Baofeng UV5RA is an excellent base-model HAM radio that does its job very well. You can also store up to 128 channels on this radio, which is more than what you’ll need, but gives you options for different frequencies. Each radio set comes standard with:
- Baofeng UV-82 two-way radio x1
- 4V 1800mAh Li-ion battery x1
- 18cm dual band antenna x1
- Power adapter x1
- Cable x1
- Speaker x1
- Belt clip x1
- Hand strap x1
- Battery charger x1
- User manual x1
As you can see, you’re definitely getting your money’s worth for this radio.
Orion Safety Alerter 12-Gauge Coastal Signaling Kit (4 flares) / $80 / 2.2 Ounces
I’m a big believer in flare guns, for the sole factor that if you’re in a densely-wooded area, it’s almost impossible to see your hand-held flare from a distance if you’re in trouble.
This flare gun kit sends up a 16,000 candlepower flare up to 500 feet in the air for seven seconds! Replacement flares can be fairly expensive, so make sure you use them only in case of emergencies (although, I recommend that you test the gun out by shooting one after you buy it)!
Another wonderful use for these flare guns, is self-defense. If you are in a dire situation of life and death, and all you have readily available is your flare gun, you best believe that you should use it. The phosphorus from the flare will burn right into your adversary, killing them with a slow and very painful death if placed in the right area.
RunningSnail Emergency Hand Crank Self-Powered AM/FM NOAA Solar Weather Radio with LED Flashlight and 1000mAh Power Bank for Smart Phones / $25 / 7.8 Ounces
I am extremely impressed with this emergency radio, and for the low price! With two ways to power it, it’s sure to stay running when you need it to. A lot of crank radio/charger combinations require an adapter to charge an electronic device, but this one comes standard with a USB port, so all you’ll need is the cord itself! The RunningSnail radio is water-resistant, not waterproof, so make sure you protect it from the elements when you can.
Even though it’s not fully waterproof, the features really make up for it. One minute of cranking will power the built-in LED flashlight for up to 20 minutes, or 5-10 minutes of radio listening. I highly recommend adding this to your BOB, so you can stay informed with radio updates while they last.
Self-Defense
SABRE Frontiersman Bear Spray / $30 / 8 Ounces
This badass bear mace is easily one of the most powerful OC sprays on the market. While it’s labeled “Bear Spray”, that doesn’t mean it’s only to be used on bears. If this spray is meant to keep bears at bay, what do you think it will do to a human? Each spray from the 7.9-ounce model goes out to 30 feet, which is almost 15 feet more than most other bear sprays out there.
If this hasn’t sold you yet, Law Enforcement officers in more than six continents, and 40 countries worldwide carry the SABRE brand of OC sprays. If you’re going to place your life in the hands of your equipment, get the best quality.
Medical
QuikClot Advanced Clotting Sponge / $14 / 2.4 Ounces
QuikClot has been a trusted brand of trauma-care, law enforcement agencies, and the military for years. Although the original QuikClot formula was effective, it was a pain in the ass to remove all of the small beads that adhered to the patient’s tissue inside of the wound once they arrived at a hospital.
Since those days, QuikClot has added their sponge product, containing the beads inside. This way, there’s a smaller chance that those beads can burrow into your tissue, potentially causing complications as time passes.
QuikClot should only be used in case of emergencies. To use it, simply place the sponge over the wound (stuff it inside if the wound is bad enough), and secure it by wrapping ACE wrap around it, or medical tape. Make sure you secure it tightly, so it doesn’t move around, as that will limit the effectiveness of the sponge.
Miscellaneous
ACDelaco Super Alkaline AAA Batteries with Bonus LED Keychain Flashlight (20 count) / $7 / 8.5 Ounces
Since you have a headlamp that requires AAA batteries, you’ll need some spares. While you don’t need to take all 20, I recommend that you do. This way, you can distribute them to other members of your crew should you need to.
Being prepared is what prepping is all about, after all! I wouldn’t necessarily rely on the LED keychain flashlight that comes with it, as most bonus lights are garbage, but it doesn’t hurt to have an extra light source for small lamination tasks.
BaoFeng 7.4V 1800mAh Li-ion Battery (5 count) / $30 / 1lb
Having a radio is great, but only having one battery and no sustainable way to charge it without an expensive portable charger (or a wall outlet) makes it quite useless without spares.
For that reason, I’ve added five spare batteries onto the packing list. You can charge all of them at your home, and then simply store them (waterproofed of course) in your BOB when you’re finished. Make sure you give them a small charge every month or so, to make sure they don’t lose any juice as they sit.
That wraps up the $1000 BOB. That’s an crazy amount of potentially life-saving items for under a thousand dollars! If you ask me, that’s an incredible deal.
- Total Cost: $993
- Total Weight: 53.58lbs
Wrap Up
In this extensive article I’ve went over 59 pieces of equipment, along with hours of research to ensure that you have the best advice for your budgeted BOB for your money. While you can always mix and match items to fit your specific needs, these lists are simply my suggestion. I recommend you check with your local retail stores for these items before you shop online for most of them, just to make sure you’re getting the best deals for your money.
For some of these items, you can shop for other brands, just make sure that you do the proper research on every single item you put in your BOB, your life may depend on the quality of equipment that you purchase. Each item that made it on my list has been hand-selected from many years of experience, along with extensive research, but that doesn’t mean that they are the only items you’ll ever need.
There are many other items out there that I may not have included on the list, so if you find something else of relevance, please feel free to post them in the comments (along with the average price, and weight)! I always love hearing what my readers’ inputs are when it comes to prepping, because as a prepper, you’ll truly never stop learning. Networking is a beautiful thing in our mutual hobby.
Remember, weight has just as much of importance as the price does for every single item. Whatever you put in your BOB, you’ll have to carry with you. Make damn sure that whatever you pack away is worth the weight, otherwise you’ll truly regret it later if you must walk through unforgiving terrain (see my article “How to Test your Bug Out Bag”) for long distances. Stay safe, stay alert.
I’m an active-duty infantryman with the U.S. Army, and I’ve served a combined-service of over 5 years. Throughout my career, I’ve learned various survival techniques, as well as self-defense techniques. I specialize in weapons, long-range reconnaissance, distance shooting, and long-term isolation survival. I’m a very conservative, very “to the point” kind of person.
Good well documented & researched article.
Thanks for a former 11B