Running out of drinking water is a very real possibility for many households. In an emergency, having an extra supply of potable water can be crucial, and 55-gallon drums are a great way to store it.
Sure, your usual stash of bottled water might be fine for short-term emergencies, but when you need lots of water for cooking, cleaning, bathing, and drinking over a very long time, drums are the best and most affordable solution that is attainable by the average prepper.
But, compared to buying a pack of bottled water there is a lot more that you’ll need to do when storing water in drums yourself.
But it is not too hard, and in this article you’ll learn how to safely prepare, store and manage your water in large drums.
For Storing Bulk Water, Drums are Your Best Bet
Storing water in 55-gallon drums is a convenient and cost-effective way to keep a huge supply of potable water on hand during an emergency.
Drums have their own advantages compared to both smaller solutions like bottles, jugs, and cans, but also truly huge containers like tanks.
Compared to jugs and bottles, drums obviously can hold a lot more, and they are more durable, too.
Durability is a bigger concern than you might think since disposable containers have a nasty tendency to break down and leak in storage, whereas drums are built to be completely watertight over a very, very long time.
Compared to larger containers like tanks and cisterns, drums are a lot easier and cheaper to install and move, when necessary, in an emergency situation.
They generally don’t require professional help or special tools, so you can set them up and fill them quickly when you are ready to act, and when empty are easily man-portable and many can be carried in a common pickup truck.
In short, drums are the ideal and attainable solution for long-term, high-volume storage for many households.
Now that you understand why drums are perfect for storing extra water, let’s get into how to prepare and fill them.
Storing Your Water in 55 Gallon Drums, Step by Step
Resist the temptation to run out, buy the first water drums you find and then bring them home and fill them up. That way lies spoiled water, ruined flooring, and wasted money. Trust me.
Instead, read over this step-by-step guide and you’ll be better prepared for the task. With the right knowledge, you can easily set up your water drum storage in a weekend.
Step 1. Pick the Your Storage Site
Before you begin, literally before you do anything else, you need to assess areas in and around your home for their suitability for storing one or more water drums.
Start with basic conditions: The spot you choose should ideally be cool and dry, out of direct sunlight, and have good air circulation.
You never want the barrels to be exposed to freezing temps! The surface should also be flat and level for safety and security.
But probably the most important consideration for your storage site is the durability of the surface: water is extremely heavy, and a 55 gallon drum of water weighs just a little less than 500 pounds!
Actually 484 pounds, on average, but what are a few pounds concerning this kind of weight?
Now, consider the load when you have 2, 4, or even 10 barrels full of water. That is enough to collapse a floor in your home!
Always keep the load limitations of the surface in mind when sitting your barrels, and the fact that you will not be able to move your barrels once they are full.
If your home presents challenges in this regard keep in mind it is possible to store them outside if necessary. More on that soon.
Lastly, consider how the area will cope with a lot of water being spilled on it.
Let’s face it, sometimes leaks and accidents happen, and when they do dozens or hundreds of gallons of water can destroy a part of your home.
If your barrels are in the basement with a drain and sump pump, then no harm is done. Keep this in mind when picking your spot!
Step 2. Get the Right Drums
Now that you have a site picked out, it is time to get the barrels themselves. I’ll tell you right up front: picking the right kind of barrel is absolutely essential to success.
There are all kinds of barrels on the market, made from all kinds of materials, but the very best of the best are made from food-grade plastics, specifically HDPE.
HDPE plastic, or High-Density Polyethylene, offers a number of advantages that make it well-suited for storing potable water long term.
HDPE is incredibly durable and resistant to damage from punctures, chemicals, UV rays, and of course degradation from the water it holds, making it an ideal choice for both indoor and outdoor storage.
Additionally, HDPE has a dependable level of resistance to biological growth due to its non-porous nature.
Together, this makes it a great choice when it comes to prepping the container, treating the water, and facilitating a long shelf life.
And because HDPE won’t corrode like other materials, the drum itself can last for more than a decade with proper care and maintenance.
Other drums, including metal, just don’t have these advantages. Save yourself a ton of grief by buying a food-grade HDPE water drum from the start and you’ll make your job a whole lot easier.
You can even get these used in many places if you need to save some cash, but you’ll need to use caution when buying used drums.
Caution: Never Repurpose Chemical Storage Drums!
If you are purchasing used drums or thinking of repurposing some other kind of container for your water remember this: you must never, ever use any container that was previously used for chemical storage!
If a container has been used for storing chemicals, it can contain toxic residue on the interior surface of the container that can leach into the water over time and cause health risks.
Even if you thoroughly clean, disinfect and decontaminate the container, tiny amounts of chemicals may remain, in the plastic, in the liner, or even in the metal, which is invisible and undetectable.
At best, they will accelerate spoilage or taint the water. At worst, they could poison you.
To avoid this unhappy outcome, never repurpose known chemical storage drums and always use care when inspecting used “water” drums sold by third parties.
Plenty of well-meaning buyers have been duped by unscrupulous sellers, sometimes to tragic ends.
If in doubt, save up and buy new.
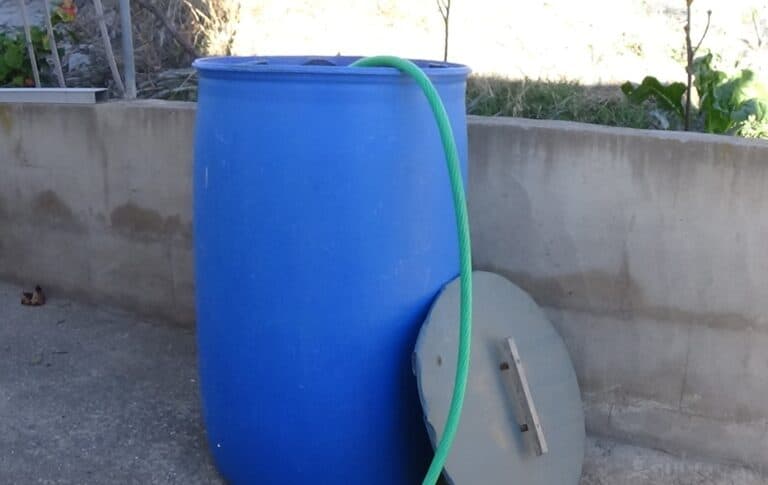
Step 3. Equip Your Drums for Dispensing
Now that you have picked out your drums, it is time to assess them and determine if you need to equip them with any special hardware for dispensing water once they are filled.
Pretty much all water drums will be equipped with capped holes (called bungs) on the top that can be used for filling, drawing or pumping out water, but this might not be entirely adequate for your purposes.
Most drums can be fitted with spigots near the bottom or even ready-to-use dispenser spouts.
Some models come from the factory so equipped, and though not strictly necessary they can make your life a little easier when rotating or using your water.
If you plan to retrofit a hose or spigot to your drum, you will need to purchase some additional parts and install them yourself.
The process isn’t complicated but it’s important to choose quality fittings and sealant that fit securely and will ensure your drums won’t leak.
Step 4. Clean Your Drums Thoroughly
Before you fill your drums with a drop of water, you need to clean and disinfect them. Yes, even when they are brand, spanking new.
Why? Because chances are there are pre-existing contaminants in the drum itself that will contaminate your water no matter how pure it is, eventually leading to spoilage in storage.
So, how do you clean your drums? Assuming they are brand new, the best way is to rinse them out with a hose, then fill them with two to five gallons of a strong bleach solution.
I use about a half cup of unscented, regular chlorine bleach for every gallon of water. Pour it into the drum, cap it tightly, and then roll the drum back and forth to ensure complete coverage. Let it sit for a half-hour, and then roll it around again.
After a couple of hours drain and rinse the drum with clean water several times. Done!
For used barrels, assess them: if they have a film or slightly sticky interior, mix up a solution of dish soap and water, scrubbing where needed to eliminate the bad spots.
I warn you: barrels that are truly gross will usually never come right again.
Once they have had a bubble bath, rinse, perform the bleach disinfection as above, rinse again and you should be good to go.
Step 5. Fill with Potable Water
Now is the time to fill the drums with water. You’ll need to use clean, potable water of course, but WHAT you use to do the filling also matters.
As with all other steps of this process, minimizing contamination, chemical and biological, is imperative.
A garden hose is not recommended; instead use a food-grade hose of the kind designed for use in food service or for RVs.
This will minimize or eliminate chemical contamination. If at all possible, fill your drums with filtered water.
When opening your drums for filling, take care that you do not knock any dust, dirt, or other debris into them, ruining the hard work you just did cleaning and disinfecting them.
Also, cap them again as soon as you are finished or are forced to take a break; the very air can contaminate the water!
Fill your drums all the way up and observe for any obvious leaks then move on to the next step.
Step 6. Add Treatment or Stabilizer, if Desired
Once your drums are filled, you can stop there. Congratulations on storing your own long-term water supply!
However, your water will not last forever, even after following these steps.
Chances are its taste will degrade over time, and it is all but certain there is SOME kind of microbial life in it- microbial life that will begin breeding, eventually spoiling the whole drum.
To improve taste (usually) and prevent spoilage, you can extend the shelf life of your water by adding treatments or water stabilizers.
These chemicals- typically sodium hypochlorite, calcium hypochlorite, potassium permanganate, chlorine dioxide or some other chemical- kill bugs and often help improve the taste by eliminating things that make the water taste foul.
Treatments are available in ready-to-use liquid form, as tablets, or in powder form. Follow the manufacturer’s instructions for application.
Do keep this in mind, though: some chemicals might produce an unwanted reaction with the material of your drums, potentially weakening them or producing a very nasty taste, so double-check the specs of both the additive and the barrel manufacturer’s specifications.
In any case, once done with the additives you can cap your drums and call it good.
Step 7. Inspect and Rotate Your Supply
With the filling and treatment process complete you are well and truly done. All that is left to do now is inspect your drums regularly for leaks or spoilage and rotate your supply.
Checking for leaks is self-evident: no matter how hard you try to make sure they don’t leak, drums are not invulnerable and can always spring a leak.
This typically occurs around spigots, welds, injection points, and other openings or weak spots.
If you notice wetness around your barrels, quickly determine which one is leaking and take appropriate action.
Rotation is another matter: rotation in this case does not refer to physically turning your drums, but to the process of cycling out old water and replacing it with fresh. There are two schools of thought on this.
The first is that you should be drawing regularly from your stores for common purposes and “topping off” the drum with new water according to the procedure above.
The downside to this method is that the more you open up your barrels the greater the chances that you’ll inadvertently introduce contaminants.
The second method is to periodically drain and refill your drums completely, disposing of the old water and starting fresh with the usual sterilization techniques.
This helps ensure that you’ll always have a supply of good-tasting, uncontaminated water but requires significantly more effort and resources, though you’ll only have to do it infrequently.
How Long Will Your Water Last in Storage Drums?
Water stored in drums can last for a long time- even years! – while remaining totally safe to drink.
However, the exact length of time depends on many factors such as the quality of the water to begin with, the material of the drum, how often it is exposed to sunlight or heat, and whether or not it is treated.
Untreated but otherwise good, clean water stored in an equally good clean drum should be expected to last about 6 months, maybe up to a year.
Note that it might not taste totally clear and pure after that time, but it should be safe to drink. Treated, your water will last at least a year and potentially far beyond that.
Can You Keep Your Drums Outside the Home?
One of the most common questions when it comes to water storage drums is whether or not they can be stored outside the home.
The answer is yes- you can keep your drums of water outdoors without much too much worry, and there are advantages to doing so. But on the other hand, there are disadvantages, too.
The good: keeping your drums of water outside means you don’t have to worry about finding space for them inside your home.
There’s also the advantage that any water leakage or spills will occur outdoors and won’t cause damage to anything indoors.
You also won’t be worried about load factors if you are keeping them on the ground or on a concrete slab.
The bad: depending on the climate and your location, outdoor storage can present a number of issues.
Extreme cold can freeze and burst your drums, while hot weather could promote the growth of microorganisms.
Additionally, sunlight can and will degrade materials used in drum construction, namely HDPE, potentially weakening them and causing leaks or promoting the leaching of chemicals into the water.
This is all relatively easy to overcome, however. Don’t store your barrels outdoors if you experience prolonged freezing temps, and make sure to protect your barrels from direct sunlight with a shade, awning, tarp, or something else.
Should You Keep Your Drums Off of Concrete and Cement Surfaces?
Another common conundrum, no pun intended, facing prospective buyers of water storage drums is whether or not it is okay to keep drums directly in contact with concrete or cement.
Most articles like this one advise buyers to place wood or even cardboard beneath the barrels so they aren’t directly touching concrete or cement surfaces.
The reasoning is always vague, and usually has something to do with the notion that concrete or cement will, somehow, leach chemicals or gasses into water through the plastic of the drum, or else that the same chemicals will weaken the plastic of the barrel somehow.
What’s the deal? Is any of it true? In my experience, no, it isn’t. Try as I might, I have never found any scientifically valid basis for these fears.
Yes, fresh cement or concrete can weep out moisture or chemicals. Yes, concrete or cement that changes temperature will lead to condensation.
But neither of these is an issue for your water drums, especially compared to the water they hold!
If I were to guess, I would say these claims arose from the old timers’ wisdom about keeping early batteries off of concrete or cement since the ground could slowly steal the charge from them.
Either that or some owners, discovering that the water in their drums went bad or sour, somehow associated this normal change in taste or spoilage with the concrete the drums rested upon.
In any case, I say put your drums right on the concrete. It is certainly strong and stable enough to hold them in most cases, and placing your heavy ass drums on a flimsy wooden pallet or some other “spacer” is only going to make them less stable.
Frequently Asked Questions
Metal drums are not a great choice for water storage. Most metal rusts easily, and that can severely contaminate your water. Metal barrels are also prone to leaking.
Yes, assuming the water is properly handled, filled, and treated. Air space in the barrel should generally be avoided, but it is not the biggest concern when it comes to storing water.
Not always! Water that has been stored for a long time may taste “flat” or even foul. This can usually be improved by vigorously storing or shaking the water before drinking.

Tom Marlowe practically grew up with a gun in his hand, and has held all kinds of jobs in the gun industry: range safety, sales, instruction and consulting, Tom has the experience to help civilian shooters figure out what will work best for them.
I store my emergency water in new 55 gallon barrels but I built a large rack that holds 9 of them horizontally in my garage. The rack is enclosed and has plywood doors to keep critters at bay. The rear of the enclosed rack is against a wall that abuts a heated area of my home. This helps to keep the enclosure warm in the winter and Cool in the summer. I also have 2 free standing 120 gallon blue water tanks that stack in the garage. I use AquaMira water treatment added to city water in all of the storage barrels. I sample the water occasionally and always filter it through a quality filter before drinking. So far I’ve no complaints about either the taste or smell of the treated water.
Great article Tom, I hope others will heed your advice and become water wise. After shelter, water is the next most important thing to store for when TSHTF. This is especially true if you store freeze dried and/ or dehydrated foodstuffs thaa will need rehydration.
Great video on long term water storage-55 gal drums. To clarify-treated city water does not need any additional water treatment for longterm storage ?
I store our water on a steel rack that holds six 55 gal barrels two sets of three. Each set are piped together with a hose valve on the bottom and a vent valve on the top to let out the air when filling. I wish I would have known about silver when I did the project as I would have installed a silver coin in each barrel. We use well water to fill them and I also treat the water with bleach. This set up is easy to drain and refill due to the fact that I have a water supply from our well piped next to the water rack and a place to drain them. This is a basement set up.
Thank you
Is there any interaction after the bleach clean out
and using Water Preserver Concentrate for which I
have already purchased. I read also somewhere not
to leave the pump in the barrel. Seems like you would
have to open close barrel often when you begin to use it
Than you for your thoughts
I purchased a 55 gallon HDPE number 2 blue drum that stored windshield wiper fluid (contains methanol). Have flushed it out and bleached it out. Thoughts on using water for drinking or just other uses like flushing toilet, washing up etc.? Thanks