As I get older, I reflect more and more on the generations that came before me and my family. Every fall, I send my father a picture of the four tons of wood pellets I’ve loaded into the garage and the canning that we completed over the year.
My grandmother was a practical woman. It has been said that she was happiest two days a year: the day they filled the coal bin, and the day they completed the canning.
A full coal bin guaranteed that her family would be warm throughout the winter. A cupboard filled with jars ensured they wouldn’t go hungry.
This sentiment resonates with me in this unbalanced world. That’s one reason I enjoy canning. It places my family’s food security where it belongs. In our own hands.
Let’s look at the various concerns associated with preserving food in glass jars.
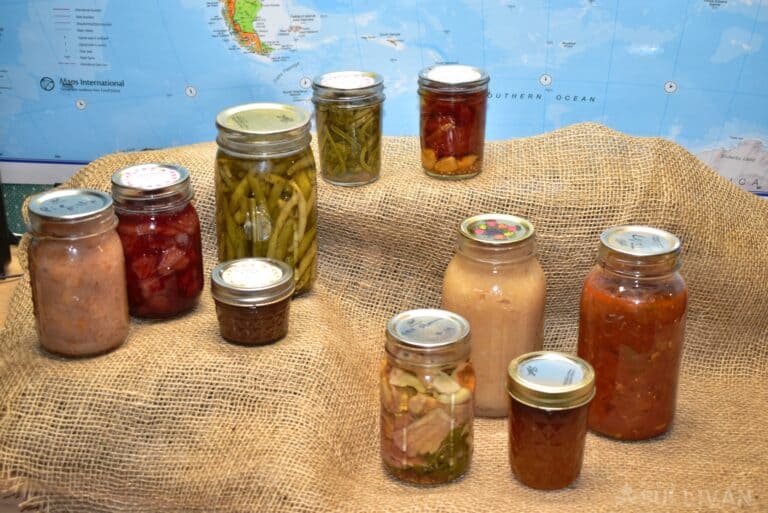
Table of Contents
Controlling the Variables that Cause Spoilage
All food storage starts with enemies. To safely store food, regardless of the method, you need to fight spoilage.
Depending on what and how you are preserving food in glass jars, you need to combat oxygen, moisture, improper pH, and light. The good news is that for each glass jar preservation method, there are generations of research and tradition available to guide you.
The good news is that glass jars have all the advantages for food preservation.
The first is oxygen. Oxygen combines with oils and fats to turn them rancid and oxidizes everything else. All canning methods we discuss minimize exposure to air and seal it out.
Glass jars are durable and impervious to oxygen exchange. The rings and lids used with glass gars form an air-tight seal.
Moisture is the realm of dehydrated goods. If your canned goods aren’t swimming in brine, they need to be dry. When you package them dry, the lids and rings keep them that way.
You can also add desiccant packages to clean up what moisture is left. Again, glass jars seal out moisture and keep the contents dry.
Where liquids are involved is where pH takes over. A sealed jar is a private little biosphere. Your goal however is not to allow the little critters to thrive. You want everything dead.
A properly acidic environment kills off any critters that will cause you a world of hurt. Glass jars are neutral containers that are resilient to high acid and salty contents.
Light is easy. Over time, it eats away at flavor and nutrition. Keep jars in a dark place, and you’re all set. The other alternative is to select a dark brown or dark blue jar. These block light naturally.
Next is durability. Glass jars are strong. You can stack them several layers deep without concerns of them crushing. Treated properly, they last for generations.
Most of the jars I use have been passed down. I’m the third generation to rely on them for my food storage. Once sealed up, they are impervious to critters and insects.
Speaking of flavor and nutrition, I left one out. Not exactly affected by canning, but you need to monitor storage temperature. Keep them cool.
So, with this bit of knowledge, let’s get to it!
Selecting Glass Jars
Are all glass jars created equal? Like anything in prepping, you must select the right tool for the job. Glass jars are numerous, easy to find, relatively inexpensive, and last forever.
You can easily clean them in the dishwasher when you are done with them, and so long as you don’t leave the metal lids on they can be used to heat food or liquids in the microwave.
Depending on if you are using them for canning, or just simple storage, be sure you are using the right jars.
If you are using jars for water bath or pressure canning, you need to make sure you are using the correct jars. Jars made for decorative purposes will not survive the canning process and may break in the canner or when you are using them.
Jar Type
You can purchase jars specifically made for canning from manufacturers such as Ball, Mason, and Kerr. While these are the most well-known, there are others.
Manufactures such as Encheng, Komota makes glass jars, however, they are mostly advertised for decorative purposes and not canning.
Aside from the typical mainstays mentioned above, there are several other types and styles of glass jar that are suitable for long-term food storage.
water. The thermal shock will shatter the jaThese will be briefly described below. Keep in mind that depending upon your objectives, your method of preservation and the food you are storing, some of these jars will work better than others:
Screw Top: This is your classic jelly or pickle jar type arrangement, with a metal or plastic lid that is secured via coarse threads molded into the glass neck of the jar.
These are great for all sorts of everyday storage, for dry or wet goods, but it is difficult or impossible to make these work with your usual home canning methods. It can be done in a factory setting with special equipment and under special conditions, but you can’t get those conditions at home.
Lock-Eat: These are interesting jars that use a two-piece lid with wire retainer arrangement that holds a thin rubber seal in place.
Similar to the screw top jars mentioned above, these are great for everyday storage of things that you use regularly, but not ideal for a long term storage unless you are freezing. Also note that the entire lid apparatus is removable and the glasses are suitable for use in the microwave for heating food.
Le Parfait: These are the fancy French equivalent to the mason jars we all know and love.
Highly reliable, these are similar to the Lock-Eat jars with their rubber gasket arrangement, and made even more secure by a strong levering action that holds the lid in place. However, this arrangement is non-removable meaning you can’t put these in the microwave or oven.
Weck: An alternative favorite for long-term food storage, Weck glass was designed in Germany to the turn of the 20th century.
These use a glass lid with a thin rubber seal like the two above types of glass, but these are held securely shut by removable metal clips that serve to create a vacuum inside the jar during immersion canning. Once canning is complete and the jars have cooled, the clips can be removed.
Size
Next is jar size. Most common standard mason-style jars come in three sizes. Quarts and pints are the most common. Next are jelly jars.
These jars are half-pint that store a volume of one cup. Larger jars, half-gallon, and 1 gallon, are also available but rarely used in water bath or pressure canning.
The larger jars have their uses, though. They are perfect for small batches of pickled vegetables and lacto-fermentation.
You do not need to use jars made for canning for these options. As long as they hold liquid, you are all set. You don’t even need a good lid. A layer of plastic wrap and a rubber band are all you need.
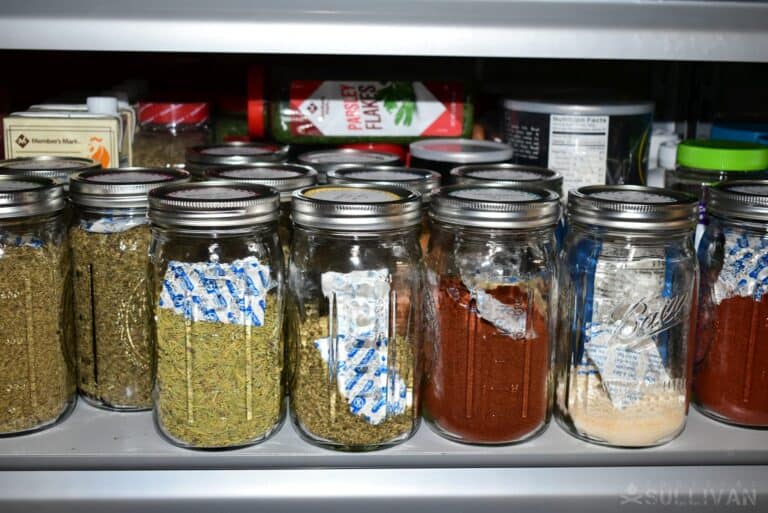
Dry Goods and More
Glass jars aren’t just great for traditional canning operations. They also work wonderfully for pantry storage of long shelf life staples that you use regularly. Things like spices, salt, sugar, honey, flour, grains, rice and pasta all store beautifully in glass.
You can even use it as a convenient container for storing and serving breakfast cereals, and I guarantee it will stay much fresher than it would in the box with the bag rolled down haphazardly.
There are several reasons why glass containers are great storage option for these items. First, it’s airtight so your goods will stay fresh longer.
Second, glass is impermeable so there’s no risk of the contents taking on any off-flavors from the jar. And finally, glass is easy to clean and inspect so you can keep an eye on potential spoilage and other problems, and you won’t have any issues sterilizing your jars when you need to clean them out and start over.
Even better, glass is totally impervious to typical pests that always seem find a way to slip into or chew through plastic containers. Bugs and rodents will have a much harder time getting a meal out of your glass-stored goods.
The metal lid and the glass walls of the jar itself are proof against nearly every critter. Now, this won’t help if your dry goods like flour, rice and so forth are already contaminated or infested when they go into the jar, but it is one more variable that you can control in the fight against pests.
So next time you’re at the store stocking up for canning season, grab a few extra glass jars to keep your everyday ingredients organized in the pantry or on the counter.
Use Oxygen Absorbers with Some Dry Goods
For the storage of dry goods, consider the use of an oxygen absorber. As we learned above, oxygen is just one of the many variables that can accelerate the spoilage of food, even dry goods.
Oxygen absorbers work by, you guessed it, absorbing the oxygen from the atmosphere inside the jar through a chemical reaction. Once all the oxygen is gone, the decay of the food inside will be greatly slowed.
These things are cheap, widely available and absolutely painless to use since you just have to toss them in the jar with the food when you store it. However, you should only use oxygen absorbers with dry goods that can be classified as low oil content and low moisture.
Using them with foods that are richer or moisture can set the stage for potentially deadly types of spoilage, specifically botulism, which can flourish in any low oxygen atmosphere.
Generally, you’ll never want to use an oxygen absorber with nuts, sugar or anything containing a high amount of either, such as granola. Your glass jars by themselves can still do a great job of storing and preserving these foods, but an oxygen absorber will do more harm than good in those cases!
Vacuum Sealing
Vacuum sealing is a modern, popular and high-tech method of food preservation that is increasingly employed by preppers that want to maximize shelf life for their stored food.
These devices are typically paired with specialty bags and a device that extracts all of the air and other gases from the bag. This, as you might have guessed, does wonders for reducing the rate of spoilage.
However, it is only relatively lately that adapters have been developed that can allow you to use your at home vacuum sealer, or vacuum packer, with your mason jars. Restoring dry goods or other foods that do not benefit from typical immersion or pressure canning, this can be a great intermediary option.
For clarity, a jar sealer is a device, an adapter, that is designed to work with an at home vacuum sealer. You’ll need both if you want to vacuum seal your jars and their contents.
Make sure you double check when you are purchasing these devices online or in person: if you already have a vacuum sealer, make sure the adapter works with your unit. It is also possible to buy combo kits that have everything you need in one box.
A Word of Caution on Dry Canning
Dry canning, as you’ll sometimes hear called, is the process of heating jars and the food they contain in a home oven at low temperature, usually between 200° and 215° F. Bottom lineup front, this method is highly suspect for the long-term preservation of food, and properly it isn’t real canning at all.
In short, these relatively low temperatures will not reliably kill off all bacteria, and can actually create bigger problems through condensation as the food cools inside the jar. This can allow bacteria to flourish, fatty foods to go rancid and all sorts of other problems.
Though it is true that heating some foods that are intended as dry storage is a good idea, you should always let these foods cool down to room temperature before storing them in your jars, and even then this isn’t necessary all the time.
My advice: if you are going to home-can foods, can them the right way and forget about dry canning entirely.
Water Bath Canning Food Storage
Water bath canning is the most popular canning method because it’s easy. Big pot, a few jars, and a few minor tools, and you’re off and running. Use water bath canning for acidic foods that aren’t too dense.
Water bath canned foods include fruits, some vegetables, and a few sauces. Mom’s apple sauce and pie filling, and grandma’s tomato sauce are some of the most popular canned foods.
In our household, we also can many jellies, jams, dill beans, and hot peppers. When foraging, I gather extra mushrooms and fiddleheads to can.
Being widely popular, there are too many recipes to count. The good news is, regardless of the recipe, the process is pretty much the same. Add food into the jar, clean the rim, pop on the lid, finger tighten, and boil.
If the dome has pulled down, then you can remove the ring, label the jar, and add it to your stash. Water bath jars are good for a minimum of 1 year, although I have eaten several jars that have 3+ years of shelf time.
The first batch you do may make you a little nervous, but after a few batches, you’ll be handling it like grandma.
There is a bit of equipment required for water bath canning. A canner, jars and lids, and a few tools. Luckily, you can use everything, except the canner, for pressure canning.
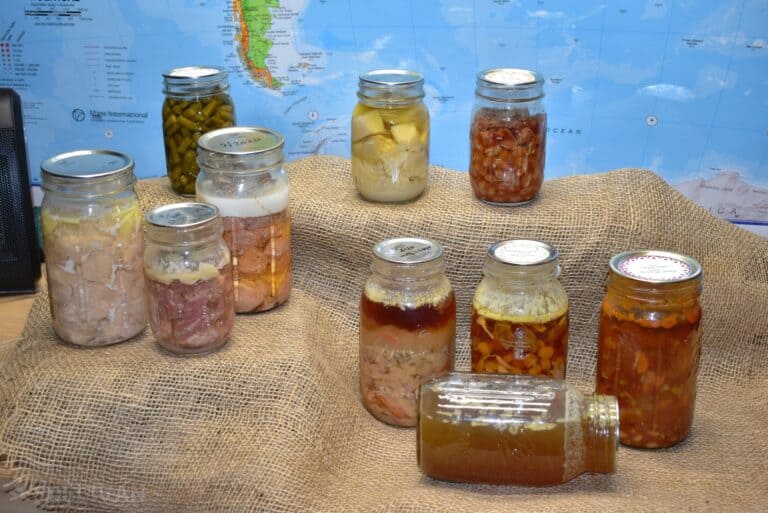
Pressure Canning
Where water bath canning is not applicable, we turn to pressure canning. Meats, low acid fruits and vegetables, soups, and stews can all be preserved with a pressure canner.
Pressure canners increase temperatures to about 245 degrees F (118 C). The extra temperature kills off critters that water bath canning cannot.
Pressure canners can intimidate. I know more people that avoid pressure canners than those that use them.
Modern canners all have several safety features that keep accidents to a minimum. So can with confidence!
I pressure can meats and stews. It’s the best way to stock up on protein. Raw packed chicken breast and pork loin are two of the cheapest ways to put pounds and pounds of protein in the pantry.
Just like water bath canning, you fill your jar, clean the lid, cap them off, and can. Pressure canning is a longer process and has a few extra steps compared to water bath canning.
Once you have met the time requirement, kill the heat and let it cool. You can’t release the pressure until it has come back down below 212 degrees F (100 C). Otherwise, the jars will have too much pressure, and may potentially explode.
When I run a batch of jars, the full cycle takes about three hours. So be patient!
Now, while water bath and pressure canning dominate the food storage world, other methods use glass jars to keep your pantry full.
Pickling and Lacto-Fermentation
I’m not sure about your grandmother, but mine made the best pickles I’ve ever had. My dad took up the mantle and has made sauerkraut for over 25 years. If you haven’t tried pickling or Lacto-Fermentation, you are in for a treat.
Pickling and fermentation are the same processes. With a little salt, you inhibit bad bacteria and allow good bacteria to flourish.
Lactobacillus bacteria convert natural sugars to acid. The resulting lactic acid is a natural preservative. Cucumbers, cabbage, carrots, cauliflower, are the most frequently preserved vegetables.
The fermentation process is as simple as it is tasty.
- Pack your vegetables into your glass jar.
- Add a few flavorings such as dill, garlic, and dried hot peppers.
- Cover the vegetables with a brine made from 8 cups of water, and 3 tablespoons canning salt. As you need more brine, just mix up another batch. Just keep the ratios the same.
- Cover with a loose lid or plastic wrap and let it sit. You can also use an airlock or a lid. If using a lid, loosen it and burp it every day.
- Leave the jar at room temperature for 3-5 days.
- After that, keep it in the fridge in your glass jar. It’ll be good for several weeks.
Glass Jars in the Freezer
If you have ample freezer space, you can even your glass jars there. This applies to sauces, jams, broth, and soups.
Glass jars are great for the freezer, as long as you take a few cautions. Never fill a jar to the top and seal it before you freeze it. As the food and liquid expand, you could burst the jar. It’s often best to freeze without a lid. Once it’s frozen solid, then put on and tighten the lid.
Straight walled jars are best for the freezer. Where the neck tapers down, you can get fractures as everything freezes because of expansion. Speaking of fractures, never warm your jars in hot water. The thermal shock will shatter the jars. More on which glass jars are good for the freezer.
Bonus: Tinctures, and Flavorings
Glass jars aren’t just for food. They are also great for storing tinctures and flavorings:
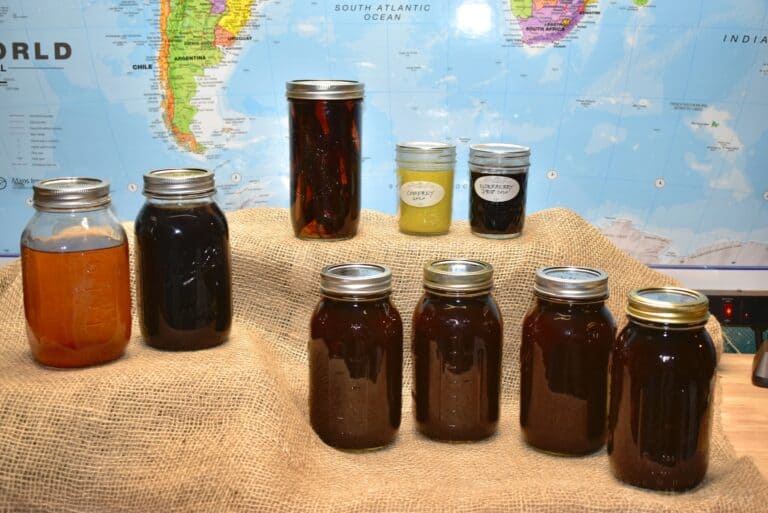
Over the years we have extended our knowledge to include wild foraged medicinals. My personal favorites are mushrooms and elderberries. Chaga, Reishi, and Bear’s Tooth are three of my favorite mushrooms to use in tinctures. Elderberries are similarly wonderful.
You don’t have to stop at tinctures! Elderberries make a great syrup when boiled, strained, and the liquid combined with honey. You can also make salves.
Don’t forget other flavorings. We just ventured into making vanilla extract. A few beans, some high-quality vodka, and a lot of time, and you have an extract that beats anything you can get in the grocery store.
For each of these, one of the most preferred storage methods is glass jars! Be they quarts, pints, jellies (half pints), or half-jellies (half cup), glass jars are perfect. Use the same lids and rings as all of your other canning methods to keep them safe.
Protecting Your Jars
One of the biggest disadvantages of glass jars is their fragility. Drop one and it’s lost forever. Jars will last for generations, so it’s worth it to take care of them!
Moving glass jars can be a little unnerving. When I have to move over 4 at a time, I always reach for an old ball or Mason cardboard box made for quarts or pints. I’ve put too much time and effort into them to drop them down the stairs.
Always keep your old boxes. You can even purchase jar protector plastic cases.
Next are shelves. A case of quart jars can weigh up to 25 pounds. Most shelves can hold 4-8 cases. That is a significant amount of weight. Invest in sturdy shelves!
For those in earthquake zones, add proper bracing and rails around the edges around the shelves. If you get a little shake, these extra security precautions will keep every jar safe.
Wrap-Up
Putting up food can be one of the most rewarding tasks in all of preparedness. You take relatively inexpensive food from the market and turn it into long-term storable meals.
Storing commercially canned chicken verse home-canned can cost you big dollars. When I see boneless chicken breast on sale, I stock up. These usually cost less than $1 per pound at the restaurant supply store.
One quart jar holds 2 pounds, and costs about 2 dollars. In comparison, the same amount of canned chicken from the grocery store costs me $8.
At those levels of savings, you can put up many, many times more meals than compared to commercially canned goods. The savings go up even more when you make comparisons to freeze-dried or MRE meals.
Glass jars are great for putting up that food. They are relatively inexpensive, widely available, and flexible. There’s no other container that supports dehydrating, water bath canning, and pressure canning.
Although a little confidence and skill are required, uncountable families for generations have relied on glass jars to feed them in the lean times.
Whether you are looking toward lean times, want to reduce waste out of the garden by preserving it, or wish to take advantage of bulk buys at the grocery store, get started now!
Canning with glass jars can do these for you. So, take advantage of glass jar preservation and fill up your shelves.

My passion is empowering people with the knowledge to prepare for personal, local, and regional emergencies. I went to school for engineering and computer science and spend my days in the security industry.
Dan,
Thanks for the info…trying the elderberry syrup this year. One issue not addessed is the shortage of lids…got any ideas about sourcing ?
Be persistent. That’s all I can say for these tough times.
Lady grey (the Mrs. ) keeps a constant eye out and has seen very little. We were lucky enough to have purchased a few bulk sleeves a year ago. But haven’t seen anything since.
Sorry I couldn’t me bore helpful.
Last summer I began making it a habit to look for lids every time I went to a store that sells canning items. Wal-Mart, the grocery store, Fleet Farm, Menards, etc. Often there was nothing. Some times I manage to get 1 box. Once – in December – I hit the jackpot – several containers of both wide and regular mouth lids on the shelf! In the interest of not being overly selfish, I only bought 6 of each. But it’s a great start for me (I don’t can everything), and even if I don’t find more, I know I can get a lot of canning done next summer!