Canning is one of the most popular food preservation methods that can be done at home. It’s a method that is able to use heat to store food in a closed glass jar to remove the air from the jar, creating a sealant.
There are two main forms of canning: pressure canning and water bath canning. We’ll be focusing on the latter for this article.
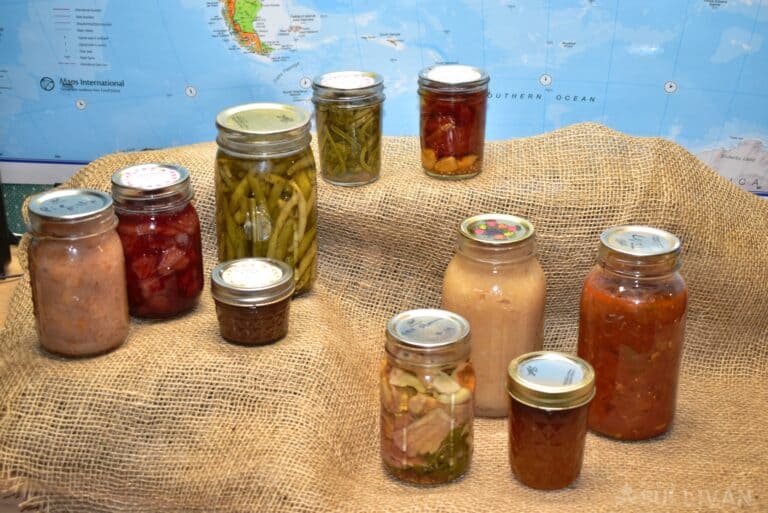
Water bath canning is a shorter and lower temperature process that is generally used for high-acid foods. Higher amount of acids is the popular choice because they are easier to preserve. Foods with a 4.6 pH or less, are considered high-acid food, anything higher is low-acid.
The process involves heating the water to boiling (212°Fahrenheit and 100°Celsius). The boiling process removes the oxygen remaining in the jar.
Overall, water bath canning is where you seal the jars and contents through the boiling water. When it is cooled, the jar will seal. In most cases, the water bath canning process takes roughly 10 – 15 minutes after the water has reached a full rolling boil.
The types of foods that ARE considered high-acid and are ideal for water bath canning, are:
- ✅ Fruits (e.g. apples, apricots, berries, cherries, cranberries, pears, and plums, etc.)
- ✅ Fruit juices
- ✅ Jams and jellies
- ✅ Fruit spreads
- ✅ Salsas
- ✅ Tomatoes (with added acid)
- ✅ Pickles
- ✅ Relishes
- ✅ Chutneys and sauces
Examples of low-acid foods (higher than a 4.6 pH), that AREN’T ideal for water bath canning, are:
- ❌ Asparagus
- ❌ Beans
- ❌ Beets
- ❌ Carrots
- ❌ Corn
- ❌ Hominy
- ❌ Meat
- ❌ Mushrooms
- ❌ Okra
- ❌ Peas
- ❌ Potatoes
- ❌ Spinach
- ❌ Squash
- ❌ Seafood
Why Is It Done?
There are many reasons why water bathing is the preferred method for canning food. First of all, it kills off bacteria like the ‘Escherichia coli O157:H7’ and ‘Salmonella Enterica’. The high temperature kills off a lot of the molds, yeasts, and bacteria. Second, it drives out the air in the jars and food that could spoil the food.
Oxygen in food and containers causes food to degrade in nutrition, flavor and appearance. This ensures a long shelf life for the product being stored. And finally, this practice is considered a good and safe procedure.
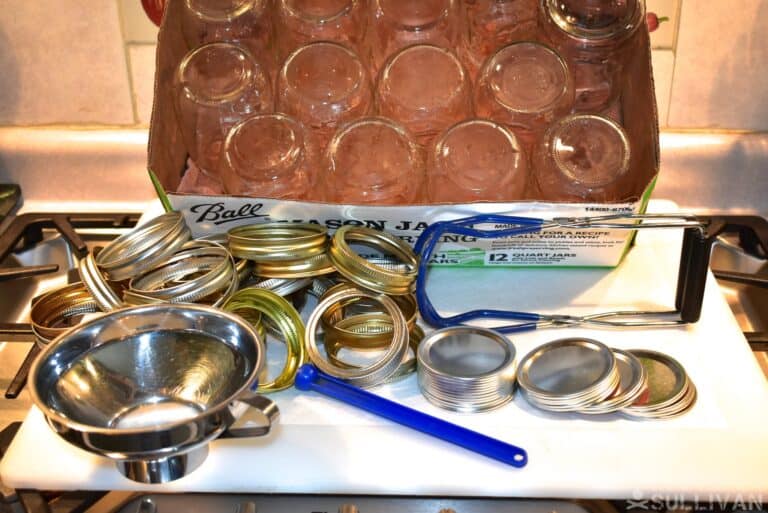
Equipment
Water Bath Canner
For the canner, it can be any container that has a rack and a tight-fitting canner lid. The depth of the contain must be enough to cover each jar plus 1 to 2 inches on top of that.
The diameter of the container must not be more than 4 inches wider than the diameter of the burner. In the case of an electric stove, the container must have a flat bottom. The canning rack that was mentioned before, prevents the jars from touching the surface of the container which then allows the water to boil evenly.
Jars
The second equipment is the jars and lids. The jars have to be made of glass that has been tempered for heat and cold. The jar itself should be free of any chips or nicks because those could make the jar less able to deal with heat.
The two-piece lid consists of a flat disk with a sealing compound and the outer metal screw band. Lids should only be used once but the screw band can be reused.
Best jars for different food types
- Jars with a regular mouth (2 inches) are best for pourable foods.
- Jars with a wide mouth (3 inches) are best for whole foods.
Best uses for different capacity jars
- Jars that hold quart (32 oz.) are best for sliced fruits, pickles, and sauces.
- Jars that hold pint (16 oz.) are best for salsas, sauces, and syrups.
- Jars that hold half gallon (64 oz.) are best for apple juice and grape juice.
- Jars that hold quart (32 oz.) are best for pickles, tomatoes, and whole fruits.
Straight shoulder jars
These jars are freezer safe.
- Straight 8 oz. jars are best for chutneys, fruit syrups, and pizza sauces.
- Straight pint and a half (24 oz.) jars are best for asparagus, pickles, soups and stews.
- Straight pint (16 oz.) jars are best for relishes, fruit butters, and sauces.
Quilted Crystal Jelly Jars
- All size (4 oz., 8 oz., and 12 oz.) jars are best for jams, jellies, marmalades, preserves, conserves, and condiments.
Optional (Extra) Utensils
- Clean towels
- Hot pads
- Cutting boards
- Jar funnel
- Jar lifter
- Hot jar handler
- Timer
Products
Disclosure: This post has links to 3rd party websites, so I may get a commission if you buy through those links. Survival Sullivan is a participant in the Amazon Services LLC Associates Program. As an Amazon Associate, I earn from qualifying purchases. See my full disclosure for more.
A kit with all the necessary equipment needed for canning are available at many locations, depending on your price limits. It can range from $10 – $60+, meaning there is something out there for everyone, like this mid-range tool set.
Although most large containers can be used, if you would like to purchase a canner, there are quite a few that come with the rack. Check out this 21.5 Quart Canner for instance.
An extra purchase that is necessary when canning foods, are the labels.
Fruit Canning Liquids
Since fruit cannot just be packaged on its own, there are a number of different liquids that it is generally canned with. Those can be water, sugar syrup, and juice or commercial unsweetened apple, pineapple, or grape juices.
Another method is to extract the juices from the fruit that being processed by crushing the ripe fruit, placing it on a simmer and strained through a cheesecloth.
For sugar syrups, boil water and sugar together until sugar dissolves which should take roughly five or so minutes. Depending on your desired syrup thickness, you need to ratio the sugar and water accordingly.
For light syrup, you would need to use 20% sugar to get 4 ¾ cups of syrup. For medium syrup, you would need 30% sugar to get 5 cups of syrup. For heavy syrup, you’d need 40% sugar to end up with 5 cups of syrup.
How Is It Done?
After the food has been picked and cooked, the process for the water bath canning starts.
Before starting:
- All equipment should be double checked to make sure they’re in top condition.
- The jars, lids and bands should be washed in hot, soapy water.
- Rinse well and dry.
Pre-Preparation:
- Heat jars in hot (not boiling) water until they are to be used.
- Fill a large container halfway with water
- Place jars in water and bring to simmer over medium heat. – heating the jars at this time prevents the jars from breaking when hot food is added later on.
- Leave the lids and bands at room temperature.
Preparation:
- Remove the hot jar from water bath using a jar lifter and empty any water inside the jar.
- Fill jars one at a time with the prepared food using a jar funnel. Leave space on top depending on the recipe. (¼ inch for jams, jellies and fruit juices. ½ inch for fruits, pickles, salsa, sauces and tomatoes).
- If started in recipe, remove any air bubbles. Repeat 2 to 3 times.
- Clean any food residue off the jar rim and threads using a clean, damp cloth.
Boiling:
- Place filled jars into the container filled with hot water, and lower the rack into the water – make sure the jars are covered by 1 to 2 inches of water.
- Place lid onto water bath container and bring to full boil.
- Process the jars in boiling water based on the altitude.
- When finished, turn off the heat and remove the container lid.
- Allow container five minutes to cool slightly.
Post-Prep:
- Remove jars from the container.
- Set the jars upright.
- Leave jars undisturbed for 12 to 24 hours.
Final Check:
- Lids should not flex up or down when the center is pressed.
- If the lid cannot be lifted off, it has a good seal. To whether your jar has sealed, press the center with your thumb or finger, and listen for a high-pitched ring when the lid is tapped with a spoon. The lid should be in a concave.
- Label and store in a cool, dry, dark place for up to 1 year.
Altitude Adjustments
- For altitudes between 1,001 to 3000 feet, the recommended time should be increased five minutes.
- For altitudes between 3,001 to 6,000 feet, process time should be increased ten minutes.
- For altitudes between 6,001 to 8,000 feet, the recommended time should be increased fifteen minutes.
- For altitudes between 8,001 to 10,000 feet, process time should be increased twenty minutes.
Tutorials
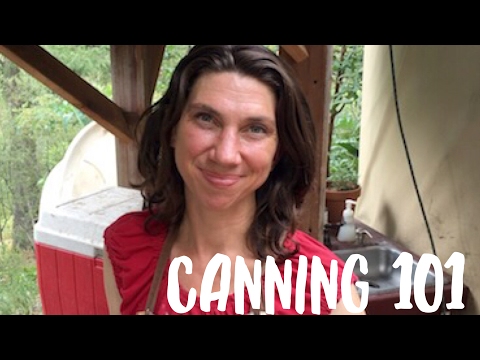
For all the visual learners out there, there are plenty of YouTube videos to give you all the information that you need. Esther Emery from ‘The Homestead Wife’ has a Complete Home Canning Basics for Beginners video on her personal channel:
She also has a storage video up on her channel:
A Few Water Bath Canning Recipes
There are tons of recipes online for foods that can be canned. Even though we’ve only given three full recipes, below we’ve listed fourteen that others have raved about.
Tomato Sauce Recipe
courtesy of ReadyNutrition.com
Ingredients:
- ½ bushel of tomatoes
- 1 tbsp. of salt
- 3 cloves of garlic, pureed
- Lemon juice as needed
Directions:
- Prep tomatoes by dropping them for 30 seconds into boiling water for blanching.
- Remove with a slotted spoon and place into a sink full of icy water.
- When they’re cool, the skin should slip right off.
- Remove the core of the tomato where it was attached to the stem.
- Cut tomatoes in half and squeeze to remove any seeds and juices (juice can be saved for a soup base).
- Place the halved tomatoes into a blender and puree until they reach the desired consistency. Pour that into a large stockpot.
- Stir in the garlic puree, and salt and bring the sauce to a boil.
- Ladle the sauce into the prepped (sanitized) jars leaving an inch of headspace.
- Add 2 tbsp. of lemon juice to each quart jar to increase the acidity for preserving,
- Wipe the rim clean of any food residue and cap your jars with the lids and rings.
- Process in a water bath for roughly 40 minutes – with adjustments for your altitude.
Strawberry Jam Recipe
courtesy of FreshPreserving.com
Ingredients:
- 2 cups of crushed strawberries.
- 3 tbsp. pectin
- ½ tsp of butter or margarine
- 3 cups granulated sugar
- Required equipment:
- Potato masher
- Ball freshTECH Jam + Jelly Maker
Directions:
- Wash strawberries in cool water and drain. Remove stem and hulls.
- Crush berries one layer at a time using a potato masher.
- Sprinkle pectin evenly over bottom of the pot (fitted with stirrer).
- Add crushed strawberries evenly over pectin. Then add butter or margarine (helps reduce foaming).
- Press jam button (timer should change to 21 minutes) press enter.
- Wait 4 minutes, when timer beeps four times – add sugar gradually while stirring continues running.
- Place glass lid on the pot.
- The machine will beep once again at the end of the process.
- Press cancel, unplug machine and immediately remove glass lid.
- Remove stirrer and skim foam if necessary.
- Ladle hot jam into prepped jars leaving ½ inch headspace.
- Wipe the rim clean of any food residue and cap your jars with the lids and rings.
- Process in a water bath for roughly 10 minutes – with adjustments for your altitude.
Applesauce Recipe
courtesy of SimplyCanning.com
Ingredients:
- Apples (21 lbs. per 7 quarts)
- Water
- Sugar (to taste)
- Cinnamon (optional)
Directions:
- Wash and cut apples in quarters. Place in a large pot.
- Add 1 cup of water. Cover and simmer until tender whilst stirring often. (water helps to prevent sticking).
- Press through a food mill.
- Add sugar
- Reheat sauce to a boil, stirring often.
- Fill prepped jars with the applesauce, leaving ½ inch of head space
- Wipe the rim clean of any food residue and cap them.
- Process in a water bath with adjustments for your altitude.
Dill Pickles Recipe
courtesy of Hunter from Survivalist Boards
Ingredients:
For Spice
- 1 tsp. Dill Seed
- ½ tsp. Dill weed
- ½ tsp. peppercorns
- 1 tbsp. sliced or crushed fresh garlic
For Brine
- 1 quart Vinegar
- 1 quart Distilled water
- cup salt
Directions:
- Cut tips of each cucumber and allow the enzyme rich juice to come out.
- Clean all the cucumbers with a potatoes brush.
- Put the spices in the bottom of the jar.
- Once the cucumbers are clean and slicked, pack them into the jars – leaving an inch of headspace.
- Pour the brine over the cucumbers and make sure it’s hot. (cucumbers should be cool, and brine should be nearly boiling). Jars should be hot before starting this process.
- Check for any air bubbles, wipe the rim clean of any food residue and cap them.
- Process in a water bath for roughly 10 minutes – with adjustments for your altitude.
Dangers and Safety Precautions
Although water bath canning is relatively safe, it can be a bit confusing for first time canners. Below are some of the important safety rules that can make your canning experience go smoothly.
Safety Information About Jars
- The quality of the jars is a very important part of the process. The jars have to be heated at boiling temperatures and cooled down again which can break cheaper quality jars. Ball and Kerr are a tried-and-true brand, that have been proven to last a long time. Commercial containers, such as ones for spaghetti sauce of pickle jars, as they are not strong enough to handle the processing time and procedure.
- Always double check your jars for any chips or nicks before starting the canning process. Discard any that do not pass the inspection as they will not seal correctly.
- Always sterilize jars before filling them with the food. This can be done in a dishwasher without the use of soap, or let them simmer in scaling water within the canner.
Processing Precautions
- Because of the constant use of hot jars, it is recommended that you invest in quality tools, such as jar lifters, canning funnels, and magnetic lid-lifting wands. Take care to look for nonmetallic or coated products as metal can damage the jars.
- After processing is finished, turn off the heat but let the canner sit undisturbed for at least five minutes. Once the five minutes have passed, carefully remove the jars without tilting them and place on a towel. Let them cool for about 24 hours then check the seals.
- When checking the seals, if the lids are concave that means that the lids are sealed. However, if they wiggle at all, the whole process should be repeated with those selected jars.
- Jars should be stored at around 57°F – 70°
- Consume the food within a year for the best quality.
- Only use jars again after sanitizing them.
General Safety Rules
- Only use modern canning recipes that are from reliable sources.
- Never reuse jar lids as they might not seal correctly when used more than once.
- If a screw-on band has rusted or been misshaped, it should be discarded and replaced. (another option would be to purchase some reusable Tattler lids).
- Do not use antique or ‘French’ type canning jars.
- Check rims carefully each time to avoid any mishaps.
- The correct amount of headspace must be left for each jar (recipes instruction usually give that information).
- Start counting the processing time after the water in the canner has come to a full boil.
- Lift out one jar at a time and always keep them upright.
Preventing Fruits from Darkening
As you may know, after being cut light color fruits, such as apples, apricots, peaches, and pears, may darken because of the natural enzymatic reaction. In order to prevent that from happening, the fruit should be paced in a holding solution until it is ready to be packed.
The holding solution is one teaspoon of ascorbic acid (vitamin C) into a gallon of water. If Vitamin C is in a tablet form, it needs to be crushed before adding it to the water.
Summary
All in all, whether you wish to start canning because of cost saving reasons or because you wish to be a prepper – canning is for everyone.
Natural and man-made disasters can happen anywhere at any time, so not being prepared is not an option anymore. With this, you can be prepared with food, and you don’t have to be a professional to do any of this.
So, what’s the first thing you want to water bath can? Let us know in the comments below.

My name is Teresa Fikes. I am a Homesteader, survivalist, prepper, historian, and writer plus much more all in one package deal. I was raised on a small family farm were I was taught at an early age to survive off the land without the help of modern conveniences. I am a writer by profession and a Homesteader by Blood, Sweat, and Tears.
This is a terrific article, THERESA!
It must have taken a good long time to compile all this info…so well done. You should be writing stuff all the time, girl because you are good.
I’ve been canning a few years myself and look forward to it each spring through fall. It’s a great skill to possess; saves money and the quality is truly controlled.
Getting ready to print a copy for my collection, so must run. But thanks very much again. Will pass on to others!
Some of the best info on the net. Keep up the good work.