When it comes to survival skills, one of the most foundational is making a fire using primitive techniques. These typically rely on sticks…

Sure, fire starters are great, matches work well and lighters are ubiquitous but when you don’t have any of those you still need to stay warm. That’s why you need to know how to make a fire the same way our ancestors did.
And there are plenty of techniques to do just that, but one of my favorites, and one you don’t hear about too much these days, is by using a fire plow.
A fire plow relies on friction between two pieces of wood just like the more commonly taught hand drill method, but it relies a little more on brute force than finesse and can be easier to pull off in some circumstances.
Keep reading and I’ll tell you everything you need to know to make and use a fire plow.
What is a Fire Plow?
A fire plow is truly simple, and is certainly the most basic but still effective method of friction fire starting.
It consists of a hardwood stick, the plow itself, and a plank or plane of softwood. The plank has a small furrow or channel cut into it that the angled end of the stick will be pressed into forcefully in order to generate friction.
The hardwood plow will also start grinding the softwood plank into dust and heating it which will eventually result in ember that you can use to ignite your tinder.
Like I said, totally simple but as always there’s a trick to constructing it.
Tools and Materials You’ll Need
As promised, the fire plow is the simplest of the tools for starting a fire via friction. You only need a couple of pieces of wood, and a sharp tool to shape them.
Hardwood Stick: you’ll need a hardwood stick to serve as the plow itself. Ideally, this stick will be anywhere from an inch to an inch and a half in diameter and as straight as possible for ease of use.
Also, the stick should be comfortable to hold because you’re going to be gripping it tightly and rubbing it back and forth like a madman.
If you aren’t good with identifying wood, press your thumbnail into the exposed fibers; if it leaves an obvious dent behind, chances are it isn’t hardwood.
Softwood Plank: you’ll need a flat plank or board of softwood to make the plane of the fire plow. 3/4 of an inch thick should be about the minimum because you don’t want to risk breaking it, and a little thicker is better.
You need the plane to be softwood so that it will break down under pressure from the hardwood plow leaving dust behind that can be subsequently heated up and ignited as an ember.
Make the plane longer than you think you’ll need so you can kneel on it or brace it on the ground for stability.
Knife: a good bushcraft or camp knife will let you do everything you need to do to create your fire plow set, from shaping and carving the stick to processing the plane and carving out a channel in it.
If you don’t have one, a hatchet can do the same thing and is also a little bit better for processing a small log or branch into a flat piece of wood to serve as the board.
Rock (optional): if you don’t have any metal cutting tools, you can use a sharp or pointed rock to do the carving and cutting. The great thing about a fire plow is that it is truly rudimentary and very easy to make even with the most primitive tools.
Tinder: you’ve got to have a small supply of good, dry tinder that is close at hand once you get an ember going using your fire plow.
Firewood: likewise, you’ll need firewood or other fuel to start building up your fire once you get your tinder going. You’re going to be putting in a ton of work to create even a single ember using this process so you can’t squander it. Have the fire built and ready to accept the tinder.
And that’s absolutely everything you need. Time to get on with the process.
Making Fire with a Fire Plow, Step by Step
The following steps will take you through crafting and using your fire plow. It really is simple, but note that simple doesn’t mean easy! Be ready for a workout. Read over all the steps before you start so you can move smoothly from one step to the next.
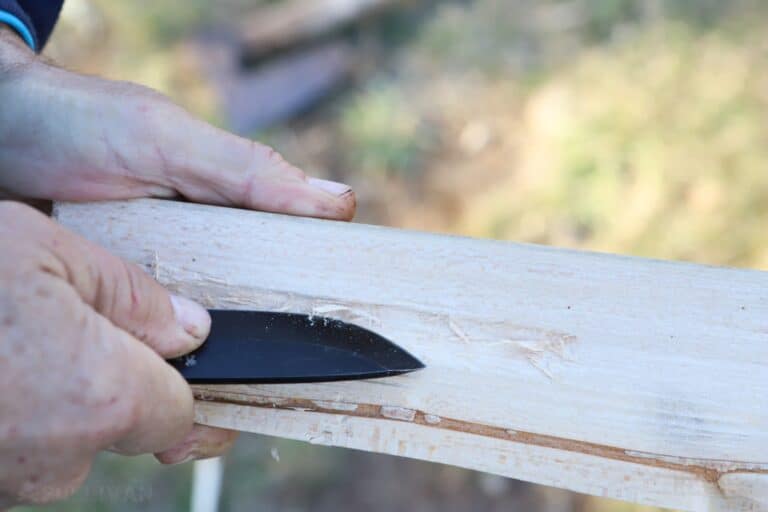
Step 1: carve plow. Using your knife or other cutting tool, carve your stick to prepare it as the plow. Remove any knots or bumps that could cause blisters or discomfort where you grip it.

Then use your knife and cut off one end at an angle, approximately 30° to 45°. This will be the end that is in contact with the plane. Some folks have better success carving a point in the plow, then cutting off the tip, sort of like a broken pencil shape.
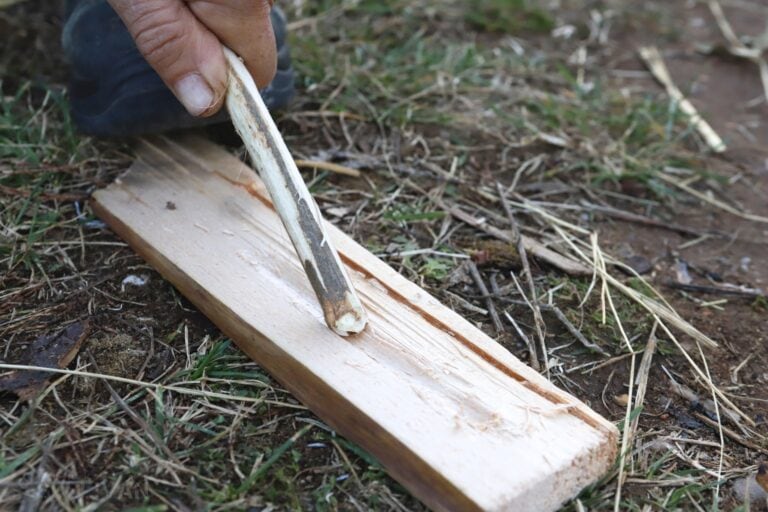
Step 2: carve channel. Using your knife or other cutting tool, carve a channel in one side of the piece of wood you’ll be using as the plane.
This channel should be approximately ⅜ of an inch to ½ an inch deep and wide enough to accommodate the end of the stick, but not much wider than that.
Stop carving about an inch away from each end. Try to keep the channel very straight and consistently shaped.
Step 3: check fitment. Take a moment to check the fit of the cut end of the plow in the channel on the plane. You want both surfaces to meet and maximize the surface area for maximum friction. Get set, and do a few practice strokes. If anything needs adjusting, tuning, or tweaking do so now.
Step 4: make sure tinder and firewood are set. Your tinder should be immediately next to the far end of the channel in the plane, on one side or the other.
Once you get an ember going, you will dump it into the tinder to ignite it. Likewise, make sure that your fire is built and ready to receive the tinder. You’ve only got one shot at this or you’ll have to start over!
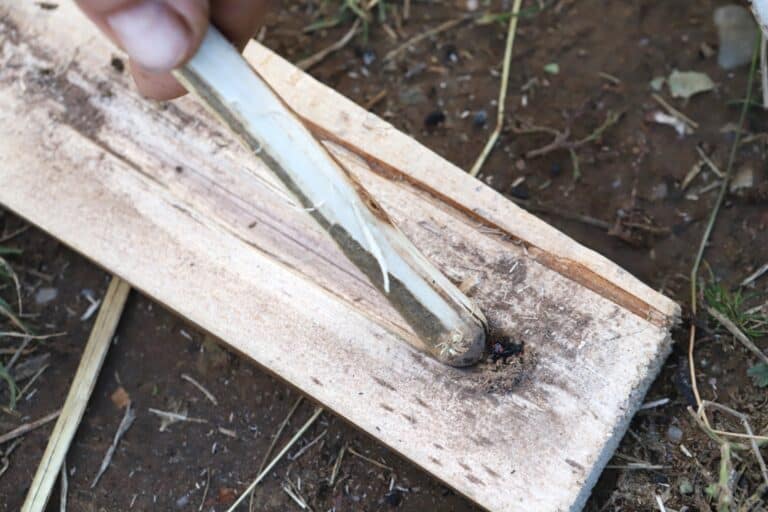
Step 5: start pushing. Now, get set and as comfortable as you can and start stroking the plow back and forth in the channel on the plane.
Make sure you’re pressing down firmly on the outbound stroke. The idea is that you want to create ground dust from the softwood plane and then start pushing it to the far end of the channel.
Step 6: keep going! You should notice dust starting to accumulate, char, turn black, and then smolder. If you smell burning wood, that’s good, but you’ve got to keep going!
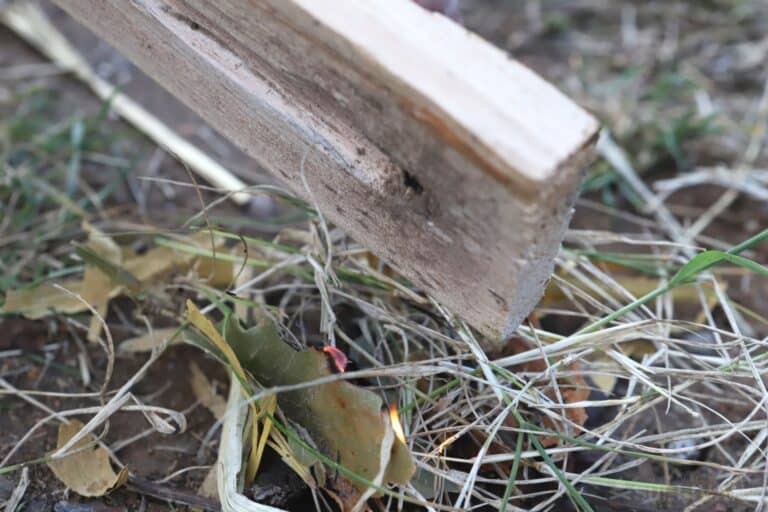
Step 7: observe for smoke and ember. You’ll probably be huffing and puffing by now, but keep an eye on the far end of the channel for any indications of a tiny ember, usually accompanied by plenty of smoke. When you think you’ve got it, move to the next step.
Step 8: dump ember into tinder. Quickly, carefully, and smoothly turn the plane over so that your ember falls into your tinder. Don’t miss!
Step 9: get tinder going. Carefully pick up and gently blow on the tinder until it is fully ignited.
Step 10: Place tinder into stack of firewood. Carefully, without snuffing it, place your tinder bundle in the required spot of the fire you built. Keep blowing on it gently if required until the fuel starts to catch.
Step 11: finished! Congratulations, you successfully built a fire using a fire plow. I told you it was simple, but not easy!
Your fire plow is reusable until the plane itself starts to get ground, through. When it starts to get too thin or the plow itself gets ground down, you should make a new set versus struggling with a set that is harder to use. That is only going to waste your energy and your time.
Helpful Tips
Use the Driest Wood Possible
You want to use the driest wood that you possibly can. That will maximize friction, heat transfer, and the creation of a good ember to ignite your tinder with.
Don’t even try it with wet wood, and even a thicker branch that is freshly fallen or cut can be too moist to be worthwhile until it is seasoned.
Use More Pressure on the Outward Stroke
It is difficult to overstate just how much of a workout this is, so keeping an eye on efficiency in your movements will make things easier and increase your chances of success.
You’ll do better if you use more pressure on the outbound stroke of the plow versus trying to keep constant pressure on it at all times. A little practice will help you get the rhythm down and save energy.
Work Quickly but Smoothly
Rehearse the entire operation a couple of times before you start. If you don’t know what you’re doing, if your tinder isn’t ready, if the tinder blows away, or if there’s any other mishap you’ll be a sweaty mess with shaking arms and no fire.
As soon as you know the ember is properly established you need to work quickly without putting it out to get a fire going. Practice makes perfect!


Tom Marlowe practically grew up with a gun in his hand, and has held all kinds of jobs in the gun industry: range safety, sales, instruction and consulting, Tom has the experience to help civilian shooters figure out what will work best for them.