Water. It is one of the survival essentials. As anyone who’s made the mistake of not bringing adequate drinking water with them in the woods can attest to, being prepared to easily filter and purify water is a necessity in any survival scenario. Luckily, filtration is possible with readily available, natural materials using a DIY filter.
What is a filter? It relies on water moving through successively smaller gaps in layers of materials, stopping sediment and particulates in each layer.
Eventually, water passes through the smallest gaps, pores in activated charcoal, and emerges filtered and ready for purification by boiling or other methods. Remember that filtration by itself does not make water safe to drink, but is a crucial first step to being prepared in case of water scarcity.
Gather Your Materials
1. Gravel. This will be the material with the largest pores, filtering the largest contaminants. This prevents the twigs, stems, leaves and other typical debris, you’d find in water taken from a natural source, from potentially blocking the finer grain filter layers below.
2. Sand. This acts a lot like the gravel, only on a smaller scale. Small pieces of bark, grit, and larger particles will be stopped as the water passes through this layer.
3. Activated charcoal. A good source of this is a campfire. Build a large coal bed under the fire, bury it and wait. As the fire burns, the charcoal develops ultra-fine pores as it is exposed to oxygen. Several days later, unbury the coal, confirm they’re cooled, and take the coals.
You’re actually going to want to pack the charcoal as tight as possible into the container later so it helps to crush the coals at this point because the finer the activated charcoal, the better for filtration.
Making The Container
1. Find a container. There’s some leeway with what the actual filter is built inside of. It needs to be sturdy enough to support the gravel and sand inside of it and it needs to be food safe. Examples of great containers are five-gallon food buckets from restaurants, glass and plastic soda bottles, and coffee tins.
Make sure you can easily modify the material the container is made of (especially in the case of brittle materials like clay or ceramic) and that it is definitely food safe (avoid plastic containers not explicitly for food or drink). Cylinder-shaped containers will provide the most even flow, and are preferred.
2. Punch a hole in the bottom of the container so the water can flow through. This hole doesn’t need to be large. The ideal filter will only have a slow drip of water coming out of it.
3. Place a coffee filter or some loose grass over the hole, and now you’re ready to pack the filter with your materials. The coffee filter will prevent the charcoal from passing through the drain at the bottom of the container. Grass can work also, because the water will be purified after anyway.
Packing The Filter
1. Rinse the gravel, sand, and charcoal to remove unwanted dirt and silt from the materials before they are packed in the container.
The filter is still effective, without rinsing, but it will reduce the filter’s lifespan. If you don’t rinse first, you will definitely need to run a few gallons of water through the filter before even attempting to use the water for something potable.
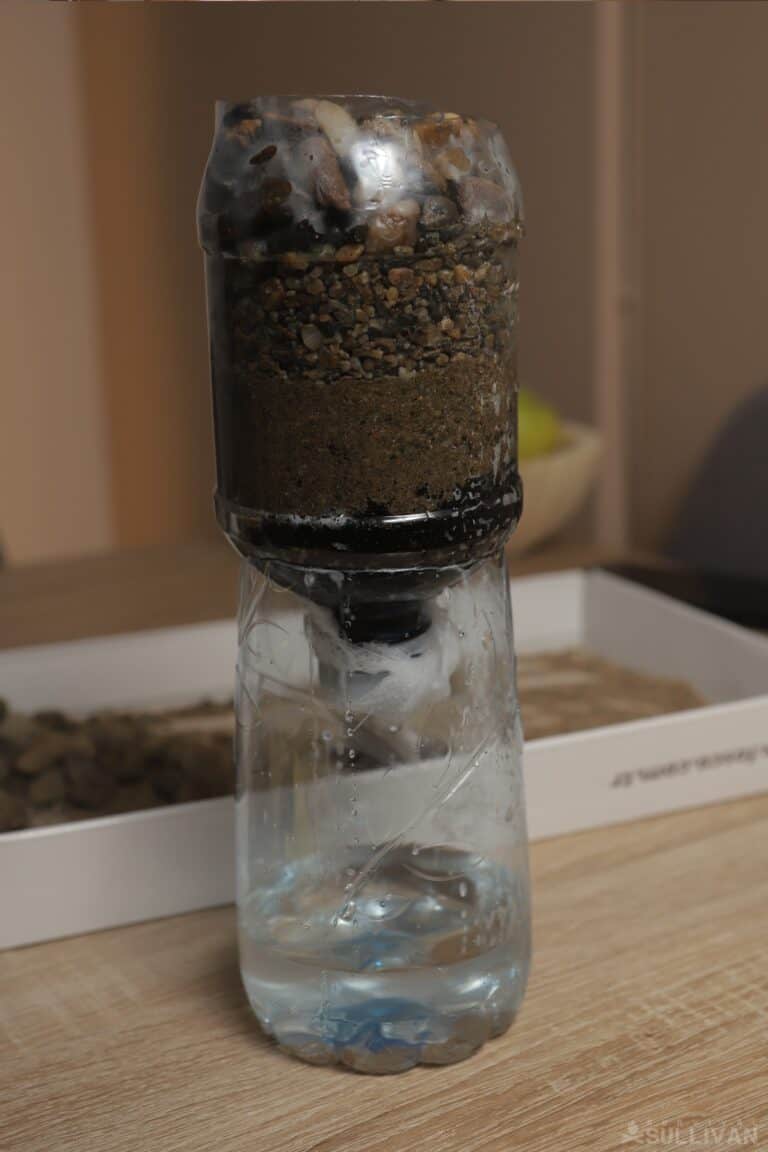
2. With the coffee filter over the hole in the container, pack the charcoal in as tightly as you can, about one-third of the way up. You only want a slow drip of water. If the water flows steadily out, you’ll need to pack it tighter. This helps to cleanse bacterial contamination and captures ultra-fine particulates, so it’s a win either way.
3. Next, add the layer of sand. If you’re lucky enough to have different grades of sand, pack in the fine sand first, working up in grade to the coarsest. The sand should also fill about a third of the container, like the charcoal.
4. Finally, add the gravel on top. Like with the sand, if you have multiple sizes of gravel, try to get it from finest to coarsest. Leave yourself about an inch or two of space from the top edge of the container. This will prevent water from overflowing if it drains slower than expected.
After you’ve added the gravel, the filter is ready to go. If you didn’t rinse the gravel and sand well, you will want to run some junk water through now just clear out any loose silt. Getting this out of the way beforehand will lead to a better filter.
A Word On Water Contamination
As said earlier, this type of process will filter out contaminants. The water still needs to be purified before drinking. This filter will take care of the larger things you’ll typically find in water sources: bugs, pieces of plant, silt and dirt, and grit.
If the charcoal is packed tight enough, it will help remove some bacteria. It won’t remove all bacteria, though, and viruses are too small for it to effectively block. Also, although the charcoal may absorb some chemical contamination, it will definitely not absorb the majority of it. You will need to boil the water or use another method to further purify it before drinking.
Humanity has done a great job of tainting a lot of nature. If you’re worried about chemical contamination, then find another water source. It is not worth the risk.
Using The Filter
Now that you’ve got your filter and a water source you’re confident about, it’s time to start. You’ll need a food safe container to catch the water as it comes out of the hole you made in the bottom of the filter.
Ideally, it should be something the filter can rest on top of. Water filtration is a very slow process and you don’t want to have to hold the filter while it happens.
Jars, jugs, and BPA-free plastic water bottles are all good choices, but an empty soda bottle or can works just as well. A good alternative for a more permanent site is attaching pipe and fittings to the bottom that act as a dripping spigot. Attach a valve if available but be careful not to leave it closed with water in the filter for an extended period.
Slowly pour the water through the top. The only thing to watch out for now is the water overflowing the top edge.
This shouldn’t happen if you’re patient and left enough room at the top when you added the gravel. After the first use you should be able to judge the right amount of water to add at a time, and how fast to fill it.
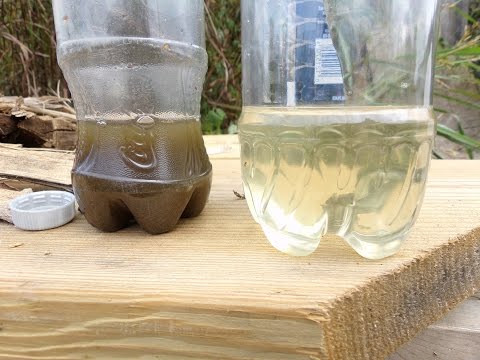
The water will slowly move through the gravel, sand, and charcoal, eventually dripping out the bottom into the second container. After it has all passed through, check the clarity or the water. If you’re not happy with it, you can filter it through again, repeating as many times as necessary to get it as clean as desired. Then it is ready to be purified.
Long-Term Use
The filter will eventually need to be replaced as it gets clogged and the filtered water stops being as clear as you want. It happens and it’s a good thing, it means the filter did its job. You can also try to pre-filter water first, but when it’s no longer working well enough, you can empty, clean, and repack the container as before.
For a more permanent DIY filter, like at a cabin or BOL, scale up by piping multiple containers into each other. Separate containers for the gravel, sand, and charcoal will make repacking easier and allow a lot more water to be filtered at once with less filling. Stack the containers, or put one over the other so water can still be pulled through by gravity.
Purifying Water
After the water’s filtered there are a bunch of different ways to purify it. Three of the most common ways of doing it are boiling, using a personal water filter such as the Sawyer Mini, and water purification tablets.
DIY filters are a great way to keep your water clean in a pinch. There’s never a guarantee that a pre-made filter will be available, especially if you’re stuck and need to bug out at a moment’s notice. Using readily available gravel, sand, and charcoal you can make sure that clean water is one less thing you need to worry about.
Do you use any alternative methods to filter your water and keep it clean at your site or retreat? Share them with us below!

My dad was military. My grandfather was a cop. They served their country well. But I don’t like taking orders. I’m taking matters into my own hands so I’m not just preparing, I’m going to a friggin’ war to provide you the best of the best survival and preparedness content out there.
Please spacify what kind of wood to use as pine will not be “tasty charcoal”
Are you sure? Most hardwoods but fully charred wood soft or hard is better than nothing. as long as it not from the few toxic/irritating woods.
So where do my water purification pills come in at? Do you also recommend the KI in my bag also?
If I had a large bottle say a two-gallon with the charcoal (can’t I use regular activated charcoal as in a fish tank) then with the bottom cut out insert a gallon jug with the sand in layers of coarseness cut the bottom off, insert a quart or 32 oz bottle with gravel. cut the bottom off of that, and pour water through it. Would run from gravel to sand then to charcoal into five-gallon. the layer could be removed and cleaned as needed. This, of course, would be for a longer place to stay than on the run like a camp or home base. what do you think?
Charcoal and activated charcoal are not the same thing. http://www.differencebetween.net/science/difference-between-charcoal-and-activated-charcoal/
Sodium chlorite or chlorine dioxide/MMS drops can be used to sanitize the water. The MMS will be the stronger of the two. Both will neutralize chemical toxins with no toxic byproducts.
If you distill the water rather than just boiling you will also remove the chemical toxins.