Traps are a time-honored and effective way to let you be in more than one place at one time when hunting or securing property. Properly designed, properly positioned and properly placed a trap can wait tirelessly for a target to blunder onto the ‘X’ before activating.

Traps can be lethal or non-lethal, but they have been employed by so many cultures around the world for so long, for hunting and warfare alike, that a thorough discussion of such would fill many volumes.
Suffice it to say however that it is in every prepper’s best interest to learn how to craft and employ primitive traps using natural or scavenged materials for the same purposes.
One of the best traps if you are hunting larger game or protecting yourself from dangerous critters is the whip trap.
Comparatively simple and easy to implement, it is nonetheless capable of inflicting grievous or lethal wounds on a large game and humans alike.
This article will provide you with an overview of whip trap design and employment as well as a step-by-step guide for implementing your own.
Table of Contents
What is a Whip Trap?
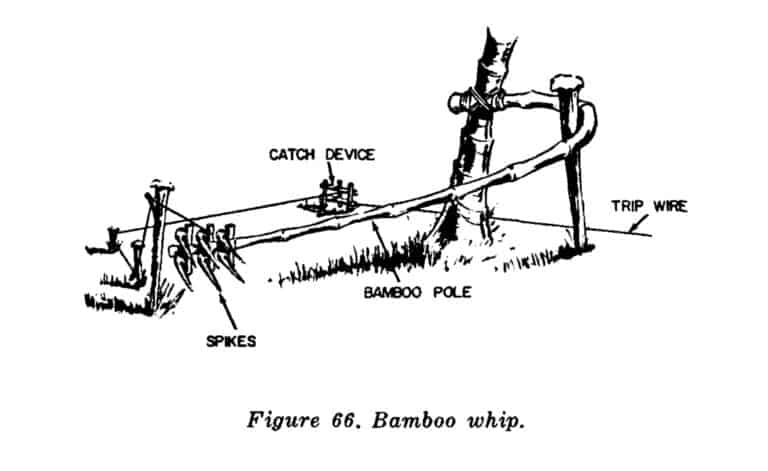
A whip trap is one that relies upon the potential energy stored in a flexible or springy pole held ready under tension to deliver damaging or deadly force to the target when the trap is activated by the victim blundering into it.
Whip traps often employ sharpened spikes or stones attached to the business end to deliver even more damage upon impact with the target.
Even without such additions whip traps are categorized as lethal traps in any case.
Typically arranged to deploy horizontally across a trail or other predefined line of approach by the victim, with some ingenuity they may also be configured to deploy vertically from below or even swing down from above.
In recent decades, whip traps were most infamously employed by Viet Cong and North Vietnamese army forces to wound, kill or delay American forces moving through the dense and labyrinthine undergrowth that made up much of the terrain in Vietnam.
Why Use a Whip Trap?
Among all of the traps you might construct using natural materials or a combination of natural materials and scavenge supplies, whip traps strike the best balance between ease of construction and sheer lethality.
Designed correctly and placed with care, these traps are more than capable of severely injuring or even killing a large animal, and they can also do the same to human beings.
This affords Preppers many advantages, namely the ability to maximize the chances that they will bring down protein-packed big game when hunting, or the ability to decisively defend avenues of approach to their shelter or bug-out location elsewhere on their property, particularly when manpower is scarce on your side.
With some basic tools, a little bit of time and some careful testing you can easily install a trap that needs little maintenance but will serve as a gruesome surprise for anyone trying to sneak up on you or for that game animal you so desperately need for your dinner table.
Components of a Whip Trap
A quick overview of a whip trap makes them appear quite complicated, but in reality they rely upon simple principles and components which are easy to source or fashion yourself using just a couple of tools.
A stout knife is all you need to make a whip trap, though a hatchet or saw will certainly help.
Below is a listing of the components that are typical of a horizontal whip trap, the kind we will be teaching you how to make in the next section.
Familiarize yourself with these components and their function before proceeding to the step-by-step.
1. Mount
The amount is the main anchor point of your whip trap. This is the component that you attach the pole or whipping part to in order to give it something to act against.
Traditionally, the mount is a sturdy tree, post or something else that will resist the forces involved while also being easy enough to camouflage that it blends into the environment around it.
2. Pivot
Often omitted by those who are trying to cobble together a whip trap design of their own, the pivot is a secondary vertical piece placed adjacent to the mount a little bit closer to the designated impact or triggering point of the trap.
The pole is bent around the pivot to provide even greater potential energy compared to what might be achieved by simply bending the pole as it is.
The pivot serves as a fulcrum, and is essential for crafting a whip trap that is capable of bringing down large game reliably.
3. Pole or “Whip”
This is the working part of the trap that inflicts damage. It is also the part that requires the most diligence in selection. It must be rigid, but highly flexible, with a lot of spring or snap when released.
Traditionally, this was a piece of green bamboo in Vietnam, but you can make do with a variety of natural and man-made materials.
Keep in mind that any cut plant life must retain its elasticity as it dries and dies, or it will ruin the function of your trap.
4. Spikes
Spikes are commonly attached to the working end of the pole in order to inflict grave damage upon the target.
This may be a single larger, longer spike for maximum penetration or a series of smaller spikes to increase the margin of error for a good hit at the cost of overall damage.
These can be attached utilizing cordage, driven through the material of the pole itself or affixed in any other way that is workable for you so long as they are sturdy and will remain in place when the trap activates.
You can utilize anything from sharpened stakes of wood to pieces of metal, arrowheads or anything else capable of penetrating the flesh of man or beast.
5. Trigger/Tripwire
The tripwire, or trigger, is the first part of the trap that the victim interacts with. Typically strung across a trail or other avenue of approach at about shin height, when the victim blunders through the trip wire the trap is activated by means of releasing the pole.
One end of the trip wire is securely fastened to an anchor point on the other side of the trail opposite the rest of the trap, with the other end being fastened to the part of the catch that is pulled away.
The other components that play a part in the setting and subsequent activation of the trap are detailed below.
6. Catch
The catch is part of the triggering mechanism of the trap, and analogous to the sear on a firearm.
The trigger interacts with the catch to release the pole from its retained position, springing the trap.
The catch is typically placed in line with the mount and the pit, although it is placed farther off of the trail away from the impact point.
Most commonly, it takes the form of two sets of perpendicular sticks, with the first being driven into the ground vertically. One member of the second set, parallel with the ground, will be fixed at the top of the first pair.
The last piece is attached to the end of the trip wire. This forms a box or frame that the toggle may rest upon when the trap is set.
7. Toggle
The toggle is a component of the catch device that connects to the trailing wire below. This is what will physically restrain the pole in place under tension when the trap is set.
The toggle is restrained by the two horizontal members of the catch device, one of which is pulled away by the tripwire, releasing the toggle and allowing all of that tension in the pole to be released explosively.
8. Trailing Wire
The trailing wire is cord or rope that runs from the working end of the pole all the way back to the catch device or it is secured by the toggle.
It is imperative that your cordage be strong, light and snag free in order to ensure maximum efficiency and operability of your whip trap.
The trailing wire is typically routed to the catch device via a series of pegs placed low along the ground in order to better camouflage it and also ensure that they will not snag or foul, potentially spoiling the activation of the trap.
Warning!
Before you begin, understand that neither this website, the website’s owners or operators, nor the author assuming any responsibility for injuries, death or property damage that may result from the use or misuse of this trap.
Furthermore, the utilization of traps for hunting is tightly regulated at the state and federal level.
Nowhere is the use of lethal booby traps permitted by law for defending home or any other property against human beings. This information is presented for informational purposes only.
Even if you are constructing this trap for academic purposes you must use maximum caution at all phases of construction, placement and triggering to prevent an accident that might result in death or grievous bodily injury to you or someone else.
Always use proper safety procedures and equipment, and clearly mark any area with a placed trap so that no human will blunder into it.
Step by Step Instructions
Below are step-by-step instructions for constructing a horizontally deploying whip trap. Take a moment to go through the instructions, and visualize the orientation and interaction of all components you have on hand before you begin.
Remember! It is imperative that you stay out of the path of the pole when you are setting it and when it is secured!
Even without spikes or other damage-dealing implements attached it is capable of inflicting severe injuries. Furthermore, remember that any part under tension might fail, resulting in injury.
Think your movements through, and always take steps to protect yourself when setting up your trap.
1. A Word on Orientation
The following steps are for setting up a horizontally deploying whip trap. You can configure your trap to swing it to the left or to the right depending on which side of the trail you place it on.
Simply remember that whichever way you bend the pole it will deploy or swing back the opposite way.
2. Select Site
Site selection is important if you are going to properly employ a whip trap. This also happens to be one of the most challenging steps.
Whip traps have a comparatively small area of effect, and they rely on the target being positioned fairly precisely compared to some other traps.
For this reason, whip traps are best used along trails or other avenues of approach where you will generally know which direction the target is approaching from.
A person who comes upon a whip trap from either side will likely detect it, or at the very best be outside of the target area when the trap is activated.
Places that will funnel your target into a tight cordon are best. Game trails, foot paths, logging roads and so forth all represent good opportunities for employing a whip trap.
3. Choose or Place Mount
With the site selected now is time to choose or place the mount. Remember, your mouth must be strong enough to withstand the forces imparted upon it when the trap is set.
Usually the mount will be a sturdy tree, whether live or dead. If you have a picture perfect spot for placing your trap but don’t have a tree to use you might plant a post or sturdy log in the ground for the purpose.
Just remember, you’ll need to camouflage this if you don’t want humans to see it, and even some animals might be spooked by an obvious contraption, so take care.
4. Check Positioning of Target Area
Now, take some time to check the position of the target area. This ideally is where your target will activate the trip wire, and upon doing so about where the working end of the pole will strike them.
The target area should be about in line with the mount on your trail, although it can be a foot or two before or past it and your trap still function well.
A properly designed whip trap will deploy and strike before a target can react, so take the time to visualize the target’s position in relation to where you will place your trip wire.
If it will help the rest of your construction efforts, place a stone or other obvious marker on the ‘X’, which is the ideal spot where the victim will trigger the trap.
5. Trim Pole
Now is the time to trim your pole to size. Remember, the longer your pole is the more potential energy and greater impact it can store. Ideally, the working end of the pole will impact the intended target precisely where you marked the ‘X’.
If you have a good pole that is just a little bit too long, don’t be afraid to trim it for best results.
Consider leaving it a few inches over long so you have extra room to add spikes if you are using them.
Remember also that if your Pole is tapering in nature you want the thinner, lighter end as the working end with the thicker, stronger end connecting to the mount. Trim accordingly.
6. Place Pivot
Install your pivot next. Unless you are very lucky, you will not have another nearby tree that you can use as the pivot. This means you’ll need to fashion a sturdy one from a branch or small log.
The pivot should be placed at least a foot or two away from the mount, and approximately halfway between the mount and the edge of the trail, although you can bias it closer to the mount if the situation dictates.
Ensure that the pivot is deeply seated and sturdy, as it will have to resist significant forces when the trap is set.
7. Attach Spikes to Pole, if Using
If you are mounting spikes, stones or any other damage-dealing implement to the working end of the poll now is the time to do that. You don’t want to be fiddling with it when the trap is set.
Fashion and attach your spikes to the thin, working end of the pole in whatever way works for you.
You can lash them securely to the pole, glue them, drive them through the end of the pole or a combination of these methods.
Just make sure they are snug and secure so they can withstand the activation of the trap and also so they can deliver maximum damage to the target.
8. Attach Trailing Wire to Pole
Now is also the time to attach the trailing wire to the working end of the pole. The trailing wire is what will connect to the catch and restrain the pole in place when the trap is set.
You want to give yourself a generous amount of cordage for this purpose since you might need a circuitous route of wire to connect properly to the catch while remaining camouflaged.
I like to leave plenty in place and then trim it later once I know it will reach and secure properly. For now, secure it to the pole with an appropriate lashing that will not slip under tension.
Also, take a sturdy stick that is about 5 inches long and it tie the free end of the trailing wire around it in the middle.
This is the toggle that you will use to secure the trailing wire and the pole with the catch device.
9. Install Pole on Mount
Now is the time to install the pole on the Mount and perform one last check to make sure that it will impact the desired area on the trail.
The interaction of the pole between the mount and the pivot is critical for correct and powerful operation of the trap, so bear with me for this explanation and make sure you look at the included image for clarity.
Imagine you are on the trail and about to walk into your trap. From this perspective, you want to secure the pole to the back side of the mount, but the pole will then run slightly in front of your pivot and curl around it as it is bent back in the armed position.
This positioning is critical for maximum mechanical advantage and function, so ensure that you get it right.
Also, it might be helpful to carve shallow, mating notches in both your mount and the base of the pole to prevent the pole from sliding or slipping.
Do not make your notch so deep in the pole that it compromises the structural integrity of whatever you are using.
When you are finished, the pole should be perpendicular to the trail with the working end and any spikes attached directly over the ‘X’ you pre-positioned.
Perform one final check to make sure that everything lines up and looks the way you want it to based on what you are targeting.
10. Place Catch Device
With the poll adjusted and mounted, now is the time to place the catch device. The catch device is mounted in line with your placement of the trip wire, on the same side of the trail as the mount and is several feet away from it.
One of the simplest and most reliable catch devices is made by planting two sturdy sticks vertically and parallel in the ground anywhere from 5 to 7 inches apart.
Then take a third stick and run it between these two at the top before lashing them or otherwise attaching them together.
This forms the frame that will hold the toggle at the end of the trailing wire in conjunction with the fourth stick that is connected to the trip wire.
11. Place Trailing Wire Routing
This step is simple, but important. You need to place a series of small diameter sticks in the ground, low to the ground, that you can route your trailing wire along to the catch device.
Make sure to look at the included photo to see the proper orientation.
In essence, these will function like primitive pulleys to give you mechanical advantage when drawing the pole into position and also to help ensure that the trailing wire does not snag when the trap is triggered and the toggle releases.
Note that you only need to place as many of these routing stakes as necessary to position the trailing wire in line with the catch device perpendicularly.
Once that is done, you can easily pull on the trailing wire to retract the pole and set the catch device.
But don’t do that just yet because we have to finish setting up the tripwire.
12. Assemble Trip Wire
All of the pieces are almost in place, now is the time to configure our tripwire. This is one of the easiest steps, but still important, so make sure you get the details right.
The first step is to stake it securely on one side of the trail. This side is opposite your trap and all of its components.
Note that you should position your tripwire high enough where it will easily be snagged by an animal’s foot or a person’s shin depending on what you are setting your trap up for.
With one end of the trip wire state, run the line to the catch device. Now you will take another piece of stick, the same diameter as those of the catch device, and attach it to the free end of the trip wire.
Next, all those left to do is to carve a mating notch in this stick and on the vertical member of the catch device that is furthest from the trail.
The objective is that the trip wire will stay in place under tension as part of the catch device when it is under load from the toggle.
But if the trip wire is disturbed, it’s your dislodge and allow the toggle to fly free between the vertical members, activating the trap.
This notch arrangement is critical and requires a practice to implement successfully. To secure and it is possible that disturbance of the trip wire might not be sufficient to dislodge it.
If it is too touchy, your trap might go off at the slightest provocation or when the wood contracts.
13. Arm Your Trap
With everything in place, now is time to arm your trap. Lay the trailing wire, routed along the stakes as described above, near the catch device.
Also lay the free end of the trip wire with the stick near the catch device. Ensure all connections, bindings, lashings and other attachment points are absolutely secure and strong.
Then, all that is left to do is pull on the free end of the trailing wire with the toggle to and through the opening of the frame in the catch device.
Depending upon the type of pole you employed this may require quite a bit of strength.
With the pole retracted, place the stick you attached to the trip wire earlier in place on the frame of the catch device, forming what looks like a sort of picture frame near the ground.
Then, carefully release the tension on the trailing wire until the toggle is resting on the horizontal members of the catch device, the one permanently attached at the top and the part near the bottom that is attached to the trip wire.
Done correctly, the entire trap should be under tension, with the tripwire taught and the working end of the pole pulled all the way back off the trail.
At this point, you should carefully test your trap by standing well out of the way of the target area and disturbing the trip wire with a thrown branch or something similar.
One common problem is that you misjudged either the length of the trip wire with the attached stick for the catch device or your trailing wire is way too long, meaning that the pole is not under enough tension or is still hanging out in front of the trail. Both eventualities are easy to fix.
Simply lengthen or shorten the tripwire as necessary or shorten the trailing wire to provide a longer draw. You can see U.S. Army Training Circular 5-31, figure 66 for more assistance.
With this basic troubleshooting done and your testing complete, your whip trap is ready for use. Good hunting and good luck!
Considerations for Employing a Whip Trap
Now that you know how to assemble and test your whip trap, let us delve a little more into practical employment.
Whip traps, like all traps, have advantages and disadvantages. You’ll need to take advantage of the former and minimize the latter if you want to find success.
As mentioned above, whip traps have the advantage of being quite powerful and relatively easy to make. But they have some significant disadvantages, ones you’ll need to work hard to overcome.
The first one, particularly for long-term use, is it many species of plant and tree will lose their elasticity once they are cut and begin to dry out.
That green, springy sapling that seems so perfect will turn as rigid as a walking stick over time, meaning that your whip trap will fail to function entirely unless you replace parts.
The other major shortcoming of whip traps is that they are quite bulky compared to their small area of effect.
As you can see from the included diagram or your own trap that you have managed to construct there is a lot going on with this trap.
You have routed cables or cordage, a large working part and more to contend with, to say nothing that the trap should really be placed in a fairly conspicuous position if you want to stand the best chance of it activating successfully.
All of this combined means that camouflage is a top priority, and that’s not going to be easy all the time.
Sure, it is easy enough to camouflage the parts that are low to the ground, including the trip wire, but camouflaging the pole, mount and pivot could prove to be quite difficult.
Best results will likely be achieved using a combination of man-made camouflage materials and natural, preferably live, foliage.
Camouflage might be less important if you are employing your whip trap against an animal, but it is absolutely imperative if it is being used against people.

Tom Marlowe practically grew up with a gun in his hand, and has held all kinds of jobs in the gun industry: range safety, sales, instruction and consulting, Tom has the experience to help civilian shooters figure out what will work best for them.