Foxholes are an iconic sight on the battlefield. They are often used as a last line of defense for troops who are facing substantial enemy fire or bombardment from artillery or aircraft.

But what is it about foxholes that make them so effective at protecting people? How can foxholes work for preppers?
Foxholes can work for preppers in a number of ways. Can make for an excellent low-profile observation point. Second, and just as important, they can provide cover if you are caught outside during an attack.
If you are in a foxhole, you are much less likely to be hit by hostile fire. Foxholes can also be used to store supplies and equipment needed to conduct a lengthy battle.
And finally, they can be used as a place to hide from the enemy assuming you have taken pains to conceal the position. If you are in a foxhole and the enemy is close by, you can stay safe until the danger has passed.
Foxholes are a great way to defend your property from potential looters when SHTF.
If you have a prepping group, you can dig foxholes around your property and rotate in shifts pulling security where they are located.
In this article, we will discuss the benefits of foxholes and how they can be used by preppers in a time of crisis.
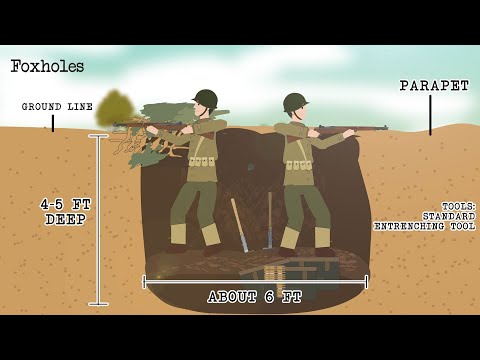
Table of Contents
Benefits of Foxholes
Foxholes have been used as some of the most effective defensive measures on the battlefield for a very long time, though the term as we know it today is more recent in its origins than you might think.
These simple but utterly effective fighting positions have been a staple of military defenses ever since small arms have come to rule the battlefield. It is easy to see why: Foxholes offer critical advantages to defenders!
Foxholes work so well for defense because they provide substantial protection from enemy fire for a minimal investment of effort.
They are deep enough that bullets can’t reach the people inside- hard cover- and they also provide meaningful cover from artillery and other explosions.
When protecting against direct fire from bullets and other projectiles, a foxhole in essence lowers the profile of the target on the receiving end, making it harder to index when an attacker is aiming and also providing several feet of dirt or other soil between the target’s body and the incoming projectile.
This is usually more than enough to completely stop bullets from rifles and machine guns, and often larger weapons as well.
Against grenades, artillery fire, bombs, and other explosive ordnance a foxhole allows those occupying it to hunker down inside the hole, significantly below the surface of the Earth where the bursting munition will impact and explode.
This provides meaningful protection from the blast wave, but perhaps more importantly also from the lethal shrapnel that is likely spewed out from such weapons.
Only the nearest or direct hit upon the foxhole is likely to immediately incapacitate or kill people sheltering inside it.
Foxholes are also advantageous because they allow troops to function together as a unit. This is important because it allows soldiers to support each other and protect each other more effectively.
Foxholes that are carefully constructed with an eye for strategy can provide multiple, interlocking fields of fire that can absolutely decimate attacking infantry, particularly when one of the foxholes is equipped with a machine gun or other crew-served weapon.
When troops are above ground or scattered willy-nilly, they are vulnerable to attack, particularly from coordinated, entrenched opponents!
In the same example, foxholes also serve as ready-made fallback points. If a foxhole is overtaken, destroyed, or endangered troops that left it behind can easily seek shelter in another nearby foxhole.
Perhaps most importantly, foxholes for all their benefits are simple to create.
A strong back, plenty of muscle, and a sturdy shovel or entrenching tool (e-tool) is all that is required to create and meaningfully fortify a foxhole fighting position. This is something that anyone can do, terrain allowing.
You’ll need to be fit, and you need to know the specifics of creating one, but if all you have is a few hours to spare you can create a formidable position.
Overall, foxholes provide a number of benefits that make them an effective tool for defense.
They are deep enough to protect troops from enemy fire, they have cover from artillery and other explosions, and they allow troops to stay together as a unit.
These factors make foxholes an important part of any defensive strategy, including preppers who are facing a long-term survival scenario where you are on your own defensively!
A Basic Foxhole is just the Beginning of your Defenses!
Once you have dug your foxhole your job isn’t necessarily over, not if you want to improve its protective capabilities and concealment.
A simple, freshly finished foxhole is pretty good, but not terribly difficult to spot considering it will have fresh, churned-earth mounded up around it and a couple of heads with rifles peeking up from inside it!
If you have time, materials, and opportunity foxholes can be further fortified and improved.
Camouflage coverings, sandbags, boards, grenade sumps, and other features can all be installed to give people using the foxhole an even better chance of survival or avoiding detection in the first place.
This can be crucially important when facing a well-equipped enemy, one with sophisticated scouting or reconnaissance capability (like drones), or for setting up devastating ambushes against anyone who would attempt to assault your position.
There is a time and a place for all of these improvements, but everything begins at the beginning like the saying goes.
The first step in constructing the most elaborate of fortified foxholes begins with a simple foxhole, dug in the ground, usually by hand. If you can’t do that, none of the other options and features matter!
In the sections below we will provide you with a step-by-step plan for digging an initial foxhole, improving it, and then finally fortifying it as a permanent or semi-permanent position. Grab your gloves and your e-tool and let’s get started!
Hardware You Will Need
The following items are useful for digging your foxhole in case you don’t have an E-Tool.
- Gardening spade
- Hatchet
- Your hands
Disclosure: This post has links to 3rd party websites, so I may get a commission if you buy through those links. Survival Sullivan is a participant in the Amazon Services LLC Associates Program. As an Amazon Associate, I earn from qualifying purchases. See my full disclosure for more.
The best tool to dig a foxhole is a small yet durable tactical shovel such as the E-Tool. These are very lightweight, very versatile pieces of equipment used for cutting, as well as digging.
There are shovels that are non-folding (these are more durable), but many are foldable so they can break down to half the size. This is a great feature because it can be easily stored in your bug out bag, and they’re also lightweight so you’ll hardly feel the added weight.
There are other tools you can use to dig your foxhole if you don’t have an E-Tool. While not as effective, they can prove useful when you don’t have room to carry an E-Tool.
Digging the ‘Hasty Fighting Position’ Foxhole
A hasty fighting position is a shallow foxhole that is dug very quickly, usually when you are short on time (when you spot an enemy in the distance that you weren’t expecting, for example).
Hasty fighting positions generally take no longer than 10 mins to dig and can be very effective if done right. Tip – when digging a foxhole, screw your E-Tool in so that the shovel head is 90 degrees from the handle. This way you can hack at the ground like a pickaxe to break the dirt up faster.
To dig a hasty fighting position:
- Configure your E-Tool so that the head is 90-degrees from the handle in an L shape.
- Hack at the ground like a pickaxe to break up the dirt, it should be roughly a foot longer than your body length.
- Once the ground is broken up, the fastest way to dig down (a hasty should be at least 2 feet deep) is to use the 90-degree configuration and dig with it like a dog, throwing the dirt behind you between your legs.
- Once the initial pit is dug, curve the part where your head will be at a 45-degree angle. This allows you to lay in the prone comfortably while pulling security in that direction.
- If time allows, grab a thick log and place it at the head of the hasty to provide extra cover from small arms fire. If you can’t find a log, that’s fine, it’s not necessary to make a hasty fighting position effective.
You can also sleep in your hasty (though it’s not recommended), if you place your head where your feet would be while pulling security. This is so if the threat presents itself again, you can simply sit up and engage your targets.
Digging the Standard Foxhole
There are many ways to dig a standard foxhole, however, I find that the following method is the most effective. They take much longer to dig compared to a hasty fighting position, but they offer far more protection.
The standard foxhole takes between 1-3 hours to dig but can be shorter if you have more than one person to assist you. These types of foxholes can accommodate 2 people comfortably and is more effective with a 2-man team. This is so one person can pull security, while the other rests.
To dig a standard foxhole:
- Break the dirt up (look in the above section to learn how) in a 6-foot circle. Once the dirt is broken up, start digging. For the standard foxhole, it is recommended that you use the standard shovel configuration on your E-Tool because you’ll be digging deeper.
- Dig down to the tallest person’s height, plus another 6 inches after that. This is so you can stand up in your foxhole comfortably without exposing yourself too much while shooting.
- Shape the excess soil around the lip of the hole in a compacted, even berm to provide cover and a rest for firearms. For larger weapons like machine guns, a notch in the berm may need to be created.
- Optional: Once your hole is completed, take some of the dirt you dug up, and make a step along the front of your foxhole so you can step onto it to see higher if need be.
Also, dig a couple of steps into the dirt so you can hastily crawl out in case SHTF and you need to relocate. Once your hole is complete, position some vegetation carefully around your foxhole so you can conceal yourself from your flanks. Make sure once you conceal it, you can still see in every direction.
Digging the Fortified Foxhole
This is the most fortified, effective method to dig your foxhole. If done right, it can protect you and your home from looters, or other threats post-collapse.
Being that it’s the most fortified, it takes the longest to dig.
A great method to use this type of foxhole for is digging them pre-collapse so that you have a position to be secure in for a few days while you are on the move. The fortified foxhole is the same depth and width as the standard foxhole but with some minor adjustments.
The fortified foxhole has three added measures of security compared to the standard foxhole.
The first level is adding a hard structure above the hole, the second is adding camouflage to help keep yourself hidden, and the third is traps set around strategic areas in the vicinity of the foxhole.
Most preppers with a house in a rural environment will want at least two fortified foxholes pre-made so they can use them when defending.
The first foxhole should be within 200m of your residence. This is so you can get there fast, and keep security on your house at a safe distance, but close enough so you can engage your target effectively (see my article “How to Shoot Like a Sniper”).
Now, each type of improvement to the foxhole can be done separately or in a logical sequence depending on your requirements and how much time or resources you have.
For that reason, the instructions are listed in individual subsections below.
Fortification Process, Step by Step
To add the above fortification to your completed foxhole:
- Gather branches that are longer than the width of your foxhole by at least one foot. Then, gather some thicker branches or logs of a shorter length.
- Place the shorter branches or logs in a diagonal pattern on 4 corners of your foxhole. There should be at least 4 spaces that you will be able to see out of around your foxhole (north, east, south, west).
- Then, place the long branches on top of the shorter ones. Make sure you use two layers at least, because you won’t be able to successfully put the branches in a complete row due to the spaces. This also adds security.
- Once the beginning stages of the fortification are complete, put a tarp (or another waterproof material) over the branches on top of your foxhole.
- Shovel some of the dirt (at least 1 foot thick) over the tarp. This adds light waterproofing for light rain, and creates a structure capable of sustaining light ordinance.
- Once the dirt is piled on top, gather vegetation from the surrounding area and place it in the dirt on top of your foxhole in such a way that it looks natural.
Concealment Process, Step by Step
To camouflage the area around your foxhole:
- Walk at least 100m away from it. Then, look in the direction of your foxhole and see if you notice any obvious mistakes you’ve made in concealing it.
- Make adjustments to obvious flaws as needed. The more natural your fortified foxhole appears, the less attention you’ll draw to it, and the less chance you have of someone discovering it before you can use it.
- Carefully uproot and replant small bushes and other vegetation from another area, placing them strategically in open areas around your fighting position. Take care that you do not block your own view out of the foxhole, because then you won’t be able to see as clearly at a distance while you scan your area for threats.
- Any dead or cut vegetation should be replaced periodically as it wilts and withers- it is easy to spot!
- Consider supplementing natural camo with man-made or improvised netting, tarps and other camo aids as needed.
Digging in Various Conditions and Soil Types
There are many types of dirt (clay, mud, frozen earth, rocky, sand, snow), so you need to take into consideration these things when digging your foxhole.
Different climates also offer different types of soil (southern states in the US have more clay, northern states often have frozen earth in the winter, etc.), so plan accordingly when you set out to dig your foxhole.
Clay
Clay can be difficult to dig in, it’s much heavier than regular soil, and can be more time-consuming to dig through. If you run into clay, simply configure your E-Tool into an L-shape and hack at it like a pickaxe to break it up.
After the clay is broken up, you can simply dig it out. You can also reuse that clay to pack in a step to get out of your foxhole because clay is easily moldable and sturdy when packed.
Mud
After it rains, more than likely the dirt in your area will turn to mud. If at all possible, wait until the soil dries before you dig your foxhole.
Mud is very difficult to dig into, because you’ll have muddy water seeping into your hole as you dig. If you must dig into mud, make sure you throw the mud far away after you’ve dug it up. Mud should be avoided to dig into if possible, save yourself the trouble.
Frozen Earth
In the colder months, the soil around you will freeze making it very difficult to dig into. Frozen earth is as hard as a rock, and you might even break the tool you’re using to dig when you’re in the process of it.
If you’re around your property and digging your foxhole, use a pickaxe to break up the soil. If you’re not near your property and you’ve already bugged out, a hasty fighting position might be your best bet for a foxhole, since they don’t take long to dig.
Rocky Soil
In some areas, especially around mountains or streams, the dirt can be filled with larger rocks. This can slow your digging process, but won’t stop it completely.
To dig in a rocky area, do your best to navigate around the rocks as you dig. If you run into a boulder in the ground, dig around it or choose another spot to dig your foxhole.
Sand
Sandy areas can be difficult to dig in. Due to the sand being very fine, the slightest movements can bring more sand into the hole you’ve already dug.
While the first few feet of sand is very loose, the next layer down is usually wet and clay-like.
If sand is your only option to dig in, place logs (or larger branches) around the perimeter of your foxhole. This helps you keep unwanted sand from falling back into the hole you’ve worked so hard to dig.
Snow
Snow can be your worst enemy when digging a foxhole. It offers little to no protection from gunfire, and when it melts it’s gone forever.
Try to avoid using snow to dig a foxhole if possible. What good is a foxhole, if it doesn’t protect you from bullets? If there’s nothing but snow around you, put in the extra work and dig into the frozen earth.
Dig In or Perish!
Foxholes are an imperative security method if you’re going to be in the wilderness when SHTF. Knowing the different types of foxholes, and in which situations you can use them, can potentially save your life (or property).
Make sure that if you make a foxhole, try to make it on the high ground. This is for two reasons, if it rains, the water won’t drain down into your hole.
Another reason is if you do get into a firefight, fighting high to low is much easier than fighting low to high. Those who have the high ground, have a higher chance of winning.

I’m an active-duty infantryman with the U.S. Army, and I’ve served a combined-service of over 5 years. Throughout my career, I’ve learned various survival techniques, as well as self-defense techniques. I specialize in weapons, long-range reconnaissance, distance shooting, and long-term isolation survival. I’m a very conservative, very “to the point” kind of person.
good job good info too thans Randy
A VERY WELCOME ARTICLE. Yes, i have dug some Hasty Foxholes, and one, maybe two, regular foxholes. Nor am i good at it. It took me more like 30-45 minutes to even dig a Hasty Foxhole, even using an E-tool like Reaper described. All day to dig a regular foxhole? I am too ashamed to remember.
Robert E. Lee probably started trench warfare when he ordered his troops to dig in every time they stopped for the night. And he probably saved many lives. And his troops nicknamed him “The King of Spades”.
I admired the ability of the Russian troops (even though Communists are even worse than Nazis) on the Eastern Front to sneak into an area at night, and dig in so silently that they could be 50 meters away from the Nazis, but the Nazis did not hear them.
Now, i need to find places to practice. This article has given me confidence. And the trowel in my BOB, WILL BE replaced the by my E-tool.
Much Thanks!
HE>i