Stockpiling candles in preparation for a SHTF disaster can be easier and cheaper than you may think. We do not need attractive and fragrant candles during a blackout, we merely need something that will brightly and safely light our path.
Emergency candles can be used not only for light, but also for heating food and warmth during an emergency of any duration or severity.
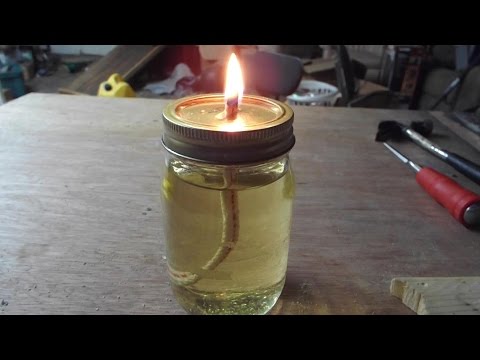
#1. Mason Jar Candles
One of the 101 uses for Mason jars is to make emergency candles or lanterns. You can even place pine cones or flowers items inside the Mason jar candles so they can double as non-prepper looking decorations and place them around your home so they are easy to grab when the lights go out.
The Mason jar candles are incredibly inexpensive and easy to make. Once you have created your own stockpile of the DIY emergency light sources, consider making a more to stash back with the rest of your bartering stockpiles.
How to Make Mason Jar Candles
Materials
• Mason jar – with matching lid and ring
• 1 nail
• Hammer
• Scissors
• Thin and flexible wire
• Cotton string – optional but recommended
• Carrier oil for fuel – cooking oil, olive oil, coconut oil, almond oil, Crisco, or paraffin oil are recommended.
• 1 cotton wick – you can buy these in bulk at a craft store or online, but making our own out of old clothing and fabric scraps, as long as they are 100 percent cotton, makes the project even cheaper. Never use polyester to make wicks, the fumes from the synthetic material could be dangerous when inhaled. Rope made out of a natural material or cotton string can also be used as a wick.
• Optional Decorative Materials: pone cones, flowers, cinnamon sticks, rocks, herbs, twigs, essential oils, and citrus shavings. The wick must stand just an inch or so taller than the Mason jar.
Directions
1. Place any decorative materials being used in the Mason jar candle project into the container first.
2. Using the hammer and nail, pound a hold into the center of the Mason jar lid. The hole needs to be only large enough for your chosen wick to fit through.
3. Fill the Mason jar up to the lip, just like you would do when canning, with the oil.
4. If using cotton fabric to make the wick, braid it and the wire together. The wire will keep the homemade candle wick stiff and firmly in place. Optional but useful step: Tie the ends of the wick together with a piece of cotton string.
5. Dip the wick into the oil for a few moments to allow it to fully absorb the liquid.
6. Remove the wick from the oil, squeeze away the excess oil, and let the wick drain on a paper towel for several minutes before putting it back inside the Mason jar and threading it through the opening made by the nail.
7. If using a commercially manufactured wick, place it directly into the Mason jar, with the metal base ring attached, and thread it through the opening made by the nail.
8. Screw the ring onto the Mason jar and store it as a decoration in any room or with the rest of your preps, until it is needed.
9. If you would like the Mason jar candle to function more like a lantern, simply wrap some wire (a larger and more stiff gauge than what was used with the wick) around the neck of the container and craft it into a handle shape.
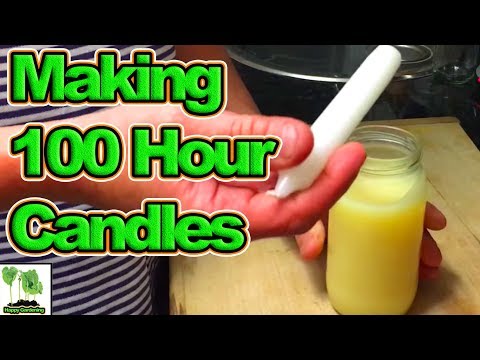
#2. DIY 100 Hour Candle
Making a 100 candle might sound hard, or like something that would take up a lot of space – or would rather expensive. Nope, it will cost you less than $1 and won’t take up more space than a pint Mason Jar. In fact, the “making” part of this DIY emergency candle project takes only about 5 seconds!
To make a 100 hour candle you simply fill a pint (or any size Mason jar you want) with Crisco – or generic brand of the shortening product.
Next, here comes the “hard” part, fellow preppers. You simply push a regular store bought candle right down in the middle of the jar full of your chosen fat or hardening oil source. Do not use coconut oil, while it does become a hardened solid, it quickly changes into a liquid when it gets warm.
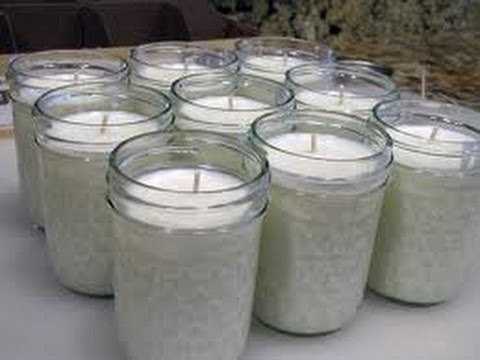
#3. DIY 50 Hour Candle
Like the other DIY emergencies candles on this list, the homemade 50 hour candle is also quick, simple, and cheap to make.
Materials
• Wicks – store bought or homemade cotton ones like detailed above.
• Mason jars or any glass jar that has a lid you can drill a hole through.
• Hammer and nail or drill and a screw.
• Cook pot or preferably, a double boiler
• Scissors
• Soy Flakes – a 5 pound bag will make about 50 eight ounce candles.
• Glass or metal measuring cup with a pour spout.
Directions
1. Drill or pound the hole for the wick in the jar lid and set it aside.
2. Place the wick in the center of the jar – the wick will be adjusted to its permanent placement after the soy wax is poured into the jar.
3. Melt the soy wax flakes over a low heat until they liquefy. Stir constantly to prevent scorching.
4. Dip the glass or metal measuring cup with the pour spout into the melted wax to scoop it up and fill all of your jars to the lip, but not all the way to the top.
5. Take a little break while the soy wax hardens, but keep a watchful eye on the jars so you can adjust the wick to the direct center to make sure it lines up with the hole you made, before the wax completely hardens.
6. Trim the wick if necessary. Ideally, with any jar style candle, you want the wick to extend approximately ¼ of an inch above the lid.
#4. Hardwood dry Sawdust or Wood Shavings
This emergency candle is designed to not just provide light, but extra warmth that may allow it to double as a survival stove.
Materials
• 3 pounds of candle wax
• Sawdust or wood shavings that are relatively small
• Cook pot – preferably one you only use for craft or candle making projects.
• Mixing bowl – line it with aluminum foil or use a disposable aluminum foil roasting pan to keep down on the mess and clean-up.
• Double boiler or second cook pot
• Candle wicks
• Mason jars, glass jars, or food cans
• Wooden spoon or metal spoon
• Duct or masking tape
• Glass or metal measuring cup with a spout
Directions
1. Tape the wick to the center bottom of the jar or can that will be used to house the homemade candle.
2. Pour approximately ½ of a cup of the sawdust or wood shavings into the mixing bowl or pan.
3. Use the double boiler to melt the candle wax over low heat. Stir constantly to avoid scorching.
4. Stir about the melted wax over the sawdust in the bowl or pan and mix it together thoroughly. Do not go overboard with the candle wax, you will still need to put more wax into each jar in later steps.
5. Place the wicks in the center of the glass or jar candle containers.
6. Scoop the wax and sawdust mixture out of the pan or bowl and fill each jar or can being used halfway full with it. It is essential that you pack the mixture firmly into each container.
7. Adjust the position of the wick to the center of the candle container if necessary – packing the wax and sawdust mixture firmly around it to hold it into place.
8. Pour a little more wax into each candle container to form a seal above the wax and sawdust mixture.
This video tutorial uses a slightly different process than I do when making sawdust emergency candles, but both should work equally well and achieve the same dependable final results

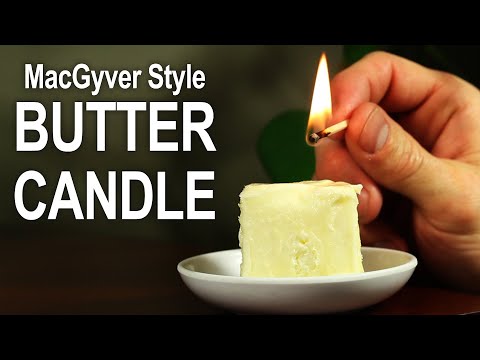
#5. Butter Candles
Materials
- 1 stick of Butter – real butter is best for this DIY emergency candle and for eating, but that nasty margarine stuff will probably work as well.
- Paper towel or toilet paper – you will need less than a single square
- Toothpick
- Saucer or similar container to house the butter candle.
Directions
1. Use the cutting guide on the butter stick to slice away as many tablespoon squares are you would like to use when making the candle. Do not remove the wax paper covering the butter stick. One tablespoon of butter will burn for approximately 1 hour. The butter must be as cold and as firm as possible for best results.
2. Poke a hole straight down through the middle of the cube of butter.
3. Twist the toilet paper or paper towel square so it is thin enough to fit down in the butter hole. Typically, I used about a 2 by 2 inch square of paper towel to serve as the wick.
4. I prefer to make the wick tall enough so that I can pull enough out of the bottom of the butter hole to give it a little crease and allow the butter block to stand on top of it to help hold it into place.
5. Rub the butter block with your index finger gently to remove just enough to lube up the wick so it starts burning right away – if you have a problem getting the homemade wick to light, which rarely ever happens.
#6. Crayon Candle
Materials
- Old broken crayons with the paper removed
- Wick
- Mason jar or clean food can
- Double boiler or cook pot
- Glass or metal measuring cup with pouring spout
Directions
1. After making sure all of the paper is removed from the broken crayons, toss them into the cook pot and meld over low to medium heat. Stir at least frequently to prevent scorching.
2. Place you wick in the candle holder – duct tape it into place if desired. It will move during the pouring process, but you can adjust its position as the wax hardens around it later.
3. Pour the wax into each chosen candle container, adjust wick if necessary, and allow to harden at least four hours before using.
How many candles do you have stockpiled for emergency use and for barter after the SHTF?

Tara Dodrill is a homesteading and survival journalist and author. She lives on a small ranch with her family in Appalachia. She has been both a host and frequent guest on preparedness radio shows. In addition to the publication of her first book, ‘Power Grid Down: How to Prepare, Survive, and Thrive after the Lights go Out’, Dodrill also travels to offer prepping tips and hands-on training and survival camps and expos.
Good Stuff, you dear She Hill Billy !! Keep this up–it helps many of us, and proves that sometimes 1 head is better than a 100.
you can melt soy wax in the microwave. DO NOT melt paraffin or any petroleum based wax in the micro wave. I use a 2 cup Pyrex measuring cup to melt the wax in. I pour candles in wide mouth “Mason” jars and any other wide mouth glass jar I can find. I use popsicle stick and small binder clips for hold the wick straight after a use a dab of hot glue to center them in the bottom of the jars.
You can also make soy wax candles in any shallow meatal tins and make ‘Buddy Burners’ in tuna cans with cardboard.
I prefer to buy old candles at junk stores and garage sales. It’s hit and miss – some years you find a lot and some hardly any. I burn them in homemade candle lanterns using either retail or my own “candle cappers”. These are metal lids with a quarter-size center hole and a ring of pencil-sized holes around the outer edge. Putting these on a glass mason jar means the flame is like a tiny electric light bulb with no flicker whatever.
If I must use liquid fuel, I have the Emergency Essential “Clear 115-Hour Plus Candle w/ Globe” filled with kerosene. Yes, they cost more, but there are sometimes sales. These I set in the bottom of a large Dollar Tree glass vase with a handmade aluminum-foil topper. Cut what will be the center hole, then position the foil over the vase so that hole is centered. Fold over the edges, then use a pencil to pierce the outside ring of small holes. I suspect these could be refilled with some sort of large syringe.
All this is strictly backup, for I believe LED flashlights are the way to go in a power outage. With rechargeable batteries I’m likely to have light long after I run out of candles or oil.
I have solar powered flashlights, radio, generators…. I ordered from jimbakkershow.com. I used the flashlights during Hurricane Harvey. the yellow ones have a screw off end that covers a usb port that I used to charge my cell phone. Now, I also have solar powered cell phone chargers.
I bought solar powered battery charger and rechargeable batteries at Harbor Freight.
I also bought my adult children solar powered generators from some other source in 2015…. don’t remember which company…. you can find them online.
I suffered through hurricane Katrina when caring for my mom…. 3.5 hrs in line to get gas for our generator!! Then, I started looking for a better solution! Lion Energy has the best I have found! I found them on jimbakkershow. Be sure to get a generator that charges in any light and not just direct sunlight. Be sure to get sine wave…. lets computers run without interruption! Most importantly, be sure that you get lithium batteries!! car type batteries will corrupt when stored but not lithium… they only lose 6% charge in one year after being fully charged. they can be plugged in and charged or charged by the sun.
Get freeze dried food… last 25 years! Augason Farms has a great variety… other companies too.
Get water filtering pitchers… at jimbakker or Survival Frog has a filter that filters 100,000 gals of water …. about $35. Good Luck! God bless!
Thank u. I’m looking for a different way. With lotion or jell. I have a kerosene jar. With wick. Just a tiny bit of candle wax. No oil in house.
Have AT LEAST 2 ways to heat your home, light your room, cook your food, charge your batteries, start a fire, have communications, provide clean water, and protect yourself/family
The ideas/projects (very well) cover MOST of these necessities