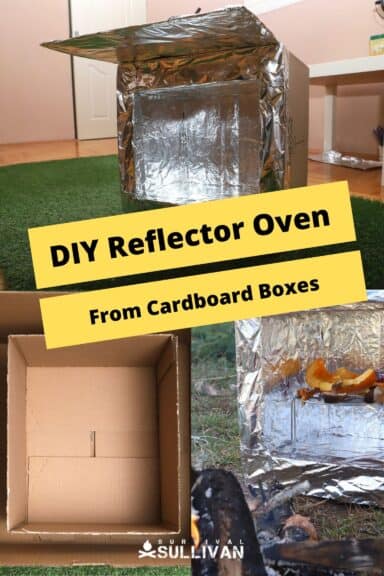
A reflector oven is a great way to cook food with more efficiency and control than you normally would with fire alone. They also happen to be very easy to construct using common materials and just a little bit of DIY ingenuity.
Highly adaptable and very portable, they’re a great option in a variety of survival scenarios, and they also happen to be one of my favorite tools in my prepper bag of tricks. In this article, I’ll teach you how to make a great DIY reflector oven, with step-by-step photos.
What You’ll Need
You won’t need much to build an effective reflector oven. These are all basic materials that are lying around your house right now, and easy enough to scavenge in an urban or suburban survival scenario.
- Small Cardboard Box: the first box you’ll need for your reflector oven, and this is the one that actually forms the cooking chamber. This box should be clean, dry, and rigid. Regarding the size, use your own best judgment: a smaller chamber is somewhat more efficient, but obviously cannot hold as much. For our example, let’s say the small box is about 12”L x 10”W x 10”D (to the rim, not including flaps). Close is good enough, as long as it fits in the larger box!
- Large Cardboard Box: a larger cardboard box will form the frame of the oven, and also hold the insulation you’ll add. This cardboard box must be able to hold the smaller box inside it with at least two inches of space on every side, including the bottom. If you had a perfect box to go with the smaller one above, it would be 16”L x 14”W x 12” D.
- Sheet of Cardboard: you need a sheet of cardboard that is preferably very rigid. This should be as wide as your large box and about twice as tall as the large box is deep. Make sure it is clean and smooth.
- Newspaper: common newspaper. If you don’t have newspaper, you can tear pages out of magazines. Use this, crumpled up, to line the space between the two boxes forming your oven to form surprisingly effective insulation, greatly increasing efficiency.
- Foil, Heavy Duty: the component that makes your oven work. Aluminum foil is an excellent reflector of infrared energy- that’s why it is so useful in the kitchen in the first place! By lining the cooking compartment of your oven with aluminum foil you can reflect or “bounce” infrared energy from a fire onto your food, and also contain the resulting heat. Use the best stuff you can find, and make sure it is in good shape and smooth.
- Glue: glue is not strictly necessary for your oven, but it makes the whole process a heck of a lot easier, and helps your oven last. You’ll use this to permanently attach the foil to various components. Any glue that has a little bit of working time that will let you smooth out the foil is best, and high temp-capable spray adhesive is ideal.
- Wire Rack (Optional): not strictly necessary, a wire rack can improve the performance of your reflector oven somewhat by allowing you to bake bread a little easier or evenly roast larger items. This is a good idea if you’re working with a larger oven.
- Empty Food Cans (Optional): used in conjunction with the rack. You can place two or more tin cans beneath the rack to hold it up off the floor of the cooking compartment. Anything that is fire-resistant will work; you can use soup cans, tuna cans, sardine cans or some other kind of can as long as it won’t emit dangerous byproducts when heated and fits in your rack.
- Rocks (Optional): common, flat rocks. Used to help level the oven near your fire if you are set up on sloped ground. Make sure they are dry, though, you don’t want any surprises.
See? I told you all of this stuff was going to be common. With all of these items gathered, take the time to read over the following sections before you begin so everything will make sense.
Warning: Your Oven Can Catch Fire in Use!
Real quick: if it hasn’t occurred to you already, you are creating an oven that is made partially out of cardboard and paper, designed to be used very near a campfire or other source of open flame.
Your oven can easily catch fire when in use if hot embers touch it or if you leave it too close to the fire for too long. Pay attention and stay nearby whenever you are using any reflector oven!
Step-by-Step
Follow these steps, and you’ll have your own highly effective reflector oven in no time.
Step 1: Test Fit Boxes
You gathered your boxes, but before we start cutting and gluing on them, we must make sure they fit properly. With the large box sitting on the ground normally, place the small box inside and check the proportions.
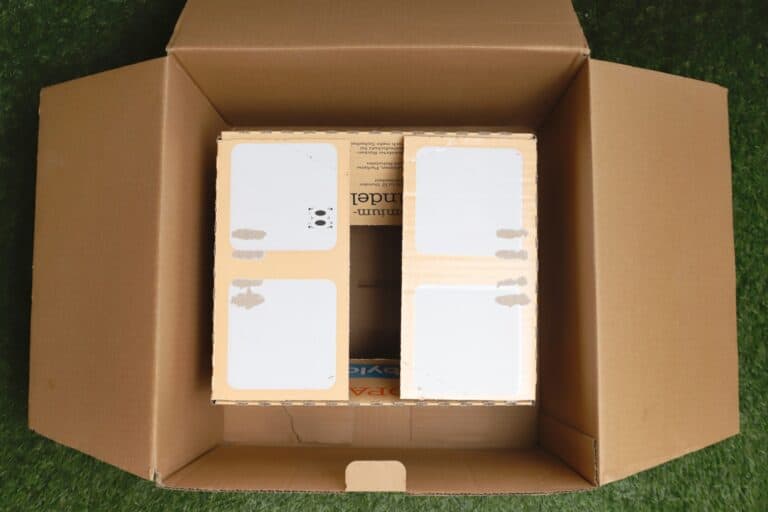
Ideally, when centered the small box will have at least 2 inches of space between it and the large box on all sides, including on the bottom. This means that the rim of the small box, minus the flaps, should be about 1 ½ inches shy of the rim of the large box.
This doesn’t have to be exact, but pretty close. If everything looks good, proceed.
Step 2: Prep Boxes
Prep your boxes by cutting off the flaps and removing any extraneous stickers, labels, paper and so forth. Anything that might promote burning or interfere with the adhesion of the aluminum foil should be dealt with.
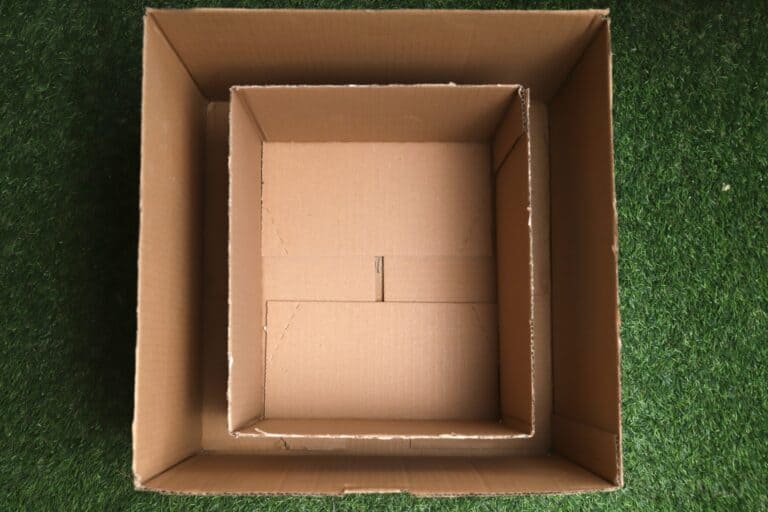
Do this cautiously, because you want both boxes to remain as strong and rigid as possible.
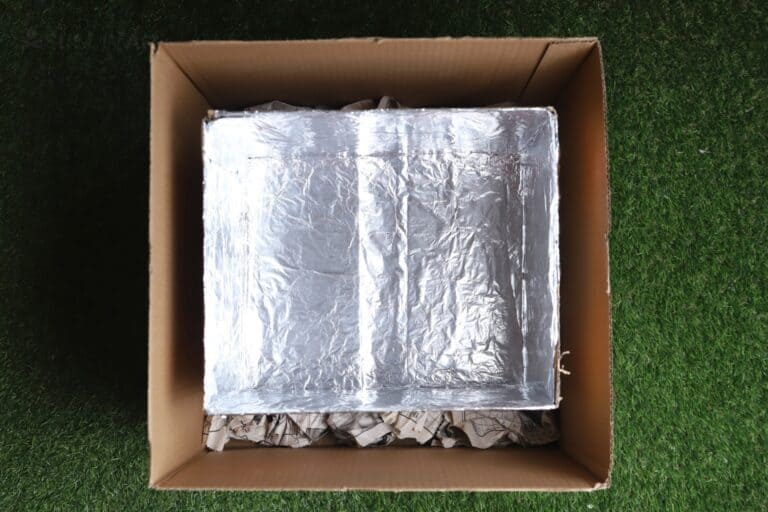
Step 3: Line Small Box Interior with Foil
Time to line the interior of the small box with the aluminum foil. Pay attention! The neater, tighter job you do here, the more effective and efficient your oven will be.
Cut sheets of aluminum foil of sufficient size to fully line the interior. Where overlap is required, take care to keep the seams flat and smooth.
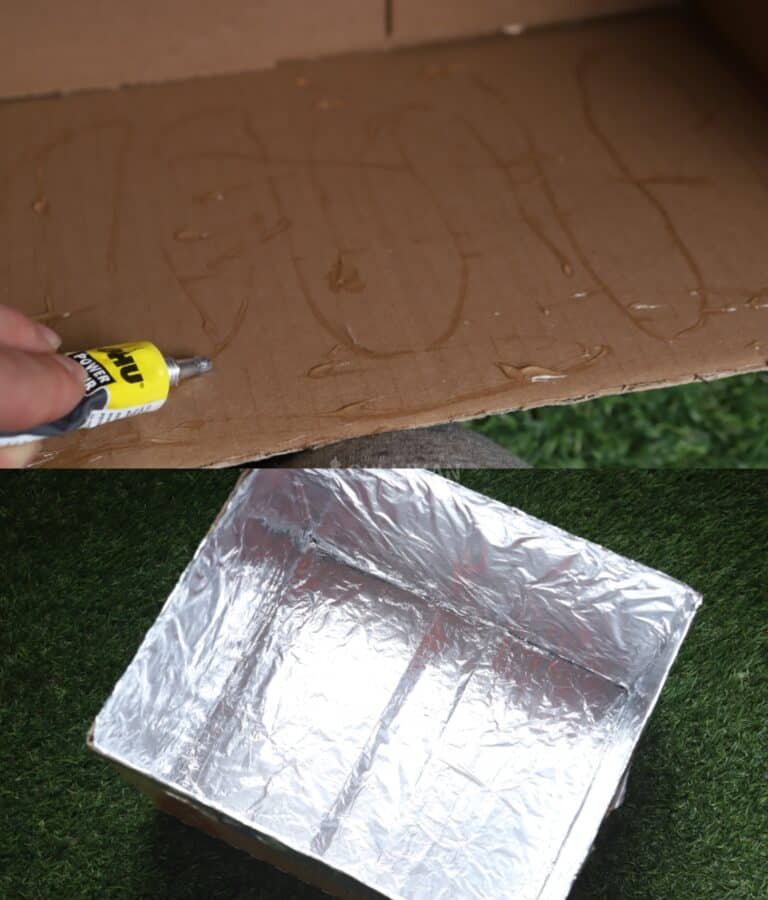
Once you have dry-fitted everything, spread glue on the interior surface, one wall at a time, and then carefully place your foil. Don’t forget to do the floor of the box too. For clarity, you do not need to put aluminum foil on the exterior of the small box.
With the sheets of aluminum foil placed on the interior of the small box, take the time to smooth out every wrinkle you can, but don’t risk tearing or crunching the foil.
If your glue has a long working time, this will be easier. Glue that “bites” and bonds quickly will make this step harder.
Step 4: Fill Large Box with Newspaper
Set the large box upright, then crumple up your newspaper into wads and line the bottom of the box. Use enough newspaper so you have a layer that will be around 1 ½ to 2 inches deep.

Step 5: Center Small Box in Large Box
With the bottom of the large box lined with your newspaper insulation, place the small box inside the large box and then center it so there’s an even amount of space on all sides.
Step 6: Pack Space In-Between with Newspaper
Now crumble up more newspaper and start packing the space on all sides of the small box that forms the chamber of the oven.
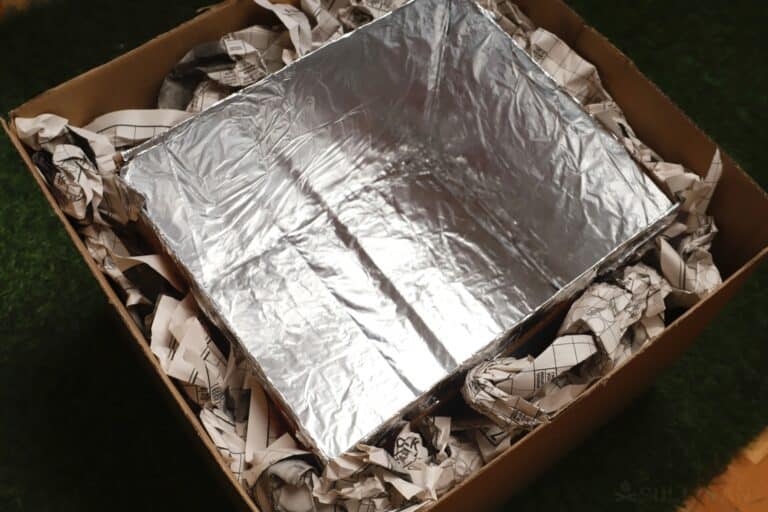
Repeat this process until the insulation is all the way to the top, level with the rims of both boxes.
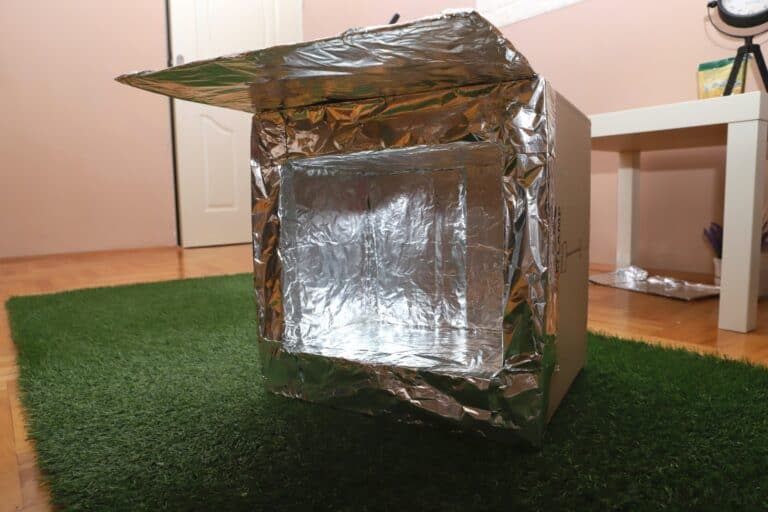
Step 7: Wrap Opening with Foil
Now take more aluminum foil and carefully use it to cover the space between both boxes, the one where you packed the newspaper.
It’s essential that this aluminum foil stays undamaged and intact because it’ll help protect the newspaper insulation from direct heat, sparks, and embers off of your fire. Done correctly, you won’t see any newspaper or opening around the perimeter of the chamber.
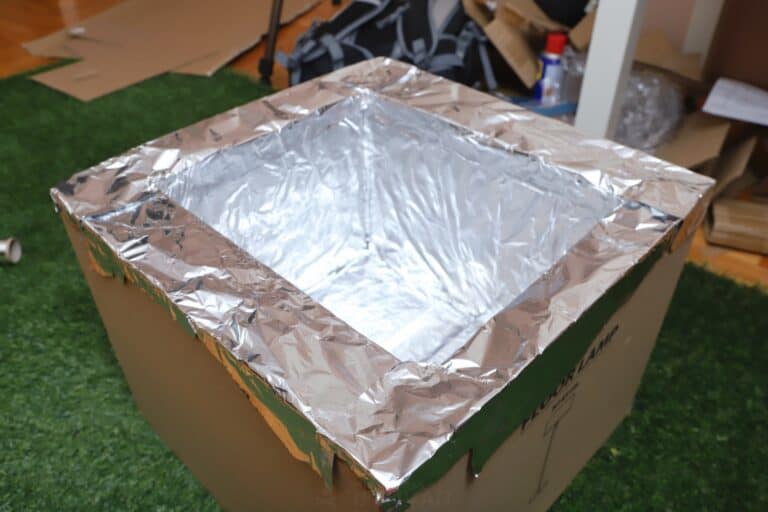
Secure one end just inside the chamber of the oven, and the other on the outside of the larger box. As long as the newspaper is covered, you’re good to go. If you aren’t pressed for material, wrap the outside of the larger box completely to provide more heat protection.
Step 8: Cover Cardboard Sheet with Foil
Grab a separate cardboard sheet from earlier and fully wrap it with aluminum foil, both sides, including the edges. You can also use a larger piece of cardboard to help you gather as much heat as possible…
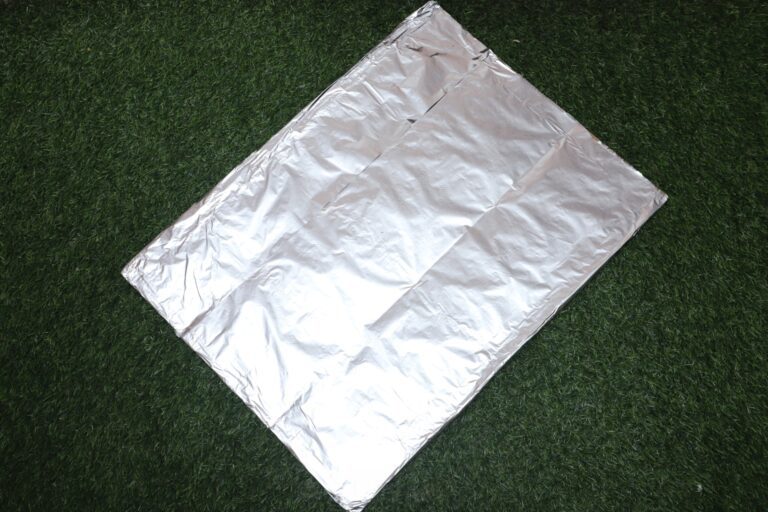
Use glue as before to secure the foil, and just like before, smooth it out and avoid rips.
This sheet will form a reflector panel to bounce even more thermal energy into your baking chamber…
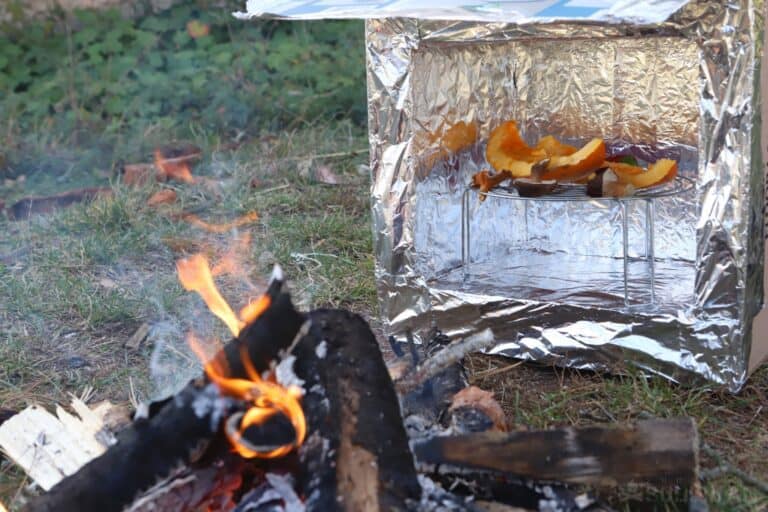
Step 9: Attach Reflector Panel to Top of Oven
Now attach your foil-covered reflector panel to the top of the oven.
You can glue it to the top if the panel is rigid enough to extend straight out. If not, consider temporarily rigging it up using clips, sticks, or something else to hold it in place.
You can use a couple of small rocks near the back edge of the oven to hold it down too.
Step 10: Position Reflector Panel for Best Effect
Careful positioning of this reflector panel is important to maximize efficiency and also prevent it from shading the interior of the oven. When your oven is directly facing the location of the fire, your reflector panel should stick straight out toward it more or less parallel to the ground. Never allow it to drop down where it will come between the baking chamber and the fire itself.
Take some time to practice positioning the reflector so it is in the perfect spot. You probably won’t want to move it while you’re actually using your oven because it too will get very hot!
Step 11: Insert Rack, if Using
If you’re using a wire rack or grill rack as described in the material section, now’s the time to place it inside the chamber on the cans.
Step 12: Place Oven Near Fire, Facing It
If you haven’t already built your fire, build it for maximum sustainability and even heat output. This ensures better control over the baking or roasting process.
How close you place your oven to the fire depends on the size of the fire and prevailing wind conditions, but in any case, you never want it to be closer than a foot to a foot and a half away. That will risk your oven catching on fire directly even with the presence of the foil.
If you need to level the oven, use flat, dry rocks. Your oven should ideally rest flat on the ground, but most places in the wild aren’t flat, of course! So long as you can level your oven and have it facing your fire, it will work…
Step 13: Bake!
Whatever you are baking or heating, carefully place it inside the oven and let it work. Keep an eye on it and it gingerly adjust the positioning of the oven if you’re able to for better control heating.
Step 14: Cautiously Remove Food
Once you think your food is done, carefully retrieve it from the oven. Caution: it and the oven will be very hot!
If required, check it for doneness and keep baking if required. Otherwise, your food is ready!
Step 15: Carefully Move Oven Away from Fire
Once you have removed the food from the oven, protect your hands and move the oven away from the fire to protect it and reduce wear and tear.
Again, be careful! Your oven will probably be surprisingly hot!
And with that, congrats, you have successfully built and used a reflector oven to prepare your meal.
Helpful Tips
- Use the best boxes you can find. Heavy-duty, sturdy boxes will always make a better and safer oven. It is worth taking the time to find ones that are ideal for this task.
- Make do without glue. If you don’t have access to any glue, you might be able to adhere the foil with warmed sap or other natural materials, or just carefully press it into position. Consider also using paper clips or similar materials to clip or pin it in place.
DIY Reflector Oven Complete
And with that, you have finished your DIY reflector oven build. Use with a little care and common sense, you might be surprised at just how effective an improvised oven like this can really be.
But do keep in mind your oven won’t last forever. It is durable enough to do a fair bit of cooking but at the end of the day, it is still made from cardboard and foil. It won’t last forever, and if it gets rained on it is basically done for.
Take care of it, though, and it will get you through a rough situation…

Tom Marlowe practically grew up with a gun in his hand, and has held all kinds of jobs in the gun industry: range safety, sales, instruction and consulting, Tom has the experience to help civilian shooters figure out what will work best for them.
I think this is a great idea and I’d love to try this with my grandkids (however they are so spoiled to microwaves and refrigerators in campers and 5th wheels they would most like think it was lame)…But I think it is amazing and I took a screen shot and notes and I’d LOVE to try this at some point! Love the rack idea too!