Trying to learn everything there is to know about prepping and buying all of the survival gear you and your family could possibly ever need is an extremely daunting proposition. Most folks come to embrace the concept or preparedness after becoming worried about national/world events or after living through some type of natural disaster.
The rush to prep after having one’s eyes opened about the plethora of SHTF scenarios which could soon unfold understandably sparks a frenzied “have to do everything at once…and right now” mindset. Newbie preppers must pause after their moment of enlightenment and create a prepping plan which can be fully mastered at a realistic and budget-friendly pace.
The 5-day challenge can serve as a valuable survival refresher and cross-training endeavor for seasoned preppers as well. As with most things in life, repetition of sound habits leads to success!
Day-1 Challenge: How to Build a Fire
Starting a fire with matches or a lighter might seem like a simple task, but during a survival situation conditions you will be forced to function under will be anything but typical. Matches and lighters will run out, get lost, stolen, and wet.
“Waterproof” matches only retain their effectiveness to a certain degree, NOTHING is 100% full-proof. Preppers must learn how to start a fire without matches in adverse weather conditions and without the aid of best-case commercial supplies.
Fire-Building Basics
- Chose a surface which is as fire-resistant, solid, and dry as possible, i.e. dry dirt, inside of a fire ring, or on a bed of rocks. Sandstone tends to pop and crack when it gets hot, try to avoid using this type of stone as a fire ring or burning surface.
- Gather some kindling. Use small twigs or dry twigs, leaves, or brush to spark a flame.
- Only once the flame is present and stable is it time to add larger twigs, branches, or logs. You can go the full-on Boy Scout route and build a “teepee” with the large twigs or logs directly above the space where the kindling is being used to start the fire. Move about carefully when using this fire-starting method, clothing and long hair can dangle too close to the flame and cause a tragedy to happen quickly.
- Resist the urge to put too much wood on too quickly, it can smother the flame. Until a steady and strong campfire is going, pace logs on the outer rim of the flame, just barely touching it. This ensures the log or branch will catch but not drown out the flame and kill the fire.
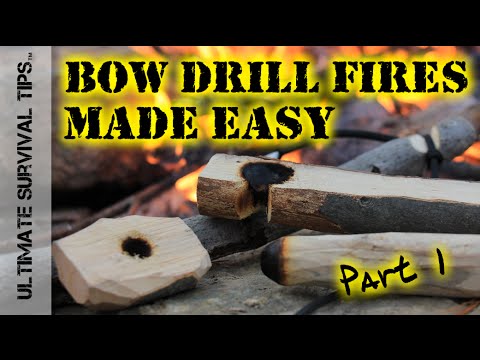
How to Start a Fire without Matches
Dan’s Note: Yes, there are easier ways to start a fire, but this is a challenge so we picked something, well, challenging.
Friction Method – this will take a while, quite a while, and require both physical effort and patience. The type of wood chosen for the fire base board and the friction spindle can make a huge difference in the time it takes to get smoke rolling and reaching the ultimate goal of sparking a flame.
Aspen, cedar, cottonwood, cypress, walnut, and willow are the best varieties of wood to use when starting a fire with the friction method. You will spin the spindle stick – which should be about 8-inches long and about the diameter of a small twig, in your hands with the bottom tip rotating on top of the fire base board.
Cut a small, fingernail size, V-shaped notch in the fire base board and create a depression in the wood next to it if possible. Place a piece of bark under the notch to catch the burning ember you will soon be putting onto the fire board. The depression will help keep the tinder next you are about to create, in place.
Before you start generating friction between the spindle and board, place a small – half-dollar size amount, of dry brush, tiny bits of bark, or a torn clothing scrap, onto the flame to help it grow stronger.
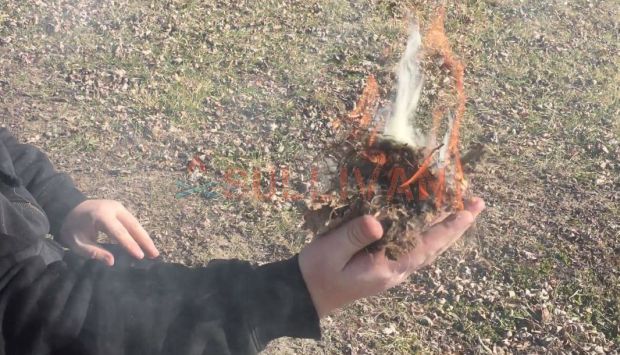
The friction created when the two pieces of wood are consistently and firmly rubbed together should eventually create an ember which is gently blown onto to nurse into becoming a flame.
Very slowly and gently, shielding the small flame from the wind as much as possible, lay the spindle onto the nest of tinder placed on the fire base board – blowing on it slightly as you move and after placement.
Bow and Drill Fire-Making Friction Method
Fire will be essential to your survival in many ways. Not only will the flames keep you warm, the heat is needed to cook food, and to boil impurities our of water so it is safe to drink after filtering and cleaning wounds.
Growing a flame and getting damp wood going is a whole lot easier if you have some quality fire-starter on hand. These simple and nearly free fire-starters are both small and lightweight so they can easily be tucked away inside of a bugout bag or get me home bag. They should also be durable and have a shelf life which almost never expires.
Making Fire-Starters
Cotton balls/Cloth and wax: Melt chunks of wax or a candle in a pot. Do not allow mixture to come to a boil. The wax should be melted on a low to slightly medium heat so it does not become scorched. The process should take on a few minutes for up to three cups of wax.
Dip a cotton ball or similarly small scrap piece of cloth into the hot wax using tongs. Hold the cotton ball or cloth in the wax for about 30 seconds before pulling it out, allowing the excess to drip off. Lay the fire-starter onto a piece of wax paper or a metal rack to allow to cool and dry thoroughly. Store the fire-starters in a waterproof portable container or freezer bags before placing in a bugout bag.
Petroleum Jelly/Turpentine: This homemade fire-starter is a dual use survival tool. Not only is it capable of sparking a flame when damp materials are used, it doubles as a healing salve.
Simply mix together three parts petroleum jelly and one-part turpentine. The mixture can be stored in the petroleum jelly jar, a similar air-tight container, or in small freezer bags.
Slather a quarter-size amount of the mixture onto the kindling and/or the spindle stick if starting a fire without matches. The jelly seems to prevent the turpentine from burning up too quickly and risk losing the growing embers.
I am not a doctor, or any type of health professional capable of offering medical advice. I can only share my personal experiences from using the petroleum jelly and turpentine mixture as a healing salve.
My great-grandfather used the salve on both his livestock and loved ones to heal small to deep wounds. It appears to foster the healing process rather quickly and also increases new skin grown. When using the salve on livestock, the jelly has an additional benefit of preventing flies from getting into the open wound.
Although, after many years of use I have never seen a human or beast have an adverse effect from using the salve topically, any home remedy can cause negative side effects and allergic reactions. Always consult with your physician before trying a home remedy and test the mixture.
Dryer lint: Save the lint from your dryer to make extremely lightweight and dependable fire-starters. Snugly wrap the lint in a piece of wax paper, rolling about half of a handful of lint into a quarter-sheet of wax paper and twist the ends together firmly, tying them with a piece of string if desired.
The fire-starters should resemble a piece of plastic-wrapped hard candy. They can be placed directly into the fire to help fan the flames or unwrapped and used as dry tinder.
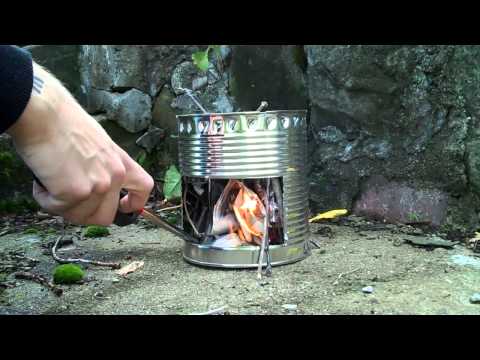
Day-2 Challenge: Hobo Stove for Survival Cooking
Now you know how to make a fire and keeping it going – so it is time to learn how to use do some basic survival cooking. Hobo stoves are simple and quick to make and will allow you to prepare a long-term storage meal packet by bringing water to a boil, cook small wild game, or warm a can of stew.
Materials
- Metal can – coffee can, cleaned paint can, or #10 can that contained long-term storage food, would all work great!
- Permanent marker and a ruler or measuring tape
- Can opener
- Drill and drill bit, hammer and roofing nail, or a manual can opener or tin snips – whichever tool you have on hand and are the most comfortable using, will suffice.
- 2 nuts, bolts, and washers
- Metal wire – an old clothes hanger or baling wire will work just fine.
Directions
- Remove the bottom of the chosen metal can.
- Cut a 4-inch square door from the lower portion of the can – make your cut about a finger’s width from the bottom front and center portion of the metal can.
- Drill or punch a hole on each side of the 4” door opening.
- Slide a bolt through each hole and secure it in place with both a wash and a nut on the inside of the can.
- Sting a piece of metal wire, about the gauge of a metal clothes hanger, from one bolt to the other.
- Bend the 4” square door slightly so it rests over the wire. The door should be loose enough to open and close and function as a damper for the hobo stove – but fit firmly enough that it does not fall off while cooking. Dampers allow users to adjust the air flow and fuel on stove fires.
- Drill, punch, poke, or hammer four small holes just under the top lip of the metal can. The holes will permit smoke to escape from the hobo stove while it is in use.
- Turn the metal can over and place the bottom you just removed inside – the can bottom should now be resting on the inside of the top of the metal can.
- While the can is still upside down, use tin snips or the punch end of a manual can opener to push in four tabs around the top rim of the can. Push the tabs gently inside to form a support for the bottom to sit upon. The puncture holes will also allow smoke to escape when the hobo stove is in use.
Hobo Stove Use Instructions
- Fill the bottom fourth of the can with small twigs, dried leaves – or any type of other kindling that is available to start a fire.
- Once the flame has become present, a pot can be placed upon the top of the hobo stove for cooking or boiling water. Typically, it takes about five to seven minutes to bring water to a boil on a coffee can size hobo stove.
- Add more twigs to keep the fire going as needed throughout the cooking process.
This Hobo Stove Instructional Video Shows Just how Simple The Survival Cookers are to Make and Use!
Day-3 Challenge: Homemade Oil Lamps
Let there be light! Whether you are prepping for a power grid failure, or simply understand the power will go out during a long-term disaster, having copious amounts of alternative light sources on hand, should be an essential part of your overall preparedness plan!
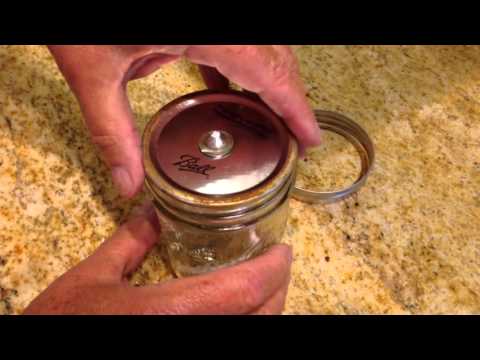
Homemade Oil Lamp
Materials
- Mason jars, lids, and rings
- Olive oil, cooking oil, Crisco, or coconut oil
- Commercially manufactured wicks or natural fiber to turn into a wick.
- Heavy button, scraps of metal, or similar material which will serve as a weight to hold the wick at the bottom of the jar.
- E600 glue – or similar “holds anything” type of glue – E600 is just my personal favorite because it works so darn well and is really cheap!
- Drill with ¼ drill bit, hammer and roofing nail, or hole punch
Directions
- Tie or otherwise secure, the wick onto the button, metal, or chosen wick weight.
- Cut the wick so it is long enough to stand two inches above the top of the Mason jar.
- Place glue on the underside of the weight AND on the spot on the bottom of the Mason jar where the weight will be placed.
- Glue the weight with the attached wick onto the chosen spot.
- Punch, drill, or hammer a hole into the center of the canning lid large enough for the wick to slide through.
- Feed the wick carefully through the hole after allowing the glue holding the weight to dry for at least two hours.
- Holding the lid containing the wick just slightly away from the top of the jar, carefully pour the chosen fuel oil into the Mason Jar.
- Press the lid with the wick firmly onto the jar and screw the canning ring around the lid to hold it in place.
- The homemade oil lamps can be stored without the fuel losing their potency for at least several years. Store in a cool dry place until the emergency lanterns are needed for use.
- You can put dried flowers, herbs, or pine cones, etc. inside the Mason jar oil lamps to give them a decorative flare so they can be stored in plain view around the home, making them even more handy when disaster strikes!
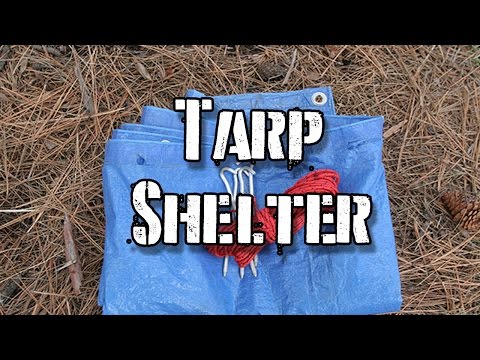
Day-4 Challenge: Emergency Shelter
Knowing how to make a survival shelter out of a tarp or from found items in the wilderness could one day save your life – but only if you have the “know how” and carry the supplies necessary with you to get the job done before nightfall!
Survival Sleeping Bag – If time, supplies, and energy are limited, you can make a “sleeping bag” out of leaves to stave off hypothermia and frostbite for the night.
Simply gather/scoop up all the dry leaves, bark, twigs, pine needs, etc. you can find on the ground and pile the mass about three feet tall and to at least match the length of your body. Carefully burrow inside and repack any disturbed matter around your body as tightly as you can to remain warm and hidden until dawn.
Emergency Lean-To – Find a rock about three feet tall or a fallen tree to turn into a forest tent for a night. Place all of the branches light enough for you to pack and lean them against the rock or fallen tree.
Once again, pack forest matter as high as you can on both the inside and the outside of the lean-to so your body is further protected from the elements.
Branch Tent – Craft a single-person tent out of branches by using paracord from your bugout bag to tie them together in a traditional triangular-top tent shape.
To make the tent sturdier, place it next to a rock, fallen tree, or hilly space in the woods – this will further protect you from wind while you sleep. You will need one branch about 10 feet long and four branches about five feet, and two branches about two feet long to construct the branch tent.
Using two of the short branches, prop them up together in a letter “A” shape against the long branch at the top. Repeat this step on the other side of the long branch.
Tie the smallest branches to the middle of the widest part of the short branches, completing the letter “A” shape on each side support branch frame. The end result should resemble a swing set frame. Pile rocks against the bottom of each of the support frame legs to add to the sturdiness of the tent.
Tarp Survival Tent – Find two trees spaces about six to 10 feet apart. Tied the cord around each tree about three to five feet off the ground. Lay the tarp over the paracord so it resembles a blanket tossed over a clothesline.
Place branches and rocks on top of the bottom of the tarp survival tent sides to help hold it to the ground. Piling leaves and other found matter not only around yourself but on the outer bottom flap being held down by the rocks and branches will help keep cold air at bay.
Day-5 Challenge: Foraging
Wild edibles exist everywhere, even during winter months – even if you live, or find yourself in a city, when the SHTF. Being able to identify “weeds” and other naturally growing plants, nuts, and berries so you can safely forage for food after a disaster just might save your life!
Foraging in a city or the suburbs will increase the chances the weeds and other natural bounty you find may have been treated with chemical pesticides that could harm or kill humans when ingested. To reduce the possibility of poisoning, always try to forage your meals away from commercial properties and parks.
Many wild edibles also boast medicinal properties. Make a journal with identification tips, recipes, and photos of all the wild edibles in your region, study it, then go on a hike to start learning how to forage for a free meal and prepare your bounty!
- Amaranth is a weed that grows almost all across the county. All parts of the plant are edible but the leaves contain spiny matter and should be boiled before eating.
- The stems and roots of Burdock can be eaten after they are boiled as well. They plant material should be boiled or approximately 20 minutes. Peel the roots and stems and wash if possible before boiling to prevent a bitter taste.
- Cattail roots can also be boiled and eaten like potatoes. The flowers of the plant are edible as well. When roasting the cattail plants, it will have a “spongy” texture and be black in color. Do not ingest too much of the fiber strands off the plant, peel them away if possible, or risk getting a belly ache. On a short, or “young” cattail plant, the lower stem and leaves are especially tender and can be eaten raw.
- Clover can be eaten raw just like lettuce.
- Plantain, a very common weed often found growing in the cracks of sidewalks, can be eaten raw or steamed for an even better taste.
- Dandelion leaves can be eaten raw. The heads of the dandelions can be used to make either a cold or hot tea.
- Acorns nuts must be soaked in warm to hot water to get rid of the tannic acid on their outer shell coating – it has a substantially bitter taste. Acorns can be ground into a powder and used as a substitute for flour in recipes.
- Purslane has crisp and moist leaves with leave a lemon with a bit of pepper taste in the mouth. The weed can be eaten raw and is a delicious addition to a wild edibles salad!
- Rose Hips are full of nutrients and even contain more vitamin C than oranges! They can be eaten raw, tossed in a foraged salad, or used to make tea and jam.
- Chickweed, an herb, can be cooked and eaten like cabbage or eaten raw. It boasts a plethora of vitamins and minerals to help fuel the body and keep it healthy.

Always avoid consuming these types of weeds:
- “Leaves of three, let it be” – as the old scouting saying indicates, weeds with leaves of three are probably poison ivy.
- Any plant with a milky substance inside or discolored sap.
- Any weed or plant boasting black, pink or purple spurs on its grain head.
- Plants with thorns on the stems.
- Any weed, plant, or berry which has a bitter or soapy taste – it is likely poisonous or may have been sprayed with chemical herbicide.
- Weeds with shiny leaves
- Berries that are white, yellow, or red in color – unless they are raspberries. Blackberries and black raspberries are both red until they ripen and turn black.
- Stay completely away from mushrooms unless you spend an extensive amount of time learning what ones growing wild in your area a safe to eat – many mushrooms look extremely similar. Eating the wrong mushroom can make your very sick or kill you.
- Weeds which contain seeds, bulbs, or beans on the inside.
- Any plant or weed that smells like almonds.
- Umbrella-shaped leaves on plants typically mean they are toxic if consumed.
The 5-day challenge was not designed to be a prepping one-off. It will take doing these projects more than once to truly grasp and then ultimately master, the survival skills.
Once you have successfully completed the prepping challenge activities, begin cross-training your loved ones or members of your mutual assistance group.
As the prepping saying goes, “Two is one and one is none.” You never want to be the only person with essential skills during a SHTF disaster – if you die, your knowledge goes with you, leaving your loved ones less prepared and protected.

Tara Dodrill is a homesteading and survival journalist and author. She lives on a small ranch with her family in Appalachia. She has been both a host and frequent guest on preparedness radio shows. In addition to the publication of her first book, ‘Power Grid Down: How to Prepare, Survive, and Thrive after the Lights go Out’, Dodrill also travels to offer prepping tips and hands-on training and survival camps and expos.