If there is something better than meat and fire, it’s meat and time. Ever since man moved from place to place, he desired the ability to transport food as needed. With this, meat required a level of permanence not found in other raw foods.
Out spoiling and a desire for portability came processing. Over time, it was discovered that heat, smoke, and salt all extended the shelf life of these valuable proteins.
Smoking and salting can preserve food for months or years depending on how much of each you use. However, with the extremes comes a certain inedibility. You can’t take heavily salted meat and eat it. To achieve this takes a subtle approach.
One such preservation method is biltong. Biltong is often called South African Jerky. Biltong uses a recipe that makes red meat an on-the-go food that packs in the calories and nutrients not found in foraged plants.
The recipe and process are both simple and applicable to a survival situation. Perfecting a recipe takes a few common spices, a little experimentation, and a little time. The effort is well worth the try. Be careful, it may turn from a hobby to an obsession.
Biltong Defined
Traditionally, jerky is meat that is spiced and dried in the sun or high heat. Biltong is also spiced, however, it is finished in the cool of the shade. More akin to prosciutto, Biltong is the result of a curing process rather than a drying process.
Born out of the colonization of South Africa. Biltong allowed settlers to travel with meat in their provisions. They carried it from the populated coast to the interior.
The process is a mix of meat drying traditions. Spicing and drying came from the indigenous people. While the use of vinegar and salt came from the ocean-going traders coming from Europe.
The addition of spices popular in Europe completed the synergy. Black pepper and coriander improved the flavor as well as longevity.
Black pepper aided in keeping away the insects during the drying process. Coriander was traditionally roasted and coarsely ground before adding. As with any spice, the fresher the better!
Biltong is a product of the cool and dry winters of South Africa. Produced in quantity in the winter, it is hung in the cool dry air for two weeks. Once fully cured it’s packed away in breathable cloth bags for use in the later months.
The synergy of preparation, spice, environment, and time all lead to the popularization of Biltong. First in South Africa, and now to the world.
Key Ingredients
Biltong starts simple and grows with your tastes. The basic ingredients are vinegar, salt, pepper, and coriander. The vinegar coats the exterior and helps the other spices stick. Salt is the universal preservative. Pepper and coriander provide flavor.
As you start, experiment, then master your recipe, I’m sure your final recipe will be as unique as you. I recommend that you begin with the basics to gain confidence.
Once you have a few batches under your belt you will quickly master the process. Now, add new flavors to match your tastes. The fun with any recipe of this type is making it your own!
You’ll see my favorite additions in the recipe section.
Food Safety
All food preservation methods have one goal – increase shelf-life. They do this by denying spoiling organisms an environment that allows them to thrive. Many preservation techniques remove oxygen, remove water, increase salinity, or increase acidity.
Biltong hits on three out of four. The salt and vinegar increase salinity and acidity. The time left hanging draws out the moisture. This combination shifts red meat to a stable state.
As a bonus, the key spice, coriander was recently found to have antibiotic properties. Therefore, the spices further aid in pushing the stability envelope into the prepper’s favor.
The one condition hedging your safety is the environment. Biltong must be dried in a low-humidity environment. Moisture will slow the curing process and enable mold growth.
Either choose your season (the dry of winter) or dehumidify via low heat (a lightbulb in the drying box).
Avoid too much heat. Too hot and you are drying or worse yet cooking your Biltong. You want cool and dry to encourage the curing process.
One other thing to look out for is “case hardening.” Case hardening occurs when the outside dries too quickly and the meat seals up. This prevents any moisture from the inside of the meat from escaping.
If this happens, turn off your fan for a day to let the moisture equalize within the meat. Otherwise, you just need to wait it out. It’s best to start with thinner pieces at first so you get accustomed to the drying process.
If you do happen to find mold on a piece during your daily inspection, not all is lost. Cut the spot off, dress with a little vinegar, then spice and return it to the curing rack.
Meat Selection and Preparation
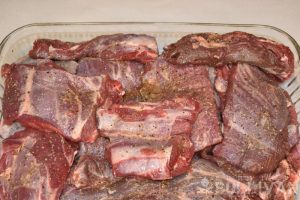
Meat is the first place I recommend experimenting. If you prefer a milder treat then start with store-bought beef. No need to get top cuts. Stick with cheaper roasts.
If you are blessed to have wild game then you are in for a treat. I love venison and this is 90% of what I make. Elk, caribou, red deer, and bison, are all great selections.
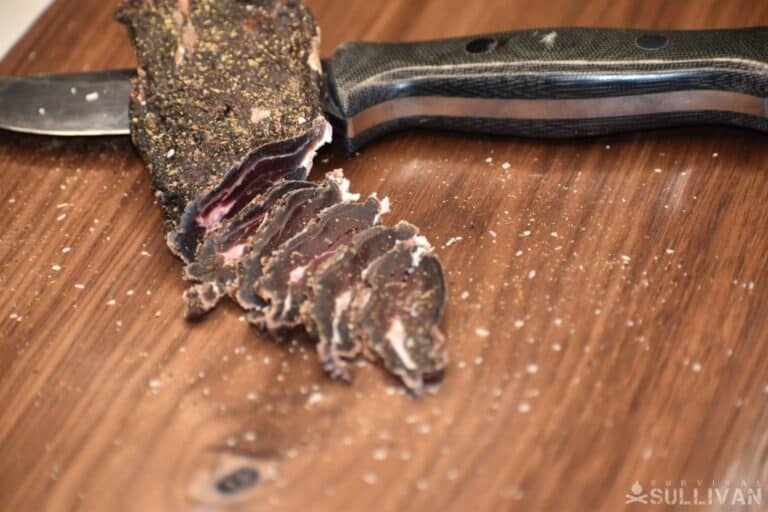
Choose one of the ‘lesser cuts’ like rump roast, top round, or bottom round. Save the tenderloin for the grill. When slicing, cut with the grain. You want long muscle fibers in the strip. This makes the final cut (once cured and dried) across the grain. This makes each bite a little less chewy and more forgiving.
Finally, you want to avoid well-marbled meat. Intra-muscular fat is hard to trim out and can go rancid over time. If you have surface fat trim it off as well. One option, if you like a little fat in your Biltong, is to eat those pieces first. You can also immediately vacuum pack and rotate them out first.
Once you have selected your roast, it’s time to prep and slice. Aside from trimming out the fat, it is best to trim off the silver skin or fascia. This is the membrane of connective tissue that covers the major muscles.
It separates muscles as well as connects them to other muscle groups or bones. Once dried the silver skin becomes inedibly tough. With it on, you won’t be able to bite off a mouthful like jerky.
I’m fine with the fascia as I cut my biltong thinly, and use it as a snack. I cut it thin enough to negate any chewiness.
During the curing process, your meat will lose 40% to 60% of its weight in water. Purchase and plan accordingly.
Equipment
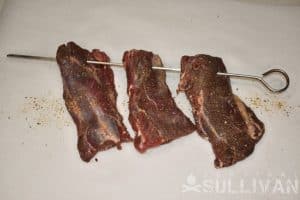
The equipment required for Biltong is as simple as are the ingredients. You need a method to hang or lay the strips of meat such that they don’t touch each other. This allows for sufficient air circulation and promotes slow curing.
Secondly, you need to provide the proper environment. I prefer to hang my biltong as I have never liked the ridges you get from laying biltong or jerky on a rack. I use a set of metal skewers to hang the strips. Others used hooks or bent paperclips that hook onto wooden dowels.
If you prefer to use a rack, stainless steel is best. Cheaper coated racks may rust by the time the biltong is dry.
To create the proper environment, you have two choices. Make biltong when it is cool and dry, or use an oven / biltong box. I have constructed a very fancy box out of a shipping box, and a computer fan. It’s cheap, easy, and gives the Mrs. something to complain about.
You can also add a heat source to keep moisture at bay. Just remember to use the lowest wattage possible as you don’t want to cook your meat.
As with any DIY project feel free to knock yourself out with upgrades

Biltong Uses
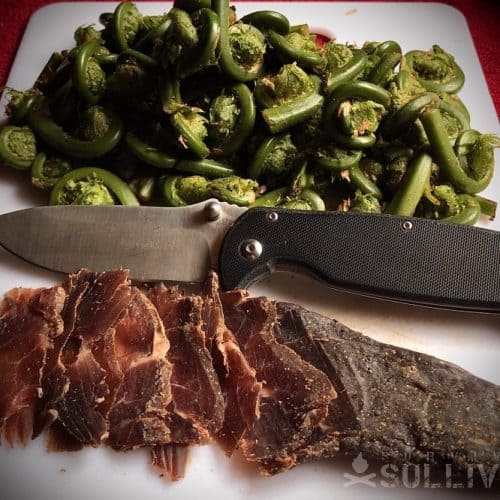
While often treated as such, Biltong is no one-trick pony. I argue that it is best when sliced paper-thin and eaten on the trail, by the fire, or with fresh bread, and good friends. Served up this way it melts in your mouth and hits you with an unsurpassed spicy meaty flavor.
I enjoy taking it camping or hunting. It’s not as smokey as jerky, and gives off less scent. The final dried product can be tough, and should be cut before you leave the house. It’s not something you just take a bite of.
Biltong is best as an accompaniment to another otherwise bland dish. Add to rice, noodles, or even vegetables when cut thick. Feel free experiment adding it during the cooking process to soften and flavor the entire dish.
Likewise, you can add it at the end as a little hit of savor. If you go this route keep the pieces small as it is tough to chew.
You can even grind your Biltong into a powder. This is easier if you dry it more thoroughly, and have a rasp, beefy grinder, or blender. Mix the powder into rice or casseroles. You can even add a binder, and make a spread.
Ok, enough about history, food chemistry, and cooking school. Let’s get to the good stuff. This is the recipe that I started with, and have since updated. I’ll add those modifications at the end.
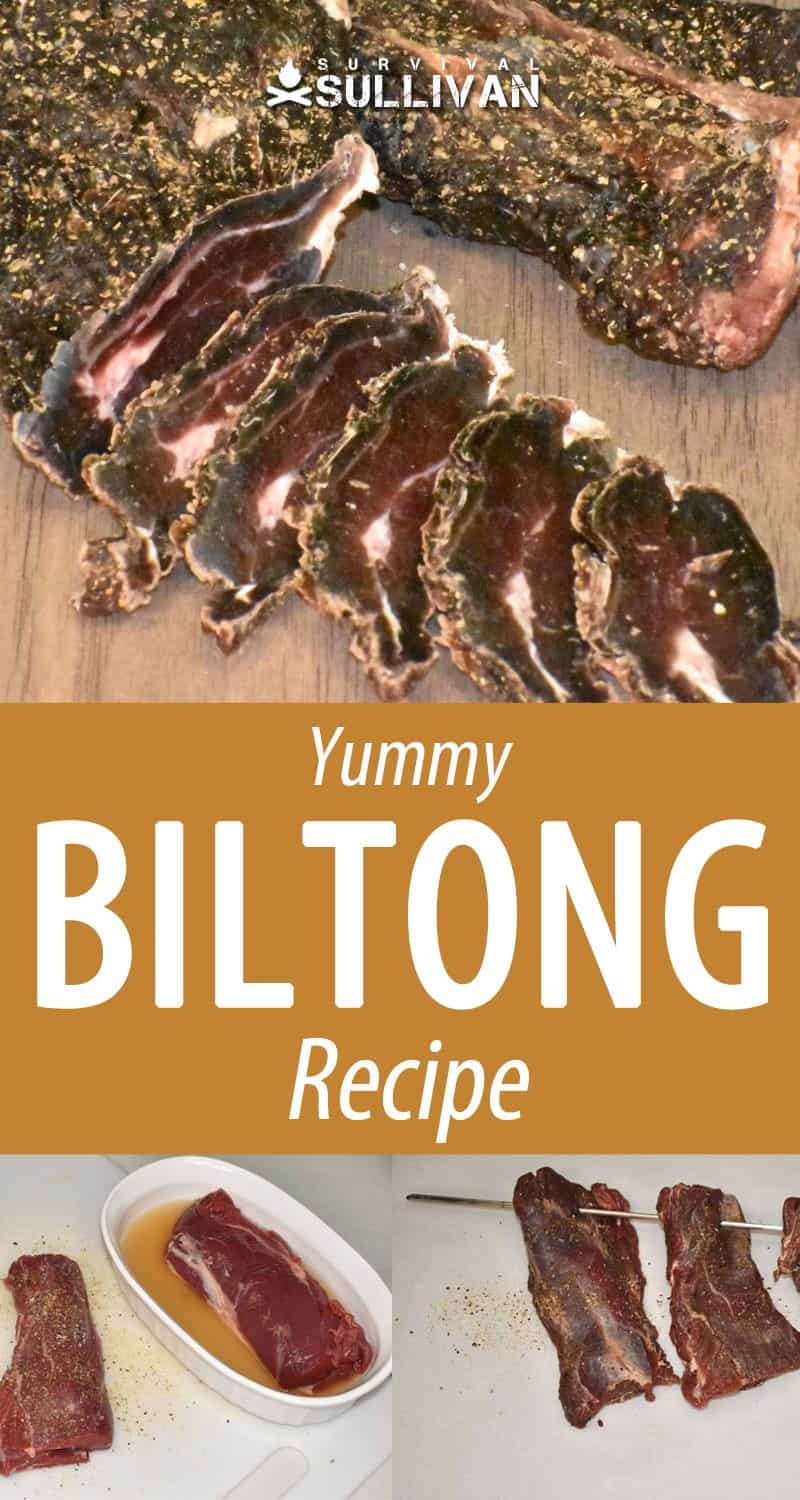
Biltong Recipe
Ingredients
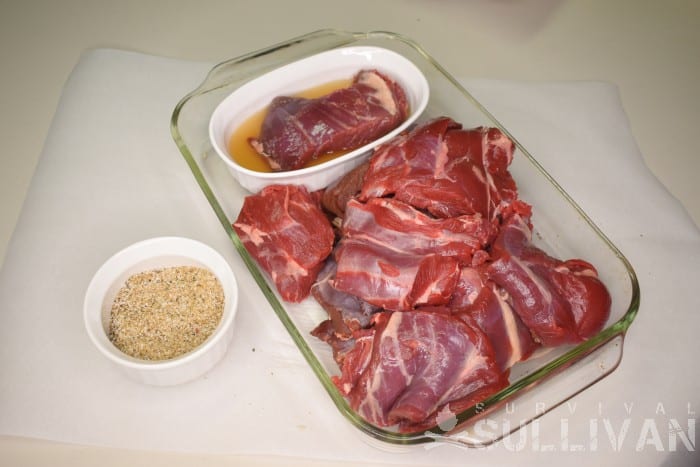
- 5 lbs lean red meat
- ¼ – ½ cup cider or malt vinegar
- 2 ½ tablespoons kosher salt
- 2 tablespoons ground coriander
- 2 teaspoons fresh ground black pepper
Instructions
- If you have whole coriander seed, toast lightly in a pan (till slightly browned and aromatic) then crush into power.
- Mix the dry ingredients (salt, pepper, coriander).
- Pour the vinegar into a shallow pan or plate.
- Slice your meat along the grain (you can slide up to 1” thick and I recommend no thinner than ½”).
- Set the slice in the vinegar, coating all sides.
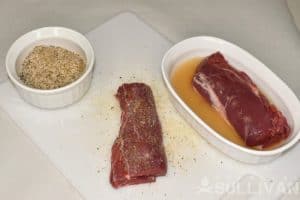
- Dust the slice with spice mixture and place in a cake pan or Ziplock bag.
- Repeat steps 4-6 until all meat has been sliced, coated and dusted.
- Refrigerate the prepared meat 4 hours or up to 24 hours. The longer it sits, the more intense the spice flavors will be.
- Remove each piece from the bag and skewer, hang, or place on a grate. If you want an extra kick, dust each slice again with more spice mixture.
- Put the meat into your biltong box, allowing it to cure and dry.
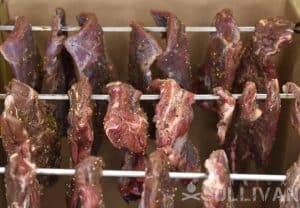
- Test the biltong ever day to make sure it is continuing to dry.
- Thin pieces are ready in as little as 3 days with thicker pieces taking up to 2 weeks. Sample a few pieces throughout the process; this will help you learn what you like and avoid letting it over dry.
- Package up the final product for short term (paper bag) or long term (vacuum seal and refrigerator).
Variations
This is where the fun starts! Play with the spices. My favorites include dried granulated garlic and smoked chipotle powder. Other recipes found on the internet include sugar in the rub.
I’m personally not a fan of sweets and meats, but to each their own. Some recipes include Worchester sauce to the mix as well. Hit the internet, pop in a few search terms, and experiment. Most of all have fun with it!
Storage
Protein is a fickle storage food. Few types of meat can store beyond one or two years. The salt content is not high enough for it to be shelf-stable. To preserve Biltong, you must keep it cool and dry.
When I make a batch, it gets divided into two groups. The first gets eaten over a week, the second gets vacuum sealed.
Keeping biltong for the short term requires, yet again, a dry environment. I use a paper bag. Store it in the bag in the fridge or somewhere cool dry.
Don’t use plastic, as it collects moisture, and promotes spoiling. Biltong in a paper bag is good for a week, longer if you live in an arid environment.
I consider biltong a precious resource and treat it as such. My larger pile gets vacuum sealed and stored in the refrigerator. I portion it into one-week servings per bag.
I have yet to do a controlled experiment where I compare frozen, refrigerated, and shelf-stored Biltong. I end up eating it too quickly. But, from everything I’ve read, in the refrigerator it should last a minimum of a year.
Frequently Asked Questions
Biltong vs Jerky
I would be neglecting my authoring duties if I didn’t address the comparison of Biltong and jerky. While they are both tasty, addictive, and dried that is where the comparison ends.
First and foremost, done properly, biltong is a cured meat. This is the product of the slow drying process. It’s closer to Prosciutto than jerky. Jerky is dried. As the water is removed the overall salt concentration increases prohibiting spoiling.
Because of the curing process, biltong can be made from thicker cuts of meat. I like my slices thick to give me a meatier final product. You can cut biltong strips up to 1”. Jerky must be thin as it needs to dry swiftly before spoiling.
To prevent initial spoiling, biltong uses vinegar to protect the meat. Jerky uses smoke. Biltong is never smoked. That being said it hasn’t stopped me from adding smoked spices to my spice mix.
Should You Use and Air Conditioner (AC) To Help the Process?
One reader asked about the use of an air conditioner for the generation of a cool environment for the curing of Biltong. In short yes, this is a great idea. I would like to add one caveat. I would not recommend allowing the AC unit to blow directly on the meat.
Biltong should be allowed to cure and not dry like jerky. Having the air pass rapidly across the meat may cause the exterior to “seal up” and case-harden.
Ultimately, this will slow the overall process. So, use your AC, but just having it in the room is sufficient. No need to speed up the process.
Should You Make Biltong in a Dehydrator?
If the environment is not agreeable, feel free to use your oven or a dehydrator set on the lowest temperature possible (for eg, 95 F / 35 C). Just be aware that the results won’t be quite as good.
This is the preferred method by a South African colleague of mine. There are two schools of thought here. The first is to dry the Biltong at a temperature of 140 degrees Fahrenheit / 60 Celsius.
This will produce a batch in as little as 12 hours. My only critique is that this results in a Biltong that isn’t quite as tasty and complex as the natural method.
For a more traditional product, I recommend setting your dehydrator lower. For example, 95 degrees Fahrenheit.
At this lower temperature, the Biltong will naturally cure rather than simply dry. The process may take several days however. This natural curing process builds flavor and texture in the final product. Remember, good things come to those who wait.
If you have a dehydrator, by all means, use it. In the damp months, it will keep you in this tasty treat!
Wrap-Up
I don’t know if it’s my hunting background, my love of the wilderness, or a strong sense of independence, but there is something about hitting the trail with no agenda and meat in your pocket.
There are about 300 calories for every six ounces of venison. This is a piece of Biltong about the size of a deck of cards.
Not enough to last you a day but enough flavor and protein to increase your energy and mood for a few hours.
As a survival food, I rate it near the top of the list for the treat category. It’s prepared at home with few ingredients and even fewer tools. It has a variety of uses and lasts a long time.
Drying and curing meat at home doesn’t need to be cloaked in mystery or food chemistry. Follow a few rules, use the correct components, and facilitate the proper environment. Now you have the makings of another step towards food independence.
Give biltong a try the next time you see a sale at the sore for one of the “lesser cuts” of meat. Even better whip up a batch the next time you are lucky enough to hunt and harvest your own meat!

My passion is empowering people with the knowledge to prepare for personal, local, and regional emergencies. I went to school for engineering and computer science and spend my days in the security industry.
Aloha this is One if the most succulent savory recipes we’ve read !! Trying Bilton out today ?
We Think your Column is resourceful and a big necessity in these uncertain times !
Bless you and your Family
Dina Lovely & Family
Hi,, i wonder if a small AC unit pushing dry, cool air threw a box with the biltong hanging would work in the warmer months,,deer season starts in late September here
If using oven & dehydrator what are Temps & times please. Whioe cooking do you turn meat?? If dehydrator do you need to turn meat or shift trays?