If you plan on bugging out to the wilderness, one of the most important skills you could have is learning how to identify edible wild plants.
But this is hardly easy, and regional variations along with dangerous look-alikes could spell disaster if you choose poorly.
One way to mitigate this risk is to employ the universal edibility test. What is the universal edibility test?
The universal edibility test is a method developed by the United States Army for determining whether or not unknown plants are safe to eat. By slowly and methodically testing each component of a plant for toxicity, it is possible to avoid poisoning when the positive identification is uncertain or impossible.
The universal edibility test is a simple, easy to implement, and generally effective method for determining the safety of wild plants when trying to supplement your food supply in the wilderness.
However, there are some significant shortcomings with the test that you should be aware of before using it.
In this article, we will cover the steps of the universal edibility test, why you should never use it on mushrooms, and the importance of positively identifying wild plants before eating them.

Table of Contents
How Does the Universal Edibility Test Work?
The universal edibility test is a great way to assess whether a plant is safe to eat or not in a reasonable amount of time.
The basic principle is simple: if a small exposure to any part of a plant produces a bad reaction on your skin, lips or mouth, you definitely don’t want to eat it!
It is far better to deal with some minor irritation to the skin or numbness of the mouth than crippling stomach pain, hallucination or death.
Any toxins that might be present in any part of a plant are likely to produce a noticeable sensation or reaction on your lips, gums, tongue or skin if they are sufficiently concentrated.
By systematically and slowly testing each part of the plant in question, you can be reasonably certain that it is safe to eat without having to worry about ingesting a dangerous amount of toxins.
The best part of the test is that it is simple to remember, easy to implement, and can be performed anywhere. This makes it an invaluable addition to your survival skills repertoire.
What are the Steps of the Universal Edibility Test?
To work, the UET must be done methodically and that means you’ll need to follow the steps involved in a precise order.
- Separate parts
- Sniff
- Rub on wrist/elbow, wait
- Rub on lips, wait
- Nibble, wait
- Swallow a small bite
We’ll break down every step in detail below.
1. Separate Parts
To begin, you’ll first harvest the plant in question and then separate it into its component parts, i.e., roots, bulb, stems, leaves, flowers, seeds, etc.
Remember that some parts of a plant might be entirely edible and nutritious while others could be highly toxic. This includes several common varieties of edible fruits, berries, and other plants.
Tomato species, for instance, are edible and safe to eat when ripe but the vines, leaves, and roots are all toxic.
Tomato plants are actually members of the nightshade family, and toxic nightshade plants contain solanine, a potentially crippling poison. The same applies to various berry bushes, wild onions, and more.
Because of this troubling fact, you must never take for granted that just because you perform a safety check on one part of a plant with no ill effects that the other parts are safe to eat.
Jumping the gun in this way could leave you half-crippled out in the wilderness or even kill you.
Take your time, do it right and potentially save your life. Once you have all the parts of the plant separated, it’s time to begin testing.
2. Sniff
After this is done, make it a point to smell each part of the plant. You are looking for sour, musty, offensive, and even some pleasant odors.
Any musty or rotten odor is an immediate disqualifier, as is a strong smell of almonds- that usually means cyanide or one of its derivatives!
Think it through: Pretty much every fruit, vegetable, and other plant matter that we eat has a reasonably pleasant smell or at least does not smell outright bad.
This is not to say that deadly plants will always smell bad, but it is easy to eliminate things you shouldn’t eat based on their odor alone.
Bad smells are bad news when it comes to assessing edible plants unless you know definitively otherwise. Assuming that the part of the plant you are investigating doesn’t make your nose crinkle, move on to the next step.
3. Rub on Wrist/Elbow
Then take whichever part is most likely to be eaten. Crush or score the part of the plant to get its juices flowing then rub it on the exposed skin of your inner arm, either at the wrist or elbow.
Now we wait: If there is no reaction after 8 hours, move on to the next step. Most compounds that are toxic will only do major damage to you if they are ingested, but this does not mean they cannot harm or irritate your skin.
That being said, things that could kill you or make you gravely sick when swallowed might only cause topical discomfort externally.
We can rely on this principle to help us further detect whether or not a given plant contains anything harmful.
The reason you want to rub the plant on the inside of your wrist or the inside of your elbow is that the skin in these locations is both thin and delicate, meaning it is prone to irritation, and also because these locations are highly vascular with many small blood vessels close to the surface.
Together, these areas can become irritated even from trace amounts of toxin, allowing us to positively determine if the plant is harmful before it ever gets close to our mouth.
Also, you only want to make small circles, about the size of a quarter, when performing this test.
There is no need to rub it all over your body, and you’ll want to leave room in other areas for testing other parts of the plant or other plants entirely.
Any rash, blistering, numbness, or tingling is a hard disqualifier: if it will hurt your skin it will hurt your guts!
4. Rub on Lips
Now it’s time for the lip test. Take the plant part in question and rub it on your lips. Then wait. Ideally, you can wait for 8 hours once again.
Note that you should not make the mistake of performing the lip test after you get a positive result from the previous step with the notion that your skin could somehow be having an adverse reaction while the plant itself is somehow safe.
Believe me, if any compound present in a plant is capable of irritating your skin it will irritate your lips far worse.
If there is no reaction after the allotted time, move on to the next step. Again, any burning, tingling, numbness, or irritation is a disqualifier.
5. Nibble
Now it’s time for the real test: Take the plant part in question and nibble on it for several minutes- taking care not to swallow! Once more, wait for at least eight hours.
The skin of your lips and the tissues of your mouth are far more sensitive to the presence of harmful compounds than the outer skin of your body.
In a way, they are the last line of inspection before swallowing something, and you’ll usually be able to tell very quickly if whatever you are sampling is it good to eat or not.
That being said, even trace amounts of toxin can be enough to cause serious harm internally, but might not be immediately detectable upon chewing any part of a plant.
For this reason, you want to take your time and pay close attention when performing this step. Getting ahead of yourself could have terrible consequences indeed.
If there is no reaction after that time, you can move on to swallowing a small bite. If there is a reaction, wash your mouth out thoroughly with fresh water!
6. Swallow
If you suffer no ill-effects after swallowing a bite (and waiting for a further 8 hours) that part of the plant is likely safe to eat. However, this may not always be the case. See the next section.
Shortcomings of the Test
The most obvious shortcoming of the test is that it is possible to get “false positives”. Some plants won’t particularly irritate the skin or mouth but might prove to have disastrous effects if ingested in quantity.
Additionally, the test takes a lot of time to perform properly and thoroughly. Testing each component of a suspect plant can take days, and that’s without taking into account the time needed for any reaction to manifest!
If you have multiple plants you are unsure about, you’ll need a block of several days or the better part of a week if you want to be sure.
The temptation will always be there to “give it 15 minutes” and move on to the next step… Maybe with severe consequences for your haste.
Warning: Don’t Use the Test on Mushrooms
Of particular note, you should never rely on the UET for wild mushrooms you are unsure about.
Many species of poisonous mushrooms cause no noticeable reaction on the skin or lips and won’t make your mouth water or tingle.
The only way to be sure about a mushroom is to have expert knowledge and positively identify it as safe.
Eating a poisonous mushroom that passes all the steps of the test might yet prove to be a fatal mistake or at the very least a grueling one.
Out of all the poisonous things growing in the wild, many species of mushroom are, ounce for ounce, among the most toxic. You cannot afford to get it wrong with fungi!
You Should Always Positively ID Wild Plants before Eating, if Possible
As reliable and adaptable as the UET is, it is no substitute for expertise and lived experience in identifying edible wild plants.
When in doubt, it is always best to seek out an expert opinion ahead of time or positive identification from a reliable reference source.
There are many great books, apps, and online resources available for plant identification, and there are often foraging groups or meetups in most areas where you can learn from those with more experience.
If you are serious about foraging, it is always worth the investment to build real skill and certainty.
Consider the UET a backup plan when you are unsure of two lookalikes or are dealing with a totally unknown plant and have no other choice.

Tom Marlowe practically grew up with a gun in his hand, and has held all kinds of jobs in the gun industry: range safety, sales, instruction and consulting, Tom has the experience to help civilian shooters figure out what will work best for them.
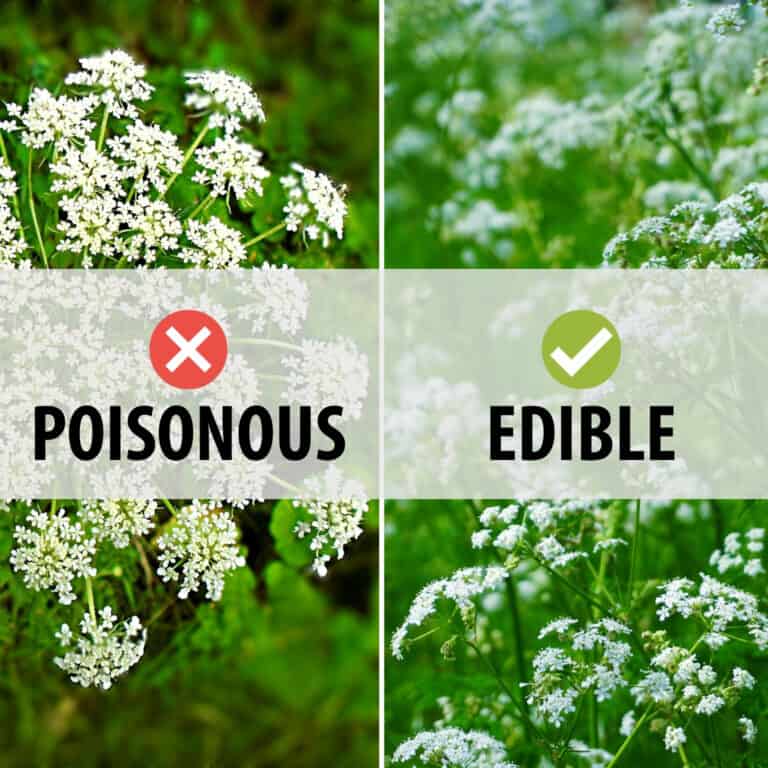
The picture of the edible vs non edible looks mixed up but it’s hard to tell with the words on it in the middle of the picture. If the left picture has a purple/red flower in the middle under the text it’s queen Ann’s lace (wild carrot flower). Not all lace has the spot but a lot of full grown flowers do it’s a tell tail sign.
There is not red flower in the picture on the left, just the red background from the X.