Swiss army knives are one of those tools that all preppers love, and one that many will choose to accompany them on their day-to-day travels or into the field.
Packing an assortment of blades, tools, and associated gadgetry the Swiss army knife was and remains one of the most versatile and elegant options among all the multitools on the market today.
However, the cramped quarters inside the frame of the knife and the intricate way these knives are assembled can make cleaning a bit of a pain.
Most long-time owners of these knives can regale listeners with more than a few ill-fated expeditions in tuning up and maintaining their prized SAK.
Unfortunately, getting them apart for maintenance is one thing but putting them back together again without any parts left over can prove another thing entirely, and maddeningly difficult.
What is a good prepper to do, then? Cursory cleanings during routine sharpening will only go so far.
Eventually, the accumulation of dirt lint, old lubricant, and other debris will turn into sludge capable of fouling and corroding any knife.
Not to worry, because we are bringing you an in-depth step-by-step guide on cleaning your Swiss army knife the foolproof and easy way.
No matter what vintage your trusty knife is you’ll be walking away with one that is shiny, new, and ready for another decade of service.
Table of Contents
Complexities of Cleaning the SAK
Compared to other folding pocket knives the Swiss army knife, for all of its elegance, can prove a proper pain in the ass to clean.
First, there is little room to spare within the frame, as they are packed with various blades and tools, and are fit together precisely leaving precious little room to maneuver for attacking deposits of dirt, grime, and rust.
Second, disassembly beyond the most rudimentary step of removing the scales is easy enough but reassembly can prove tricky.
I have seen more than a few owners of Swiss army knives fail to get their knives back together again properly, and even if they do, function is often mysteriously impeded with tension on various tools being either far too high or dangerously loose.
This potential outcome is usually enough to scare most owners off of the chore entirely.
Lastly, even those who think themselves clever and would opt simply to place every tool and every blade in the open position to allow better access to the interior will find this a dicey proposition.
Many tool tips become extremely difficult to manipulate once their neighbors are open, and this also makes controlling the knife safely a bit problematic.
All of these methods are viable, however, although I think they pale in comparison to the method I will guide you through below.
It is the same one I use for cleaning all of my knives, and so long as I am thorough I have experienced no problems over the years and my knives work noticeably better than ever before.
Variations
Before we get into the steps proper we should take a moment to discuss all the many variations of the Swiss army knife that are out there.
Most notably, what most people call ‘Swiss army’ knives are not true Swiss army knives (made by the Victorinox company, today).
But, just like every cola-flavored soft drink is a “coke”, every knife of similar form factor and function to the original is called by that moniker.
I’m not going to get into some hipster-ish debate over it, as the only thing we are concerned with for the purposes of this article is whether or not we can remove the scales of the knife.
Some knives, especially cheaper knockoffs of the genuine article, utilize a one-piece chassis or frame with the scales built in.
Others, like the majority of traditional Swiss army knives, have removable plastic or wooden scales.
If your knife has non-removable scales that are riveted on, or a one-piece frame and handle you obviously will not have any scales to remove, and furthermore you’ll have to be extremely diligent about rinsing and drying your knife before you re-lubricate it.
So long as you keep that in mind, you will find the instructions below adaptable to any type of knife made by any manufacturer. Let’s get started.
The Best Way to Clean a Swiss Army Knife
**Caution: You’ll be handling your knife with blades and other tools exposed in slippery conditions, potentially in soapy water. Make sure you use cut-resistant gloves that will provide you some grip for safety, and always take care to keep your fingers out of the closure path of all tools, particularly blades.**
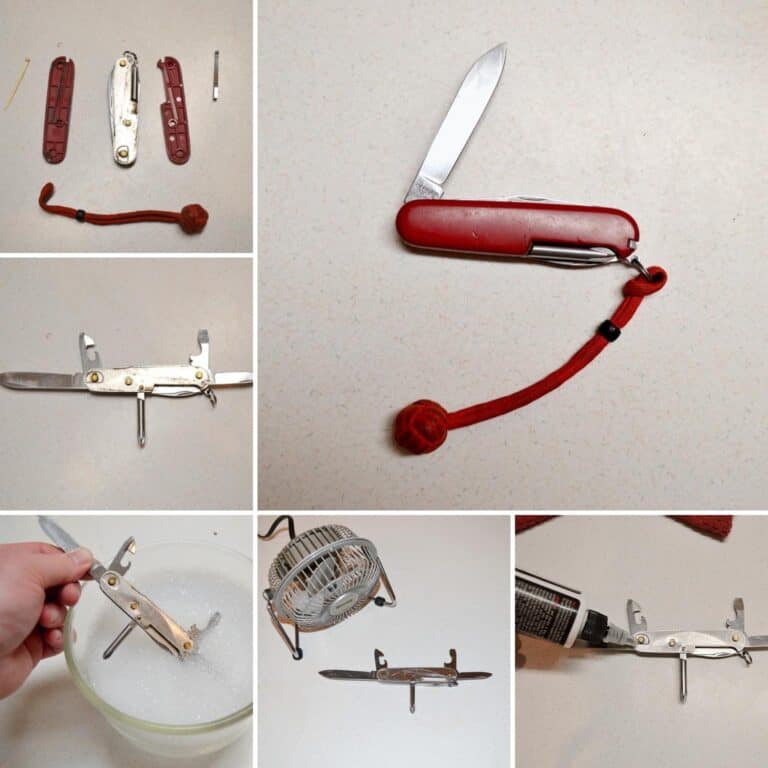
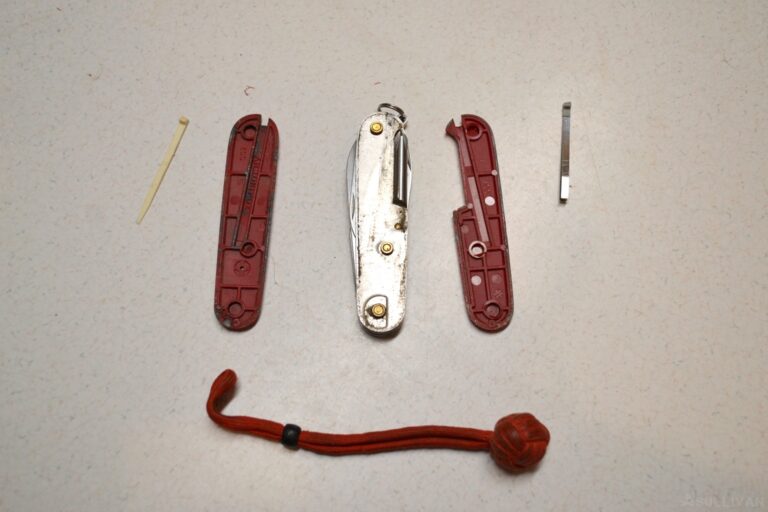
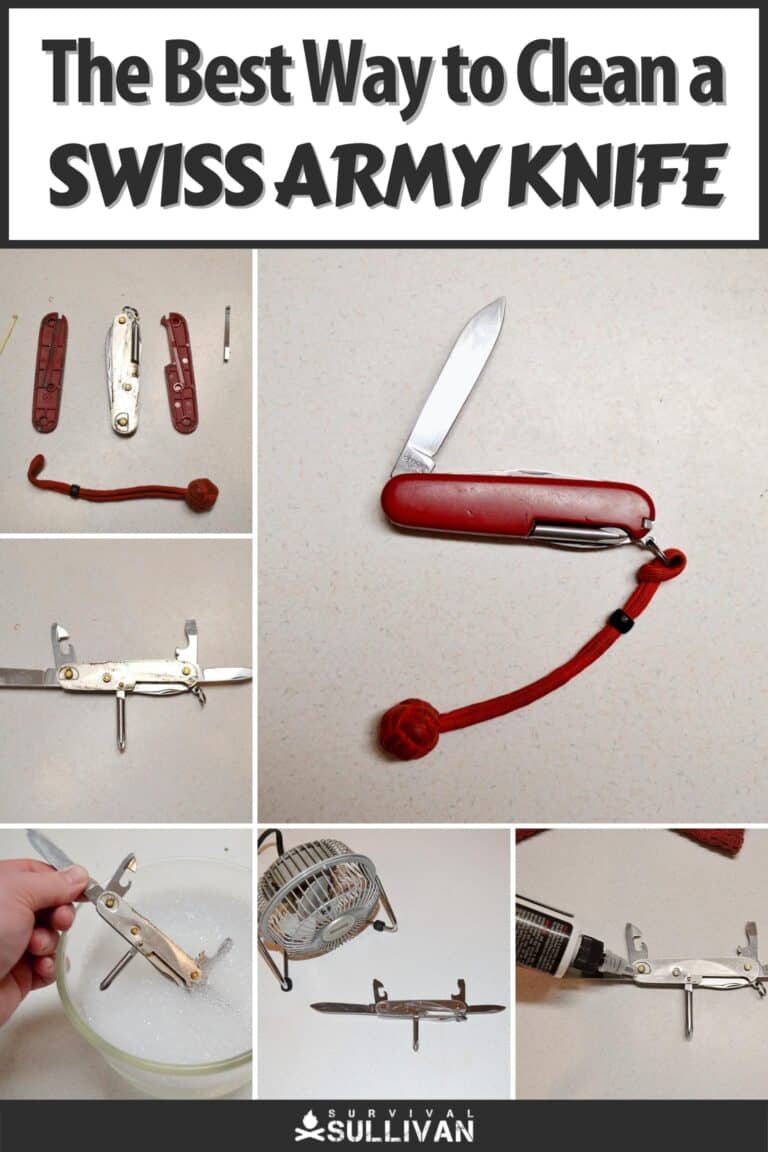
Step 1: Remove Scales
First things first. If your knife has removable scales, remove them. They might be held on with screws if they are an off-brand, but chances are they are merely press fit onto the frame, typically snapping over the rivets or escutcheons for the purpose.
If you have a classic Swiss army knife, you don’t need to fret with trying to slip a thin tool, razor blade, or anything else between the scales and the frame to get them off; that way lies injury and damage.
Instead, all you’ll need to do is remove your toothpick and tweezers (or pen or whatever other tiny tools your knife carries) and then slip a thin but sturdy probe into the space where they stow before gently and carefully prying the scales up and off the frame.
You can use a thin screwdriver of the kind typically encountered for working on electronics, a thin nail or something similar.
Step 2: Bubble Bath
Now all you’ll need to do to prepare a proper wash for your Swiss army knife is some warm water and any dish soap.
You can do this in the sink or in a large bowl, it makes no difference. Draw the water, add a few drops of soap, stir or agitate until you have plenty of suds and then you are ready to give your knife a thorough washing to remove the grit, grime and sludge from its internals.
Now, depending on your knife and your preferences there are a couple of ways to proceed.
Option 1: The first option is to immerse the knife in the soapy water before opening and closing each tool repeatedly until you notice an improvement in function. As always, use caution and protect your hands.
This method usually works best with knives that have generous nail nicks or other features to allow easy opening and closing.
Repeat the process with each tool until the function is noticeably improved, then give the knife a final, vigorous swish in the water.
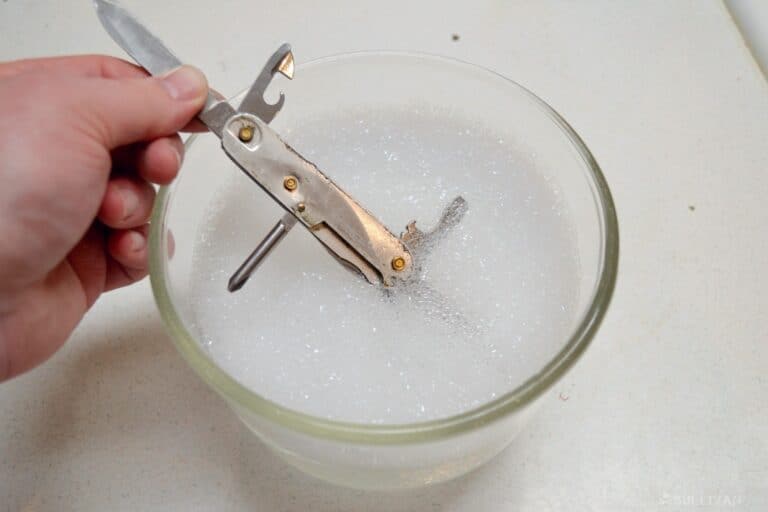
Option 2: If your knife has tools that are difficult to manipulate or open, you should open as many of them as possible before immersing the knife in the soapy water. If you can only get some of the tools open, you’ll need to do this in sets or relays.
With the tools open, immerse the knife in the soapy water you’ve prepared and then swish it around vigorously.
Take care that you do not slip and injure yourself or bang your tools into the sides of your container.
If you have never cleaned your SAK properly you should see a noticeable amount of crud coming out of the knife and the tools should be easier to open and close already.
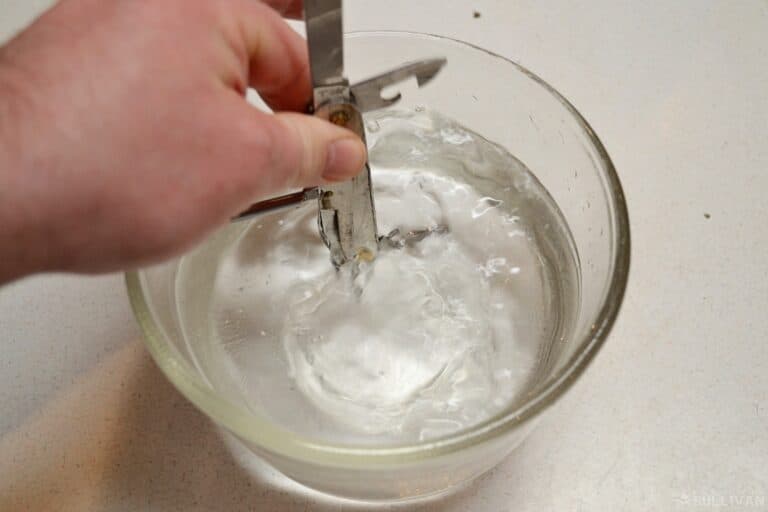
Step 3: Rinse
Once we have cleaned the knife with soapy water using either of the methods above it is time to rinse it.
Open as many tools on the knife that you can easily and then rinse out the knife using a separate bowl of hot water or the sprayer on your sink. This will remove any remaining residue and any traces of soap left within.
Also, be sure to use the hottest water that you can handle safely as this will promote evaporation and leave less lurking in the nooks and crannies of your knife, just waiting to cause rusting.

Step 4: Dry Thoroughly
Now is the time to dry the knife thoroughly and this can be tricky because the inside is so cramped. Stop at nothing to ensure you get all traces of water out of it.
Begin by shaking the knife vigorously to dislodge any droplets lurking within. If you have a workshop air compressor with the appropriate nozzle now is the time to use it.
In a pinch you can use canned air or keyboard duster to achieve the same effect. I have known a couple of guys (including your author, here!) that used a leaf blower when there were no other options to ensure all traces of the water were removed.
Especially if you are using a knife with carbon steel blades or any vintage Swiss army knife you can be assured that it will rust if there is any trace of moisture remaining.
There is no measure that is too fastidious for drying out your knife’s internals. Place it in front of a fan, use a hair dryer on low, whatever you have to do- until you are satisfied the knife is completely dry!
With that done, move on to the next step.

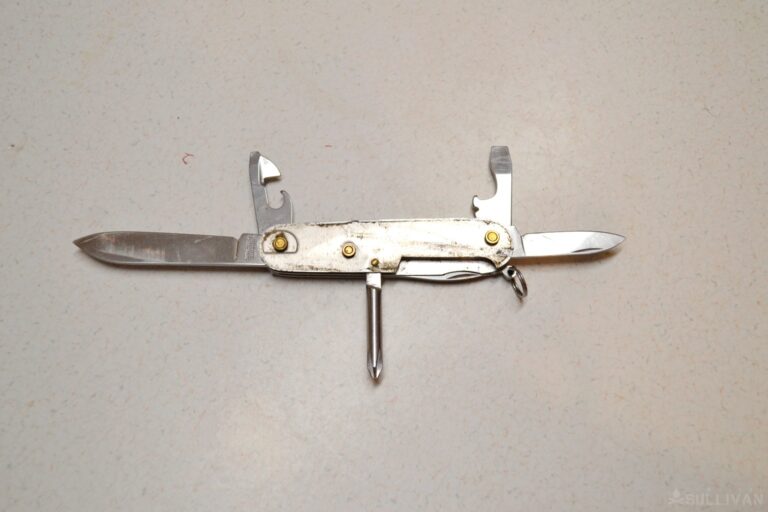
Step 5: Function Check
We are almost finished, but before we move on to the final step it is time to give the knife a final inspection.
Don’t put the scales back on just yet, if you remove them, and proceed to open and close each tool individually to ensure it still functions smoothly.
Because our previous steps likely removed any traces of lubrication on the knife you might find them slightly more difficult to actuate than normal, but you should not feel any grinding, hitching or other sensations that would indicate debris in the mechanism.
If you detect any serious hang-ups, rinse the knife out again, repeating steps three and four.
Step 6: Lubricate
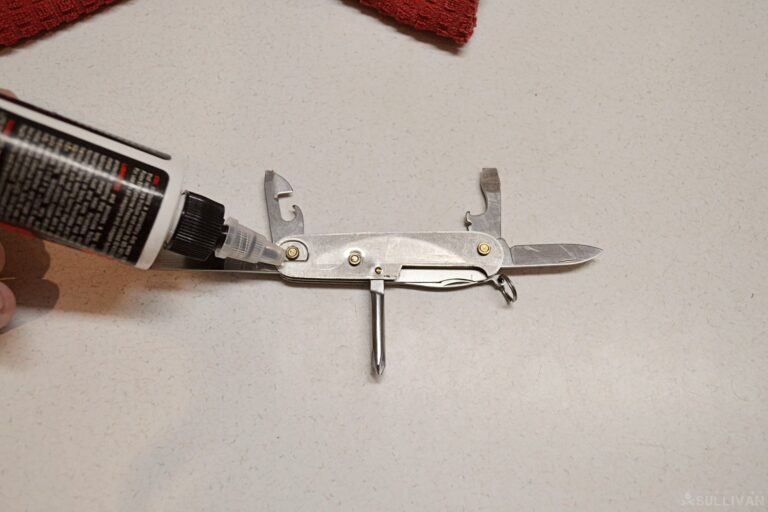
Assuming all of your tools function normally, all that is left to do is re-lubricate the knife.
Using the appropriate oil apply a drop to the base or pivot of each tool before opening and closing it a couple of times, then using your fingertip or a clean cloth apply a light sheen of oil across the entirety of each tool’s surface. As always, take care of that you do not spear or cut yourself.
Once that is finished you can reattach your scales, if removed, and then wipe the exterior off.
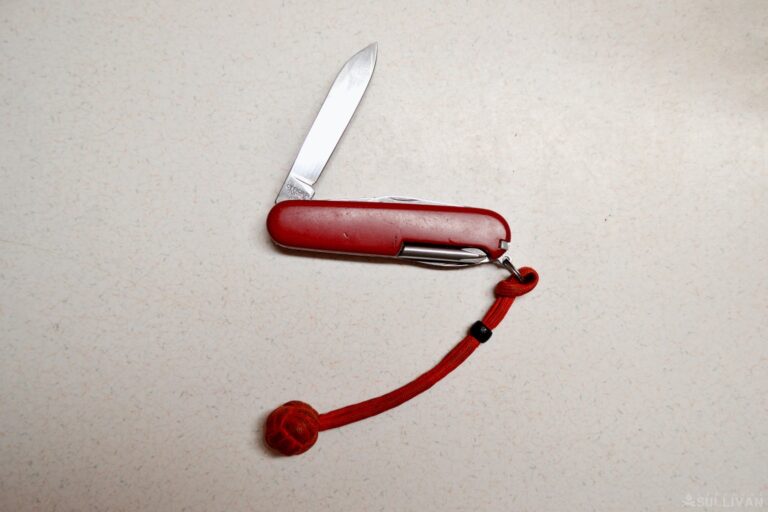
Done!
That’s it, you are all done! Your Swiss army knife should be shining and functioning like new. And to think, you did it all without disassembling it down to every tool, part, pin and spring.
Your knife should now be ready to provide you with another few years of service before you need to repeat this process again.
With that being said, there are a few more things to discuss concerning proper cleaning and care of your Swiss army knife, so let us keep going.
Removing Serious Rust
The method I laid out above is excellent for routine cleaning of a knife that is otherwise in good repair and in good shape.
However, it will not do much if anything to remove rust that has formed on the tools or frame of your knife.
If you have a knife that has been badly neglected or is showing signs of serious corrosion, you’ll need to take care of the rust before you can get back to regular cleaning.
There are various methods for doing so, but generally you can get the worst of the rust off in a hurry by using a genuine copper penny to scrape off serious deposits and then follow up with successively finer and finer grains of steel wool in conjunction with a little bit of machine oil.
As always, use caution and take care to avoid damaging the edge of your blades. If you need more guidance, we have an article on this website that can walk you through removing stubborn rust from your knife.
Methods to Avoid
Every Swiss army knife owner has their own preferred method for cleaning and their own opinion on what a proper cleaning is.
Some folks might balk at my method, but no matter who you are you should definitely avoid the following methods of cleaning.
They are all entirely lackluster for one reason or another, and the end result is that you’ll have a damaged knife or one that does not work properly for long.
Dishwasher
As unbelievable as it sounds, there are some people who propose cleaning a Swiss army knife in the dishwasher. It might not sound that crazy an idea, at first.
After all, it uses pressurized, soapy water and a high-temperature rinse just like I advocated above, right?
Right, but wrong: The inside of an operating dishwasher is an extremely hostile environment for any quality steel, and this is why any knife manufacturer worth its salt will always recommend you hand wash their knives and not subject them to the rigors of a dishwashing cycle.
The end result of sending your Swiss army knife through a dishwasher cycle will probably be accelerated wear, tear and corrosion. Don’t subject your Swiss army knife to that!
WD-40
WD-40 is a greatly beloved American icon that has a place in every workshop. Unfortunately, WD-40 is not a lubricant, or at least it is not a lubricant of any value.
WD-40 does drive out moisture and does so pretty well, and while it will serve as a short-term, low-temperature lubricant capable of stopping squeaks and getting rusty bolts unstuck it is a terrible lubricant for any moving parts or machinery.
It will quickly attract grit and detritus before drying into a gummy shellac which will further impede the proper function.
Proponents like the notion of using WD-40 and that thin applicator straw to blast out the internals of the knife, drive out moisture and lubricate it all in one shot. Nice in theory, but terrible in practice. Avoid it for your Swiss army knife!
Brake Cleaner
Another pressurized, aggressive cleaner, brake cleaner is often used on unsuspecting Swiss army knives by overzealous gun owners who typically keep it handy for removing metal deposits from neglected guns.
Unfortunately, brake cleaner is simply too much for the fine steel that most knives are constructed of, and furthermore it can easily attack plastics, acrylics, wood, and other materials that commonly comprise the scales of such knives, weakening them.
You might make a case for using brake cleaner to begin restoring a hideously neglected blade or tool but it is far too much muscle for routine cleaning. Spare your Swiss army knife such abuse!
Conclusion
Your Swiss army knife is a constant and trustworthy companion on your adventures, and deserves thorough and routine cleaning to keep it in tip-top shape.
But properly cleaning a Swiss army knife in detail is usually an exercise and frustration. Unless, of course, you use the easy method we have described above.
By regularly cleaning your Swiss army knife you’ll ensure that it will last for many adventures to come, and it will function normally when you need it.

Tom Marlowe practically grew up with a gun in his hand, and has held all kinds of jobs in the gun industry: range safety, sales, instruction and consulting, Tom has the experience to help civilian shooters figure out what will work best for them.