The fourth musketeer of beans, bullets, and bandages is the bugout bag. Oft discussed. Rarely done well. Bugout bags are the king of misrepresentation and poor judgment. Myself included.
My first bag was hastily put together in response to a personal scare. I’m still not quite sure where I was going to bugout to with 50’ of paracord, a case of granola bars, and three extra socks. While I improved with experience, there is always room for improvement.
Each bugout bag will be as individual as the person using it. Where are you coming from? Where are you going? What is the terrain like? How long is the journey?
Each question will frame the size, shape, and contents of your bag. Let’s take a little time to shorten up the learning curve for you and your rural BOB.
Table of Contents
Rural Bugout Considerations
Rural bugouts are as different from urban bugouts as the country mouse is from the city mouse. Urban centers are filled with people, have more concrete than trees, and have more people.
Lots more people. My opinion of urban living is summed up by the statement “food foraging is also known as dumpster diving”.
My bias aside, there are benefits to an urban bugout. There can be safety in numbers and some resources are plentiful. I once took an urban survival class where we created an improvised litter.
Within 15 minutes, we had wooden strapping, tee-shirts, and plastic sheeting. With these, we carried a 225-pound teammate a half a mile in relative comfort. The next team used a shopping cart. Not too many carts in the wild.
I’d still place my money on the rural bugout. Rural bugouts deal with fewer people. There are more travel route options. The general chance of survival is greater. Not 100% but greater.
Let’s first look at the special considerations of a rural bugout.
Rural Bugout Travel and Your Bag
Rural travel will be long and physically challenging. This directly impacts your bag. To combat the duration on the road the contents must carefully be selected. Every spare ounce of gear will be felt, and intensify mile after mile.
The physical challenges of off-road travel will require a bag that is a part of you. Each move you make will be amplified by an ill-fitting bag. This will make unconventional travel (crawling, climbing) near impossible.
Remember these points as you select both your gear and your bag.
Back to Basics
I like to tackle most survival problems using the rule of threes. Life is in jeopardy in three minutes without air. Three hours without maintaining your body temperature you die. Three days without water you die. It helps me to prioritize my approach to a problem.
Maintaining body temperature depends on your environment. The deep south in July provides a different challenge than February in Minnesota. Keep this in mind as bugout bags are not a one size fits all formula.
There is nothing better than a long drink of cold spring water. Nothing worse than a case of amoebic dysentery. While water may look clean and clear, it may hide hidden dangers.
Food is pretty much everywhere in the wild… if you know where to look. That being said, eating the wrong plant, or the wrong part of a plant, or the right plant in the wrong season will get you in trouble.
Foraging is not to be taken lightly. Remember, most people are pretty pissy after a few missed meals and are prone to make bad decisions.
Time to Get Going – Rural Bugout
Your plan is solid, you know your triggers, and now everything goes south. It’s time to hit the road. This is the only way to increase your chance of survival.
As with all survival decisions, timing is everything. Make sure that you have gotten out before it’s too late. Haste makes for poor decisions and judgment. You are leaving for a reason and purpose. Don’t second guess it. Execute your plan.
Preparing and practicing now will pay off three-fold on the trail. Select your bag and contents with care. Do they meet the specified need? Is there a replacement that will fulfill more than one function?
Take a critical eye on your bag. Is it too military? Does it fit in with your environment? How heavy is it?
Can you maintain a walking pace for a full day or do you have to stop every hour? Can you supplement with a bike or cart to carry a heavier load?
Are you prepared for rerouting along the way? Where are the segments where changing the route is fine? Where are the segments where a reroute would be fatal?
Take the time you have now to seek out and answer these questions. You have time now. You may not have it later.
The remainder of this discussion will address your bag and its contents. Your ability to blend in and survey the landscape around you will guide you in your selection of bag, clothes, and contents. Study up on them now and make educated choices.
While you will not be hunting you will need to adapt their tools and techniques. It will be best to pass by unnoticed. Know your terrain, both physical and human.
With all these tools in place and properly honed you’ll make it to your bugout location safe and sound.
Rural Bugout Bag Characteristics
Urban bags should be of high quality. You can, however, forgive a questionable zipper or seam when you are walking flat and level ground. Rural bags need to take a beating and never let you down.
Your rural bugout will bump, batter, and tear at your bag. Select one built sturdy enough to manage this abuse.
Second is comfort. Can you log miles on flat ground as well as cut through the thick stuff on your hands and knees in comfort?
Oh, and you haven’t gone through the brush on your hands and knees? With a 40-pound pack? It’s time to try it! It’s a special experience everyone should have.
You should be able to manage all types of terrain and hiking conditions with no hot spots or blisters. The minute you get one you will need to stop and heal or suffer further injury.
Third is size. The distances involved in rural bugouts require more time and more stuff. Food and water alone for several days will take up considerable space.
Take time to bring all three together to guarantee you have a comfortable bag that holds everything (that you need and can carry) that will hold up to abuse.
Bags
As much as I like Molle and tactical gear, it makes you conspicuous and a target. Camping gear, on the other hand, is ubiquitous in the woods.
Secondly, most of the tactical bags on the market are designed more as short-term assault packs. Rural bugouts may take significantly longer than three days. Therefore, let’s focus on camping-oriented bags.
The good news about hiking backpacks is there are more than enough to choose from. Internet reviews abound. Most include real-world stress tests.
Check the blog of any Appalachian Trail or Pacific Coast Trail hiker to get an account of months of use and abuse.
Stick with the better-known brands including Kelty, Osprey, Sierra Designs, and Gregory. There are too many variations to cover. Spend a few days on the internet, and narrow down based on your specific needs.
Once you have the world of hiking bags narrowed down, hit your local camping supplier and take them for a spin. Make sure to have the staff assist you in fitting the bag to your size, shape, and frame.
You must ensure it fits. You do not want to end up with blisters and cramps after the first few hours. Resist the temptation to get the bag that looks good. Get the one that fits!
Most hiking bags will be bright and overt in appearance. Don’t let this dissuade you. On the open trail, this will be the norm. If you wish to go off-trail then purchase a camouflage rain cover.
Lightweight with designs for every season and environment. They will change the look of your back in moments.
Supplies and Equipment
Time for the “stuff” section of this adventure. As before, I will take these roughly in the order of the rule of threes. One bit of advice that I may give prioritize devices that can be used for multiple purposes. This provides flexibility and saves precious weight.
Ounces are pounds and pounds are pain. A trip around your house is not a realistic test of your loaded bag.
Strap it on and do 10-15 miles across rough terrain. Now try it for two or three days. I’ll bet you will find more than a few extra items that you can get rid of.
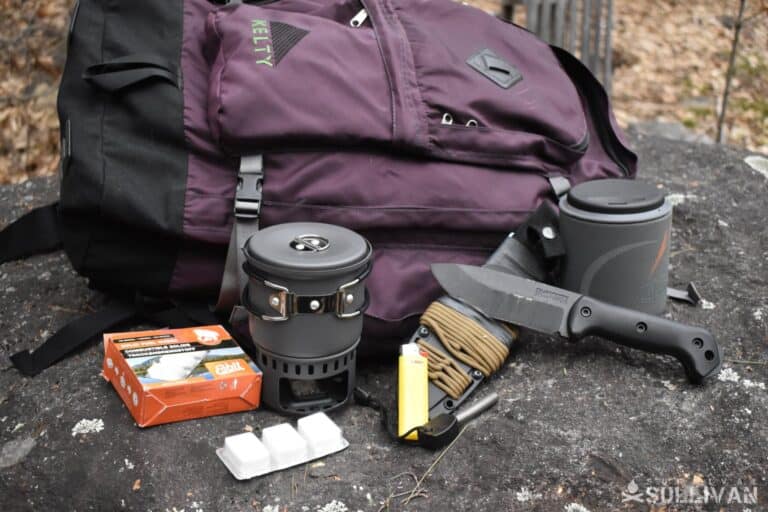
Fire
The ability to make fire may not fit your environment for life-sustaining warmth. Especially in the 90-degree evenings of our southern neighbors. Remember, when it’s 70 degrees and comfortable, don’t underestimate the emotional well-being a fire brings.
To build a fire, you can either master the art of the hand drill or carry a Bic lighter. In a time of need, I’ll take a lighter any day. That being said, to master the bow drill or the hand drill you need intimate knowledge of fire.
Tinder, kindling, heat, spark, oxygen, and fuel must be in balance to start a fire. They must be in perfect balance to succeed with primitive fire-making methods.
The more you know about these, the easier it will be to get warm with a firesteel or a road flare.
I prefer to carry multiple means of making fire. From firesteel to a Bic lighter, to a road flare. When time and environment allow, I’ll use the fire steel.
Starting a fire with a firesteel can be therapeutic and rewarding. If it’s pouring rain, a few degrees above freezing, and I’m soaked to the bone – out comes the flare. I’m in no mood or condition to mess around. I need a fire NOW.
Have multiple means to make a fire in your bag and on your person. Skip the cheap butane lighters and get a real Bic. I find the knockoffs a vehicle for my anger. The flints don’t last and the wheels break.
Include tinder and fire starters homemade or otherwise. I highly recommend Live Fire Cord. It’s paracord with a central core of flammable tinder.
Replace your shoelaces, zipper pulls, and knife wraps with lengths of it. That way you are never out of reach of quality tinder.
If in doubt, no need to get fancy. A small bottle with cotton balls and Vaseline, or jute twine soaked in paraffin both work great as tinder.
I wasn’t joking about road flares. Nothing short of a hurricane will put one out. Not expecting a monsoon, use a trioxane bar. Hit it with your Bic, and you have tinder that you need to douse with water to put it out.
Both fit the multi-use category. Flares are the ultimate signaling device. The resulting light and smoke will bring in help. Trioxane bars have been used for cooking for generations. Two birds, one stone.
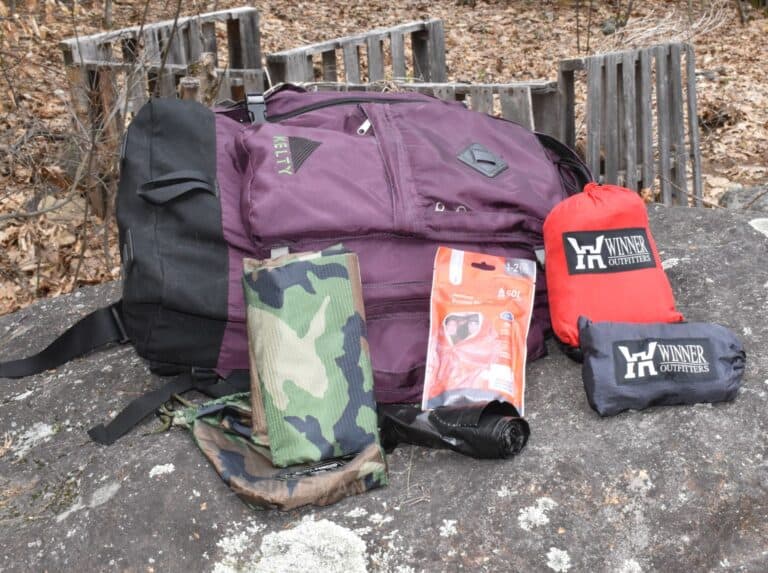
Shelter
Shelter from the elements is a requirement regardless of your environment. There aren’t too many places in the world that are 70 and sunny always. There will eventually be rain, wind, or sun. Avoid an excess of these.
Shelter can take many forms. A big tent, a hammock and rain fly, or an army poncho all work. It all depends on how much weight you can carry and how much personal comfort means to you.
Again, we seek the advice of the camping industry as well as the bushcraft masters. For short-term needs, I prefer a hammock or poncho.
With a few trees or poles, you can get out of the worst of the weather. Given a few contractor garbage bags (55-gallon drum liners) you can improvise a reasonable shelter.
This is one area where two is one and one is none. Carry a primary shelter as well as the materials to improvise an ad hoc shelter. Even a tarp or a bivy sack will keep you dry and warm inside a debris hut.
Depending on your region you may need a sleeping bag. In some regions, you may need more than one (summer, spring/fall, winter).
The heavy and worthless bags of our youth have been replaced by technological marvels that weigh ounces. If you haven’t upgraded your bag in a while it’s worth it to take an updated look.
Tools
I’ll add tools to this section as it is much easier to build a small shelter with them than without.
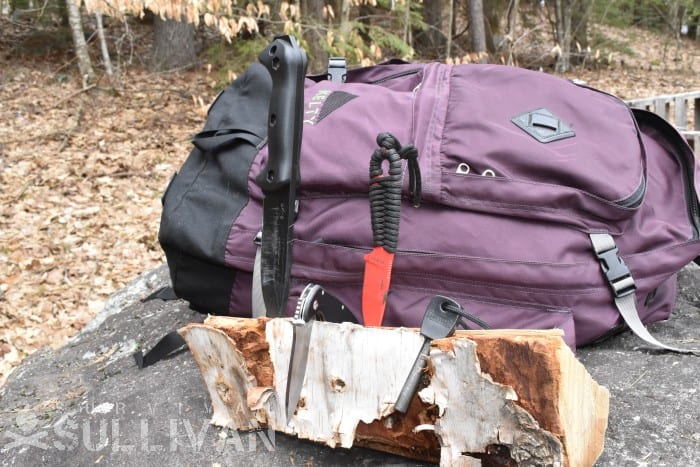
Personal taste will guide you here, but I recommend at least one solid knife as well as one larger cutting tool. Your knife should be sturdy enough to manage batoning firewood.
On the trail, you will need to process more wood than you think. This is given that the environment is amenable to fire, and that your fire is not a threat. A quality knife will cut, carve, and baton.
You may wish to get a second knife as a backup. It can be purposed for more detailed work (no need to make a feather stick with a Becker BK2 when a small neck knife will do).
For processing larger pieces of wood look to a hatchet or a saw. Both come in many shapes and sizes. Refer to quality online reviews to guide you.
Once you have made your choice, spend some time with your new tool. Saws and hatchets have a learning curve. Each requires a specific set of skills and each demands attention to safety.
Do not forget cordage and even a few zip ties. If you find yourself in need of shelter cordage goes a long way to making that process easier. Even if your shelter is a poncho, you’ll need some paracord to keep it upright.
I don’t need to go on about the multiple uses of paracord. Have 100 feet. Zip ties are nice to have. If you have them, you’ll find uses for them.
Clothing
During a rural bugout, you must plan to encounter multiple weather patterns. Murphy’s law guarantees that your bugout will happen in the cold and the wet.
The good news is that the hunting and camping industries have all but solved this problem. High-performance base layers and technologically advanced outer layers keep your core temperature well-regulated. They even come in camouflage.
Be prepared to dress in layers. You will naturally overheat and you must minimize sweating.
The wetter you get, from the inside or the outside, the colder you will get. Add and remove layers to maintain a comfortable temperature.
Finally, don’t underestimate socks and hats. Foot care is paramount to health on the trail. Pack several extra pairs. Enough to let each pair dry after use.
During the summer a hat will keep the sun off your head. During the winter it will keep valuable heat in!
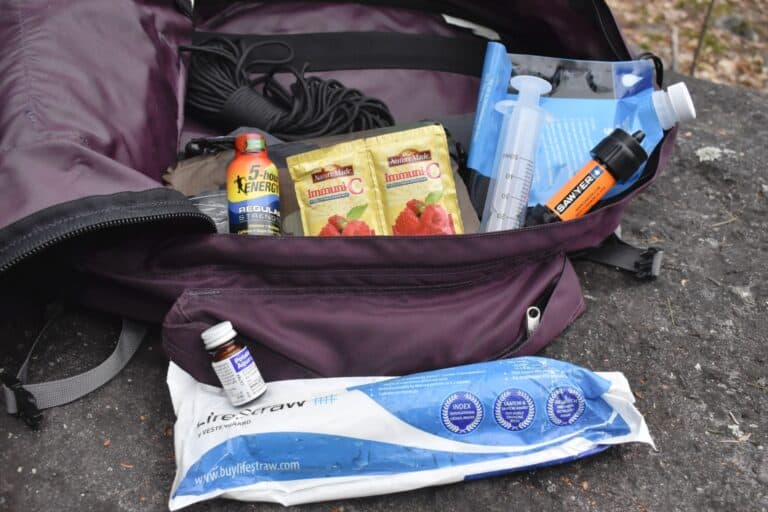
Water
Three days without a drink and you’re beyond the point of no return. A harsh climate reduces your time to 24 hours. Water is a short-term necessity. You may not be able to carry all you need.
You must know how to properly treat water. There is more than one water contaminate that will do you in.
Carry multiple methods for treating water. I recommend three: heat, filters, and chemicals. For heat carry a single-walled canteen.
Do not attempt to boil water in an insulated container – this is dangerous. Carry an inexpensive stainless-steel single-wall water bottle large enough to boil a liter of water. Have two.
We are blessed with an abundance of filters today. I recommend one that is flexible. One used as a gravity filter or with a second container bag to push the water through.
Pay particular attention to the maintenance of the filter. Many require back-flushing between uses.
While I like the straw-style filters for a walk in the woods, I prefer more versatile filters for my BOB.
Chemical treatment is easy and takes minimal room in your pack. A few pills purify several gallons of water. They make a great backup to your backup.
Please note that I am not a fan of improvised water filters. No amount of sand and charcoal will filter out giardia.
Food
2,000 calories per day per person is an absolute minimum. You will most likely be traveling on foot and that requires a lot of energy. Again, look to the long-trail hikers for advice.
You need nutritionally and calorie-dense foods in your pack. Secondly, you want food that stores for a long time and does not need to be prepared in any way.
The average AT through hiker burns between 500 and 800 calories per hour. This adds up to 4,500 to 6,000 calories per day. This is just to maintain weight.
Any less and you will be digging into your body’s reserves. Great if you want to lose weight, bad if you are trying to survive the apocalypse.
Meals on Wheels
Trail-ready snacks are a good idea; yet, the benefits of a hot meal cannot be discounted. Keep a mix of foods that can be eaten on the trail, as well as those that are better heated.
Ready-to-eat meals include jerky, protein bars, snickers bars (the original high-energy trail food), and trail mix. Be sure to review the best by dates and rotate often. Secondly, you must pay attention to the storage conditions of your food.
Keeping Snickers in your BOB in the trunk of your car will result in a hot mess. This is fine if you are ok with a sloppy, sticky snack. Otherwise, keep to jerky and protein bars.
Larger meals include MREs, meal replacement bars such as Mainstay, SOS Food Labs, and DayTrex, and freeze-dried meals.
MREs are self-contained, store for years, and are filling. Meal replacement bars are generally filling, store for years, and taste like sawdust. Sometimes calories are calories. Not every meal needs to be fine dining.
Freeze-dried meals are the panacea of trail foods. They weigh almost nothing, store forever, and are satisfying and delicious. Technology has improved their taste and texture. With a little effort, they resemble freshly prepared meals.
Two items to look to with freeze-dried meals: cost and calorie count. Freeze-dried meals are expensive. The good news is that they go on sale regularly. I purchase My Patriot Supply meals and I never purchase anything unless it is discounted 50%.
Check the calorie count for freeze-dried meals. Often they pad calories with sugar. Those drink packets are loaded with sugar and can be a significant portion of the total calories. Review the total count and adjust appropriately.
Adjust water requirements when packing freeze-dried meals. Most require a few cups of water and that adds up over a few days.
Finally, don’t forget spices and vitamins. They can add life to a bland meal and provide a sense of normality to a rough bugout. I always keep a few bouillon cubes and tea bags in my kit just to spice up a simmered broth, and to warm up in familiar comfort.
You will be burning a lot of calories from both physical and emotional stress. A few multivitamins will go a long way to meeting your needs while everything, including your diet, changes.
Meals on the Leaf, Fin, and Hoof
It is good to include the ability to gather your own food on the trail. I would not depend on your ability to find food on the way. Knowledge and skill can add to your calorie count for the day.
Foraging is my go-to food source on the trail. Plants don’t run. While I’ll never survive on my knowledge of plants and mushrooms, I can fend off hunger for a few days.
This is one area to seek professional instruction. I’m comfortable with about a dozen mushroom varieties. However, I build that knowledge slowly over time and with professional assistance. Plants are no different.
Even a small misstep can give you cramps and take you out of commission. Still, grabbing a pocket full of plantain or fiddleheads for dinner adds variety and interest to any meal.
Fishing generally requires some equipment and can be done if you stop for the night. I like to sink a line as much as the next guy. Taking time out to fish during a bugout is more of a risk than a reward.
A trotline is a win-win. When you stop for the night toss out a line. Let it do the work while you rest.
Pack a length of line, hooks, bobbers, etc. Pick bait as it presents itself during the day. A few grubs, a worm under a log, etc. At night time bait your hooks and toss out the line. With luck by morning, you’ll have much-needed protein.
The same goes for snares. They are best set out overnight unless you plan on staying in one location for a few days.
Pack snare wire and have the knowledge to make a deadfall trap. I’ve seen enough of the TV show Alone to know that you can live on mice for a few days if you have to. To make life easier pack a few mouse traps.
It is good to include the ability to gather your own food on the trail. While I would not depend on your ability to find, knowledge and skill can add to your calorie count.
Cooking Tools
If your plan includes cooking make sure to have the proper tools. A pot and a cup will be required to cook anything with water. A spoon will make the eating process a little more civil.
Don’t forget to add your left-over bones, heads, and herbs to the pot to simmer in your down hours. A bone broth can provide numerous micronutrients.
A small stove makes cooking a bit easier and will have less smell than a campfire. Esbit stoves are cheap, easy to startup, and usually come with a small pot included.
Navigation
Few rural areas are as conveniently laid out as cities. Landmarks are few and far between. This necessitates the ability to navigate the wild. GPS and maps will rule your destiny.
I love my GPS. If you have one, preload your waypoints. All your route and cache waypoints. Include all probable re-routes.
Most GPSs can support sim cards loaded with 1:25,000 topo maps. Load these so you know what you’re getting into with regards to hills, cliffs, and waterways.
Even if you have a GPS learn to use a map and compass. This is a learned skill. It is perishable so practice often. A GPS dropped on a rock is useless. A map dropped on a rock is still a map. Get a quality compass and all the topo maps required for your route.
Seal your maps with a waterproof coating. This will pay off in spades when Murphy shows up and causes it to rain.
You may want to augment your map with Satellite images pulled from Google or Bing. These can come in handy if you need to circumvent small towns or neighborhoods.
Safety and Security
While we are talking about towns and neighborhoods, let’s talk about security. Just because you are away from the city doesn’t mean that there isn’t a negative element around.
This will require you to defend yourself and well as potentially heal yourself.
Rural areas have fewer people, but that only removes the concept of safety in numbers. If you get in trouble you are on your own. How you choose to deal with these challenges is up to you, however, a firearm is still the great equalizer.
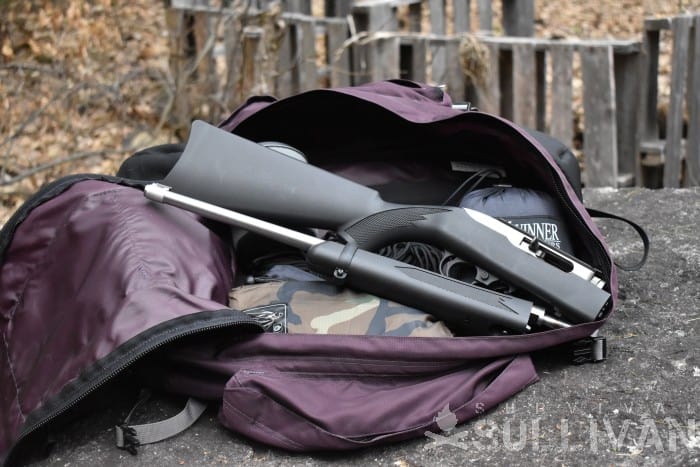
Pound for pound a .22 a great option. Large enough to kill small game and light enough to carry significant ammo. Getting shot by a .22 is still getting shot. It will suck.
.22 firearm options abound. The Ruger 10/22 is one of the most universal rifles on the market. Inexpensive, good quality, and with a significant aftermarket parts industry.
There is a reason that so many people love them. Within the last 10 years, Ruger has even come up with a takedown version. This variant separates into two halves and stores in a small backpack.
If you wish to go with a larger caliber you can choose an AR, AK, or a pistol caliber carbine (PCC). The nice thing about the PCC is you can carry the same ammo as your pistol, or even the same magazines.
My complement of travel firearms includes a Glock 19 and a Glock pattern AR or a KelTec Sub-2000. Regardless of which makes it into the bag, I only need to carry one set of ammo and magazines.
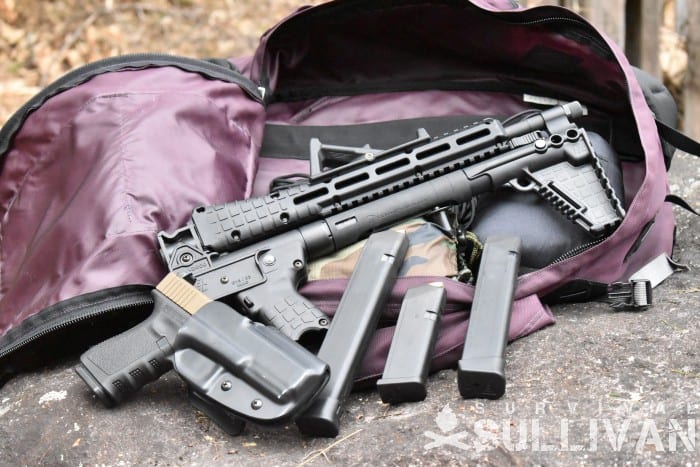
Your environment, familiarity, and skills will dictate your final choice. No need to get an AR if you can shoot the wings off a gnat at 100 yards with grampy’s .308. Carry what you use accurately and safely, and stick with it.
I recommend a minimum of two weapons. One for close quarters (pistol or AR/AK), and one for long-range (AR/AK/ high power rifle). Much beyond this and things start to get heavy.
Medical
If you plan on making holes you have to plan on patching holes. This is the job of your medical kit. On a long bugout, you will need a substantial one.
Start with the simple injuries you expect. These include scrapes (Band-Aids), blisters (dressings, moleskin), burns (more dressings, burn gel), and general aches and pains (Tylenol, Ibuprofen, other painkillers).
Don’t forget stomach discomfort (Imodium, Prilosec, Tums) and minor eye injuries (eyewash). You must also include any personal medications that you take and allergy medications.
You will also need to plan for exhaustion (electrolyte salts), infections (antibiotic gels (multi-use as fire starter)), and the ability to clean out minor wounds (tweezers, alcohol prep pads, irritation syringes).
Moving on to more serious injuries you must prepare for severe bleeding (hemostatic gauze, dressings, steri-strips, tourniquets), or worse (chest seals).
Bugouts require special attention to orthopedic injuries. Sprained ankles, knees, and wrists slow you down without proper support. Include SAM splints, Ace and Coban wraps, and slings (multi-use as water pre-filter and cordage).
You need the skills to improvise a litter. In the event one of your team members is no longer ambulatory, you will need to carry them.
Next, don’t forget a few things that make your life a little easier. Namely, bug spray, sunscreen, and sanitation items.
Soap, toothpaste, hand sanitizer (multi-use as Firestarter), dental floss (multi-use as cordage) all make you feel a little more human. Feminine hygiene will be a must for any ladies in your party.
Lighting
Half of our life happens at night. Be prepared to see at night. A few quality flashlights and extra batteries are a must. I recommend both a flashlight as well as headlamp should be in your bag.
If your plan includes surreptitious travel, be prepared. Get lights with a red filter to maintain your night vision as well as minimize your light exposure.
I also recommend glow sticks (the mini ones are great for marking trails). Get a few, as they are cheap, and rotate on an annual basis.
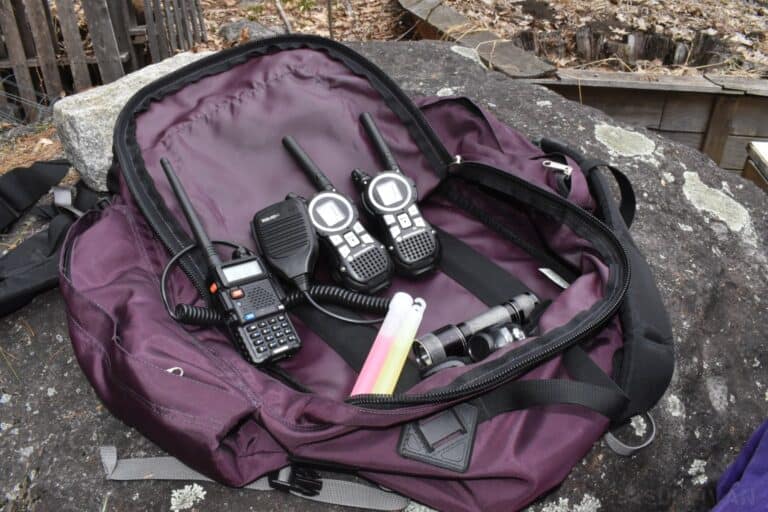
Communications
There is an unreasonable aversion to electronics in the prepper community. One person yells EMP and all of a sudden, all electronics are bad. This is an unreasonable approach as you are denying yourself a universe of tools.
Without communication, relationships change. People outside of walking distance instantly become “someone I used to know.” Whether you need to communicate within your group or across the miles you will need electronic support.
For short-range communications, blister pack radios are adequate. Be forewarned the range that they report is almost criminal. You can expect maximum ranges under a mile in most conditions.
For ranges from one to 20 miles, HAM handi-talkies are a must. Limited to line of sight and affected by hills, you have the option of higher power and better antennas.
They necessitate a license to broadcast but can be used without one in the event of an emergency.
The longest distances demand high-frequency radios. This is where your General HAM license comes in. The good news is you can talk around the world with the right equipment.
My favorite option here is a Mountain Topper radio and a long-wire antenna. With this setup, you can use CW (Morse Code) to talk across the US. If you don’t know CW then use a tablet computer and the FLDigi software to do it for you.
Choosing the correct radio correctly will get not only the ability to communicate with team members but also the ability to pick up FM as well as NOAA weather radio. With the right HAM setup, you can save NOAA weather maps offline!
Considering BOB Upgrades
Don’t feel the need to limit yourself to the items on this list. From the bag to the Bic lighter, you must make it your own. In that spirit, here are a few items to add to the list that may or may not apply to your situation.
Bags and Transportation
Depending on your routes and terrain you can expand the size of your bag as well as how you carry it. A bike with a trailer is a great way to move heavier loads. Even bags stacked on a pushed (not ridden) bike is a conveyance used around the world.
Many cart designs operate over smooth and rough terrain. If a river is a part of your route utilize boats for movement.
Own the Night
Those who can see in the dark own the night. Not everyone can afford or justify a PVS-14 Generation 3 night vision monocular. If you can… Can I borrow it?
There are a host of new night vision optics on the market that are much more affordable. With one, you can travel, survey, and hunt by night. They are a true game-changer.
Own the Skies
I don’t hide the fact that I like geeky toys. Drones fall into both the geek and toy categories. With a quality drone, you can look ahead a mile or so and scout what is around the next bend.
Own the Shadows
Fading into the background is admirable at both bad office parties and rural bugouts. The ability to camouflage yourself and your possessions on the trail is the difference between life and death.
Thankfully, we humans generally suck at detecting camouflage (there are exceptions to every rule).
A face paint kit and appropriate netting will go a long way to conceal yourself and your position. Add in practice adding appropriate cover and you can completely disappear in plain sight.
Rural Bugout Bag Checklist
Here’s a handy checklist that you can download to make sure you don’t miss anything when building your bug-out bag.
Conclusion
Being able to move from a compromised position to one of safety entails a plan. It next requires the equipment to affect the move. Rural bugouts demand both significant planning as well a proper preparation.
When you prepare your BOB you will need to consider many obstacles. Extra time, the difficult terrain, the solitude, and the special medical concerns must be taken into consideration.
Covering all these conditions will take time and practice. While things are quiet and there’s no impending danger is the time to take action.
Learn a few lessons from your concrete-dwelling brothers and sisters. Apply what fits. Adapt what is close. Learn from what doesn’t. Leave no stone unturned when perfecting your rural bugout bag!

My passion is empowering people with the knowledge to prepare for personal, local, and regional emergencies. I went to school for engineering and computer science and spend my days in the security industry.
Excellent article!
Touches all the basics, includes links to separate products.
Sound advice on Rule of threes.