The trucker’s hitch (or power cinch, rope tackle, hay knot, harvester’s knot, dolly knot, there are many names) is the unchallenged king of tension knots.
It is a compound knot (an arrangement of rope made of multiple different knots) which has the unusual feature of providing mechanical advantage, like a simple pulley system, for pulling on a load.
The knot takes its many names from the various situation in which one may wish to lash something securely down (a trucker moving cargo, a harvester moving a harvest, a haymaker moving (you guessed it!) hay… etc.).
In the Ashley Book of Knots, the acknowledged bible of knotting, a few variations are given under #1514, #2124, #2125 and #2126.
Some Knotting Jargon
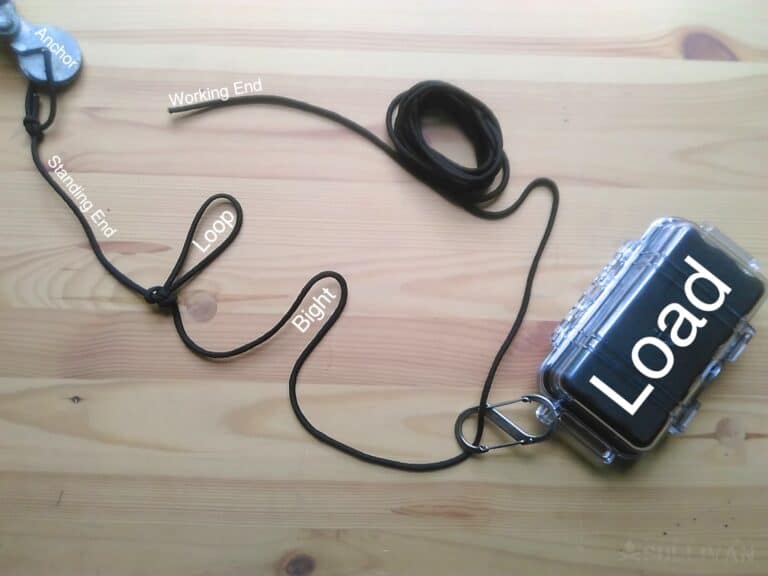
- The standing end is the end of the rope not being used to tie the knot.
- The anchor is where the standing is secured (normally by another knot).
- The working end is the end being used to tie the kno
- The load is the object which the rope is tied onto. In practical use, this may not be the thing which is being tied down. Say you’re tying a christmas tree to your car roof, you will probably pass the lines over the tree, but be actually tying knots onto the roof bars, not the christmas tree itself. In this case, as far as the trucker’s hitch is concerned, the roof bars are the load.
- A bight is a bnd in the rope.
- A loop is a knot which produced a fixed loop or similar shape in the rope. If you pull on the ends of a loop it should not come undone.
Principles
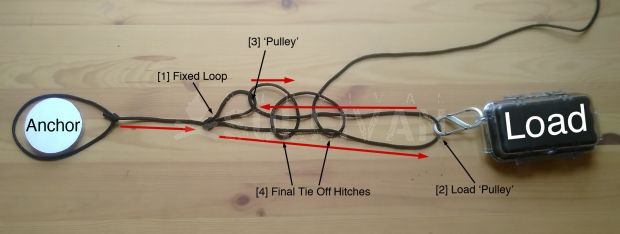
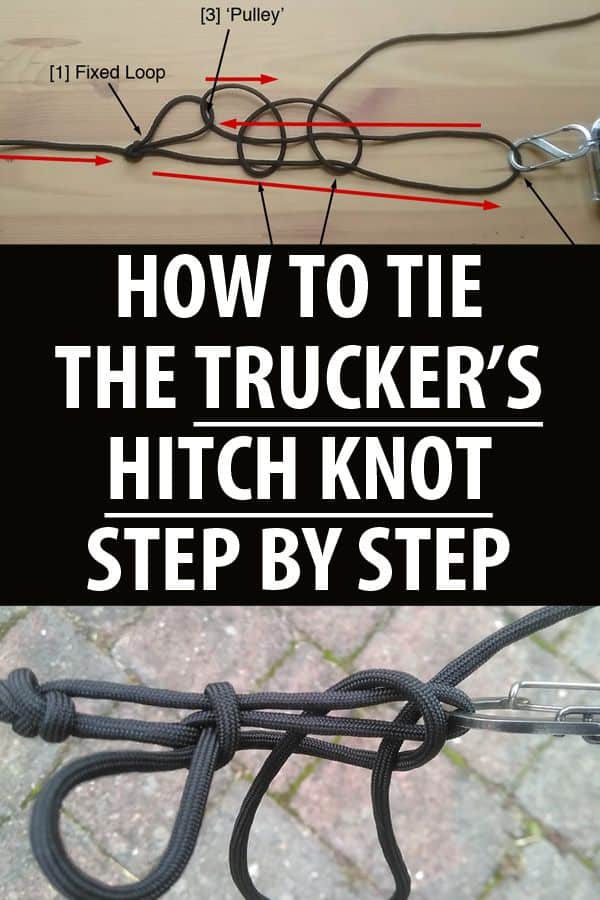
In principle, the trucker’s hitch is a simple pulley. It is made up by [1] tying a fixed loop somewhere in the middle of the rope, then [2] taking the working end around the load (first ‘pulley’) and [3] through the fixed loop (second ‘pulley’), then pulling the working end towards the load (at which point the loop and load act as pulleys) and [4] tying it off once it is tight enough.
The diagram below shows these steps in sequence, and the red arrows show the direction in which the tension is applied to each part of the system, when everything is pulled tight.
Mechanical Advantage
(If you aren’t interested in the theory and maths, then you can skip this bit. All you really need to know is that a trucker’s hitch makes it easier to pull a weight, but it won’t go as far for each foot you pull. But this part is very interesting…).
For those who don’t know, ‘mechanical advantage’ is where a mechnics is used to amplify force, in return for distance moved. In the case of a pulley, the use of a pulley makes it easier to move the weight on the end, but you won’t move it as far.
The ratio of energy needed to distance moved is always constant for any given system, no matter what mechanical advantage you have, the advantage is just in how your energy is used.
This might all sound a bit pointless, surely if you can lift the thing then you can lift it and if you can’t then you can’t, right? Wrong.
Consider a person who is relatively weak in terms of brute strength, but has great stamina. With the right mechanical advantage they could lift a huge weight in small increments, in the same way that an enormous sail can be raised by a single person with a good winch.
The trucker’s hitch provides a theoretical mechanical advantage of 3: . This means that for every one foot/inch/mile you move the weight, you have to pull the end of the rope three inches/feet/miles.
However, this is a theoretical calculation, assuming a perfectly frictionless rope with no stretch and no slack. In reality, taking these factors into account, the advantage is probably somewhere between 1.6 : 1 and 2 : 1, depending on your rope.
Important The words ‘anchor’ and ‘load’ are often used in discussion of mechanical advantage systems. In this article they specific, defined meanings which have nothing to do with the mechanical advantage. The mechanical load and anchor may be different from the load and anchor as referred to here (or they may be the same) depending on how you use the trucker’s hitch in practice.
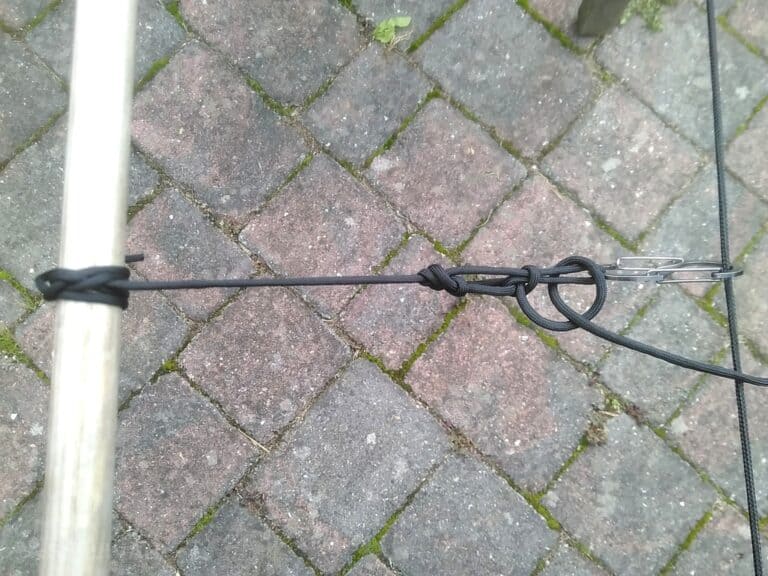
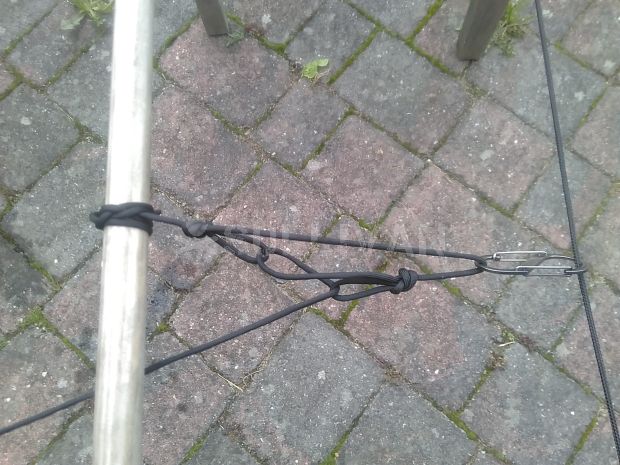
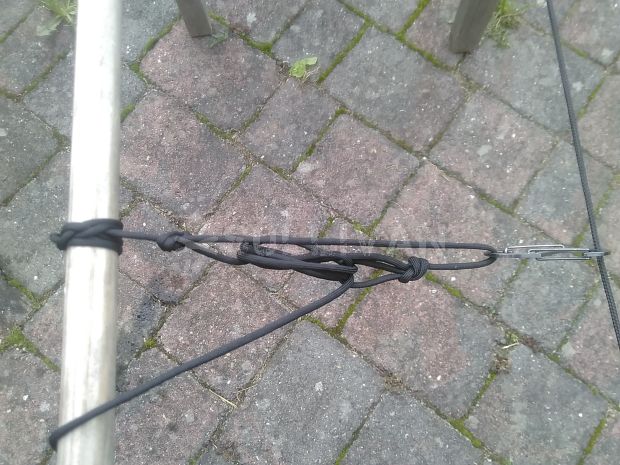
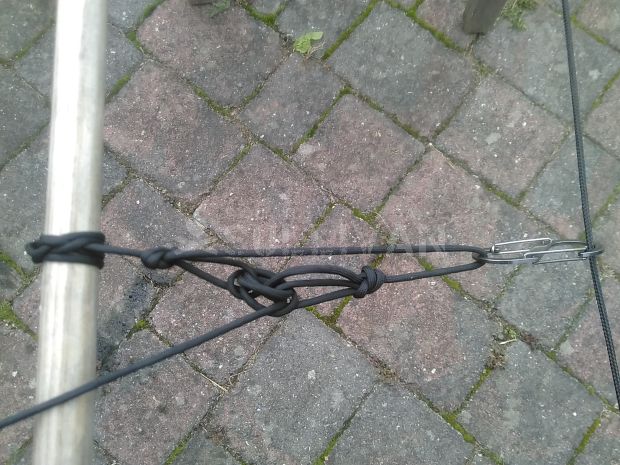
How to Tie in Practice
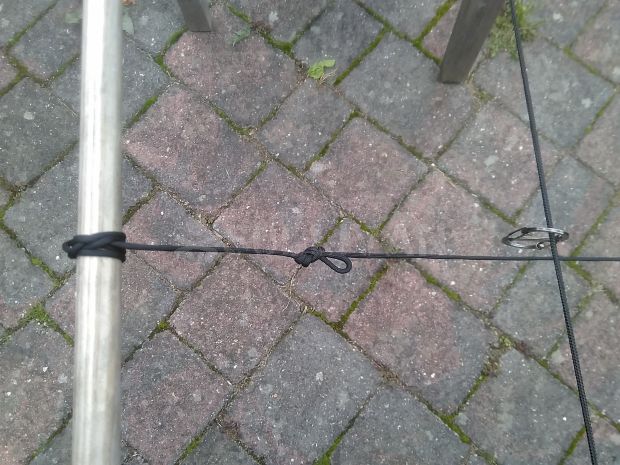
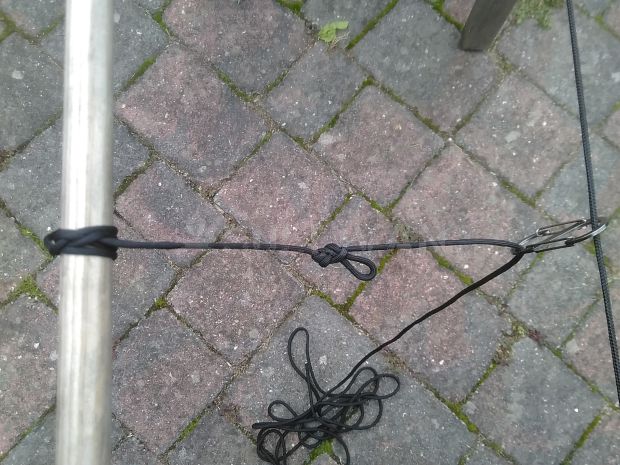
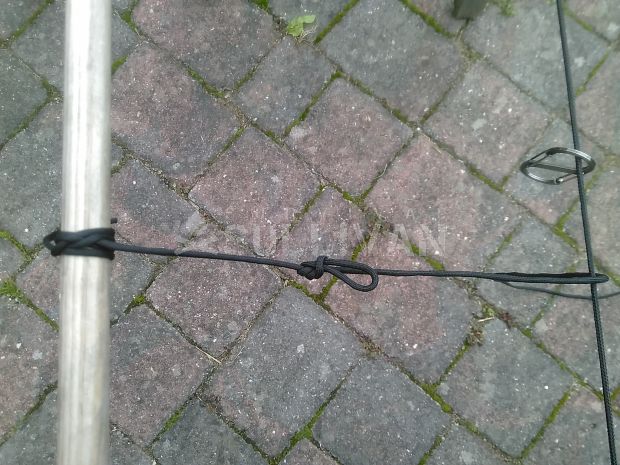
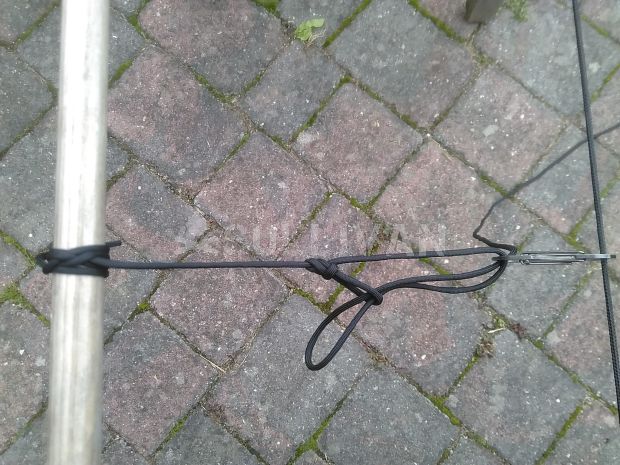
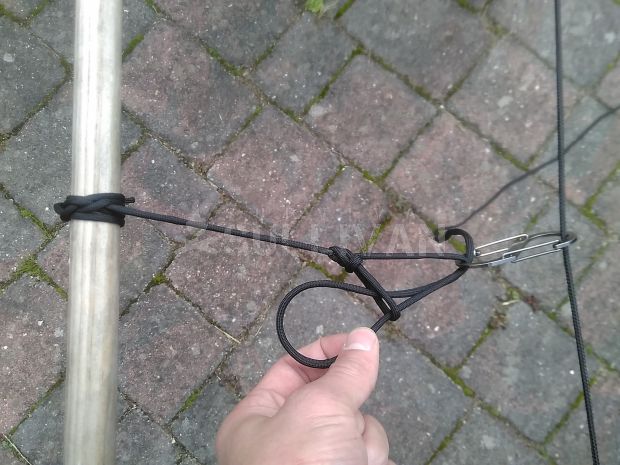
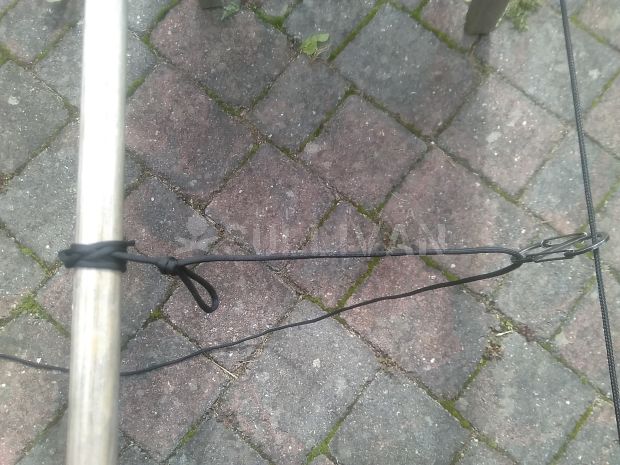
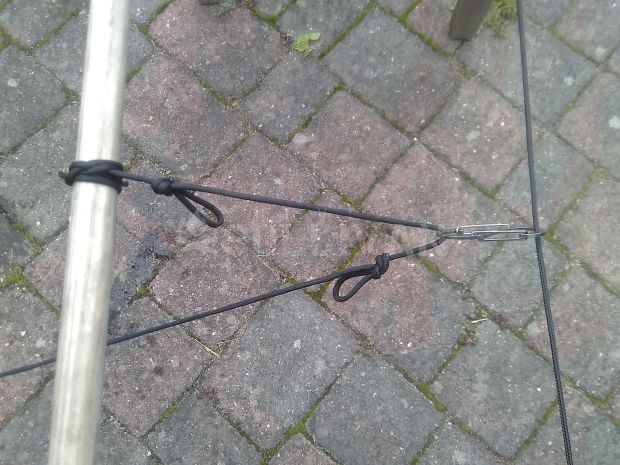
In all of the following pictures, the anchor is the wooden bar on the left of the photos, and the load is the suspended carabiner on the right.
First, fix the standing end of your rope to the anchor point. This can be done with any god strong knot, I normally use a boom hitch for this, but a clove hitch, a round turn and two half hitches etc. would also work.
Next, tie a fixed a loop in the rope, between the anchor point and the load. Generally speaking, about three quarters of the way along the rope from the anchor point is a good place to put it, but there are finer points to be made about this.
If you have very little rope to use, put it closer to the load point, because you will use up less rope in later steps. If your rope has a lot of stretch in it or you intend to pull the knot very tight, then put the loop further back towards the anchor, because it will move more towards the load as tighten the knot.
Having said all of that, in the picture below the knot is about half way along the rope for the sake of instruction, because it made the photographs more clear.
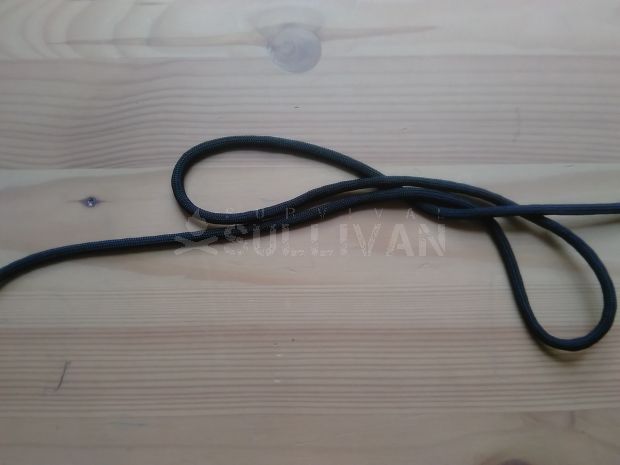
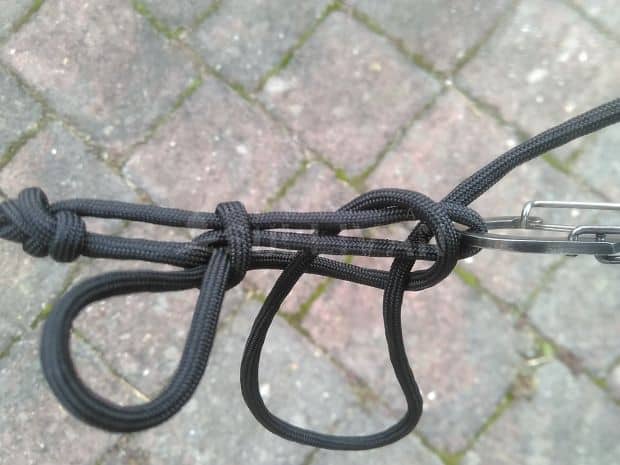
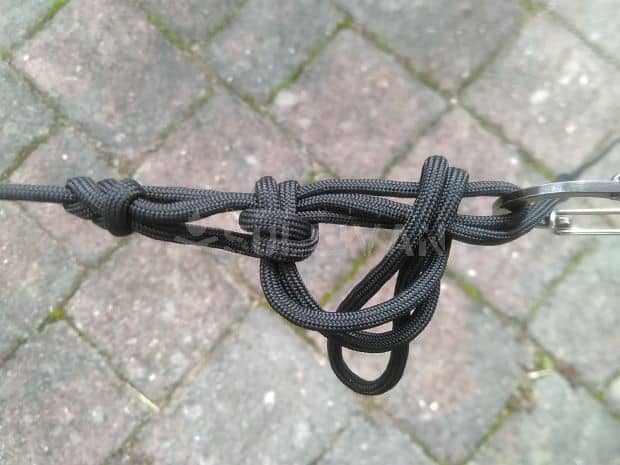
There are many variations of the trucker’s hitch, using many different loop knots. In my opinion the best is a directional figure of eight, used below. A directional loop is a loop which naturally ‘faces’ or ‘is angled towards’ the direction the rope goes in, rather than at right angles to it as many (non-directional) loops are.
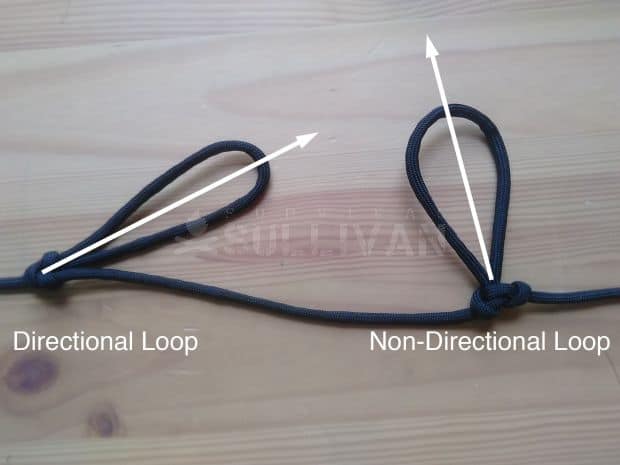
The directional figure of eight forms a secure loop which sits naturally along the rope, and is pulled tighter into this position by the tension of the trucker’s hitch. Make sure to tie the knot such that the top of the loop faces away from the anchor and towards the load.
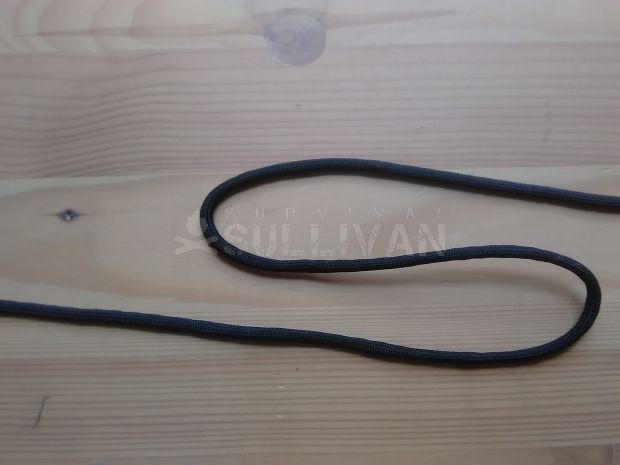
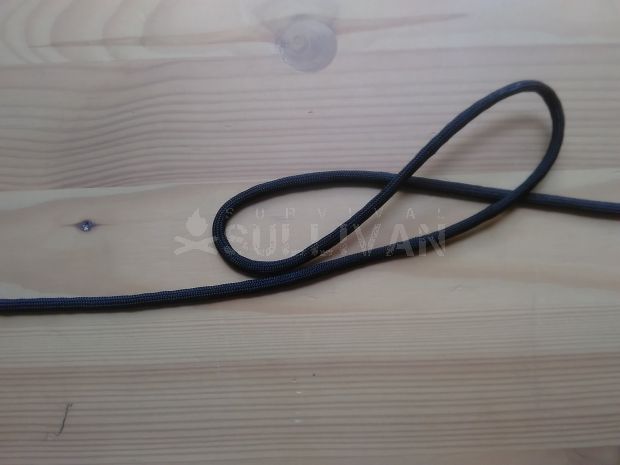
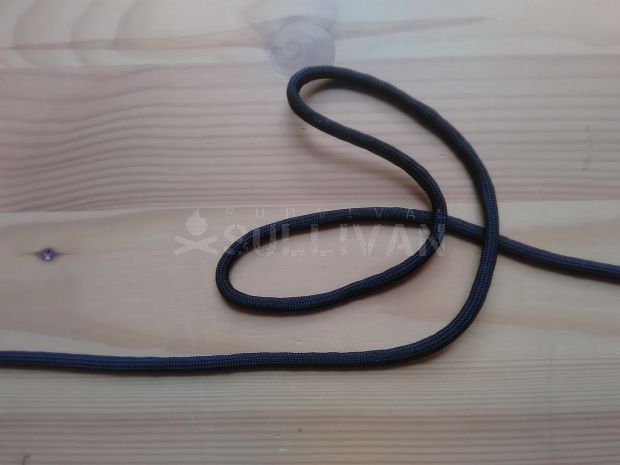
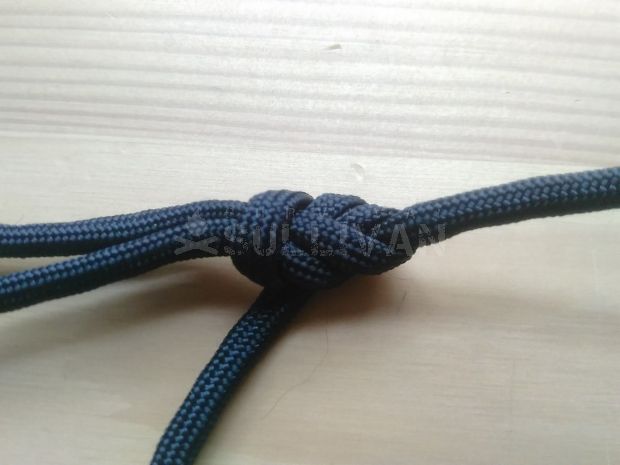
The following pictures illustrate how to tie the directional figure of eight.

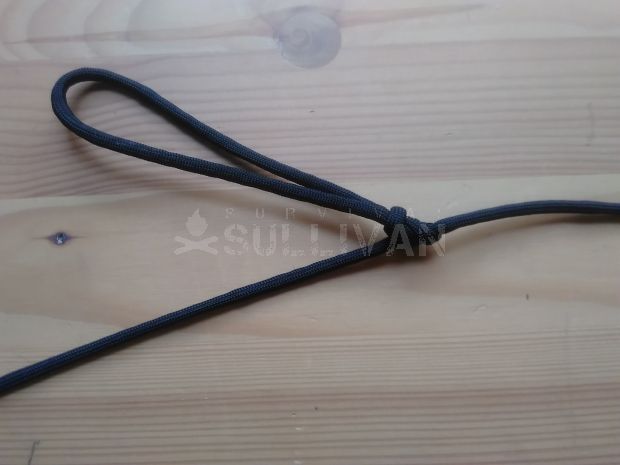
The final picture shows how the different strands should lie over each other when the knot is properly tightened (or ‘dressed’). This really does aid stability and strength, so make sure yours looks like this!
Finally, this is the directional figure of eight in situ, as it would be used in the trucker’s hitch.
Next pass your working end around your load, or some secure point on it (a securely attached hook, carabiner etc.).
Then thread the working end through the loop you made earlier, and back towards the load.

Finally, pull on the working end to tighten the whole structure, then tie off the end to secure the tension. The most common way to do this is two half hitches. More half hitches can be tied to take up slack rope, though slipped half hitches will do this better as they use more rope (see below).
The second half hitch has been left loose to show how it has been tied.
Variations
There are many and various ways to tie the trucker’s hitch, these are only a few with obvious benefits for certain situations. If you know of any others, please feel free to explain in the comments below.
Slipped Hitches
This variation is to slip (not pass the working end through) the final securing half hitches. This makes it easier to undo the knot, because pulling hard on the working end will undo both hitches immediately.
This arrangement is surprisingly secure. The only real danger being from the working end being accidentally pulled (being tripped over or pulled when mistaken for another rope).
As before, the second hitch has been left loose for the purpose of illustration.
On a Bight
By tying a whole knot ‘on the bight’ (using a bight as if it were the working end) it is possible to tie a knot (which would normally need the use of the end) in the middle of the rope. This is especially useful when the ends of the rope are inaccessible, or are already tied to something which you don’t want to untie.
‘Real Truckers’ used this variation a lot, because it means one rope can tie down all of their cargo, but any crate or box can removed or added anywhere, without needing to find the end of the rope.
Begin the knot as before, with a fixed loop.
Instead of passing the working end around the load and through the loop, make a bight and treat that as the working end. Make sure to leave the real working end exactly where it is to avoid confusion.
Pull the system tight. You will have to pull on each the two ‘sides of the bight, to test which one leads to the standing end, and which to the working end. Use the one which leads to the standing end to tension the knot.
Finally, use the whole bight to tie off the knot with half hitches.
Versatackle Knot
The versatackle is a variation of the same principle as the trucker’s hitch, but uses two ‘pulley loops’ and is self-locking under tension because of the friction of multiple layers of rope.
Excellent for pulling a rope very tight, and not losing any of this tension fiddling about with half hitches to lock it. On the other hand, the Versatackle does take a long time to make and to undo, would be impractical to tie on a bight, and will always need more rope than a trucker’s hitch for the same job.
Begin as in the trucker’s hitch, by tying a fixed mid loop, then leading the working end through a point on the load and back towards that loop. For the purposes of this guide, this will be called loop A.
Now tie another mid loop in the working end after the load. If you are using a directional loop then it should face toward the first loop/away from the load/toward the anchor. This will be called loop B. Try to make both of your loops fairly small.
Now thread the working end through loop B, then loop A. If you went down through loop B, then go up through loop A, and vice versa.
Pull the working end to add some tension, then go round again, and again and again. You want to go round at least three or four times, but the more you use the more mechanical advantage you will gain and more secure the final structure will be.
Don’t worry about the different turns lying neatly next to each other, you want them to touch and overlap as they go through the loops. If you went up though loop A the first time, keep going up through it (and down through loop B, and vice versa).
Finally, pull on the working end to tighten the system. You might need to adjust some of the earlier turns if they don’t tighten. When you let go of the working end, the whole system should lock itself because of the friction and tension of the different tuns holding each other down.
Having said that, a few half hitches for security (and/or to take up extra rope) can’t hurt.
Nick O’Law has been exposed to survival from a very young age. In his teenage years, he learned A LOT about bushcrafting, such as making snares and traps, and even how to make DIY knives.
If you haven’t ye read and tried his knot-making articles on Survival Sullivan, you should definitely check them out.
Tie a fixed loop? Do you not want to easily re-use your rope? In the U.K. We twist a loop and once the tension is off, the whole thing will just pull undone. We also multiply mechanical advantage by pulling a dolly with one or more additional dollies; double, triple, etc.
I will try to get around to filming how to do it, but if someone more motivated than I wants to get in first, feel free!
Sorry only that is not a truckers knot it is just a slip knot a trucker can be undone a lot easier I’m 72 with a little over 3 million miles under my belt with lots of flat bed time just letting you know that you are doing it wrong. Thank you Fred
Great method and explanation, Mr. O’Law!
After seeing Mr. L’Homme’s comment I searched for the UK version and settled on this. https://youtu.be/CjGIxQQRmrk.
Your inputs?
Ra.