Did you know that humans can survive three days without water and three weeks without food? Perhaps you’re familiar with it.
But, keep in mind that in many outdoor emergency circumstances, it’s not dehydration or a lack of nutrition that kills people; it’s a failure to retain enough body heat.
Exposure is one of the single best and most common killers in any outdoor survival scenario. A few hours exposed to extreme conditions is enough to snatch the life out of you. Hypothermia is enemy number one, though you must be just as cautious in hot, arid environments.
If you’re new to prepping or just overwhelmed by all there is to understand about outdoor survival, start with learning how to stay warm.
Knowing how to build a shelter for warmth improves your chances of surviving. The shelter you choose is determined by location, supplies available, and the urgency of the emergency situation.
This article will provide you with plans and instructions for crafting a suitable shelter no matter the environment and what you have at hand.
Table of Contents
Shelter Ranks High Among Survival Needs
While all survival needs are not equivalent, they may be placed in a hierarchy biologically.
While humans require a variety of things in order to thrive, we only require a small number of macro necessities in order to survive. They are as follows: air, shelter, water, and food.
Someone will die if deprived of any one of them for an extended period of time; however, how long someone has to live without it is determined by both innate and circumstantial factors.
For example, a human can live for about three minutes without air, three days without water, and three weeks without food. However, a person will only live for about three hours without shelter in extreme conditions.
While this may not be an accurate estimate under all circumstances (a person might be able to live for much longer if they are very well nourished and have no prior health problems), it does underscore the importance of having a good shelter in any emergency situation.
Simple Field Shelters Can Save Your Life
When considering a survival shelter in the context of an emergency or catastrophe, many people think about a teepee, basic cabin, or large tent. These are all good shelters for various reasons, but a decent shelter does not have to be complicated!
A lean-to shelter constructed from a reflective emergency blanket or a snow cave dug out of a snow bank or drift is basically equipped with materials and can significantly enhance your situation.
If you’re focused on building large, semi-permanent shelters when what you really need is something that’s just big enough for you (or your group) to snuggle into together in order to stay warm, then you may be putting the wagon before the horse.
In reality, smaller huts are frequently more efficient than larger ones because far less energy is required to keep the air confined within them warm, which will warm you up in kind.
Remember: Results, not looks, are what matter the most when considering a survival shelter. There is much to commend a technically proficient shelter but as long as it can stand up, withstand the weather and keep you warm it is more than good enough!
Establishing Your Survival Shelter
Talking about a survival shelter is one thing; actually having to figure it out and build it in a foreign and hostile environment when your very life hangs in the balance is another thing entirely!
Confronted with all the many variables you must overcome in a live event is liable to give you brain-lock, or as you might have heard it called elsewhere “paralysis by analysis.”
But you needn’t fear: Constructing a superb survival shelter that will go the distance is easily done via a simple procedure consisting of just 5 steps: Gather Tools, Site Selection, Assess Personal Requirements, Determine Design and Protect Shelter.
We’ll discuss all of them below.
Gather Tools
The first step to building a shelter is to gather the tools you will need.
Of course, what this entails will be determined by the environment in which you find yourself and what materials are at hand.
If you’re in a cold region, for instance, then it would be sensible to utilize a shovel or something that can scrape and shape snow.
In a wooded region, on the other hand, you might want to focus on making use of hatches, axes and saws.
In general, however, there are some items which are useful in just about any situation: a sturdy knife (preferably with a fixed blade), fasteners, carabiners and some sturdy cordage (paracord is ideal) are all excellent options for every environment.
With these items in hand, you’re already well on your way to constructing a shelter!
Site Selection
The site where you decide to build your shelter is critical as it will have a major impact on the finished product. If possible, try and find a site that is sheltered from the wind and rain (or snow, if you’re in a cold environment).
If this isn’t possible, then do your best to orient your shelter so as to take advantage of natural windbreaks and other objects or terrain features which might deflect precipitation.
Another thing to consider when selecting a site is the ground itself. Try and find a spot that is relatively level and free of obstructions.
This will make life much easier when it comes time to actually build the shelter! Also take care to site your shelter so that ground water will not sweep through or into it.
Also, and this is a big one, do not locate your shelter near any obvious insect hives or nests, animal burrows, nearby carcasses or anything of the sort. You don’t want close encounters with any of them under the circumstances!
Assess Personal Requirements
Before you can start building your shelter, you need to first assess your personal requirements:
- What type of shelter do you need under the circumstances?
- Something for a short overnight stay or a longer lodging?
- For cold weather or hot weather?
- How much additional insulation do you have- sleeping bags, blankets, clothing, etc.?
- How many people will be using the shelter?
- What kind of weather are you likely to face?
- Are you injured in such a way that your work capacity is reduced?
All these factors must be taken into account before beginning construction as they will heavily influence your chosen style of shelter.
A team working together for a long-duration survival situation might well want to invest more energy up front in emplacing a sturdy, high performance shelter like a tipi or cabin compared to a lone traveler bedding down overnight.
Determine Design
The design of your shelter is going to depend on the materials and tools at hand, the environment you’re in, your skill and your personal requirements discussed previously.
If you have a tarp or some other form of waterproof material, are alone and only staying put for a night or two then you might want to consider a simple A-frame shelter.
If you’re part of a group in a cold environment and have access to copious snow, then a proper igloo or large snow cave might be the way to go.
In a hot climate, something like a simple lean-to or tarp shade might be more appropriate.
Protect Shelter
Once your shelter is built, it’s important to protect it from the elements and incidental damage. Wasting energy on repairs is not a winning strategy!
If possible, try and find some large branches or rocks that can be used to help support the structure. In a cold weather shelter, it’s also important to insulate the floor with leaves or other materials in order to prevent heat loss.
Finally, make sure that there are no openings through which wind or rain (or snow) can enter! Shore them up with whatever is at hand.
With these five simple steps in mind, you can build a shelter that will provide you with the protection you need to make it through even the most challenging of survival situations.
Emergency Shelters
Keep in mind your primary objective in an emergency is shelter not comfort. If you are stranded unexpectedly in the woods or forced into the elements during a natural disaster, a basic shelter can protect against exposure until help is available.
In an emergency situation it’s crucial that you think out of the box to utilize items you brought or can gather in the immediate area. If you have an EDC (every day carry) bag, you will already be ahead of the average person.
Check your surroundings for caves, an overhanging ledge, fallen trees with dense branches, or even a large clump of bushes. Consider one of the following emergency shelters:
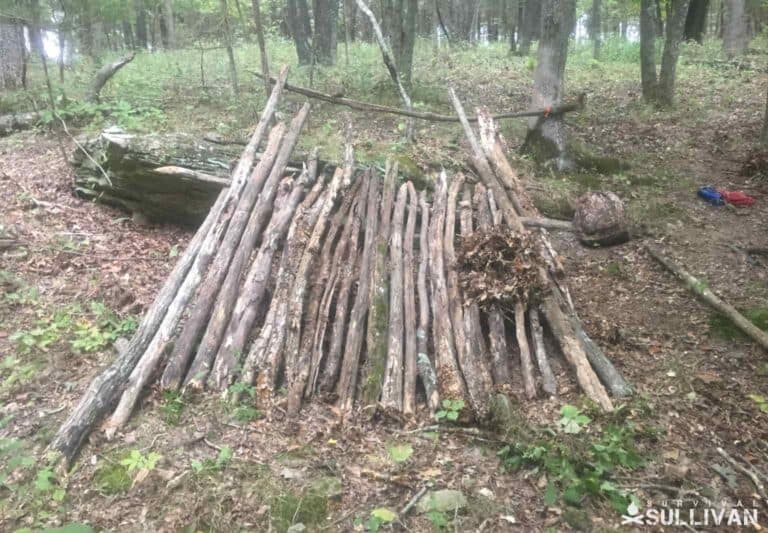
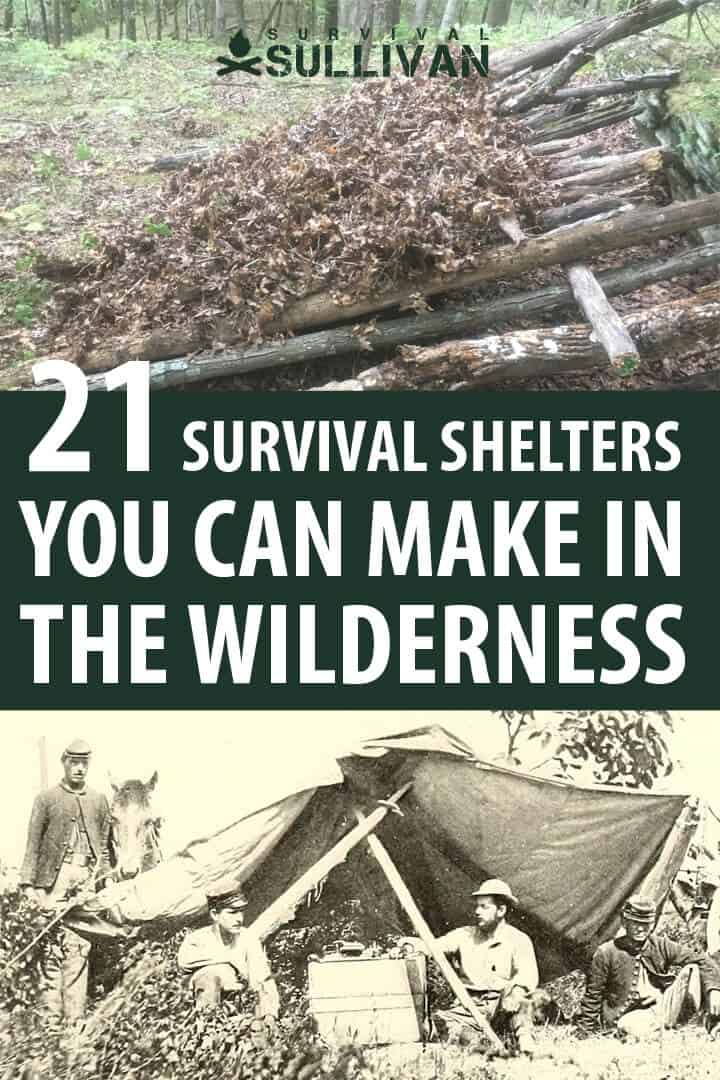
The Cocoon or Debris Hut
If you need shelter quickly, gather as much dry materials as you can from the ground near the location you’ve chosen. Just about anything dry will work, common materials are pine needles, leaves or other foliage.
Create a 24 to 36-inch mound that is a bit longer than you are tall. Pad the ground as well with dry material. Tunnel into your cocoon for a natural barrier of protection against the elements.
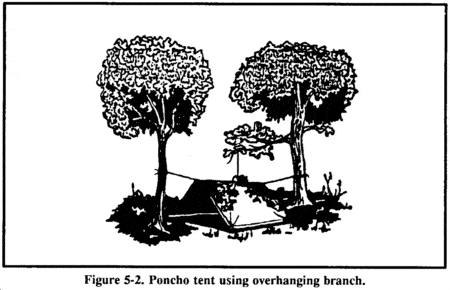
One-Man Shelter
Using a parachute, if available, three poles and a sturdy tree, you can construct a one-man shelter easily.
To make this shelter:
- Locate a pole of approximately 14 ½ foot long and two additional poles approximately 9 ¾ foot long.
- Fasten one end of the longest pole to the tree about as high as your waist if you stand by the tree.
- Position the two shorter poles on the ground parallel to the longer pole, one on each side.
- Now drape the parachute over the long pole and adjust it so the edges hang down about equally on both sides.
- The excess material on each side where it meets the ground should be tucked securely underneath each short pole and spread out on the inside to create a floor inside.
- At the open end near the tree, anchor the corners or lay a short pole horizontally between them so they do not slide toward each other.
- Excess parachute material if any can be used to cover the doorway in inclement weather.
This shelter is wind resistant due to the parachute material. It is large enough for one person to crawl into comfortably and yet can be easily warmed. A candle can keep the interior at a comfortable temperature.
If you build a small fire you can also use heated rocks for added warmth. Be aware any type of snowfall can cave this shelter in so it is not ideal for snowy weather conditions.
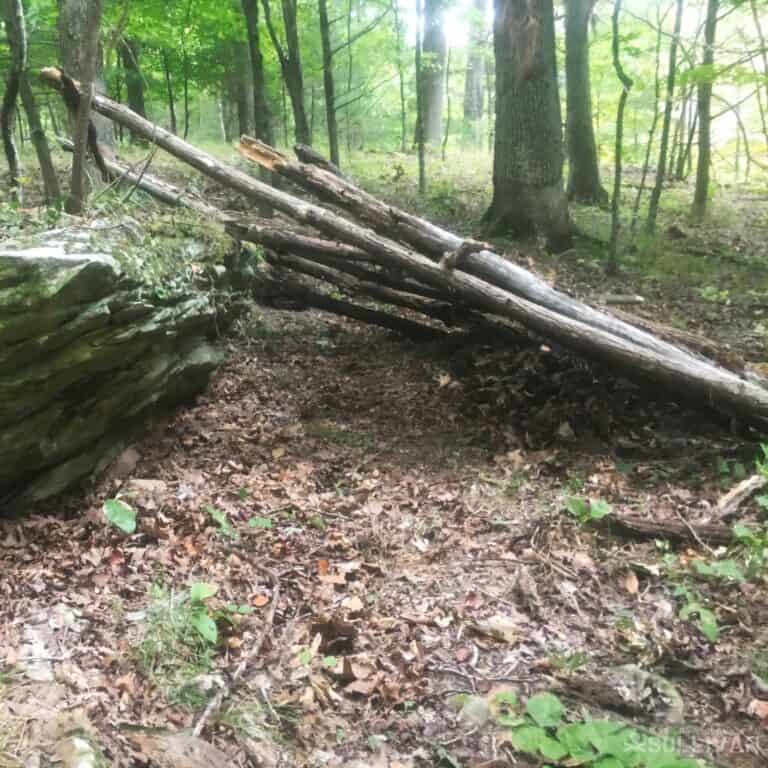
The Lean-To
This shelter works if you’re lucky enough to find a fallen tree, small overhang or other large object nearby.
Gather dry ground covering, such as dry leaves, moss, pine needles, as well as several small branches. Construct a wall against the windward side of the object by leaning the smaller limbs against it.
Weave dry materials into the wall to make it a thick barrier against wind and rain. A thick layer of pine needles or leaves will shield against moisture on the ground. A fire near the opening will provide extra heat.
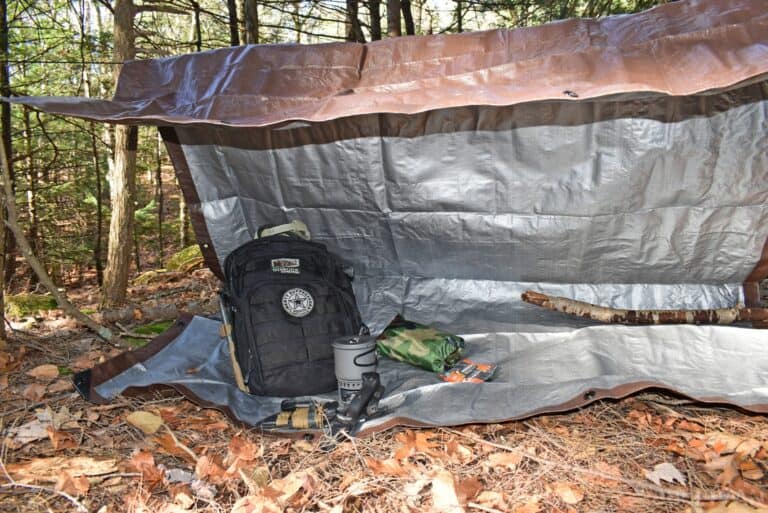
Tarp Burrito
Disclosure: This post has links to 3rd party websites, so I may get a commission if you buy through those links. Survival Sullivan is a participant in the Amazon Services LLC Associates Program. As an Amazon Associate, I earn from qualifying purchases. See my full disclosure for more.
If you have a tarp, this is a no fuss, no muss shelter that takes less than a minute to setup. Spread your tarp in your selected spot and flip one side close to one-third of the way. Continue folding to create a folded “roll” with the seam underneath.
Choose one end of the tarp and fold it under itself to close it off. Slide into the open end. If you have a sleeping bag you can push it in first and then slide in feet first.
All seams should be tucked securely under your body, leaving only the door which you can pull down in rainy weather or in warmer weather, prop open with a short stick angled between the tarp and the ground.
Remember although this shelter is quick and easy, because it has little ventilation, the inside will get damp or wet by morning except in the driest of weather.
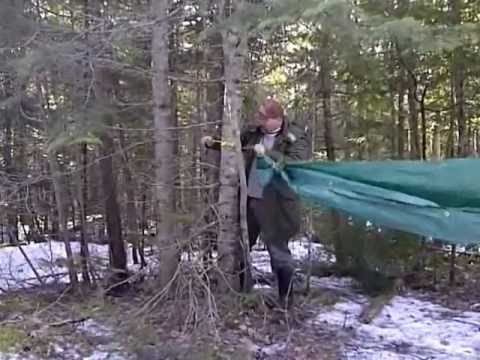
Tarp Hammock
If you have a larger tarp and need to put up a quick shelter that will keep you up off the ground, the tarp hammock shelter show in the video below is a great option.
You do need trees or some other way to anchor/hang the hammock in the air. If desired, you can add an additional tarp for cover on a ridgeline above the hammock.
Tarp Tipi
If you’ve ever seen a traditional tipi made from large hides or canvas, you know what a tarp tipi looks like. The difference is that a tarp tipi can be built more quickly, and you don’t have to have hides or canvas, you can use a tarp or any other type of covering.
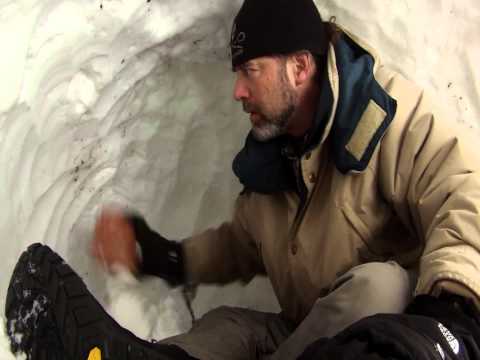
Emergency Snow Shelter
If you find yourself stranded in a deep snow environment, you can build an emergency snow shelter for temporary shelter. You will need to be able to excavate the snow to build your shelter.
Without the proper tools, this can be more difficult to do. But if you have prepared for the environment by carrying the proper tools you can build a decent snow shelter in under half an hour as shown in the video below:

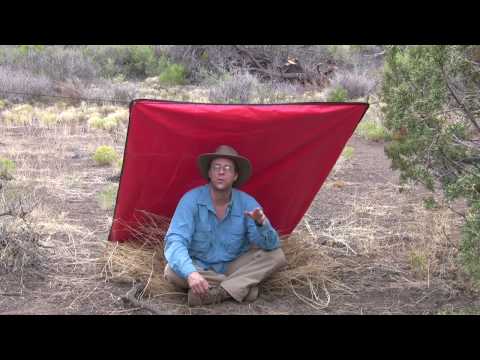
Shelter for Shade
In certain areas of the world a survival situation may only require shelter from the heat. When shade is your primary goal, you can quickly spread the tarp or plastic out in a way that lets you crawl beneath it.
If you are in possession of rope or paracord, simply fasten the tarp to four trees and take shelter beneath it.
Ramada
If you happen to be stranded in an area where shelter from the harshness of the sun’s rays is the priority, consider building a Ramada shelter.
The ramada is basically four posts and cross beams covered with a flat roof made of either brush, a tarp, or anything you have available that provides cover. In a desert environment, you can add removable walls to help block the breeze in the evenings and provide some warmth as well.

Double Layer Desert Tarp
The desert tarp gained popularity in military survival training over the last century, but this double layered shelter actually dates back several centuries in the desert countries, specifically the Middle East and Northern areas of Africa.
You need a couple dozen feet of cordage, stakes, anchoring objects, and two tarps or one large tarp to make this shelter. It can be built as a double layer rectangle close to the ground or as shown toward the end of the video below:
Tarp Wing
This unusual setup is ideal for protecting a large area from rain if you have large tarp or coverage for a more compact area if all you have is a small tarp. Tie two opposite corners of the tarp up high and two in down lower
The Tarp Wing will serve you well by keeping off both sun and rain. In wind though, it will billow and whip.
Tree-Pit Snow Shelter
This type of shelter works in snowy, cold weather in a location with pine or evergreen trees.
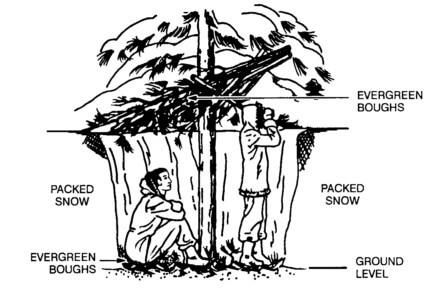
It requires some type of tool for digging. If conditions are right, it’s a good option.
- Find a solid tree with a dense canopy of branches above
- Use a shovel, if available, or other tool to remove snow from around the base of the tree. Dig until you reach the ground or to the needed depth and size to suit your group.
- To ensure the walls are supported, firmly pack all snow along the inside walls and around the top edges of the hole.
- Gather additional leafy branches or sticks and large leaves to provide cover over the top of the pit. Use evergreen branches or other dry material as a shield against the ground in the bottom of the pit.
Other Emergency Shelter Ideas
- Consider using a hollowed-out tree or fallen log to burrow into for sleeping.
- The mouth of an abandoned cave or beneath a rocky overhang will protect from the elements.
- A tree with a thick canopy of leaves is better than nothing.
- Larger fallen logs and big boulders can serve as a wind break or back wall of a low shelter.
- In dry locations, hollow out the ground enough to lie in it. Cover the bottom with leaves or grass and cover the opening with large limbs and a few dense branches. You can even make a long term shelter this way as shown in this video.
- In rainy weather or wet areas, find a shelter location on a hill so rain drains away from you or if doable, build an elevated sleeping area, build an elevated sleeping area using a layer of rocks under leaves and grass (more).
- The cross or “T” shape is abnormal in nature. Use cording, duct tape, or your shoelace to lash two limbs in this form and sink in the ground near your shelter to make it easier for search and rescue teams to spot you.
- A mirror, pop can or anything else that will flash sunlight can be attached to your “T” or even to the highest part of your shelter or a nearby tree to attract attention of aircraft.
- In freezing weather, water poured over a reed or other semi-solid roof will quickly freeze, filling in gaps and serving as an insulator.
How to Build Semi-Permanent Shelters
If you prepared well for your trip or find yourself in possession of a tarp or any large piece of plastic sheeting, there are a variety of ways you can build a shelter.
Semi-permanent shelters can be built fairly quickly and provide temporary shelter. It’s vital to practice building tarp shelters several times so you can be familiar with the process and be ready for unexpected issues that may arise.
Tent Shelter
In a situation where rain or inclement weather is possible, a tent shelter will provide more protection than a simple shade canopy.
Tie a rope between two sturdy trees and position the plastic or tarp over it lengthwise to form a long-sided A-shape. Anchor the sides to the ground with stakes if available or even sharpened sticks pounded into the ground. Use sleeping bag or create a bed of leaves and grass.
Lean-To Tarp Shelter
Fasten two opposing corners of the poncho or plastic sheeting to trees. Pull the other ends to the ground diagonally and anchor with heavy boulders, stakes if available or sharpened sticks sunk in the ground. Create a sleeping area using dry materials at least 8 inches thick.

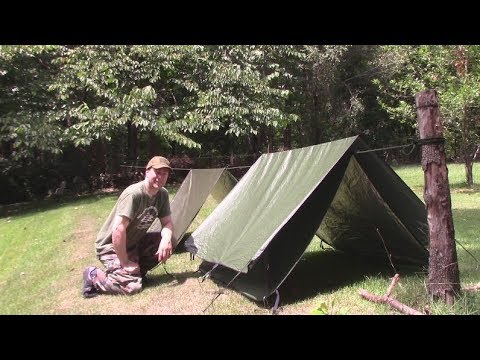
The A-Frame
If you have the luxury of time, try this one. Gather a pair of sticks 4 to 5 feet in length and another at least 10-foot long. Form the letter A by leaning the two short sticks together with the longest limb at the top of the A and the other end against the ground. Use your boot lace, cording if available, or your belt to fasten them together where they meet.
Pile a thick layer of dry materials inside to shield you from the cold, damp ground. Since shelter, not comfort is the goal, even a layer of rocks will work for this in the absence of other materials.
Create the wall by angling more sticks and limbs against the longest stick. Further insulate your wall by wedging or piling dry materials like grass, leaves and moss into the frame. The opening should be on the high end.
Quinzhee Shelter
- Easier than building an igloo, the dome shaped quinzhee is built from about any kind of snow.
- Begin by stacking gear, typically a backpack under a tarp at your shelter location.
- Cover the tarp and gear with snow and pack it until it is about 24 inches completely around.
- Forage or cut 36 to 48 sticks about one foot in length to serve as guide sticks.
- Push the foot-long sticks into the dome somewhat evenly spaced around the entire structure.
- Carefully tunnel into one side to reclaim your gear and the tarp.
- Remove snow from within the structure until you get to the bottom of every stick.
- When finished, the quinzhee should be pretty uniform in thickness all the way around.
- Poke a small hole in the ceiling of the quinzhee for ventilation.
Snow Cave Shelter
In deep snow areas, a snow cave can be a good way to insulate against the elements if there are no other options.
Snow shelters are very dangerous to build due to the possibility of individuals suffering from oxygen deprivation or a cave in if not done correctly.
It’s crucial that you research how to select the right snow and practice creating a snow shelter with an experienced person prior to trying it alone.
- Choose a snow drift or bank that is deep and solid.
- Cold air falls and collects in the lowest point. Tunnel into one side of the drift at an angle so you have a tunnel with a low point to serve as this “cold well”.
- Create an elevated sleeping area, similar to a shelf or mound.
- The inner roof should be smooth which will encourage water to run down the sides rather than dripping from the ceiling onto you.
- Pooling ice water is definitely a problem. Dig a trench around the inner circumference of your cave or at least around your sleeping mound. If you have a smooth inner roof, water will run down the sides of your cave and pool in the trench away from your body.
- Create a small opening no less than 6-inches around for ventilation.
- Take a stick or other tool with you into the snow cave to break through collapsed snow or ice in case you are trapped unexpectedly.
- Build your shelter no bigger than needed. Starting a fire may be impossible and smaller shelters are easier to keep warm via your body heat.
- Melting a frozen bottle of water is time consuming and requires a lot of heat so if you are lucky enough to have water, keep it close to your body to prevent freezing.

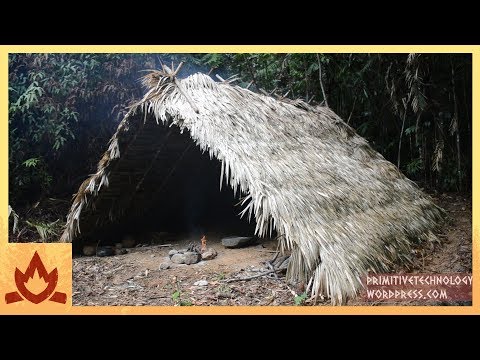
Wikiup Long Term Shelter
For a longer term, semi-permanent and water-resistant shelter which will allow you to have a cozy fire inside the shelter, build a Wikiup or Debris Tipi shelter as seen here.
Wedge Tarp
The aerodynamic shape of the wedge tarp typically withstands cutting winds and driving rain. It is ideally suited to windy weather when there is a continual predicable wind direction.
With at least 5 anchor points, it is capable of being more secure than other tarp shelters. Typical setup is dual purpose in that it includes at least two corners that serve to harvest rainwater.
- To begin, anchor two corners on the same side into the wind.
- Fasten a line across the center to the opposite edge of the tarp.
- The remaining corners are then fastened downward to the ground.
- Then tie up a line to the center of the opposite side of the tarp.
- Anchor the remaining two corners down toward the ground.
- Open wings and increase ventilation by utilizing more cord and reducing the angle.
- For superior weatherproofing, the last corners can be anchored down sharply.
- Use a couple rocks or pieces of log near the first corners to increase the depth for water collection.
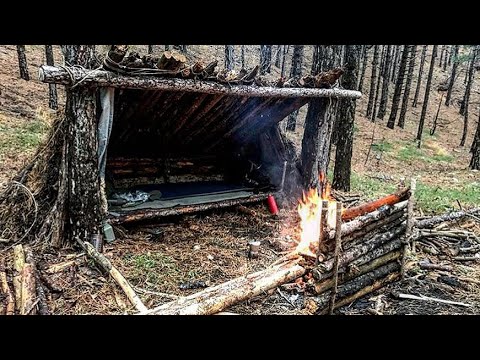
Field-Expedient Lean-To
If you are in the woods and can secure enough natural supplies, you can construct a field-expedient lean-to even utilizing only a good survival knife.
There is definitely more of a time investment in building this type of structure, but it will pay off in protection from exposure. This is ideal if you need shelter longer than just overnight.
Materials Needed:
- A good survival knife
- Two sturdy trees standing about 6-7 feet apart.
- In the absence of two trees, use Y-shaped limbs or even two tripods.
- Cut or find a branch about 6-foot in length and about an inch thick
- 5-8 poles or limbs that are an inch in diameter and 6-foot long.
- Vines, paracord, or other material for lashing horizontal support to each tree
- Additional poles, limbs or vines for cross support of the beams
Lash the longest limb, which will serve as the horizontal support, between the two trees at chest height.
Keeping in mind you want the wind at the back of the lean-to, securely fasten one end of the first 6-foot pole on one side of the horizontal support.
Continue with the other poles to complete the frame. Fill in frame with branches, grass, pine needles and leaves working from the bottom up like shingles.
Helpful Items for Building Primitive Shelters
Primitive shelters may be your only options in certain survival scenarios, so be sure to keep these in mind before building one:
- Trees or other solid objects to use for brace walls.
- Dry ground cover materials such as pine needles, leaves, moss, grass, or evergreen branches.
- An axe or saw for cutting and notching branches if needed.
- Some type of cording or rope for tying trees together. Things such as Paracord, strong vines, twine, rope, a belt, even duct tape or zip ties will work if available.
- A good, sturdy survival knife
- Comprehensive first-aid kit. Accidents do happen and it’s best to be prepared.
- One or more ways to start a fire (lighter, waterproof matches, magnesium stick, flint, etc.)
Cautions and Other Tips
- For more than one person, it’s better to build a single shelter and settle in together for added warmth.
- Be aware of your surroundings. Dense bushes and lower ground are home to more insects. Inspect your selected spot for ticks, fire ants, bees or wasps, or poisonous snakes or scorpions.
- Stay near the opening in caves and be alert for animals who may also be seeking shelter from the elements.
- Keep any tools sharp, wear gloves and heavy protective clothing when available. Cut away from the body and be alert for possible slips or misses that could cause injury.
- Smaller shelters are easier to retain heat so build only as big as needed for your group size.
- Build a small fire near the opening either in a pit or edged with rocks. Ensure the area is free of anything that may catch fire and keep dirt, water or even sand on hand to handle wayward embers or fire.
- Rocks heated in the fire and stacked in your shelter will provide extra heat. If conditions necessitate a fire inside your shelter, adequate ventilation is a must.
- If winds are possible, consider potential fire paths and take proper precautions.
- Always let someone know your planned route and destination and update them on any deviations that occur.
- If use of a stove or lantern inside your shelter is necessary, use care and turn off when not in use. Carbon monoxide gas is dangerous and can be fatal.
- Use boulders, tree branches or fallen logs to partially block the entrance to help retain heat and keep animals out.
- When foraging for supplies, remember items can have unexpected uses in a pinch. Pieces of rope, discarded paper, or a forgotten shoe or boot, torn plastic tarps, ponchos, even ripped parachutes may be used as shelter materials.
It’s always a good idea to practice shelter building several times before you attempt in the wilderness. Each time you build a shelter, you will learn more about what can go wrong.
In most cases, practice makes perfect. In the case of shelter building, practice may just save your life. What type of shelter interests you most?

My dad was military. My grandfather was a cop. They served their country well. But I don’t like taking orders. I’m taking matters into my own hands so I’m not just preparing, I’m going to a friggin’ war to provide you the best of the best survival and preparedness content out there.
You missed the most basic and quickest built shelter, that will save your life.
The debris hut; this shelter is like your parachute model. what person lost in
the woods has a parachute or any thing else but the clothes on their back?
this shelter is framed with sticks , and then covered with any thing and every thing.
Made right it is water proof and very warm. crucial if the temp. drops and
the wind picks up.
every survivalist knows about this shelter.
I think your omitting it is a major goof. caught ya