Flint knapping rocks is the oldest, most primal way of making tools. The first people to rough out a hand axe are truly giants on whose shoulders we stand.

There is something very satisfying in the knowledge that you could walk into the wilderness with nothing at all, pick up a piece of flint and a heavy rock, and make your own knife, no forging required, with materials you find around you.
Warning! Flint is sharp and knapping produces dust which can cause breathing problems and silicosis. Do not work flint without eye protection and use a mask or dust extraction unit indoors. all activities are undertaken at the reader’s risk.
Table of Contents
Why Learn Knapping?
It’s worth knowing from the start that flint is not the only knappable material. Flint with significant impurities is called Chert and can make beautiful arrowheads and knives just like any other knappable stone.
In fact, any stone can be knapped since any stone can be broken down into small parts and used as simple tools, but those which can be shaped best are conchoidal rocks. The geology is interesting but not very useful here, essentially a rock is conchoidal if it breaks on a certain way struck.
Think of the waves and arcs in the edges of broken glass and you’ll understand. This is because glass is conchoidal, like Flint, Chert, Obsidian and many other rocks, and knappers often use glass for practice, especially as they are first learning, because it is free and easily available.
In a survival situation, being able to knap arrowheads and knives from broken bottles may even be more appropriate or useful than flint if you are in an urban area.
Putting glass aside, this guide will assume you are using flint (which will sometimes be referred to as ‘rock’ or stone’) because it is the best and most common knapping material.
When finding and selecting flint, discard any whole boulders with no bulges or nodules on them, as they will be very difficult to get into.
Once a suitable boulder is found, use a hard hammerstone (not another piece of flint but something hard like granite) to knock off a nodule from the outside.
This should produce a window on the flint inside. If the colour is regular (the richer and darker the better) and you can’t see any obvious cracks or splits which could indicate water damage, then you’re good to go.
Breaking up the flint into smaller parts (called ‘quartering’) is a good idea for transportation, and sorting out flakes for different uses. All of the techniques outlined below will work on a larger scale for quartering.
The best quartered flakes are larger than you might think, leaving room for things to go wrong with the knapping and still turn out a decent tool. Never forget, flintknapping is an exercise in hoping that bashing two rocks together in a special way will somehow make an tool!
Tools of the Trade
Hammer Stones
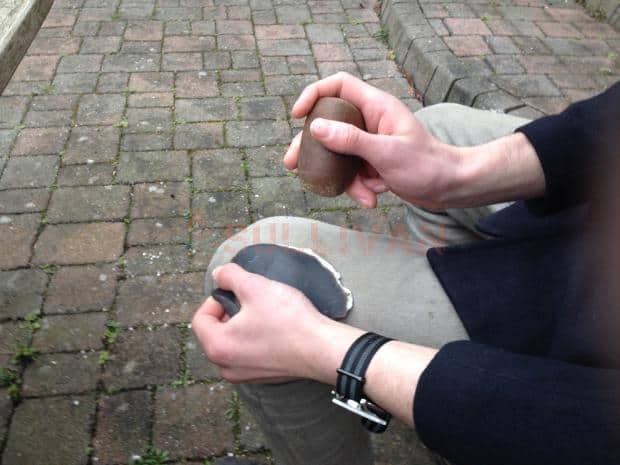
The best hammerstones are made from medium to coarse -grained rock like granite or quartzite, rounded and small enough to fit comfortably into your hand.
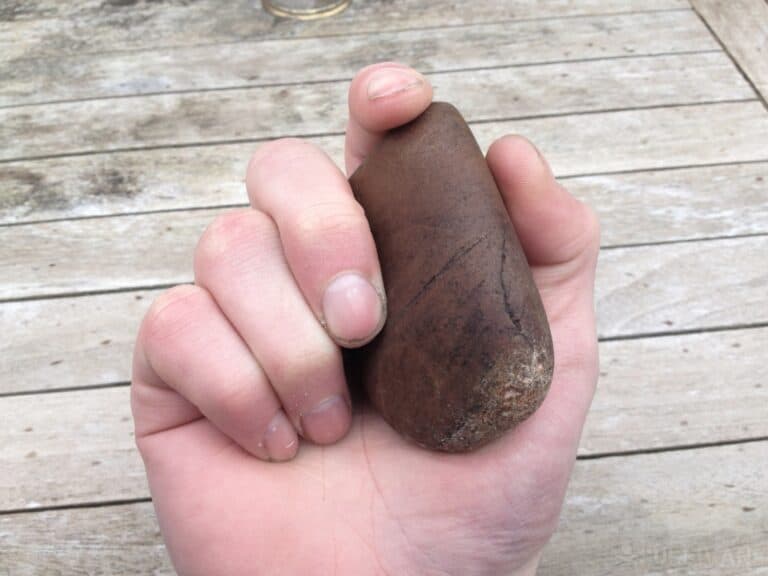
If possible find one like in the picture below, with a round end and a slightly flattened end where the forefinger can go. Near-spherical stones are awkward to hold and so pack little punch, closer to egg shaped is best.
You should hold the hammerstone with your thumb curled around the front, your forefinger over top and the other three fingers securing it from the back (normally only the ring finger actually makes contact with the stone but find what works for you):
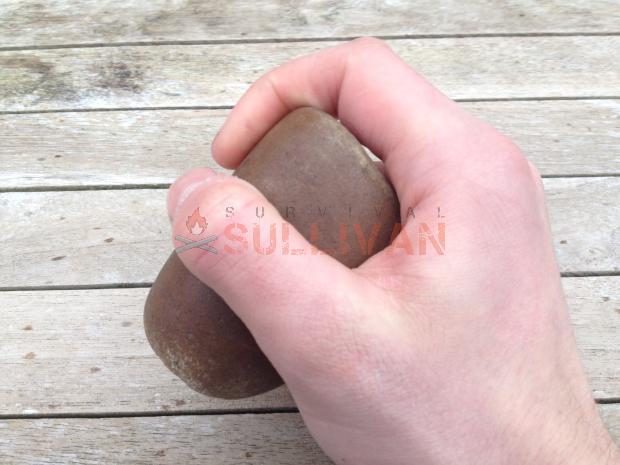
This is not the most natural grip (also shown below: How not to do it), but holding the stone without a forefinger over the top will reduce control and effectiveness, (because the forefinger stops it from bouncing away from the flint):
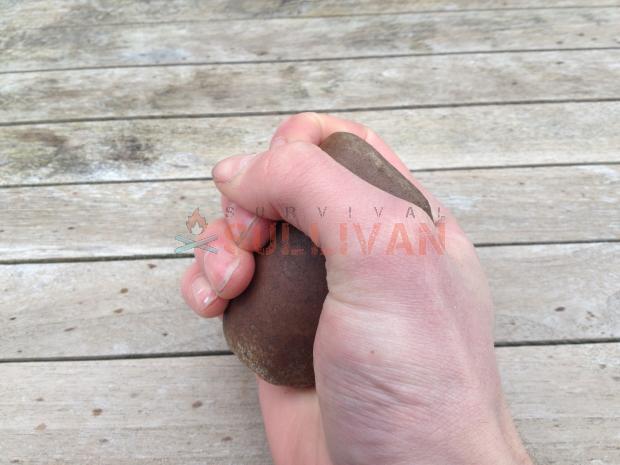
This is less comfortable in the long run because it reduces back-shock into the hand if the flint doesn’t break and the hammerstone can’t follow through.
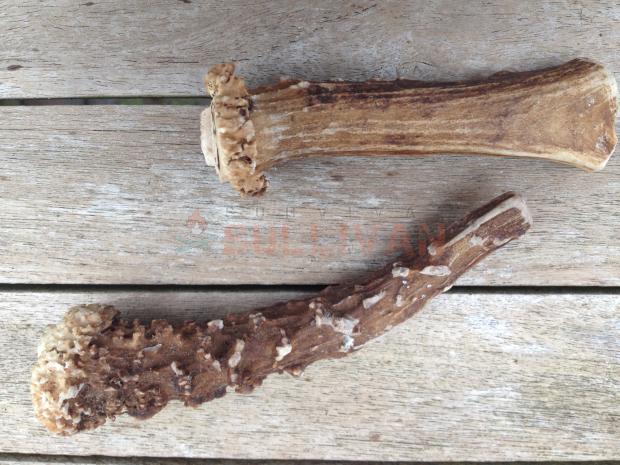
Billets and Soft Hammers
Any percussion/hitting tool not made of stone is a soft hammer, because in comparison, wood and antler (the two most common choices) are soft.
They are generally long, club-like billets, made for swinging and momentum. The end should be rounded, but not to broad, otherwise precision will be difficult.
It is important to have a variety of sizes for different jobs, and to experiment with different materials.
Finding broad enough material is a challenge (especially if buying, good antlers can be very expensive). Hardwoods will be better than softwoods, which tend to be impractical.
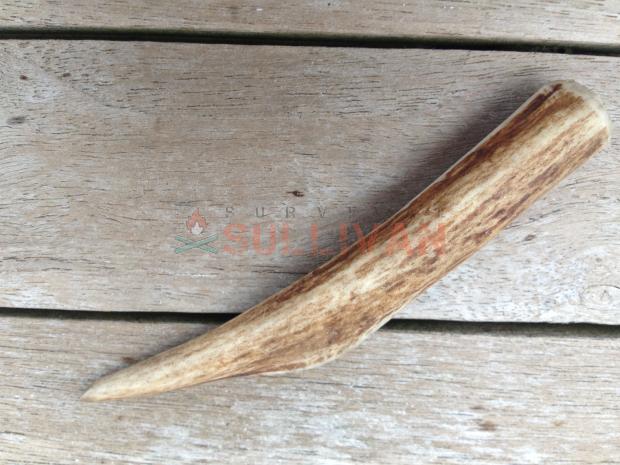
Pressure Flakers and Nibblers
These are small tools with pointed or slotted ends, for fine shaping of arrowheads, spearpoint and blade edges. Often made of an antler tine, a pressure flaker has a pointed end for pushing small flakes off the edges of a larger piece, slowly whittling down the shape.
A nibbler takes its name from a mouth-like slot in the end, which accomplishes the same thing by leverage, inserting the edge of the work into the slot and pushing down on the other end to peel of small flakes.
Making flint Tools
There are two types of tool that can be made from a flint boulder core and flake. Whenever small piece of flint is struck off a larger rock, the smaller piece is called a flake and the larger part is the core.
Tools can be made in two ways: by reducing the material around a core, leaving the core in the shape of a the desired tool (normally hand axes, adzes, chisels etc), or by using the smaller flakes which come off the larger cores as tools themselves, perhaps with some even smaller flakes taken off them, to refine their shape (knives, arrowheads, spearheads and other finer tools are made this way).
These are core tools and flake tools respectively. Obviously, the master knapper will minimize waste by doing both art once: the flakes that come from a large core will make tools, but the core will end up as a tool in itself too.
This is much easier said than done though, and many beginner knappers find themselves making rough, cylindrical cores with no useful potential as tools, and even masters sometimes just use a rock for taking off small blades if that is what is needed.
Don’t be disheartened just because not everything appears useful when you start knapping.
Core Tools
A core tool is made by taking a large flake of flint (a piece which has been broken of a boulder) and reducing it into a useful shape. Keep in mind that your tool needs to be as flat and thin as possible, while still being strong, so the best way to approach the manufacturing is often as an exercise in lump reduction, which happily produces a tool.
Focusing on one end slightly more than another will thin it out and produce a wedge shaped tool, an axe.
The instructions below are for making a handaxe or axehead but the techniques can be applied to different shapes for different purposes.
How to make a Handaxe or Axehead
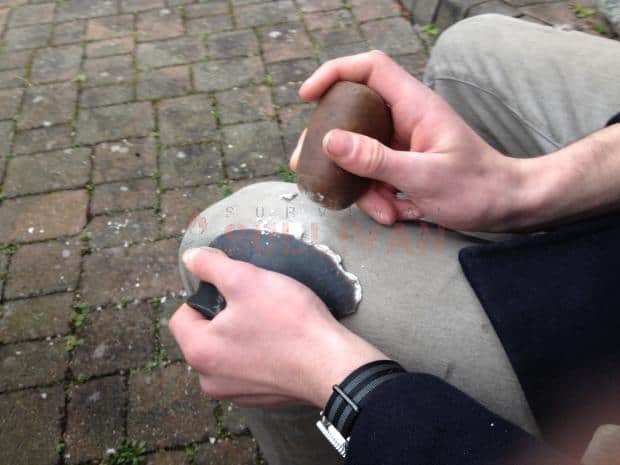
Begin with a large flake, and a hammerstone. Rest the work against your thigh/knee, on the opposite side to your hammerstone. Angle it so that the flattish (ish) side of the work (which should be uppermost as in the picture) is at about 30° below horizontal, on the outside of your thigh.
Bring the hammerstone down, near the edge of the work, at an angle to the stone. The point where you hit should be close to the edge, but far enough from it that you will not be hitting a very thin piece of flint, which will just splinter.
If the edge are very thin, abrading them with a rough grindstone can give the striking points (called ‘platforms’) more strength, leading to better quality flakes.
This first stroke should knock off an outer flake from the underside of the work and if your original flake has a layer of cortex (the chalky outer covering of flint) on it, this stroke should remove some of it.
Proceed around the edge, continually reducing the largest lumps you can find, on by one.
Notice how the first flake will have left two small points at the edge of where the flake detached (shown below, though the tool in the picture has been turned over to aid flaking). These are ideal platforms for the next flakes.

As the tool begins to thin and take shape, look at the flint and choose which end will be the but and which the tip.
You should take flakes of by hitting from the front, and also turn the work over and hit from the other side. This is called bifacing, and over time it will center the cutting edge. This is where axeheads and handaxes diverge.
For a handaxe, take more flakes off the tip. This will thin it, and make it narrower in comparison with the butt.
You should also take fewer flakes at the butt end and use a combination of abrasion and direct hits at right angles to the flint to round out the edges. The picture shows pointing the end.
For an axehead to be fitted to a handle, you should try to make the tip/head/cutting edge wide the the butt. This is because the head is fitted into the handle by pressure, and the pressure of hits during use keeps it there.
These hits pch the head back into the handle, and so the head end must be wider than the butt, effectively making a wedge will not fit all the way through the whole made in the handle, keeping it in place by pressure.
Because of this, it is very important to polish/grind the edges of the axehead after flaking.
Find a coarse grindstone and grind down the edges not the cutting edge or the butt, but the sides between them) as flat as possible.
If you don’t do this, then the sharp edges will cut the handle just as fast as they cut whatever you’re using the axe on!
The picture below shows a selection of handaxes. From left to right: made as a demonstration piece by the author’s teacher, the author’s first and second attempts, and the piece made in this tutorial.
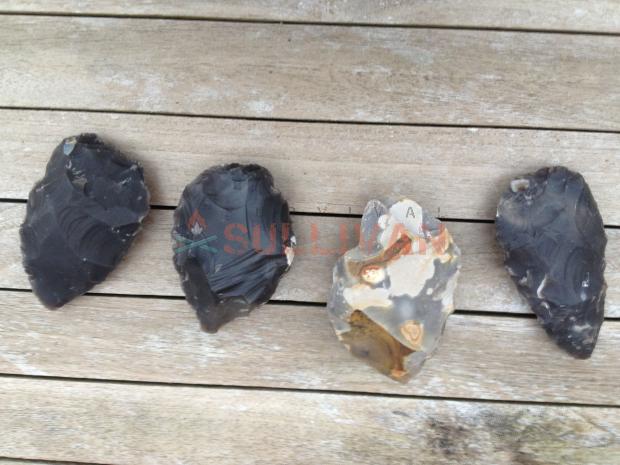
photo above: a selection of handaxes
Using Core Tools
Flint tools do not behave like metal ones. This is because metal does not a splitting grain in the same way flint does.
This is a blessing and a curse, it means flint is easy top shape into tools, but it also means that levering against the edge of a flint tool will probably just break off a flake.
As a general rule, edged flint tools should be used edge forwards, so the blade edge should be at the from of the movement of the tool, and if possible should be perpendicular to the cut.
For example, a flint axe is always hit at right angles, straight into the side of a tree, or at about 45° in softer wood.
Scraping edges are more effective is used against the edge of a piece of work than it’s side (think of how it easier to whittle shavings from the corner/edge of piece of lumber than digging into its flat surfaces)
Flake Tools
As mentioned above, flake tools are those made of smaller flakes, hammered from bigger pieces of flint.
They are generally finer to work and are liable to split easily in the making process. It’s worth it though, there is no feeling like hunting with an arrow you have made yourself.
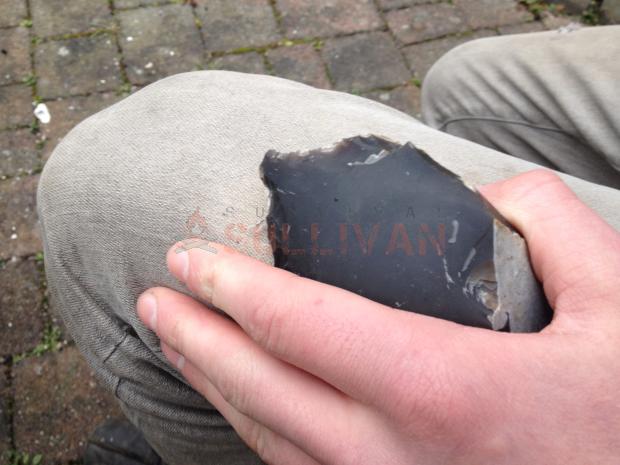
Using First Strike Flakes
‘First strike’ flakes are those which are struck straight off a larger core. They are often razor sharp, with a wide variety of shapes and are generally the best tools to use for fine cutting or carving work.
Thinner flakes with sharp edges are the the sharpest, but also the most fragile, and should be used with care, pushing the sharp edge ahead of where the flake is held.
Thicker flakes can have oblique scraping edges. These are useful because they are harder to blunt and can be used at any angle, easily removing large shavings for shaping antler or wood.
Pointed flakes can be used to drill holes, twisting them with your fingers like a drill bit works well but takes a long time. Making a pressure flaked ‘drill bit’ and attaching it to the end of a stick to ue as a finger drill will be more effective.
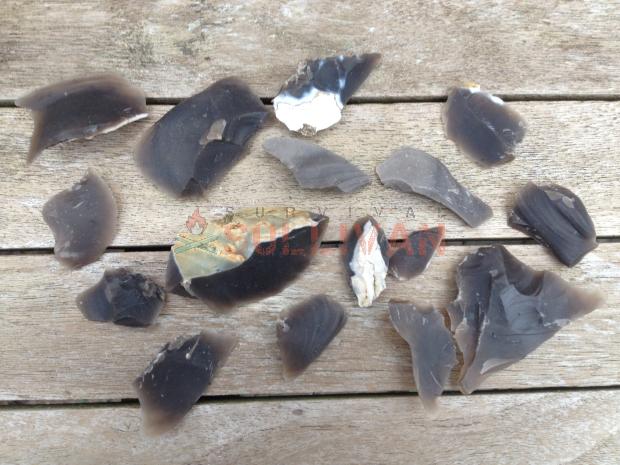
photo: selection of first strike flakes
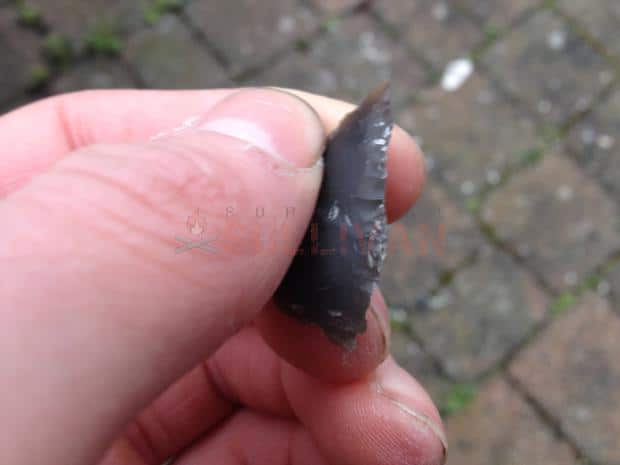
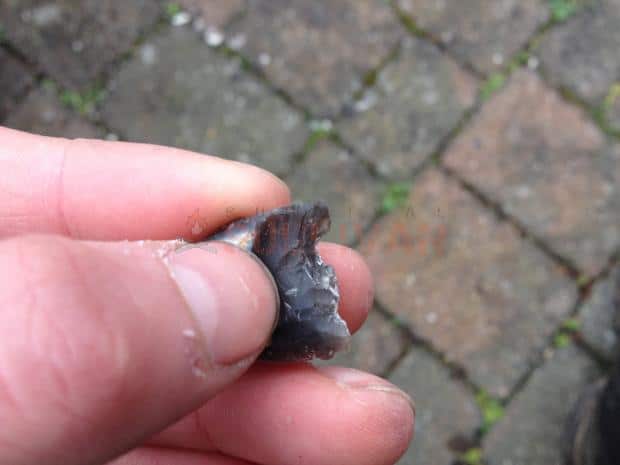
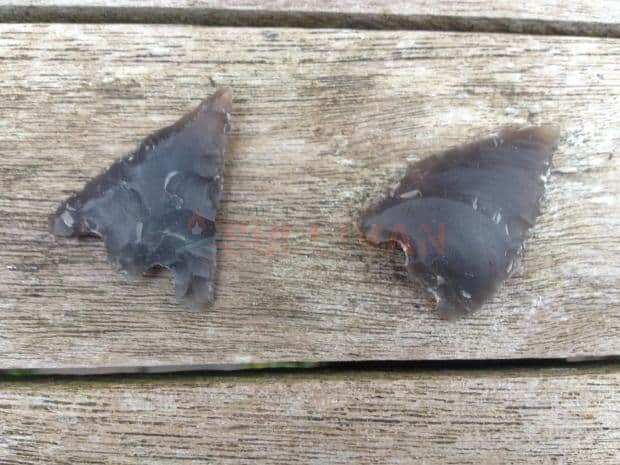
Making an Arrowhead
First, select a suitable blank. All flakes of flint have a ‘percussion bulb’, a roughly conical area where the force which broke them off originated.
Good blanks is slightly cambered/curved from end to end or side to side, and has its percussion bulb at one end as this makes the bulb easier to around.
Ideal blanks are also roughly arrowhead-shaped already, and will have their percussion bulb at the bottom (near where the shaft would go) of the arrowhead. The picture shows a selection of good blanks.

photo: Picture of some good arrowhead blanks
Begin by gripping the work with the fingers of your non-dominant hand curled in to almost form a fist, and the flint between them and your palm:
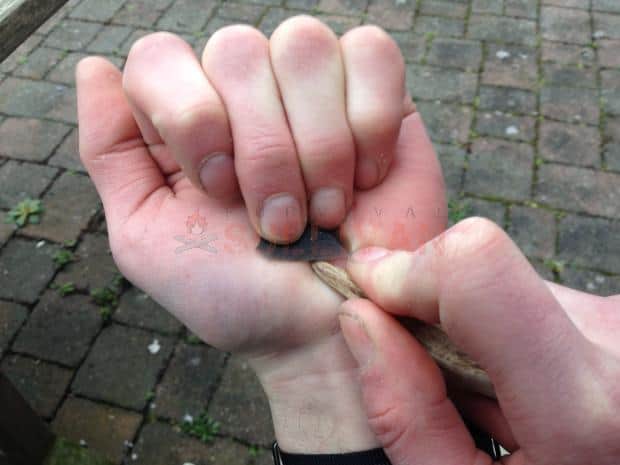
photo: pressure flaking
Use a pressure flaking tool to press small flakes away from the very edges of your work, placing the tip on the flint, then pushing down hard to break off a small flake.
Rough out an arrowhead shape, making sure to keep the tip as central as possible, the base reasonably broad and the outline slightly larger than you actually want (as it will be reduced in the next step).
The picture below shows the debitage from pressure flaking, zoomed in as much as possible:
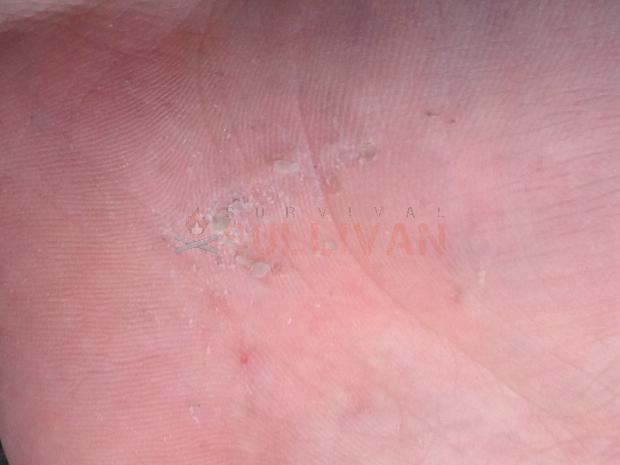
photo above: pressure flaking debitage
Once your shape is roughed out, turn the work over and begin to flake down the sides of the arrowhead, as carefully and regularly as possible.
This should produce a fluted effect. Once this is done, turn the work again and do the same. This is bifacing, just like with a larger tool.
Finally, you may wish to add a tang, barbs or notch for attaching the head to a shaft. Begin by pushing out a single flake where you want to notch. Then turn the work over, and push out two flakes, one from either side of the gap left by the first flake.
Turn the work and ouch out another flakes in similar fashion. Continue until you have a good notch. A tang is simply two very large notches, one in either side of the head.
Finished! Spearheads and daggers are made by the same process, only larger, and daggers tend to have very long notches to be used as handles.
Nick O’Law has been exposed to survival from a very young age. In his teenage years, he learned A LOT about bushcrafting, such as making snares and traps, and even how to make DIY knives.
If you haven’t ye read and tried his knot-making articles on Survival Sullivan, you should definitely check them out.
I learned flint knapping incredibly easily, by using the bottom of beer/soda bottles. Obviously cheap, and far easier to knap than stone, but teaches method, how stone reacts to striking in different ways and angles. Highly recommend doing this first!!!!
I Love this. Maybe you could give a tutorial on searching for and choosing the best workable material.