Building a chicken coop doesn’t need to be expensive! You can build a chicken coop that is predator-proof from scrap material found around most homesteads and a couple small rolls of fencing – or less than $100 worth of wood.
Upcycling an old rabbit hutch into a chicken coop is an even cheaper way to secure your meat and egg birds.
Chicken coop kits sold at agriculture supply stores and online can range from $200 to $500 – even for a small habitat. If your flock free ranges or has a large day time run, there is no need to construct a large or tall coop.
When we bought our farm, it came complete with many things, one of which as a chicken coop. Because the coop was made out of particle boards, I knew it was not going to be sound, or even last very long. Actually, I was surprised it had already lasted or two years before we bought our dream survival retreat land.
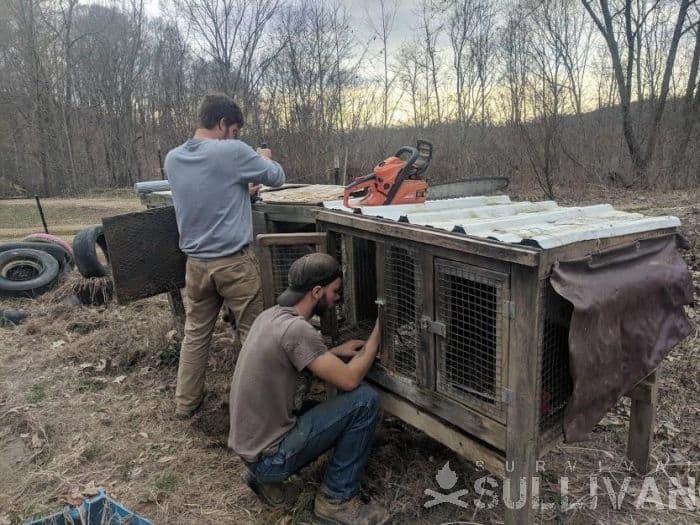
Before I moved my chicken and ducks into the coop, my husband and a buddy set to work upgrading it, and making it far more predator proof.
I crossed my fingers going into last winter while hoping and praying some additional fix up would keep the world’s ugliest chicken coop safe and together until spring. Well, it lasted, and now it is time to build the chickens a nice new home…
I wanted to build a sturdy new chicken coop that was going to be ultra simple to clean, and collect eggs from and be very easy on the budget. Chicken wire is awesome for keeping birds in, but lousy for keeping predators out.
Chicken coops should be constructed with hardware cloth (rabbit hutch wire), and chicken wire should only used for the upper side portion and top of day run areas.
You could also use bird netting for the top of the new run because it is sufficient to keep hawks away. If you live in a high predator area where bears wander about in the woods, you should avoid using chicken wire altogether.
After scrounging around my husband’s cool junk yard pile, I knew the only thing I would have to buy is some hardware cloth, and chicken wire. While still “shopping” in the junkyard, I happened across an old rabbit hutch.
I decided with a bit of retrofitting, the hutch could be turned into a suitable 2-story chicken coop. Once the bottom portion was added, my junker of a rabbit hutch would look almost identical to those over-priced coop kits that were advertised at Tractor Supply, and Rural King.
Last summer I turned a smaller hutch into a chick brooder and it worked out great. All of the droppings fell out the bottom or could easily be knocked out with the straw when it was replace.
Not having to clean out a wood floor chicken coop once a week every week was going to be an incredible time saver.
Why You Need One
Even if you live on a large and secluded survival homestead with a big tribe of folks to help you work and defend the place, a need to develop during a SHTF scenario could still materialize.
A backup up plan for a TEOTWAWKI survival homestead is far beyond wise – and could make a life or death difference for your loved ones.
A rabbit hutch chicken coop can quickly be turned into a portable chicken cage and living quarters during a bugout. A rabbit hutch style chicken coop like the one shown in the photo above is large enough to house two laying hens and it is a simple two person carry.
Several of these small rabbit hutch chicken coops sitting right next to each other can provide enough space for a decent size flock that is still highly portable.
Where to Place It
I highly recommend placing the chicken coop on concrete paver blocks to prevent them from sinking into soft ground during rainy times of the year if they are being constructed with portability in mind.
A plastic tub containing food and/or bedding can be strapped to the top of the hutch style coop to both keep it at the ready in case a bugout becomes necessary and to save space when rapidly leaving your home during a SHTF event.
Below, I will detail how to build the rabbit hutch we are turning into a coop, just in case you do not have one laying around your homestead. You might be able to score a cheap wood hutch by looking on Craigslist or local Facebook trading posts and auction pages.
Your rabbit hutches or chicken brooders do not have to look exactly like the ones I am using to be able to follow the process outlined, you will simply need to adjust material measurements to suit the needs of the structure you are working with.
My beloved yet weird heritage breed Buckeye chickens simply refuse to fly, so my medicinal herbs and roots might be safe since they will be grown in tabletop style raised beds.
But, not wanting to leave that to chance, I am going to use chicken wire and 2 X 2 wood strips to make lightweight caged top coverings for them to keep the chickens away from the healing crops while they do their job and rid the area of bugs.
You can also place pressure treated plywood on the ends of the hutch style chicken coop. But, doing so will decrease air flow during the summer months. During fairly warm days from the late fall through the early spring the flaps could be raised entirely or partially to allow more light to flow into the living area.
Egg production slows down during cold weather months, so adding as much light, natural or artificial (hanging solar coop lights), can help increase egg production.
I am taking the rubber roofing off of our old chicken coop and attaching one end of it to the front part of the roof on the new hutch style chicken coop. Then I am going to roll the rest of the rubber roofing onto the top of the roof and tie it into place with baling twine.
During the winter months I can simply undo the baling twine and allow the rubber roofing to unfurl over the front of the coop to allow more weather protection for the chickens.
Building the Chicken Coop
Materials List
- 16 pressure treated 2 x 3’s or 2 X 4s that are 8 foot long. If you buy pine, they will cost around $40.
- 2 pounds of decking screws – 2 and ½ inch. They will cost around $20 if you do not already have these or similar screws on hand.
- 14 2×2 pressure treated furring strips that are 8 foot long – cost should be around $30.
- 1 sheet of ½ inch thick pressure treated plywood – 4 foot by 8 foot – cost should be about $40. Corrugated metal could also be used. I recommend covering the plywood with shingles or rubber for add longevity.
- ½ staples
- 5 hinges – ½ inch recommended and ½ inch barrel bolts
- Approximately 3 to 4 rolls of 36 inch x 10 foot rolls of 1/2 of hardware cloth
Tools List
- Impact Driver
- Staple Gun
- Circular Saw
- Drill and ⅛ of an inch drill bit
- Hammer
- Carpenter Square
- Pencil – carpenter pencil recommended
- Measuring Tape
- Tin snips
- Leather Work Gloves
- Safety Goggles
Instructions
- Measure and then cut two of the 2 x 3 or 2 x 4 studs with a circular saw to they are 6 feet long. These boards will serve as the long support for the cheap DIY rabbit hutch. Make sure to save the scrap wood from the stud board cutting for use in extra projects!
- Measure and then cut four of the 2 X 3 support stud pieces 33 inches long – you can get two from each eight foot long stud board. There won’t be much scrap left, but save it anyway; it could come in handy one day.
- Abut the ends of the six foot long stud supports to the ends of the 33 foot long stud supports so they form a box and are flush.
- Next, abut the two middle support studs at 2 inches and 4 inches on center from one end of the 6 foot long support structure.
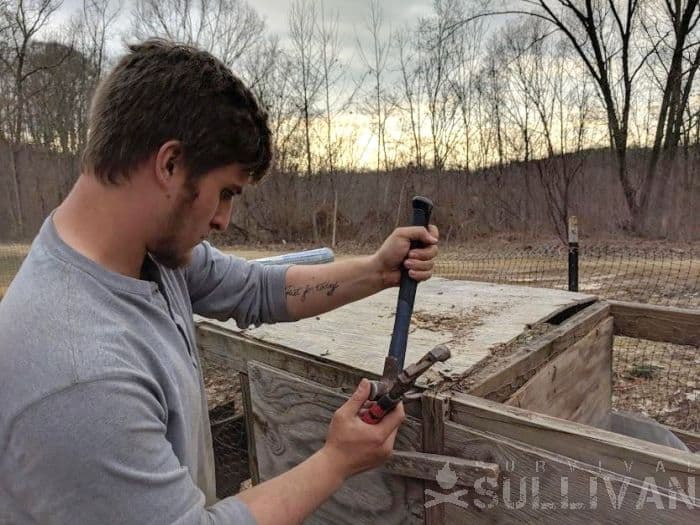
- Drill two holes or the ⅛ pilot holes and screw the boards together enough to secure them but not extra tight at this point. You can split the wood on the thin boards if you torque the screws too tightly.
- Now that the frames have been attached together and squared up, mark one side as the front. Sure, this might seem a bit silly but, believe me, you can accidentally put a front top piece on a back top piece and not notice until you have to undo everything you just did.
- Open a roll of mesh cloth. and spread it across one frame. Mark and cut to fit with enough excess wire to fold around all sides.
- Staple the hardware cloth into place. Staple in multiple areas on the front of the frame and around the side where the excess is wrapped. Ideally, you want about a half an inch of excess wrapped around each side of the frame.
- Measure and then cut the four furring strips into 3 foot long lengths.
- Trim up the scrap pieces left after cutting so they measure 21 inches long.
- Cut four more furring strips to measure 21 inches long. You should now have eight 21 inch long furring strips, and eight 36 inch long furring strips.
- Put together the “picture frame” doors by abutting the short furring strips on the end with the longer furring strips to make corners.
- Screw the ends together.
- Cover each frame with hardware cloth, and secure it with multiple staples. These frame will be your dividers inside the hutch style coop and the ends that go on either side of the coop. You can skip adding dividers if you so choose, but you should still attach furring strips where the dividers would have gone to add more stability to the structure and to help support the roof.
- To mount the dividers on each side of the coop, line them up with the frame and screw them into place.
- Mount the cross bracing to the front of the hutch by butting together the ends and the center of the dividers – or the furring strips you mounted if skipping the dividers. You’’ll probably need a helping hand to hold the cross bracing in place while screwing it in.
- Roll out more hardware cloth for covering the back of the hutch-style chicken coop. Even though you’re going to cover the back of the coop with plywood, corrugated metal, or both, do not skip adding the hardware cloth. This adds another layer of protection against predators.
- Staple the wire into place.
- Attach the back cross brace over top of the hardware cloth on the back of the chicken coop.
- Mount the back legs onto the chicken coop. You cut the legs to be as tall or as short as you would like. Remember, the chickens will be using the space beneath their coop as a small run space when they are not free ranging in the large chicken run that we will build.
- Turn your attention back to the front of the chicken coop. Add another layer of 2 X 3 boards onto the front to create a space to attach the legs, and also providing a mounting area for the little coop doors.
- To add facing to the front edge area of the coop hardware cloth floor, cut a 2 X 3 board to attach in between the front legs. This is a great time to make use of some of the scrap wood that you saved.
- To add facing to the front divider edge areas cut 2 foot long pieces of board from the 2 X 3 scrap wood and drift them into pace before securing with screws.
- Stand the hutch style chicken coop up to test the stability of the legs after tightening all screws. If the coop is both sturdy and square, it is time to move the chicken habitat to where it will be located – it will be easier to carry before the doors and roof are attached.
- Measure the openings on the chicken coop to make sure you do not need to adapt the length or width of any of your already cut materials. The doors on my coop are about 21 inches by 20 inches. There is a gap around the door to allow it to swing free when unlatched this is approximately ⅛ of an inch to 3/16 of an inch wide.
- You will build the doors just like you did the divider pieces. Cut the top and bottom frame pieces and then abut the vertical pieces to the edges of the top and bottom frame pieces.
- Drill holes in the corner areas and affix the pieces together.
- Spread hardware cloth over each frame, allowing for approximately ½ inch of excess to wrap around each side of the door.
- Secure the hardware cloth into place with multiple staples.
- Measure down from the top left corner to the 2 ½ inch mark, and attach a hinge.
- Measure up from the bottom 2 ½ inches, and attach another hinge.
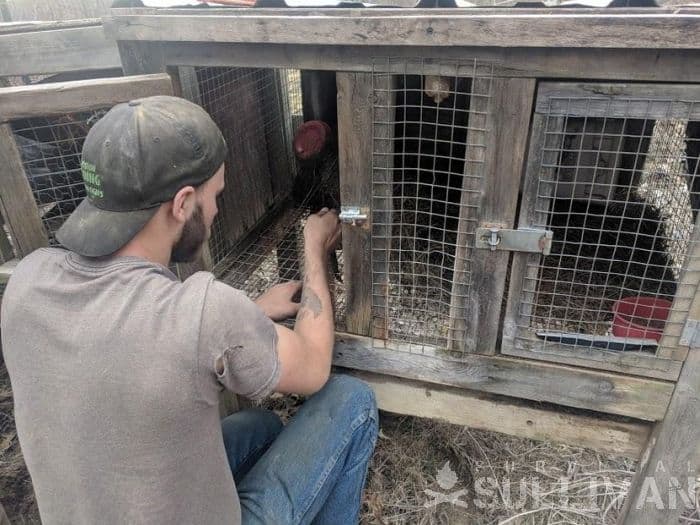
- Hang the door, and attach it to the hinges. This part might also require a helping hand.
- Mount a barrel bolt on the side of the coop that is opposite of the hinged side – the side where the door will open. I mounted my bolt about halfway down the door frame to ensure it would fit snugly into the space, and not allow for movement that a predator could stick its hand in to try to pry the door open.
- Repeat the door and barrel bolt mounting step for each chicken coop door.
- Roll out hardware cloth and drape it across the top of the hutch as the first roof layer. Allow a little overhang on all sides and staple securely into place.
- Use scrap wood, particularly furring strips, to add about two or three inches of height to only the front of the roof. This will give the roof a slight angle, and allow water and snow to run off of it easily.
- Cut a piece of plywood to be used as a second portion of the roof.
- Place it over top of the hardware cloth layer – allow it to overhand about two inches on the front.
- Screw the plywood into place.
- To make the top of the roof cut a sheet of corrugated metal to fit on top of the hutch style chicken coop, allowing a bit of an overhang on all side.
- You can also now install gussets to add more stability to the hutch. Affix the gussets to where the floor of the coop and the legs intersect.
We will also be adding pressure treated plywood to the back and ends of the lower portion of the hutch style chicken coop to offer weather protection and to help this portion of the coop retain heat during cold weather months.
Corrugated metal sheeting will be placed as a ground cover beneath the coop lower area. This will protect the birds from burrowing predators.
The metal sheeting will be covered with dirt from out compost pile to give the chickens something natural to scratch in, and to hold the sheeting firmly in place.
I am going to regularly plant herb seeds either directly into the dirt, or in sturdy planters so the flock can have free choice access to their nutritional and medicinal supplements.
Finally, a hinged door will be placed on the lower portion of the DIY chicken to give the members of the flock ample access ways to their day run. A fountain-style waterer will be affixed to the lower portion of the run so the birds have a steady supply of clean water that can be filled from the outside of the coop.
To curtail mess inside of the living quarters, the flock feeder will be placed outside of the coop in the day run. We will be turning a plastic tote into a feed holder.
Holes will be drilled around the lower portion of the tote, and PVC elbow pieces secured in place through the holes so the birds can access the feed without it becoming wet, while cutting down on waste.
Although many tutorials detailing how to make such a feeder claim you can pour one 50 pound bag of feed in the tote before placing the lid on top in an effort to save feeding chore time, I strongly urge against doing so.
The food will become moist during chilly nights, and when it rains it can become moldy. I pour only a day or two of feed into the other tubs that I have like the one we will be making in part 2 to prevent loss of feed due to moisture or mold.
Building The Chicken Run
I am going to incorporate the chicken coop into my apothecary patch, so the run being built will include growing areas. Placing chickens in the grocery growing area will help keep bugs away.
Typically, chickens have a hooped run not much more than one foot tall made out of chicken wire and 2 X 2 furring stripes that wrap around the borders of the garden. Initially I was going to go this route, but ultimately considered the concept slightly flawed.
Getting to eggs laid in the hooped run or retrieving an injured or sick bird from inside the tightly enclosed area would be problematic. Some folks who make garden chicken runs in this manner break the run up into shorter sections that can be lifted up to garner interior access.
This would reduce the problems I noted above, but would make the entire hooped run far more subject to being knocked out of alignment by roosters or other animals, and allowing the birds to be more exposed to predators, or have full run of the garden.
Instead, I am going to build raised beds on stilts – sort of a table structure with hardware cloth reinforced by furring strips to hold the weight of the dirt and growing plants
I will make toppers for each one out of chicken wire and more furring strips so the lightweight plant protectors can be lifted off to weed, prune, or collect garden goodies – while keeping the birds away from the crops.
Final Words
Saving money by using materials and resources wisely is the homesteading way, and this cheap DIY chicken coop project definitely fits that bill. The amount of wood used in the project was minimal.
Even if you do not have or can cheaply find a rabbit hutch to upcycle into a chicken coop, the scrap wood you have stockpiled on your homestead should provide enough materials to make the coop detailed above, or a similar structure following this same model.
How have you upcycled junk or rabbit cages into something new and useful on your homestead? Please share your stories with the rest of the community in the comments section below so we can all learn new tips and tricks together.

Tara Dodrill is a homesteading and survival journalist and author. She lives on a small ranch with her family in Appalachia. She has been both a host and frequent guest on preparedness radio shows. In addition to the publication of her first book, ‘Power Grid Down: How to Prepare, Survive, and Thrive after the Lights go Out’, Dodrill also travels to offer prepping tips and hands-on training and survival camps and expos.