Caching survival supplies in out-of-the-way locations or along your bug-out routes is not a new concept for most preppers. Even those who plan to carry everything with them can see the wisdom in hiding a few choice items along the route just in case they run into unforeseen problems.
Having your own secret stash that is easy to access when you are far from home may make the difference between life and death.
This is a popular “rainy day” concept for survival, what a twist on this tried-and-true technique has special utility for those who might otherwise face severe challenges when it comes to carrying a BOB that is heavily laden with survival gear, provisions and the other necessary stuff you’ll need while bugging out.
If you’re dealing with an injury, are physically weak or just finding out that you are growing infirm as you advance in years, creating a network of bucket caches is a way to cut down on serious exertion while bugging out, and also to ensure that you have access to needed gear.
In today’s article, I will be explaining bucket caching as a concept, when it is best for you as a prepper and how best to implement it.
Survival Caches Explained
A survival cache is simply a hidden source of equipment that is pre-emplaced in anticipation of resupply during an emergency. The cache might be emplaced as an insurance policy covering loss of your primary gear or used as a supplement to what you already carry.
In case of loss or just consumption of provisions and other supplies a survival cache will enable you to save time, effort and backtracking.
You might keep weapons, tools, survival equipment like water filters and fire-starting materials in your survival cache. You can even keep food and drinking water in them with some caveats and precautions.
It is possible to anticipate and shore-up any weaknesses or anticipated issues with your survival loadout through anticipation and smart placement of survival caches.
The items you choose for a survival cache will typically be held inside a container that will afford them a considerable amount of protection from the environment they are in, but not always.
What is most important is the gear is held together and you can be assured that will be reasonably intact and ready to use once you access it.
A survival cache is typically buried, a method that ensures excellent concealment. While laborious to conceal in this manner, it means an accidental discovery by another person will be very rare unless they are extremely lucky or are out prospecting with a metal detector.
Is also possible to hide survival caches inside other terrain features or even buildings.
The Bucket Network Method
Compared to more traditional survival cache methods, the bucket network method does not rely on one or two large caches, but instead relies on multiple smaller caches that are easier to emplace.
Normally, these buckets will be placed all along your anticipated bug out routes going to any given bug-out location that you have selected.
This idea nominally means that with enough time and preparation no matter which way you go when it comes time to bug out, and no matter which route you are taking you can be assured of accessing additional supplies on the way.
This is an excellent way to “disaster-proof” your plans since you’ll be ready to grab more gear at regular intervals along your journey regardless of what has occurred.
You can liken this to taking a long road trip by car over a great distance on a highway. Would you rather have only one or two fully-featured exits where you can resupply with gas, food and other needed provisions for your journey or would you rather have multiple, frequent exits that are not quite as well-equipped?
With only one or two, you’ll need to make tough choices before you cross certain points of no-return.
With multiple, smaller exits you don’t need to sweat it so much if something unexpected happens, nor do you need to fret over trying to press on and save time when you know there is another stop just a little farther down the line.
Applying this methodology to your bug-out works just the same!
Who is the Bucket Network Cache Method Best For?
The bucket network method is ideal for preppers who, due to their circumstances, might be relying upon a selection of multiple bug-out locations with multiple routes to get to each of them.
If you are potentially facing a situation that could see you detour multiple times or could cut you off from escape routes easily, you’d be best off to have multiple resupply points.
The bucket network method is also terrific for those who are not in great shape, lack strength and endurance, are old and infirm, or perhaps just suffer from a lingering injury that will prevent them from carrying a massive and usually heavily loaded bug-out bag to supply them.
I’m talking specifically about folks who have enough strength to affect self-rescue, but not enough strength or athleticism to haul many tens of pounds all over creation on their backs.
Lastly, preppers who commute over long distances to and from work, or who regularly travel for any other reason over a fixed area can be well-served by a bucket network of survival caches going both directions; bugging out or getting home!
If you are starting off far from home where you have the bulk of your gear and provisions, and need to get home after a disaster has broken out your bucket network can serve as a sort of survival railroad that can help you do that.
The Trade-Off
The single biggest trade-off when deciding to go with a bucket network method of placing survival caches is that you will be required to repeat the essential steps multiple times, sometimes many times, in order to complete it.
Instead of assembling, sealing and hiding, or burying one or two survival caches you could be doing this five or ten times, or potentially more than a dozen depending on how far you want to take the concept.
This is obviously more work in the long run, and not to mention it will demand a greater amount of containers, but you should also consider the second and third order effects of having to make all of these varied trips and all of these places along your bug-out routes.
It will certainly increase your exposure to prying eyes as you come and go unless you already have cover for action to explain your presence there.
The last thing you want is for someone to remember what you were doing out there, and perhaps go sniffing around after you have left your hide site!
But that being said, it is a far easier thing to tote and dig a small hole, or prepare a small concealment for something the size of a bucket than it is for a giant plastic container or pipe.
A short bout of exertion is often more than enough effort to prepare your chosen site for your survival container bucket.
So long as you are willing to invest less overall effort more often, and over a longer time, you can rest assured that, before long, you will have a comprehensive network of survival caches ready and waiting on you in case of emergency.
But there is one more thing you must keep in mind: You will need to service a greater number of caches, naturally!
Preparing Your Bucket Cache
First you’ll need to decide what you are going to place inside your cache. There are a couple of “schools of thought” when using the bucket network method.
Some people prefer to place identical or nearly identical caches of items that you will need consistently along your route, sort of like a pit stop for preppers.
Others take a more logical, long-game approach placing stashes of items in a particular order that they are likely to need them; for instance an initial “reaction” pack consisting of weapon, food and water in the first cache, a “sustainment” pack of water filtration, firemaking and shelter supplies in the second, and so on.
Both are absolutely viable, it is really just a matter of assessing your needs and what, if anything, you will be bringing into the bug-out with you from the get-go.
The Contents
Some items you might consider stashing in your bucket caches:
- Food
- Water
- Guns and Ammo
- Tools
- Fire-Starting Aids and Tinder
- Sustainment Items – Water Filters, Shelter Materials, Etc.
- Clothing
- Medical Gear
- Batteries
- Navigation Aids
- Signaling Equipment
- Flashlights
- Batteries
- Compact Backpack (Great for Get-Home Duty!)
- Fishing/Trap Kit
- Cash or Precious Metals
There are a few special considerations you must keep in mind for each individual kit depending on the items you want it to hold.
Food is a big one, since keeping it fresh and edible even when it has its own sealed packaging and is further contained inside your sealed bucket is going to be a challenge, most especially if you bury it. Moisture is extremely persistent, as are insects.
Any failure in your bucket’s structural integrity, no matter how minute, can easily ruin any food you keep inside.
There is also the issue of shelf life. Any food, no matter how well preserved and well packaged, has a finite shelf life. This shelf life is often shortened by exposure to radical shifts in temperature and exposure to the elements.
If you do not access your survival caches regularly you’ll still need to rotate your food according to its legitimate expiration date if you want to be able to count on it. If you have a sizable bucket cache network, this can turn into quite the sizable yearly project.
For this reason, the most “durable” and long lasting foods should be considered for the purpose, and preferably ones that have equally impressive preservation and packaging. Military MREs are probably the most ideal provision in this niche.
Also consider the impact that temperature shifts and humidity can have on other items, especially batteries. Alkaline batteries are especially vulnerable to temperature shifts, and will rapidly lose their charge when exposed to fluctuations between hot and cold.
Fabrics can mold and ammunition can be rendered useless by moisture intrusion as well.
The Container
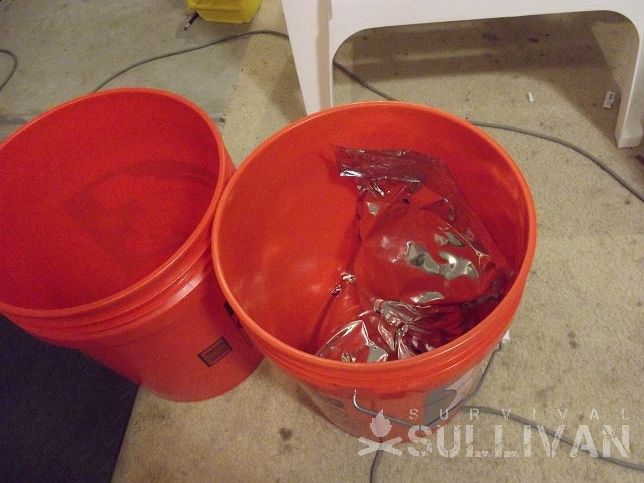
Your container for this task, as you are probably expecting, is probably going to be a common 5 gallon bucket, the type you can get at any hardware store that features a heavy, gasketed lid for keeping its contents inside. This gasketed lid will help to keep water, insects and rodents out of our cache.
These buckets have many advantages. They are generally easy to transport with decent handles. They are sturdy, at least sturdy enough to resist dings, dents, exposure to moisture and perhaps burying under a few pounds of dirt or sand.
They have ample capacity unless you are absolutely loading them down with water or ammunition and will not be so heavy that they cannot be easily moved into position.
Their footprint is small overall compared to a larger, rectangular container, and that means you will have to displace less dirt or other ground in order to bury them, and you can fit them inside or under a wider variety of concealments.
Cache Integrity
One thing to keep in mind is that your bucket is going to be exposed to the elements to a greater or lesser degree for a lengthy period of time without regular maintenance.
If the seal fails or the bucket is in any way compromised it will be penetrated by moisture, invaded by insects and ravaged by rodents. Your contents are likely to be completely destroyed or rendered unusable in any case.
It may be best to further fortify your bucket against moisture intrusion by relying on one of several proven methods for bolstering it against environmental intrusion. Sealing it in a heavy duty plastic bag as an outer layer is one option.
Another is shoring up the seals with a bead of silicone adhesive or even expanding, water-resistant foam. These seals are easy enough to break with nothing more than a pocket knife but can dramatically increase your bucket’s weather resistance.
As an alternative for improving integrity, you might individually compartment your supplies inside the bucket using heavy-duty zipper freezer bags or vacuum bags for the ultimate in weather resistance.
It is still a good policy to count on moisture getting to the contents no matter where you store it unless it is inside an air-conditioned structure. Remember that the rigors of exposure are hard on all kinds of equipment no matter how high the quality!
Siting
Siting your survival cache bucket is the lion’s share of the work for establishing your network. Picking a good hide site is not easy, but when it is chosen with care and well-hidden this is an excellent investment in your chances of ongoing survival.
There are two major factors you must prepare against when placing your bucket. The first is that you have to assume other people will be along at some point and pass your hiding place.
Whether or not they find your bucket and the treasure it contains is up to luck and how well you conceal it. Certain environments will make this easy. Others will make it very difficult or risky.
The traditional and most common method for hiding any survival cache is by burying it. Burying your survival bucket ensures that it will be completely out of sight to casual observation, and spending a little extra effort dressing the dig site and the surrounding terrain will ensure that is completely invisible.
This doesn’t mean you can set it and completely forget it however, since Mother Nature and plain, old, dumb luck might conspire to reveal your hiding place.
Other decent locations include crevices or small caves in rock walls, inside dead or hollow trees, in the banks of rivers and other similar locations.
Urban preppers can be even more creative when it comes to locating their cache, since built-up areas always afford a great wealth of hiding places that “normal people” will typically steer clear of.
Hiding the bucket in plain sight among a pile of detritus or refuse may work best so long as the bucket looks faded, scuffed, and splattered with paint, stain or some other nastiness. Most people don’t root through garbage to investigate old buckets!
Below is a list of hide sites for your survival bucket network:
- Buried in soft soil.
- Hidden in a rock fall.
- Stashed in a cave, crevice or similar fissure.
- Lowered into an abandoned animal burrow.
- Placed inside a hollow tree trunk or beneath a fallen tree.
- Hidden within an abandoned building.
- Tucked away in an out-of-service utility installation.
Cache Security
You have to take care to ensure your survival bucket is buried deeply enough that a thin top layer of soil will not be displaced, revealing it, by erosion, rain or the passage of animals or people.
Speaking of rain, make a double sure that you have not located it in an area prone for flooding or you might have to go bobbing for it when you need it!
Start thinking through any potential events or circumstances that could render your survival cache inaccessible, or even destroyed.
For instance, locating your cache inside a hollow tree that is either cut down or topples from disease or injury will at best expose your cache, and more than likely destroy it.
It might require a little research to make a good call depending on where you plan on hiding it; sticking your cache inside a cave that is a popular destination for local spelunkers will not do you any good. Similarly, any area that is a popular metal-detecting venture is also a poor choice.
Thwarting the human element is doubly important in any urban or suburban setting. You have to keep your cache hidden enough, far enough out of the way that most people will never even encounter it, either for fear of danger, legal repercussions or the disincentive of getting filthy.
At the same time you cannot place your cache in any location that will put you into great peril when it comes time to retrieve it.
Abandoned buildings are great for this purpose but you must remember that they are also a popular haunt for the criminal element and constantly targeted for vandalism or destruction within cities across the globe. Think this through carefully.
But, in the end, this is one of the great things about a bucket cache network; if you lose one chance are you will have another one, safely intact, a relatively short distance away.
You shouldn’t put all your eggs in one basket and you definitely shouldn’t rely on a single, vulnerable survival cache!
Locating
Just like the pirates of old, locating your buried treasure, in this case your treasure being your survival supplies, after you have hidden it will be of paramount importance when the time comes to retrieve it.
Failing to properly account for the locations of all your various stashes can spell disaster, to say nothing of wasting all that time, effort and resources.
There are various ways to keep track of where you bury or otherwise will hide your survival caches.
The easiest way is to locate it near a completely immovable landmark that will not be effaced or destroyed by anything but the most cataclysmic disasters or violent weather conditions.
Using these fixed points as your initial reference is a fairly simple matter to pace off a number of steps from a given heading on the landmark until you are right over top of your stash.
You might also consider writing down coordinates if using a GPS, relying on maps and sketches, steps in a grid format or any other data that will help you locate each and every stash.
Especially if you have a sizable network, do not rely on your memory to keep track of them all.
Paper remembers what your mind will forget and you definitely don’t want to forget where you have crucial survival gear pre-emplaced.
On the other hand, you must be extra cautious that any written instructions do not become compromised, as someone might potentially head to your stash site and beat you to it.
Conclusion
Survival caches are a great way to lay in supplies for a bug-out or resupply when you are running low while carrying them.
Employing a cache bucket network is a great, low-impact way to set yourself up for success when you might be heading in any one of several directions when the time comes to bug out, or if you would struggle to haul a heavy and cumbersome BOB around when things get rough.
With a little extra work up front you can be sure you’ll have supplies in place all over!

Tom Marlowe practically grew up with a gun in his hand, and has held all kinds of jobs in the gun industry: range safety, sales, instruction and consulting, Tom has the experience to help civilian shooters figure out what will work best for them.
That’s your best article yet, though the others are pretty great too. Thank you for the tips and advice, there were several that people normally wouldn’t consider, I certainly did not! As described in your article, I am an older prepper and definitely not as strong as I was when I first started this, so caches are probably my only realistic get home option. Thank you again,
Good article, but I have always felt it would be hard for me to stash away good gear. I think it’s a good idea for anyone to have their best gear most easily and readily accessible and the caches can contain stuff they have used a bit for the sake of familiarity and to get some use out of those items. Of course you can economize, but we wouldn’t want to bury junkie equipment either.
I’m speaking mainly of guns and high quality or expensive gear like radios and such, but they are important enough to cache them. Bargain hunting can help make it easier on our wallets to fill our cached containers.
I think many of us can cache or stash gear around our dwellings, a friend’s house, where we work, cars, sheds, etc., for a quick grab and go without garnishing too much suspicion or attention. And then we can put forth the extra effort to cache in open areas, or any place along our routes of escape. I imagine it’s those widely spaced, far away caches that most of us would worry about most. I know I would.