We’ve all seen it in the movies: the hero gets captured by the villain’s henchmen and is either handcuffed or tied up, but somehow finds a way to break free of their bindings, escape, and go on to defeat the bad guys.

This type of scenario may be viewed as romantic or unrealistic by some. However in reality, there are several ways to escape from zip ties, handcuffs, rope/paracord, and duct tape.
If you ever find yourself captured by foes in a SHTF or disaster scenario, with a little know how, you can escape and make it back to your group or family.
It’s important to attempt an escape from your bindings at the right moment. If you are seen escaping from your bindings, it will only complicate things for you.
Make sure you’re practicing the right way, using the right methods. Otherwise, you could find yourself developing bad habits. Thus, dooming yourself should you ever need to use these techniques in real life.
Table of Contents
Precautions
Next, we need to discuss a few precautions. First, never practice these skills alone! Accidents happen. Let’s compare and contrast two situations. First, after much laughing, your buddy unlocks you from a very stuck position.
In contrast, you have to explain your situation to the police after they bust down your door. Here, a loved one has phoned in a wellness check after you haven’t answered the phone in three days.
The next precaution is to take it slow. It is very possible to get into positions that are both uncomfortable and restrictive. This can lead to additional stress and potentially panic.
We never make sound decisions when panicking. Often, we make the situation worse. It does not take much to spiral your situation out beyond your ability to manage it.
Be careful, and always work with a friend!
Illegal Restraint Defined
First, it’s necessary to define when and why you would want to get out of handcuffs. This all boils down to illegal restraint.
We are not talking about having a few pops, doing something you shouldn’t, and going to jail for it. That is legal restraint. You got what you deserved, and it’s time to pay your penance.
Illegal restraint is when you are put into custody outside the actions of the law. This may be during a kidnap and ransom scenario, restraint for political gain, a domestic violence event, or even capture by law enforcement figures acting outside of the law.
Regardless of the event, your restraint will probably lead to severe injury or death if you do not escape. Your job is therefore to escape, and then evade your captors.
Know Your Cuffs
Here in the states the Smith & Wesson Model 100 are some of the most common handcuffs. Learn to escape these, and you’re pretty well off for North America and most of Mexico. They are popular, but not the only models.
Similar designs are available from Winchester (WN-40), Peerless (700C), CTS (1008 Tri-Max), and others all have their unique characteristics.
Don’t forget hinged handcuffs (S&W 1H and 300, Peerless 802C, CTS 1058, etc.). They restrict your range of motion. This adds another layer of challenge.
Finally, handcuffs vary internationally. What is popular in the United States, may differ greatly from what you will encounter in Chinese-influenced countries as well as European-influenced countries.
If your travels take you to areas where you want to be better prepared, spend a few hours with Google image searches. Work to identify what is popular in that region, then work on updating your skills.
Handcuff Anatomy
In order to defeat any device, you must understand it. That being said, handcuffs are actually pretty simple machines.
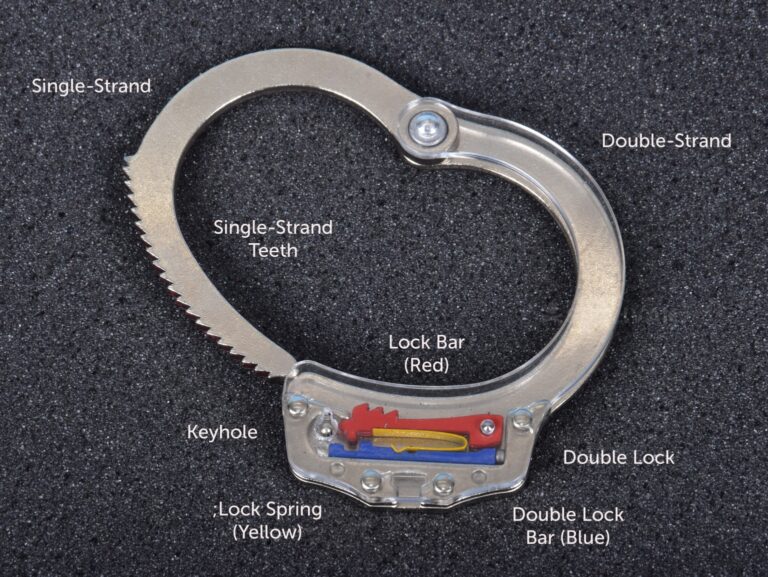
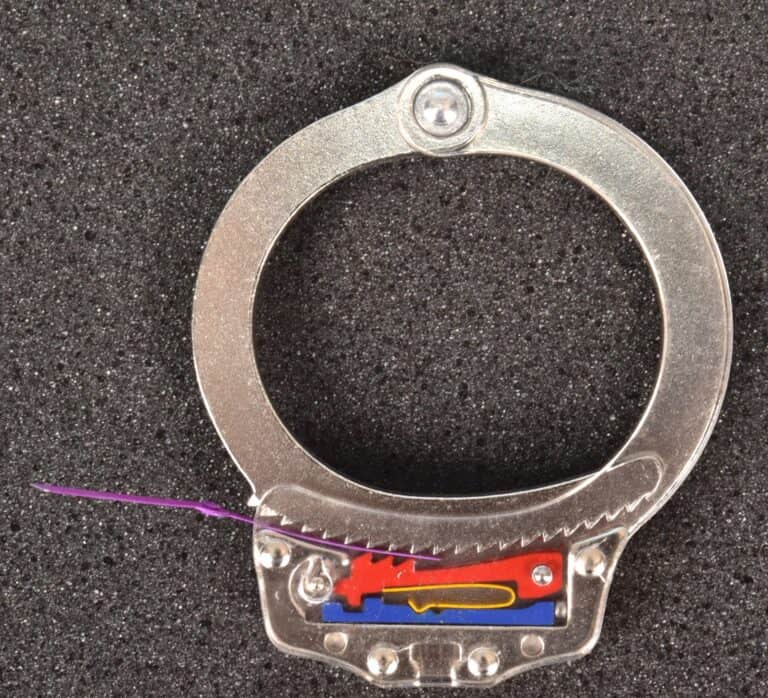
The traditional Smith and Wesson Model 100 is one of the most widely used handcuff in the world. For readers in the US and Central \ South America, these are the ones that you will most likely encounter. S&W M100s have a few parts you need to be familiar with.
Double-Strand
The body consists of two metal plates riveted together to hold the other components in place. Formally this is called the “Double-Strand”. The double-strands encase the locking mechanisms between its two halves.
Single-Strand
The single-strand is an arm hinged to the double-strand, and swings between the two halves. This is the first half of the locking mechanism.
The end of the single-strand has a series of teeth. These engage with teeth on the locking bar in the body.
The teeth perform two functions. First, they ratchet into place, allowing the handcuff to tighten around the wrists. Second, once engaged, the teeth lock, and don’t allow the handcuff to back out or loosen up. This keeps the person bound in custody.
Lock Bar Teeth
Within the body formed by the handcuff double-strand is the lock bar. The lock bar is the second half of the locking mechanism. The lock bar has several teeth that engage with the teeth of the single-strand.
Lock Bar Spring
The lock bar spring presses up on the lock bar, engaging the lock bar teeth with the teeth on the single-strand.
Key and Keyhole
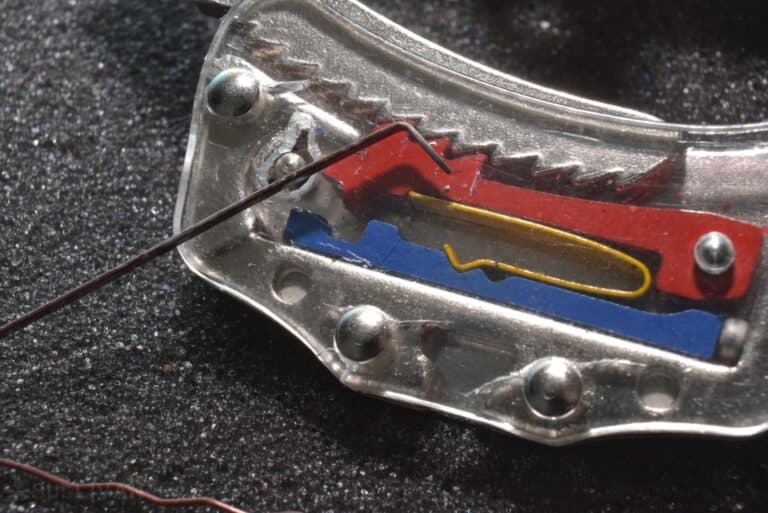
The key of the handcuff is engaged with the handcuff key (I know it’s a little backward, but bear with me). The key, in the keyhole, when turned depresses the lock bar, disengaging it from the single-strand teeth.
With the key engaging the lock bar, the single-strand can be backed out of the handcuff body releasing the wrists. The key also turns in the opposite direction to disengage the double lock.
Double Lock
The double-lock handcuff is rumored to be manipulation proof but we all know that’s not exactly true. There are many magicians, Harry Houdini among them, who were able to escape handcuffs within a short period of time. If the magicians can do it quickly, it must be something you can learn to do if you practice enough.
The double lock engages the lock bar, and prevents the lock bar from being disengaged from the teeth on the single-strand. The double lock is engaged to keep the single-strand from tightening any further on the wrist.
Before the advent of the double lock, criminals would tighten the cuffs around their wrists and complain that they were too tight. When the officer uncuffed them to reset the cuffs, the criminal would attempt to escape.
The double lock prevents the single-strand from being tightened, depriving those in custody from doing more bad things.
In double locked cuffs, a spring is pushed in the opposite direction of the cuff’s travel, and takes the serrated bar with it.
This alone makes the cuffs impossible to escape from using the single lock method. But once the double lock has been unlocked, the bar will slide back over and from then on you can release the single lock.
In order to release that double lock, you’ll need to take a pick and insert it into the upper cut out, but this time around, point the pick in the opposite direction of the cuff’s travel direction. Then, turn the pick in the direction that the actual key would turn in order to release that double lock.
It will need more pressure and tension in order to move, but if done right, the pick will press the bar on the double lock and it should release. Once the double lock has been released, all that’s left for you is to pick the single lock.
Key
The key engages the lock bar within the body, and pushes the lock bar teeth away from the teeth on the single-strand.
The key usually rotates in two directions. One direction disengages the double lock. The other direction disengages the teeth. If the double lock has been set, it must be disengaged before the key will rotate to unlock the teeth.
Each of these components susceptible to attack. Let’s look at the best ways to escape handcuffs.
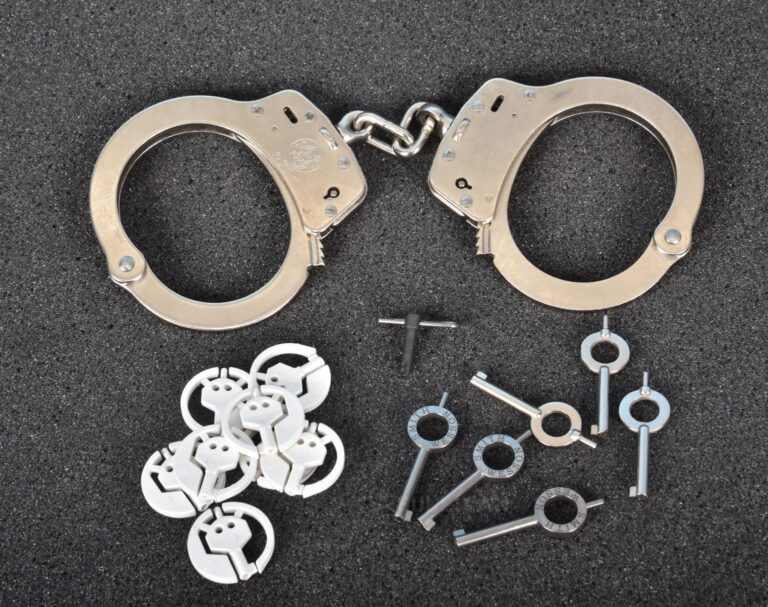
But first, to practice, get a pair or two.
Tools of the Trade
A dedicated counter custody or restraint defeating kit will consist of multiple tools carried surreptitiously on your person.
These tools could be of a purpose design or improvised nature, and don’t discount the efficacy of the improvised ones. Whatever they are, they must be accessible in short order and from any position and escape detection during a hasty search by your captors.
Handcuff key
A compact, easily hidden handcuff key (double ended for both locking systems found on double lock handcuffs) is an indispensable tool and can save you a ton of grief should you be restrained with handcuffs.
Be advised, being caught with such a key will raise serious suspicions among legitimate law enforcement, though it is not illegal in most jurisdictions.
Wherever you stash this key, it must be easily accessible whether or not you are cuffed with your hands in front or behind you.
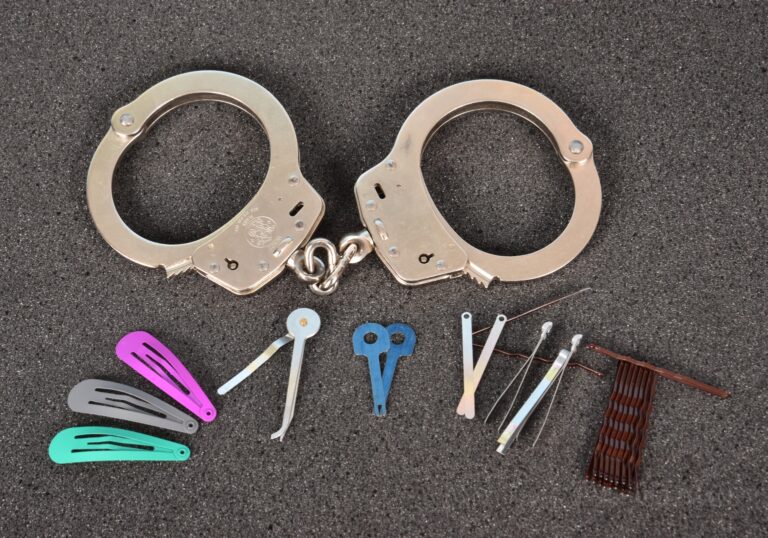
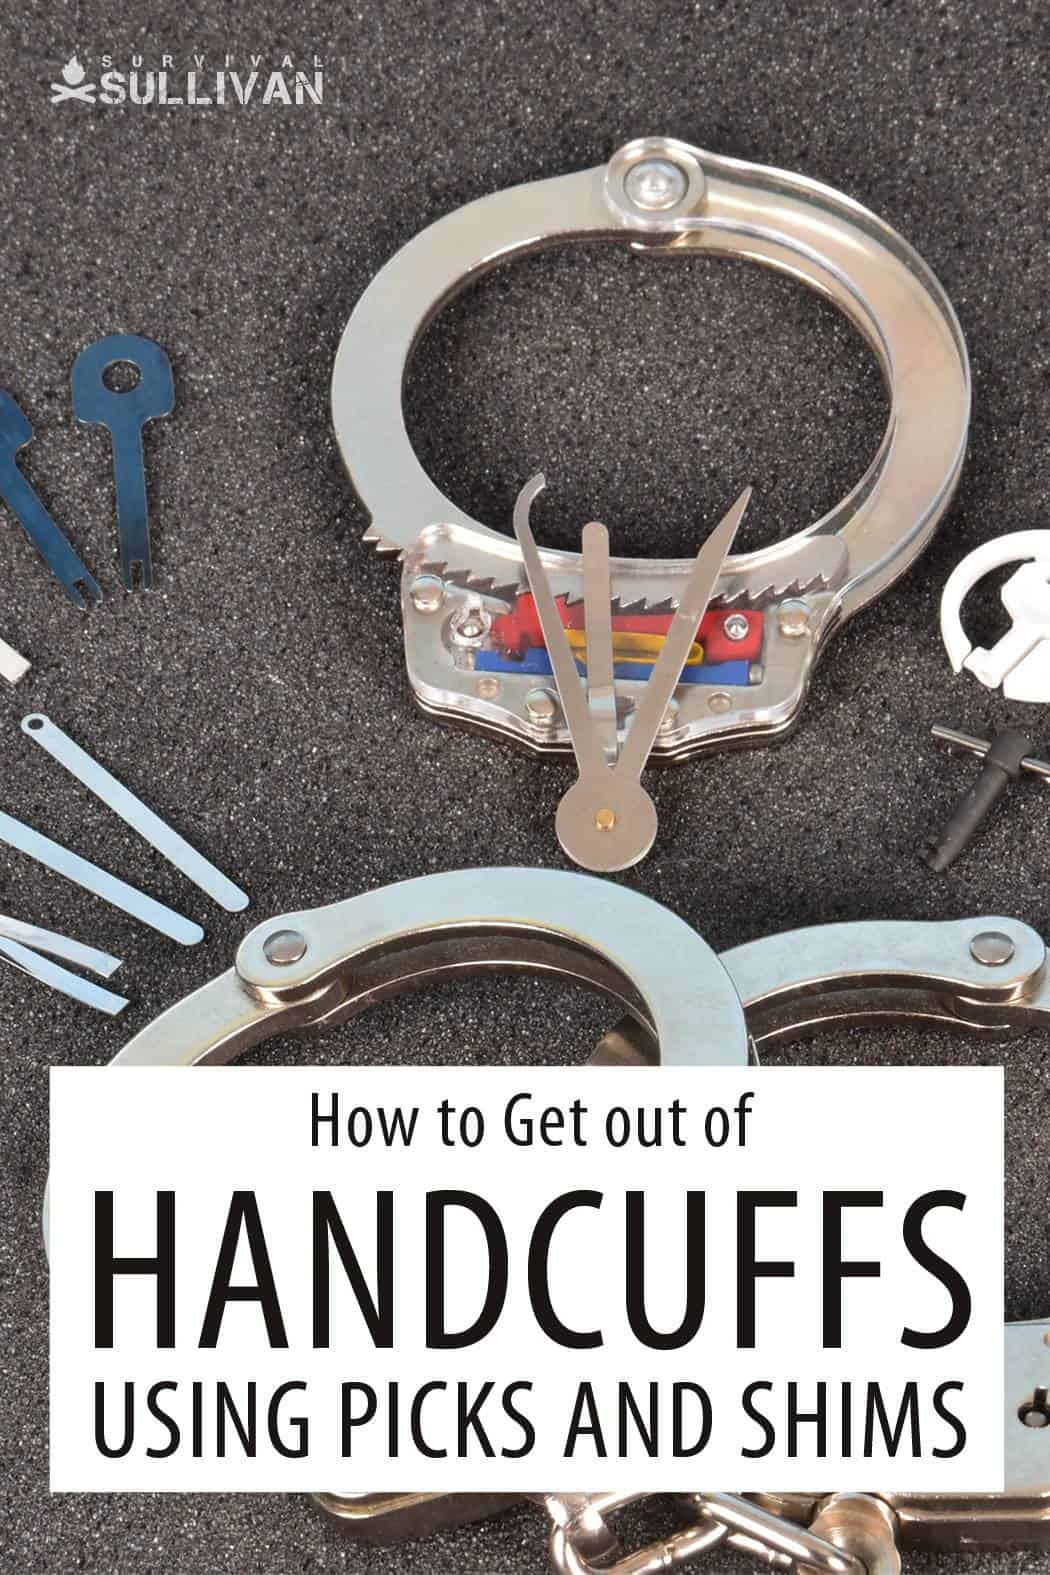
Shim
A shim is a thin, flexible device used to defeat the ratcheting mechanism of handcuffs. By inserting the shim between the components of the bracelet and then tightening them slightly you can unlock the cuff and remove them entirely.
Purpose-made tools to this end are available, but many improvised options work just as well or better, including bobby pins and flattened pieces of wire.
Blade
A hideout blade is another mandatory counter custody tool. Able to make relatively quick work of soft restraints such as duct tape, rope and potentially even zip ties, you might choose a safety razor blade, glass scraper blade, hobby knife insert or even a disposable scalpel for the job.
This is fiddly work, but do your best to build up a reasonably secure way to grip the blade that will not cut your fingers using duct tape or something else.
When it comes time to hide these tools on your person, good options are anywhere around waist level that you think you can get away with.
Inside belt loops, inside tiny stitched compartments along inseams and other joinery on clothing. Redundant locations inside pocket hems or footwear might also be worth considering.
The golden rule is that your tools must escape detection during a cursory initial search so that you have a chance to access and implement them.
Consider also that you are likely to be searched ever more thoroughly and better secured as time goes on in captivity, and you might well be stripped. We will talk more about that in just a bit.
Escaping Handcuffs Using Shims
Quick action steps to escape handcuffs:
- Insert shim between jaw and ratchet.
- Press into place firmly.
- Tighten arm of cuff so shim will prevent closure of ratchet.
- Hold shim in place, open cuff.
The first non-key opening method is shimming. Shims are thin metal strips that slip between the teeth of the lock bar and the teeth on the single-strand.
A properly placed shim separates the teeth, and allows the single-strand to slip by the teeth of the lock bar. With an easy twist of the wrist, you are free.
Shims must be thin, but not too thin. They must be stout enough to separate the two sets of teeth, but not too weak that they bend. Weak shims crumple as you put them in place. You are now at risk of jamming and damaging the cuffs.
Similarly, shims must not be too thick. A shim that is too thick won’t fit between the two sets of teeth. Again, you risk jamming up the cuffs.
Finally, the shims should be smooth. I have used both hairpins and barrettes with plastic coatings. The coating binds in the teeth and gum up the works. The single-strand, while free, can’t move.
Shim Materials
Shims can be easy to make as well as inexpensive to purchase. Commercial shims come in many shapes and sizes. Most are made of spring steel, while others are made from aluminum or tin. These are almost guaranteed to be perfect for the job.
That being said, practice with them! I’ve used a few that I’d consider thin and weak. They work great once. But only once. Twice and you are pushing your luck.
If you choose to make your own, there are few options that I have found that work very well. As long as you pay attention to width and thickness you can turn almost anything into a shim.
First are bobby pins. On the edge of too thick, they work great if you sand them down just a touch. With their thickness comes durability. I have a few that I have used a hundred times.
Aside from the thickness, I find their biggest disadvantage is the difficulty to attach them to anything.
For concealment, it’s best to have either a hole or a hook shape to tie them to a tether or to hook them into the thread of a seam. You can do it with bobby pins. It just takes practice and patients. And maybe a little glue.
My favorite shim material is hair barrettes. Specifically, ones from the Dollar Store. These are just thin enough to slip easily between teeth and durable to be used many times. To top it all off, they come with a built-in attachment point.
The two halves of the barrette are hinged together with a hollow rivet. The hole is just big enough to slip a piece of Kevlar string through. I use Kevlar as that is perfect for defeating zip ties, but that is for another article.
I have had little luck with soda can aluminum (too thin), plastic strapping (not stiff enough), or soup can tin (works well but too hard to cut and improvise with). Try out several materials to see what works for you!
Concealing shims is easy. Slip them into a seam in your pants, or tie them to string and drop them down a pant leg. Retrieve them when you need them.
You can also stitch them into your clothing with a single thread. Pull the shim and break the thread when needed. Just make sure that your concealment method is durable enough to withstand a day of normal activity.
Shimming Handcuffs
Shimming handcuffs is easy, but it takes some practice. There are two things to know before you attempt to shim cuffs. First, the secondary lock must not be engaged. Either the cuffs don’t have one, the person cuffing you didn’t engage it, or you’ve already disengaged it.
A lot happens in high-stress situations. You must always keep your wits about you, as it’s the small details that matter in these situations.
Practice with your trusted buddies with various levels of stress. During this time, see if you can determine if your “captor” applies the lock or not.
Often, it takes a separate movement to engage it. If you concentrate, you will learn to notice the positioning or clicks of the double lock. Even under stress.
Next, in order for shimming to work, you need two teeth of room. As you put the shim in place, you need to tighten the cuffs. This draws the shim further between the teeth, thus separating them.
Remember, every tooth you lose, you will never get back. If you don’t have enough space (e.g., the cuffs are already tight) then don’t attempt shimming. You will only make yourself more uncomfortable, and less maneuverable. Move on to an alternate method.
OK, on to the finer points of shimming…
Slip the shim between the single-strand teeth, and the lock bar teeth. Push it as far as it will go.
Then, while you are placing pressure on the shim (pushing it farther into the body of the cuff), gently tighten the single-strand. Tighten them for two clicks.
Once you bypass two teeth, you have separated the single-strand teeth from the lock bar teeth. Now you can drive the shim home.
Next, roll your wrist against the single-strand to loosen it. Keep rolling and you will open them right up. Just remember to keep pressure on the shim. If it slips out you’re back in the original position–stuck.
Step by Step: Picking Handcuffs Using Shims
Step 1: Select and prepare your shim: trim the shim to length and width and make sure that it’ll fit your target handcuff, scrape off any coatings to ensure that is moves free in the cuffs and round over the leading edge if possible.
Step 2: Check the tightness of the cuffs: you will need the movement of at least two teeth in the single strand, Please note, you will not get these back if the shimming attempt fails and the cuffs may be uncomfortably tight.
Step 3: Insert the shim between the single strand and the locking bar, push it in as far as it will go:
Step 4: While pushing the shim forward into the lock, push the single strand forward tightening it. This forces the shim between the single strand and the lock bar rendering the lock useless.
At this point the single strand should start to move freely:

Step 5: Holding the shim in place, back the single strand out, and release the handcuff:

Escaping Handcuffs using the Keys
The most obvious answer to opening any locked device is with a key. Locked door? Use the key. Locked car? Use the key. Locked handcuffs? Use the key.
That being said, your key does not have to be a traditional handcuff key.
There are several keys on the market that are effective at unlocking handcuffs, and therefore releasing you from them.
First are original manufactures’ handcuff keys. While it is obvious what they are, they are great to practice with, and to stash in your bag or on your person.
Where and if you store these depends on your situation. Some states (e.g., Florida) and countries consider handcuff keys illegal for civilian ownership. Especially be careful when you travel internationally.
The second option is plastic keys. The advantage to these is that they look like a large button.
Therefore, they can be sewn onto your clothing for surreptitious use. You can also easily cut, trim, or melt them into different more subtle shapes for deeper concealment.
The biggest disadvantage of plastic keys is that they are not very durable. You will get only a few uses out of them before the primary surfaces bend. Luckily, they are cheap. Buy a lot and replace them often.
Finally, some keys are intentionally made to look innocuous. Often these are sold as endings to shoelaces (aglets). You can hide these on your body, in your clothes, or in plain sight as aglets.
Again, practice with them, and learn their use and their durability. My favorite is the Delta Key.

Putting a key to use is easy. Slip it in the keyhole and turn:

You may have to turn in two directions. One direction to disengage the double lock, and a second to disengage the teeth. It doesn’t get much easier than that.
Step by Step: Using Handcuff Keys
Step 1. Insert the key into the keyhole. If doing this blindfolded or behind your back, the angled tip of the key will help you insert the key if you are not perfectly perpendicular:
Step 2. Rotate the key away from the double strand to disengage the double lock.

Step 3. Rotate the key in the opposite direction to unlock the lockbar:
Step 4. Keep the key pressed against the lock bar and release the handcuffs.
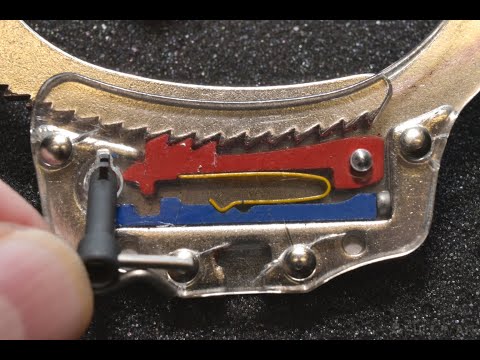
Escaping Handcuffs Using Picks
The next option is picking the cuffs. Like most locks, you can open them with the right tools, and a little knowledge.
As locks go, they are simple. There is one surface you must engage to disable them. All you need is a correctly shaped pick.
Just like shims, you can purchase commercial picks or make your own. Buy a few, learn the ins and outs, then enjoy some deviant arts and crafts.
If you choose to make your own, material selection will be the difference between success and failure. The metal must be strong enough to apply the lateral pressure required to disengage the teeth or lock bar. Next, it must be thin enough to fit into the cuff keyhole.
Finally, it must be easy enough to work with your available tools. This is particularly of interest if you are manufacturing the pick during your travels, where you don’t have your own shop.
In the grand scheme of things, picking cuffs is pretty easy. All you have to do is get the pick in place, and then rotate it to disengage the double lock and then the lock bar.
In practical use, the effectiveness of your attempt depends on both your skill and the pick. I’ve had ones that are just too thick to maneuver around the keyhole and ones that are just right.
As it happens with all lock picking, you need to develop a sense of feel for it. Some days you are on. Some days you’re off. Don’t give up, keep at it. Then keep at it when the cuffs are on your wrists. Then behind your back. Then under stress. Get the picture?
Escaping Handcuffs – With A Paperclip
If lockpicking isn’t your thing, you can plan ahead and tie your shoes using the boot lace covert handcuff key, which is a pair of shoelaces where a handcuff key is discreetly attached to the end of the bootlace.
This key has a very minuscule chance of detection, and can be used from any position, lying down, standing, or sitting, to unlock your cuffs.
You can also escape from handcuffs using a hair bobby pin. Remove the middle and then break the barrette.
Break off the edges by working the metal forward and backward repeatedly until you end up with two roughly equally sized bands. Determine the smoother of the two edges and break that edge away from the ball where it meets the two edges.
Leaving a nice, right angle bend will help you grasp and manipulate the improvised shim.
Grasping the pin between the thumb and forefinger, slide that smooth edge into the cuffs one click in to separate the serrated edges and disable the lock. With some practice, this method is quick and efficient but only works well if the edge is smooth and not jagged.
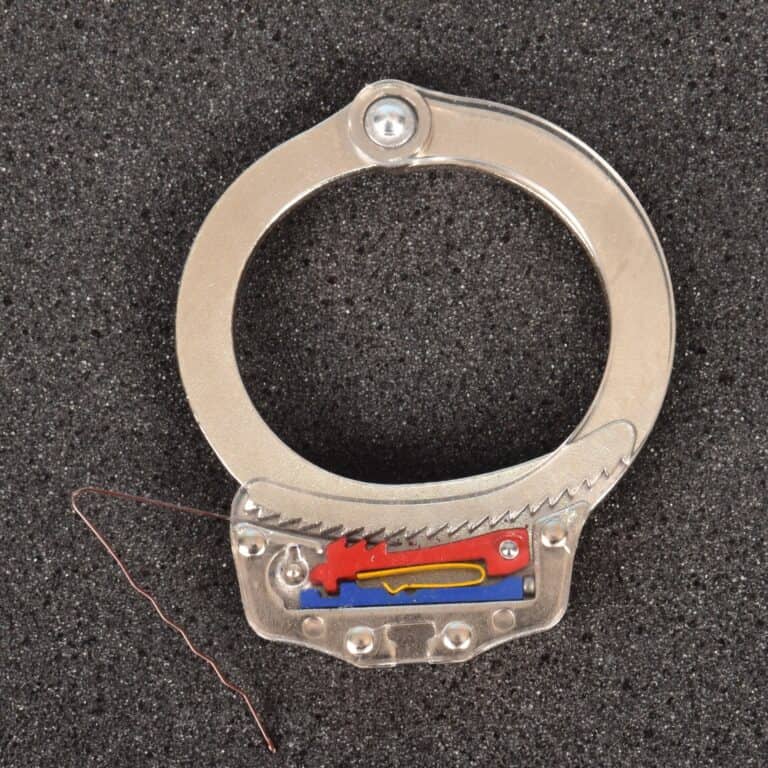
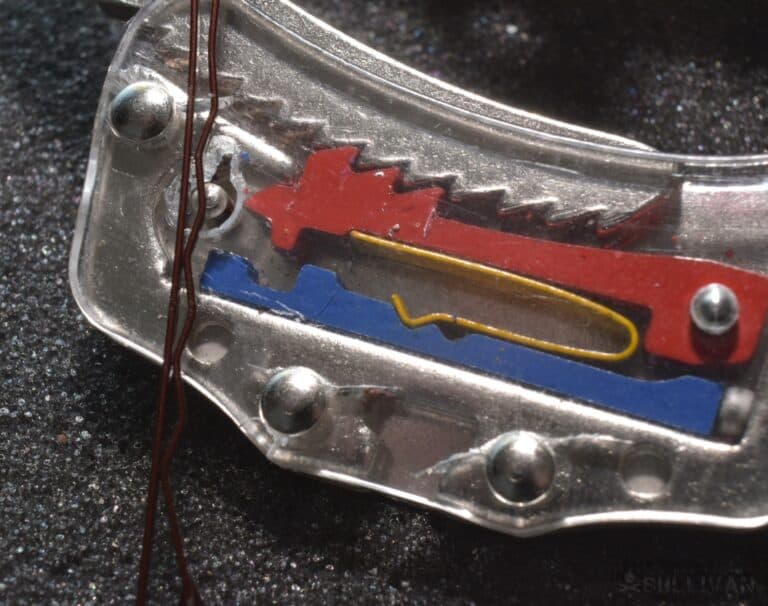
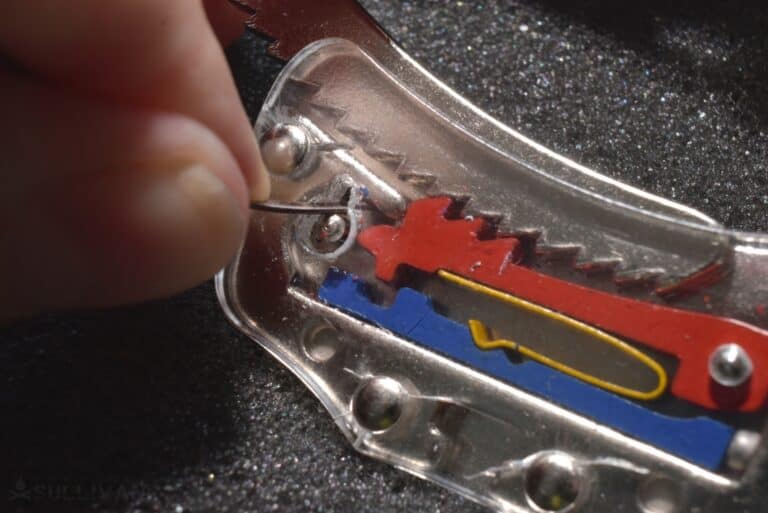
Finally, you can use a stiff piece of wire or a paper clip. As with the other improvised picks, bend the wire to the correct angle either using your fingers or the handcuff itself.
Insert the wire into the keyhole or wedge it between the body and locking arm. After a bit of practice you’ll get the hang of the lengths and degree angle that you need.
It’s imperative for you to practice these methods at home with someone standing by with the real key if needed. You don’t want the first time you try to get out of handcuffs to be when you are captured and restrained in a real disaster scenario where your life depends on escaping.
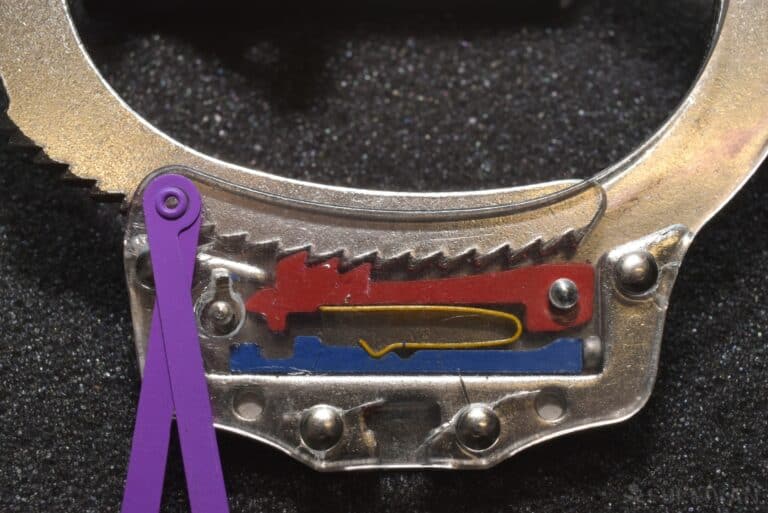
Step by Step: Opening Handcuffs With Picks
Step 1: Select your pick material, either commercially made or improvised. If improvising a shim select a piece of wire (e.g., paper clip) or metal (e.g., bobby pin) long enough to easily handle with bound fingers (e.g., hands behind your back):
Step 2: If using a commercial pick, skip ahead to Step 5.
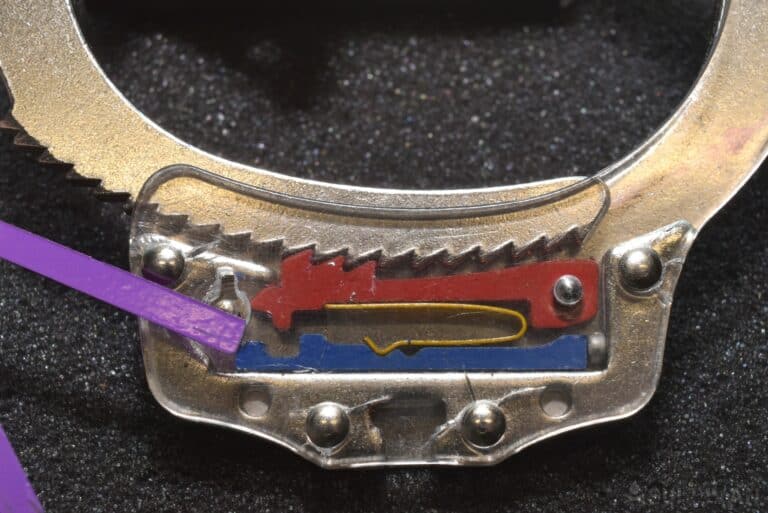
Step 3: Straighten the pick and insert one end into the keyhole, double lock hole, or trap it between the single strand and the body or the double strand, insert approximately 1/8 – 1/4 of an inch (3mm – 5mm):
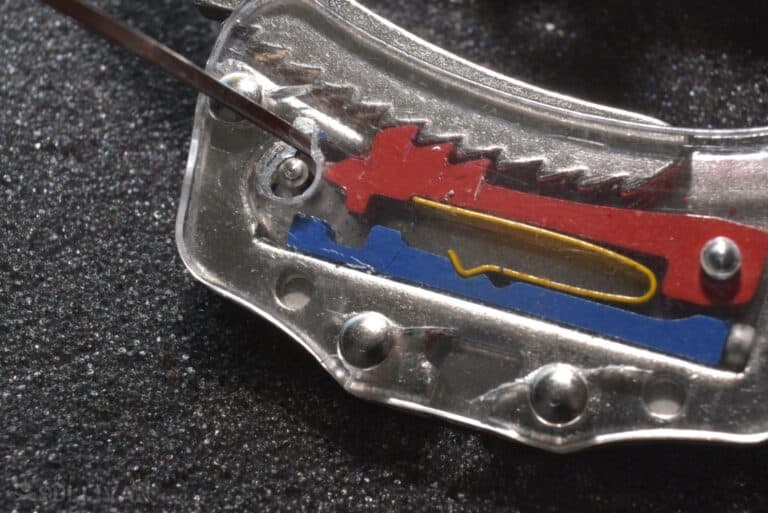
Step 4: Bend the wire to a right angle It may be helpful to add a second bend to the wire about 1 inch (25mm) to make it easier to turn the pick:
Step 5: Insert the pick into the keyhole and rotate the pick around the post to disengage the double lock and the lock bar:
Step 6: Once the lock bar has been disengaged, release the single strand of the handcuff.
Escaping Zip Ties
Quick action steps:
- Maneuver arms to front of body.
- Raise arms way overhead.
- Forcefully thrust elbows down and back, following through.
- Wrists should “wedge” across chest, breaking ties.
Zip ties are extremely useful items in a bug out bag or survival kit, and one of the many uses that they fulfill is none other than to tie people up if necessary.
In order to understand how to escape a zip tie restraint, you first need to understand how zip ties work. Zip ties are made of a durable Nylon material with several, tiny teeth that run down one side of the tie. A molded ratchet is located on the end with several small teeth in a small case.
Since it is molded, the ratchet can allow pressure to be placed downward when the tape is placed through the open case, and then brought back up so that the areas in between the teeth on the tape come into perfect alignment with the teeth inside the ratchet.
This is what causes the zip ties to lock. When this happens, more movement will tighten the tie, but moving it backwards will not. It is precisely for this reason that zip ties can make for an effective restraining device.
Even though they are strong, they are not invincible. In fact, one such way to free you from them is to break them. If you have enough strength, it is possible to break apart the locking mechanism, but you can’t always count on this.
As an alternative method to break them apart, you can raise your hands above your head (assuming they are tied in front of you), and then bring them down with much force and speed against the upper part of your abdomen, while simultaneously pulling your elbows back and apart as much as possible.
If done with enough force and speed, the action will break the locking blade in the zip tie. The downside to this method is that it typically multiple attempts and it does cut deeply into your wrists.
There are two additional methods to break free of zip ties other than actually breaking them. You can pick the lock of the zip tie using a thin piece of material to press the locking mechanism up.
If you prevent the locking mechanism from coming into contact with the teeth of the strap, it’s possible to just pull the zip tie out. Examples of materials that you can use to pick the lock include hair barrettes, a pocket clip, paperclips, or if possible, your finger nail.
Finally, if breaking or picking the zip ties is not possible, you can attempt to cut or saw through them. Look around nearby for a material made of stone, concrete, or brick. Any item with rough edges may work.
Quick action steps for the friction saw method:
- Wind cord around ties.
- Grasp cord firmly.
- Pull back and forth to saw through ties.
Although time consuming, it is possible to cut the zip ties using the friction created by rubbing the ties back and forth over the rough edge.
Just in case there are not materials with rough edges within reach when you are trying to escape, you need a back-up plan. Smart preppers know to replace their shoelaces with 550 paracord so it is always available to them.
How can 550 cord be used to cut through zip ties? Simply remove both of your shoelaces (or more appropriately, 550 cord) and then tie them together.
Next, tie a bowline at both ends of the cord, with the resulting loop being large enough for you to slide your foot over. Next, thread the 550 cord under one of the zip ties, and then put one foot in each loop and move your feet into each loop.
Move your feet so that the cord will move back and forth, similar to how you would ride a bicycle. Eventually, the pressure on the zip ties from the 550 cord will generate enough heat to simply wear through the zip tie.
The faster you make the bicycle motion, the more friction you create and the quicker you will cut through the ties. Once the ties break, replace the 550 cord in your shoes and execute your escape plan.
Escaping Duct Tape
Quick action steps:
- Maneuver arms to front of body.
- Raise arms way overhead.
- Forcefully thrust elbows down and back, following through.
- Wrists should “wedge” across torso, snapping tape.
Duct tape is arguably the easiest restraint method to break out of, but that doesn’t mean it’s easy. Duct tape, a fabric tape reinforced with polyethylene coating, is undeniably one of the strongest adhesives out there. This is great news for when you need to get something repaired, but its bad news if you’ve been tied up with it by hostile forces.
One way to break free of duct tape is similar to the method for zip ties. Raise your hands above your head, and then bring them down quickly and forcefully against your abdomen while pulling your elbows apart. The advantage here is that you won’t cut your wrists like you would with the zip ties.
With that being said, you can heavily bruise, or break your wrists if you’ve tried multiple times with no success. Exercise caution when you’re practicing this method. Start small, then work up to more layers of duct tape. This way, you can tell what your body is capable of breaking using this method.
In addition to cutting through duct tape with a sharp object or rough edged material, there are three additional ways to break free of duct tape. Each one will work but has its own limitation.
The first to to wiggle and flex your hands and wrists until you are able to pull one hand free. It sounds straightforward, but do not be deceived, it takes a LOT of effort and time. It’s not as quick as the next two methods.
The limitation with this method comes into play if the duct tape is also around your arms and torso, making it more difficult to escape.
A second method for getting through duct tape, and you may have guessed it, is to chew through it. If your hands have been tied in front of you at a point where you can bring them up to your mouth, use your teeth to gnaw through the tape or at least weaken it.
This works best if used together with the first method of working one hand free. The obvious obstacle here is your mouth must be free. You will need another strategy if your captors thought to cover your mouth with a duct tape as well.
A third method to escape duct tape is to get the duct tape wet with water. Duct tape is water resistant, not waterproof. This means it can withstand moisture and water for only short periods of time.
If enough water or moisture is applied for long enough, the adhesive can and will fail. The more wet the tape becomes, the easier it is to peel away from whatever it is stuck to—in this case your hands or wrists.
If you have any water bottles or are near a natural water source, get the duct tape around your wrists soaked and you’ll have a much less challenging time wrestling free of them. If you aren’t within reach of a water source and can’t get your hands to your mouth to use saliva, you’ll have to use a different method.
If duct tape is around your mouth, simply extend your tongue out of your mouth and lick the tape surrounding your lips, while simultaneously opening your jaw vigorously. With enough practice, you will be able to free your mouth from the tape, as the adhesive can’t stick to a wet surface.
Escaping Rope / Paracord
Quick action steps:
- Create slack in ropes however you can so you can move (see below.)
- Maneuver against edge, sharp or rough object.
- Shimmy back and forth to saw through rope incrementally.
The fourth and final restraint that we will discuss breaking free from is rope/paracord. The neat thing about rope is that you can actually, in a way, influence how tightly it is tied around you.
Pretend to be cooperative while you are being tied up by holding your knuckles in the direction of your captor, but keeping space between your wrists and elbows. This makes it easier to slip your hands out later when trying to escape.
If the rope is being tied around your chest (to a tree for example), take a huge breath to fill your lungs with air. Hold it as long as you can, hopefully until your captor is done tying you up. When you release that air from your lungs, there will be a little slack in the rope.
The first way to break free of your bondages is to cut through the ropes with a knife, rock, or any other sharp object. You can also use something as unsuspecting as a key in your pocket.
Assuming your mouth hasn’t been gagged or taped over, you can use your teeth to loosen up the ropes.
After some work, you should be able to slip out of them. This method is made even more effective if you hold your wrists slightly apart like in the above example.
If none of the above examples work for you (maybe you were expertly tied up or your captors caught you holding your elbows apart) and it’s impossible for you to loosen the ropes or wrestle out of them, then what you’ll need to do is to take your shoelaces (or better yet, paracord if you have it) and make a large loop on both sides.
Next, place one loop around your left foot, bring the rest of the shoelace around your ropes one time, and then place the second loop around your right foot.
Get on your back with your feet up in front of you, and then move your legs as if you were riding a bicycle. In anywhere from fifteen seconds to a minute, the shoelaces should saw through the ropes.
The Restraint “Arms Race”
I must remind readers that these techniques do not exist in a vacuum. Today’s cutting edge counter custody technique could be proven hopelessly obsolete next year, next month or next week.
This is because the bad guys, particularly professional kidnappers of all stripes, improve their techniques in direct responses to the challenges that they encounter and the countermeasures they see being propagated on the internet.
It is a game as old as time itself between adversaries. Move and counter move. One great example about our zip tie defeating technique above.
The technique is effective, no doubt about it, and in response to this kidnappers in Central America, particularly Mexico started implementing what is known as vampire cuffs to counter this.
Vampire cuffs are just zip ties, but ones upgraded with sharp spurs, made from additional zip ties cut down radically into points, attached at the location where the underside of the wearer’s wrists will be.
Now, if someone attempted to use the momentum based snapping technique detailed above when wearing such vampire cuffs the “fangs” will bite deeply and painfully into the wrists, inflicting lacerations.
Pain is a disincentive to be sure, but on the offhand chance that a person is able to power through with the technique they will likely be bleeding substantially and could leave a trail of blood for captors to follow should they escape.
This is just one such example, and there are many others besides. The point is you should not plan on encountering a textbook simple example of restraint or illegal custody. Practice accordingly.
Complications of Captivity
If you are taken captive, you must escape at the first available opportunity that affords you any chance of success. The reason is your situation will only get worse and worse, and your chances shrink the longer you are held captive.
This is because captors that move you or reposition you will invariably increase their security by searching you more thoroughly, improving or supplementing your restraints and other such measures that will make it more and more difficult for you to get away or protect yourself.
You’re likely to be strip searched if not stripped out right and this means that most of your tools we have squirreled away, discussed above, will be gone.
Consider that you might be duct taped, zip tied or handcuffed when initially captured but what happens if you are handcuffed and duct tape and bound with rope or strapped to a gurney somewhere else? Your chances of freeing yourself can begin to close in on zero under such circumstances.
Remember that you likely will not have a better chance to remove your restraints and get away then you will in the early stages of the event.
Learning More
Nothing beats professional instruction. I’ve now taken two classes from Ed Calderon on counter custody mindset and techniques. Both classes were excellent, and pushed the boundaries for me both physically and mentally (tazers can be… interesting).
As an added benefit, Matt Fiddler of Serepick stopped by to provide a guest session on locks and handcuffs. Matt is a certified and registered locksmith and Security Professional with over 25 years of experience.
Currently, he leads a Security Team for a Fortune 100 Organization in the United States. If you have time, search his DEFCON videos where his research into lock bypass techniques resulted in several noted public disclosures of critical lock design flaws.
Practice, Practice, Practice
Cuff picking, shimming, and traditional key use are all perishable skills. If you don’t practice them, you get rusty. That is not good when you need them the most.
When you are first learning, you will need to practice more often. Likewise, as you develop your skills, you will be best served by increasing the difficulty.
Again, always practice with someone you trust. This is not a time for joking. If you need help, they must jump in immediately. No joking, no hesitation. When it’s time to get out, they must let you out.
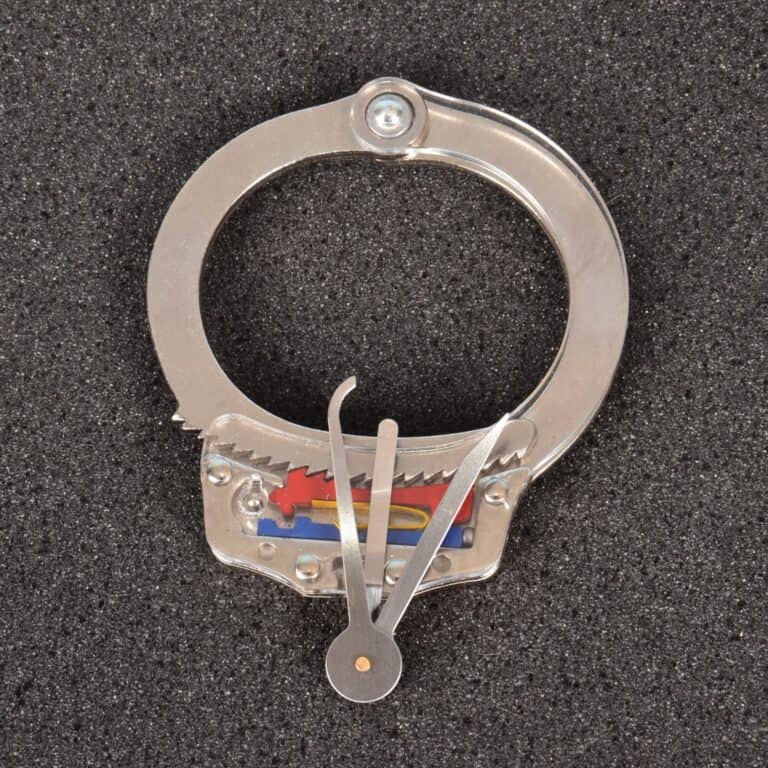
Start with the easiest situation. Work your techniques on a bench in good lighting. It may help to pick up a see-through practice cuff. Instead of guessing where the components are, you can directly see them. Work on the bench until you build up knowledge, skill, and confidence.
Move on to a cuff on one wrist then both wrists. Try the two positions allowed by the set of cuffs (e.g., keyhole away from your body (easier) and towards your body (harder)).
This is where you can add other stressors. Take a jog around the block to up your pulse. Soak your hands in an ice-water bath to affect your fine motor control.
The next step is to restrict your senses. Add blindfolds, hoods, loud music, and even excessive amounts of body spray or room freshener. We focus on the most dominant sense.
If you need to focus on your sense of touch, the loud music or overwhelming smell can drive you to distraction. It’s surprising how intense a black canvas hood can be! You need to learn to work through the distractions.
Finally, add physical stressors. Cuff your hands behind your back. Cuff them between your feet. Cuff one arm above your head. Cuff left hand to right foot, and right hand to left foot.
Even during the initial application of the handcuffs add stress. This will stress your ability to focus if / when the double locks have been applied. Add multiple layers of restraints including zip ties, rope, and duct tape (assuming you know how to defeat them as well).
Remember to be cautious as you escalate the various situations. There is a difference between discomfort and injury. Minor discomfort is expected. Injury serves no one and is counterproductive.
Frequently Asked Questions
A question that commonly comes up whenever discussing this subject is the probability of injury, both in training and a live event. Dynamic techniques that rely on strength and momentum will be subjecting the delicate carpal bones of your hands and wrists to considerable forces.
The fingers in particular are vulnerable to damage. It stands to reason that injury is far from out of the question. Even in the case of soft or subtle techniques relying upon picking or tool usage you might need to struggle mightily in order to position yourself for success.
The answer to the question of whether or not your hands or wrists will be injured, either injuries to tissue, ligaments and tendons or something worse like a fracture or dislocation, is complex as there are many factors involved in the calculus.
Perhaps the most obvious is the innate fitness and sturdiness of your own biology. People who are young, fit and athletic are less likely to be injured. Stronger tissues and bones are more resistant to injury, especially over multiple sharp movements or impacts. Folks who are already dealing with infirmity, old injuries or a general lack of athleticism will probably suffer more.
The type of the restraint, too, makes a big difference. Ropes and duct tape, while more than capable of being strong enough to lead to pull the muscles, sprained tendons and serious chafing generally are yielding and flexible enough to afford you a margin of error for multiple or botched attempts without serious injury.
Handcuffs, by comparison, are invariably made from steel or other alloys and generally will not give way from force alone before your bones and tissues will. They are notorious for biting into the wrists of those wearing them under load and can dislocate your thumb if you try to pull them free.
Zip ties are somewhere in the middle. They are flexible but pretty hard, and though they can be broken as described above a botched attempt will see them cut into your flesh readily and they may prove strong enough to withstand attempts to break them, potentially leading to soft tissue injuries.
Keep in mind that meaningful practice at escaping restraints, particularly when using dynamic techniques, is definitely going to involve some pain and may involve injury. Don’t sell yourself short by softballing restraints used in training and practice, and always take proper precaution when practicing these techniques.
When considering your counter custody plan, you might be wondering whether or not handcuffs all use the same key. Although the strict answer is no, the practical answer is yes.
At least, if you are in North, Central and South America, that is. The vast majority of handcuffs are based on only a couple legacy designs, and since and given set of handcuffs are temporary and not truly permanent restraints the only modest security increase of specialized keyways creates too great a logistical burden on those who typically employ them, namely law enforcement. Accordingly, handcuffs use a standardized key, and keys intended for double locking handcuffs have a double ended key to fit each lock.
This is not to say you won’t run into some specialized handcuffs or handcuff like restraints such as thumb cuffs that utilize alternate keys. Certain handcuffs utilize high security cylindrical keys but these are a rare exception.
Overwhelmingly, you can buy a standard universal handcuff key and be confident that any handcuffs you are restrained with can be unlocked by it.
Bottom line: Yes, any decent pair of bolt cutters can easily defeat chain linked or hinged handcuffs, and with a little bit of extra effort can defeat rigid cuffs.
Now, there is the academic and the practical answer to this question. Academically, as I said, yes. Practically, probably not unless you have someone to help you or you are lucky enough to have your hands cuffed in front of you.
This is because bolt cutters require a considerable amount of strength to operate and the likelihood that you’ll be able to position the bolt cutters in such a way to cut the chains or links joining your handcuffs if your hands are not in front of you is pretty slim.
One should also keep in mind that using bolt cutters to attack the bracelets of the handcuffs while they are being worn is risky as it will be fairly easy to bend or warp the metal in such a way that it impales a person’s wrists. It is far better, if you have access to bolt cutters, to use them to free up the hands and worry about getting the bracelets off later.

Nick Oetken is a prepper, outdoor enthusiast but, most of all, he is our in-house firearms expert. Look out for his articles on guns to find out which ones you need for your survival.
I have been Tied Up and Handcuffed many times and can always get free because i have learned to unlock Handcuffs and Untie Rope. It is a good Skill to learn and to have.
Interesting, may I ask in what circumstances? lol