Rain is like manna from heaven. All life here on our lovely planet requires water to live, and lots of it. Just like planet earth, our bodies are mostly water, so ya gotta have it.
Most people are tapped into their city water and they are comfortable with that. But the best water is deep in the ground, not to mention what will they do if something were to happen to that water supply…
I remember being a kid at my grandparent’s place, or their friends and family’s farms, and there was always a hand pump behind the house.
The water that came out of there was so cold and refreshing. On a hot summer day, after fishing or just running around in the woods, I went straight for that over pops or iced tea.
I also remember my grandparents and my uncle having rain barrels on the corners of their houses or sheds. They used that water on their gardens, because being rainwater it was clean and free of the chemicals and impurities that you get in your tap water (They keep the tap water within the legal limits though, mmmm, refreshing, huh?).
Is It Legal?
Can you believe that in some states there are laws that regulate how to catch and save rainwater on your own property? For instance, in Colorado you are allowed only two rain barrels for collecting rainwater.
In Nevada it is currently only legal to collect rainwater if it is being used for wildlife. In Oregon there is such strict regulation on rainwater collection if you live there and plan to build a rainwater collection system it is advisable that you research the laws as you could find yourself in hot water (I just had to do it, sorry).
Just like in Oregon, Utah strongly restricts rainwater collection and so you should research the laws there as well if you plan to construct a rainwater collection system.
The rest of the states throughout the United States loosely regulate rainwater collection, have no regulation, or strongly suggest that you do collect rainwater.
In the U.S. Virgin Islands there has been regulation since 1964 requiring new construction to have a self-sustained potable water system, like wells or cisterns, for collecting rainwater.
Getting Started
I’ve lived in a couple of houses that had large underground water tanks that were directly fed from the rooftop gutter systems on the house. We didn’t use them, but I liked knowing they were there if I needed them.
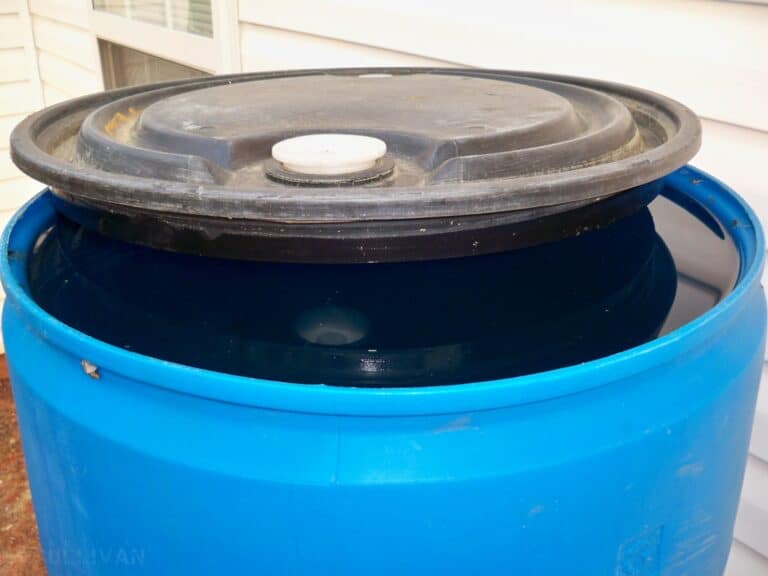
If you don’t have these large cisterns for storing water, your next best choice is to use the plastic stock water tanks, or you can just use plastic food-grade barrels. You know, the blue plastic barrels.
Those are perfect for making your rainwater collection system as they previously contained food items so you know they are safe to drink from, and being plastic they are easy to drill and cut for your plumbing lines.
Here is a video similar to what I described:
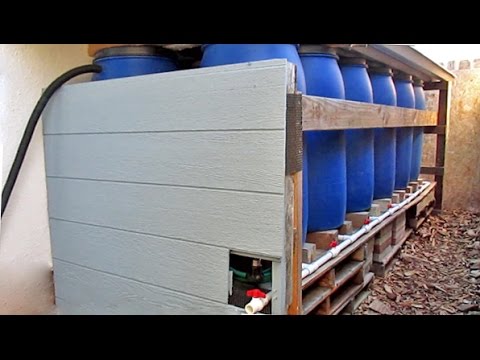
My cistern tanks were 1000 gallons. To get that amount of water using barrels you’d need 20, 50-gallon barrels. That’s a lot of barrels so if you’re only concerned with a smaller amount of water reserves.
For the sake of this article, let’s say that you line 9 barrels up across the back of your house or barn. I like an odd number so there is a center barrel. Make sure they all have the original lids for them so that you can clamp them on tight.
Setting Up
Usually, the gutter on your house has a high point in the center and slopes to each end of the building; we will use that as an example. You can use concrete blocks or you can make a steel rack that the barrels sit on.
You can build it out of logs if you have to, whatever it takes. The goal is to have the barrels on each end set at the same height and to have them a couple of feet or so off the ground.
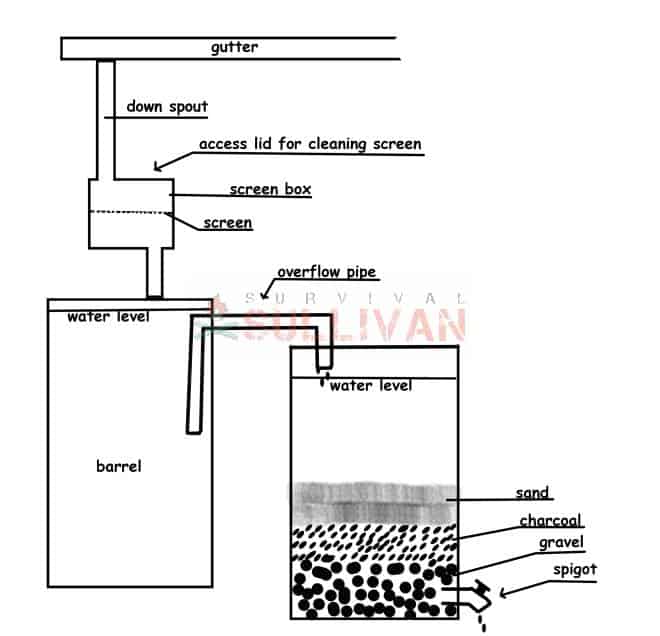
The downspout from the gutter will go into a filter box over the barrel at each end. This filter is just a sheet metal box with a screen in it to catch leaves and bugs etc. and then a downspout that goes into the barrel.
You can easily access it to regularly clean it of dust, dirt, roofing materials, and other debris by having a flap door on top of it next to the downspout pipe.
So, each barrel on the end is a couple of feet off the ground and has a filter box on it. You want the next barrel in line from each direction to be about four to six inches lower, then the next one four to six inches lower, etc. until you get to the center barrel.
If the end barrels are two feet off the ground the center barrel will end up being only six to eight inches off the ground.
You can make the end barrels a little higher if you want to make sure you have the clearance, but being two feet off the ground is usually low enough to be able to reach the filters without a ladder and is still high enough to get them all in that descending order.
This setup gives you 9 barrels arranged in a sort of a “V” pattern. Each barrel has a spillover pipe coming from the side at the top that goes into the top of the next barrel.
This spillover pipe should extend about halfway down inside the inlet barrel (the higher barrel). This prevents any floating debris that made it through the screen from getting into the next barrel. I would use a 2” PVC pipe for the spillover pipes.
You can do the same thing with only seven, five, or three barrels if you want. You can go the other way and put more barrels if you want, but try to keep it an odd number so each side array feeds into the last barrel which will be in the center.
When you get to the center barrel it will contain the filtering material and a spout.
Making Your Own Barrel Water Filter Step by Step
Making your own barrel water filter isn’t as hard as you might think assuming you have some basic supplies on hand and a little bit of DIY ingenuity. Below is a list of materials and tools that you’ll need. Review that, and then we’ll get right into the steps
Note: Use Only Activated Charcoal!
And one more thing before we get to that list of supplies: it is imperative that you only use actual activated charcoal or naturally produced wood charcoal that you’ve ground yourself for this purpose. You should never, ever use a charcoal that is intended for use in a barbecue grill.
Why? Because grill charcoal is typically made with all sorts of chemicals, including accelerants and other stuff, that can leach out of the charcoal and into your water- the water that you’re trying to make clean and safe. Talk about counterproductive!
Activated charcoal is readily available and cheap, and that should be your first choice but if not you can make your own charcoal from clean, all-natural wood and then grind that up for the same purpose. Never use those little briquettes out of the big bags!
Materials
Below is a list of materials you’ll need to make your water barrel filter.
- Water Barrel: This is the barrel itself that functions as the filter body. You can use a traditional wooden water barrel, or a modern plastic rain barrel or other water barrel. They all work with just a little bit of modification owing to the type of material they are. As long as it holds water and doesn’t leak your good to go.
- Pre-filter (if not using sediment filter on intake): If your water barrel filter is fed from a rain collection system that has a filter screen or some other device to trap large debris, you don’t need this. Otherwise, you want to use a piece of screen door mesh or some other fine material that can catch larger debris as you pour it into the barrel. This should be large enough to sit over the top rim and sturdy enough to not deform and pop out.
- Canvas Strainer: A clean piece of coarse canvas will act as the sort of membrane between the false bottom of our barrel and the actual stack of filter media above. This component is critical to prevent fine bits of charcoal and the smaller pieces of gravel from drifting down and clogging our spigot or connector.
- Gravel, Large: large gravel that will form part of the “false bottom” in our barrel. This gravel should be about ¾ inch in size but a little larger is okay. You’ll need enough to form a layer in your barrel that is at least 8 inches deep.
- Gravel, Medium: the next size down of gravel, and also part of the false bottom that will allow water to flow through the filter and then still reach our spigot without clogging up. This should be about a ½ inch in diameter more or less, and you’ll need enough to form a layer that is at least 4 inches deep.
- Gravel, Small: the smallest size of gravel. Use pea gravel or other small pebbles that are no larger than a ¼ inch diameter. You’ll need enough for another layer that is about 4 inches deep.
- Sand: clean, washed sand that has no dyes, colors, additives or anything like that. You’ll need enough sand to make a layer in your barrel that is anywhere from 8 to 10 inches deep.
- Activated Charcoal: This is the most effective and important part of your filter layer. This should be fine activated charcoal, and you’ll need a quantity sufficient to make a layer that is 10 inches deep.
- Collection Container: Assuming you don’t have your filter barrel daisy chained into another storage barrel for the holding of purified water, you’ll need a collection container to hold your water when you open the spigot.
Tools
You won’t need much in order to craft your filter barrel since it is mostly assembly of the components above, but if the barrel is not ready to go with a pre-installed spigot you’ll need the following.
- Drill w/ Bits: you’ll need an electric drill with a drill bit that is just slightly smaller than the stem on your spigot or connector kit.
- Spigot/Connector Kit: depending on your purposes for your barrel, you can get a spigot that will allow you to immediately collect the water you filter through the faucet or transport it through a hose, or utilize a connector kit to daisy chain your filter barrel to another storage barrel. Make sure your kit has the appropriate rubber washers, and if it doesn’t you’ll need those separately.
- Silicone Caulk: a bead of silicone caulk can help prevent leaks no matter what kind of spigot or connector you are using. Purchase the type that is prescribed by the manufacturer of the barrel or your connector kit. May not be required for wood barrels.
- Scissors: sharp upholstery scissors to cut the canvas above.
With all that on hand, it is time to assemble!
Assembling Your Barrel Water Filter, Step By Step
The following guide will tell you exactly how to assemble your barrel water filter. If your barrel already has a spigot installed, skip to step 4.
Step 1: Drill hole for spigot. A few inches from the bottom of the barrel, drill a hole for the spigot. Start the hole with a nail or punch to keep your drill bit from skittering across the surface and wandering.
Step 2: Deburr hole. Scrape the insides of the hole you just made to remove any fuzzy shavings or strands that might clog your spigot.
Step 3: Install spigot. Put the stem of the spigot through the hole and then thread on the included lock nut and washers as described by the instructions with your kit. Apply any silicone caulk or other included sealant according to the instructions. Wait until the caulk has fully cured, if applied, before proceeding.
Step 4: Add large gravel. Start carefully adding large gravel to the bottom of your barrel, being careful not to ding the stem of the spigot. You’ll want this layer to rise over the level of the spigot at least an inch.
Step 5: Add medium gravel. With the large gravel in place, now add the medium gravel on top of that, going for about a 4 inch layer. Again, the level of the spigot should be completely covered by the preceding layer of large gravel.
Step 6: Add small gravel. Now add the small gravel on top of the layer of medium gravel, another 4 in worth. Take the time to level this layer completely and make sure all of the gravel is settled before you proceed.
Step 7: Add canvas layer. Carefully cut out a piece of canvas that will stretch from edge to edge in the barrel snugly leaving no gaps at the edges. It is crucial that the fit be snug otherwise find debris in the form of sand or charcoal can get past it. Place this on the layer of small gravel you just added.
Step 8: Add charcoal. Time to start filling the activated charcoal. Pour some charcoal in on top of the canvas, level it and pack it, and then pour more until you have a layer that is about 10 inches deep.
Step 9: Add sand. Now pour in your layer of sand, taking time to level it and pack it before adding more until you have achieved a total thickness of between 8 and 10 inches.
Step 10: Install pre-filter if using. If you don’t have your barrel connected up to a rain-catching system or daisy chained in a sequence of barrels, install your mesh screen at the top of the barrel. Otherwise, put the lid on your barrel and secure it.
Step 11: Finished! Your barrel filter is done and ready to receive water.
It will take time for water to trickle down through the layers of your filter and then accumulate at the bottom, but this barrel filter typically works a lot faster with a much larger quantity of water than comparable but smaller water filters. Just make it a point to clean it in the spring and in the fall, changing out the canvas and replacing the charcoal as necessary and it can provide you many years of reliable service. The gravel and sand can be washed and reused!
Final Treatments
The water in these barrels is technically clean. Especially after it comes out of the last barrel, which is the filter barrel.
But, in order to make sure it is completely safe and 100% potable water, I would still do a final treatment using one of the following methods before I drank it.
Boiling
The easiest way of treating water and making it potable is by simply boiling it. You can boil mud puddle water and make it potable because boiling kills any, and all, bad microorganisms that may be lurking in the murk, including harmful bacteria viruses.
When you boil water to make it safe to drink, make sure to bring it to a full boil for 1 full minute or more. Keep in mind; once it starts boiling, it is evaporating. If you boil it too long, you will actually lose a little to the air. After you boil it, let it cool.
If you have a couple of water-holding vessels, just pour them back and forth, and that will help the taste a little by aeration, and rid the water of:
- Volatile organic materials such as benzene (gasoline impurities)
- Ammonia
- Methane
- Chlorine
- Hydrogen sulfide
- Dissolved metals such as iron and manganese
- Many oils
- Algae by-products
Using Bleach
Another way of treating water, to make sure it is safe and potable, is to treat it with chemicals.
Bleach is the best thing to kill off the pathogens that might be in there. It doesn’t take much.
- If you have some cleaning bleach that says it is 5% chlorine you just need two drops of chlorine per quart (or liter) and 8 drops of chlorine for 1 gallon.
- If it has lower than 5% concentrate chlorine, then you need to add 7 to 10 drops per 1 quart or liter, and 40 drops for 1 gallon.
Let stand for about half an hour and taste it. There should be a slight chlorine taste. If not, then you need to repeat the treatment and let it sit for another quarter of an hour.
If then the chlorine taste is strong, let it stand for a couple of hours (or so). Then pour it back and forth between two vessels to aerate it (as discussed above).
Planning Ahead
If you plan ahead for this, you can buy pool filter sand and activated charcoal for aquariums. Buy four clean buckets with lids and a spigot, and put it up to be assembled for emergencies.
I actually bought a couple of ceramic filters and spigots that are designed for using two 5-gallon buckets. The filter fastens to the lid/bottom of a bucket and the bottom bucket has a spigot. That simple.
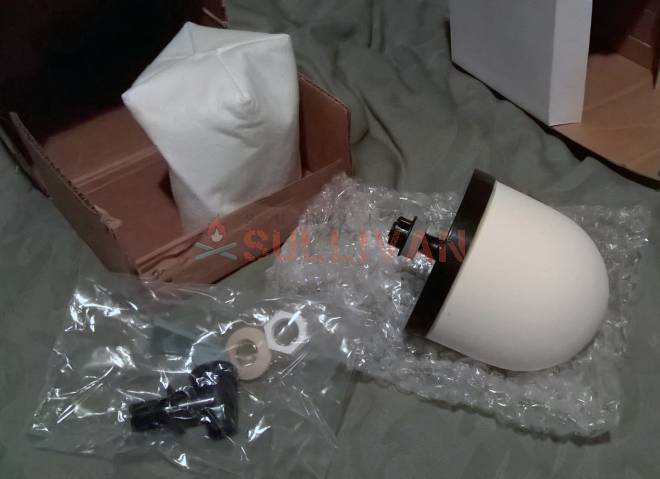
They cost about $30 for each filter/spigot set, and I’ve had them stashed for about 10 years or so.
The ceramic filters are usable pretty much forever. You just have to clean them periodically by brushing them clean. They are supposed to be a one-and-done setup, where you can pour whatever water in the top bucket and it comes out clean.
I planned that if I really ever had to use them, that I would do a gravel and sand bucket pre-filter system to make the ceramics last longer.
You can make as large of a sand and gravel system as you want, and the last step goes through these ceramic filters. The ceramic filter is supposed to be better than activated charcoal. Hopefully, if I ever need it, that’s an accurate statement from the manufacturer.
Here’s a video using a ceramic filter:
Wrap-Up
The reality is that you need to plan ahead for a lot of things. I’ve had many certain items put up for years. They won’t go bad. They’re paid for and don’t eat anything.
If I never need them, I’ll be perfectly happy. But if a time ever comes when they are needed they will be invaluable.
If you can make clean water in a time when no one else has any, you can get anything you want for it.
You will also have to protect it too, just like anything else. If, and when, these times ever come, food and water will be as much of a concern as protecting it from bad guys that want to take it from you.

Eric Eichenberger is an avid outdoorsman, skilled marksman, and former certified range officer and instructor with nearly 40 years experience handling and repairing firearms.
A skilled craftsman with a strong love for working with his hands, Eric spent 20 years as a carpenter and custom woodworker in high end homes. As a gold and silversmith he has created hundreds of pieces of jewelry over the years using the lost wax casting method.
The grandson of humble country folk, he was raised with the “do it yourself” mentality and so is accustomed to coming up with unique solutions to problems utilizing materials at hand.
Great article with lots of good tips. Are the grey Lowes buckets food grade? You can get frosting buckets from bakeries, sometimes free.
well done
Well done and great information.
In my area of California, they are so afraid of mosquitoes and west Nile virus that it is not permitted to have rain catch systems. But I am printing this information and keeping it for just incase.
If your using “Totes” to catch the rainwater in you might consider Guppies (mosquito fish) to keep down the bugs. Some people would not like this idea because fish might pee in the water??? Any way I loved the information you have provided for people who are looking ahead.
How long would you say does it take to filter 20 gallons of water ?
Yes, this is my question, I am trying to get a feel for the flow rate. Obviously when there is heavy rain you don’t want water backing up and being wasted, but I don’t really know how fast water would percolate through the sand and charcoal, in other words, how broad the surface would need to be. We get some pretty heavy rain round here, it can be fairly gushing out the downspout. I suppose I will have to test for myself with a small mockup!
You need to update the information you list in this article. Oregon no longer restricts rainwater harvesting on a state level, and in fact has a very informative booklet that is very easy to find. I am about to build in Klamath County, and they allow a cistern and rainwater harvesting in lieu of a well or well contract.
Washington State is VERY restrictive on rainwater harvesting. It is illegal to harvest without a permit
Not seeing the same information you are referring to: https://ecology.wa.gov/Water-Shorelines/Water-supply/Water-recovery-solutions/Rainwater-collection
Tell me how you protect your system from freezing and breaking in the winter?