Beans are considered a superfood in lean time as they provide ample protein and fiber without the need for refrigeration or special processing. You need to store beans properly, however, as they are susceptible to bacteria and pest infestation.
Whether storing kidney or navy beans, eliminating light, air, heat, and moisture are the primary outcomes you need to control. Keep reading to learn everything you need to know about maximizing the storage life of your dried beans.
Annually we grow and process 27 million tons of dried beans. Billions of beans used as a staple food from Africa to South America.
Although eaten with other sides and ingredients, beans by themselves are nutritional powerhouses. One-half cup of cooked black beans boasts over 100 calories, 20 grams of carbohydrates, and 8 grams of protein. Beans are also rich in micronutrients, including folic acid, magnesium, phosphorus, and potassium.
Extrapolating to a full pound, beans have over 1,500 calories. Conveniently, 30 pounds fit into a standard 5-gallon bucket. This makes almost a month of calories for one person in a bucket.
That falls in line with rice, oats, wheat, and pasta. If all you had were beans and your foraging skills, you could easily survive 30 days of subsistence living.
When packaged properly beans can last for over 25 years. There is a risk that they become overly dry. The issue here is that they become hard and difficult to cook. In most circumstances, you can cook beans in a few hours at a low simmer.
If they are over-dry a few hours won’t do it. They’ll remain hard and unpalatable. Don’t fret, you can still cook them either with baking soda, or in a pressure canner. You can even use them as a partial flour substitute.
Beans are one of the cheapest sources of protein you can pack away. Depending on where you source them and what kind you source you can expect to pay between $1 and $2 per pound.
To make your money go the farthest, buy in bulk. If this does not fit your budget, then try to add one or two bags of beans to your grocery cart each week.
Table of Contents
How Long Do Dried Beans Last?
If you are the kind of person who leaves their dried beans in the original packaging and stores them in the pantry then you’ll get about a 1 year shelf life out of them. With proper storage, including keeping them out of direct sunlight, you can expect an extended life of about 25+ years.
How Many Beans to Store
Prepping for the long-term takes volume. A few 1-pound bags won’t help when the grid goes down. You need to secure your independence for weeks or months. The prepper yardstick is having a full year of calories. Let’s look at the math.
The average person needs around 2,000 – 2,500 calories per day. The average family of four therefore needs 10,000 calories. At 365 days in a year, this adds up to about 3.6 million calories that you need in your long-term storage.
At 1,500 calories per pound, that would be a little over 2,400 pounds of beans. Yeah, that’s a lot of beans. Too many.
Taking a more moderate approach to your digestive health, the Provident Living Food Storage Calculator has a more reasonable approach.
Assuming the same family of four, including two adult children (over the age of 12) they recommend only 240 pounds of beans. They balance this out with 1600 pounds of grains (wheat, rice, oats, pasta, etc.), 120 pounds of dairy products (for fat and protein), and 120 pounds of additional fats (oils, butters, and shortening).
Fill the gaps with salt and sugar, and you have a balanced year’s supply of food. From here you add spices, meats, and other treats to make a more exciting menu and you can survive the year in relative comfort.
Sourcing Beans in Bulk
Almost every grocery store carries beans in one-pound plastic bags. We’re thinking big though. If you must, buy them a pound at a time. But save a little effort, and possibly money, by asking the manager for one or more unopened cases. They may even give you a discount.
Next is the local wholesale store such as Sam’s Club or Costco. I’ll admit that my local clubs have little in the way of bulk beans. However, I have seen good supplies in other areas of the country.
Next is restaurant supply stores. I watch our local store for weekends that are open to the public. When this happens, I buy big. Really big!
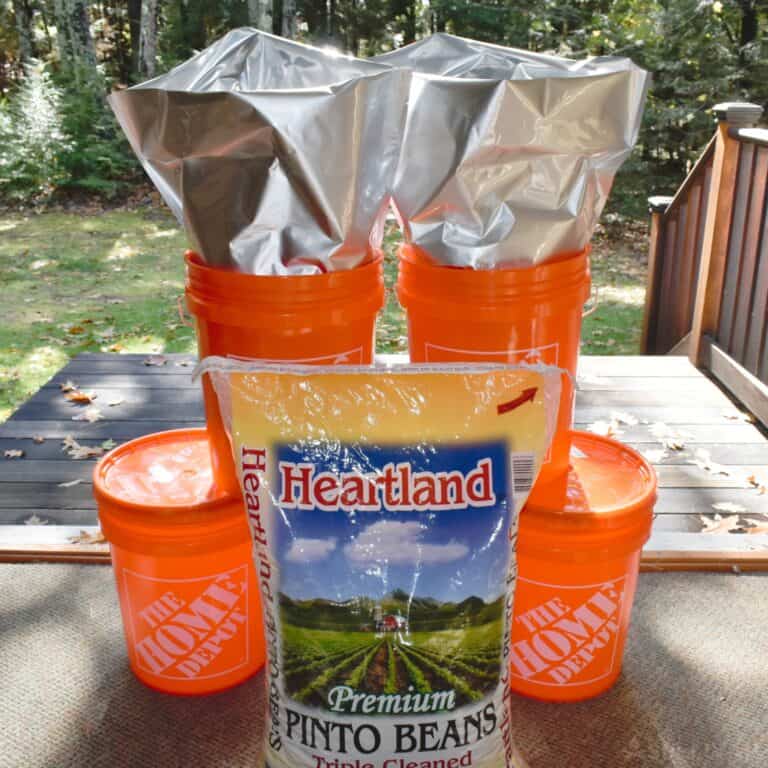
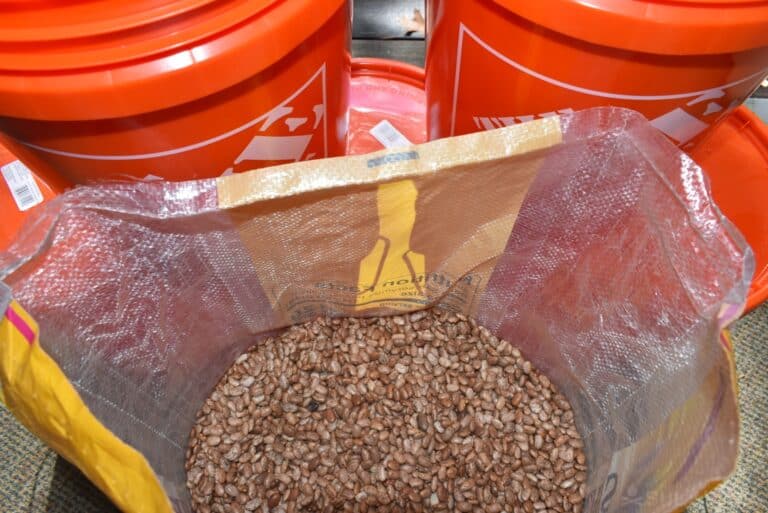
They carry 50-pound bags of over a half dozen different varieties. I pick up 100 pounds at a time, as this divides evenly between three 5-gallon buckets.
Finally, seek out your local ethnic grocery stores. African, Ethiopian, and Mexican stores usually carry beans in bulk. Our local Mexican/South American grocery store has an aisle dedicated to beans and rice in bulk.
Store Dried Beans in Proper Cooking Amounts
Using your dried beans for cooking is the ultimate goal of doing all of that important work in storing them. The biggest mistake new preppers make is storing too much in one container.
What happens is that you open a huge plastic bucket of beans or one of the vacuum sealer bags, only use one cup, and then are stuck using all of the remaining beans because now you’ve introduced all of the factors that cause spoilage.
This means you’ll need to start thinking about what recipes you’ll be using the beans in ahead of time. Consider things such as the size of your family, how much you generally eat per meal/per week, and how much storage space you have available.
For a family of four it is safe to say that 1-2 cups of beans per person per meal will be enough as long as you are supplementing other items in it as well.
Portion your beans per meal and seal them separately. You’ll be able to access only the food-safe storage containers that have individual meal portions within instead of having to open the entire batch.
Precautions for Bean Storage
As with all long-term foods, you will be in a minor battle for your food. This is a battle that you can’t afford to lose. The enemies are bugs, moisture, oxygen, heat, and light. The good news is that each has a weapon that you can deploy.
The goal is to pack your beans away for multiple decades, and have them in the same condition as the day you packed them away. With a few precautions, you can save your beans in bulk and ever have to rotate them.
Bugs and Pests
Protection from bugs and pests is best summed up by preparation and packaging. All raw foods have a few eggs or insects. It is impossible to escape these completely. In most cases, we cook and eat the food before these can become an issue.
Over the months or years, improperly treated food allows the pests to multiply and thrive, eventually ruining your valuable stash of beans. You can pre-treat your beans to kill off the bugs and eggs. There are two preferred pre-treatments: diatomaceous earth, and freezing.
Diatomaceous earth is the fossilized remains of microscopic animals. This white powder is safe for human consumption, however it is murder on insects.
Small and sharp, it cuts and eventually dehydrates the critters. Mix in a small amount as you package your beans and any insects that hatch will die shortly thereafter.
Food grade diatomaceous earth is safe for humans to consume. Some people even add it to their diet to combat intestinal parasites.
If you wish, you can give your beans a quick rinse before cooking, but it is unnecessary. Diatomaceous earth also has the advantage of absorbing any moisture in your packaging!
Freezing is the second pre-treatment method. A few days in the freezer will not affect your beans. It will however kill any insects and eggs.
Freezing interrupts the eggs at a cellular level, bursting them microscopically. Just like lettuce that accidentally freezes, the eggs will no longer be viable after this treatment.
Moisture
Beans need a little moisture, otherwise they will be hard and will be slow to soften during cooking. As long as you have packed your beans during a relatively dry season, you are OK. If you pack them during a damp season, then don’t fret, we have just the tool for you.
Desiccant packets contain a small amount of silica gel. When dry, silica absorbs moisture from the air. You see these packets in pill bottles, tool bags, or any container where they wish to keep the contents dry. Available for cheap online, get a bunch and add a few to your packing container.
The second issue with moisture is its infiltration into your storage container. Using a quality container, we will talk about 5-gallon buckets shortly, with an airtight and watertight seal. Keep them in a dry place and you won’t have an issue.
If you have a water issue, for example you are storing them in a basement and you have a minor flood, then your container is your first line of defense. We will look at multiple packing layers shortly to provide a little extra insurance.
Oxygen
The seal on your container will also defend against oxygen intrusion. Bugs need oxygen to live. Eggs need it to hatch. Natural oils spoil in the presence of oxygen. Remove the oxygen and you remove the opportunity for spoilage.
A quality seal will keep new oxygen from getting to your food. This is the first step. The second is removing any oxygen packed with the food. This is the job of oxygen absorbers. Also called O2 absorbers, these packets use a chemical reaction to use up any oxygen in your packing.
They are simple. Most O2 absorbers contain powdered iron. The iron, in the presence of oxygen, rusts. This chemical reaction, oxidation, binds the oxygen. The only variable you need to learn about is the amount of oxygen you have to remove.
O2 absorbers are rated by the volume of oxygen they react with. For a 5-gallon bucket, you will need 4,000 cubic centimeters of absorption. That’s two 2,000 cc absorbers (a standard size).
Heat
You cannot mitigate heat. You can only avoid it. The best bet is to find a cool area for your long-term storage.
In a perfect world, you would have a room dedicated to your long-term food storage in a basement. Basements remain cool during the heat of the summer and don’t get as cold as other rooms during the winter. They are perfect for storage.
If you don’t have a basement, then you will need to rely on AC if you live in a warm climate, and central heating if you live in a cold one. Try to avoid unheated garages and sheds as the extreme temperatures will negatively affect the food and the container.
Your sweet-spot for storage is between 50 and 70 degrees Fahrenheit (10 to 21 Celsius).
Light
Ultraviolet light destroys nutrients in food and breaks down plastics and rubber. Given enough time, your food will spoil, and your seals will become brittle. The easiest protection is to shut your beans in a closet, closed room, or under the stairs.
If these are not an option, then you need to first use a light-blocking container. This does not have to be perfect. Any dark color will do. Just avoid transparent or translucent plastics.
If you are packing in Mylar bags (to be discussed in the next sections), then they also add a layer of protection. Finally, throw a tarp or blanket over your bean buckets. These precautions will ensure light does not spoil your goods.
Original Packaging
Using the original packaging is a viable solution, however, it isn’t the best. You need to protect against the enemies of storage. This will only be possible with sturdy packaging, and most original packaging isn’t.
With a few precautions, you can use the bags that your beans come in. If your storage area, basement room, closet, etc. is cool, dry, dark, and pest free, you can stack your bags on a pallet and wait. Freeze your beans for 3-5 days before storage to kill off any pests.
With perfect conditions, you can expect to only get 3 to 5 years, as oxygen gradually degrades the beans. You may get more time out of them, however, it is best to incorporate a rotation schedule to keep your beans fresh.
Perfection in a Bucket: 5-Gallon Buckets
There are several reasons preppers like 5-gallon buckets. They are cheap, sturdy, come in a variety of colors, and they seal up tight. You can get a bucket from the big box stores for a few dollars. You can even get them for free from your local grocery store or bakery.
They get bulk materials in them, such as icing and other dry goods. With a quick wash and a new lid, you can get as many as you want as long as you are patient. Make a habit of making the rounds every Saturday morning and it almost guarantees you to get a few each week.
The ones I get from the local bakery are free, however they don’t come with lids. I swing by Home Depot for replacement lids. At $2 each, I’m a happy man.
You can always place your beans in their original package inside a 5-gallon bucket. This isn’t a bad idea, but there are two ways that are more efficient and effective. Let’s look at those.
Buckets and Diatomaceous Earth
Diatomaceous earth is the perfect companion to your beans. In this application, it will both protect against insects and moisture.
You will need two buckets to allow for thorough mixing. In the first bucket, add 15 pounds of beans and ¼ cup of diatomaceous earth. Gently but thoroughly mix your beans, then pour into the second bucket.
Then repeat with another 15 pounds and a ¼ cup of diatomaceous earth. Top off the second bucket with the new mixture, seal, and move to your next bucket.
You can expect to get about 30-33 pounds of beans per bucket. With this method, you can expect 10-15 years of storage. Again, make beans a part of your life, and set up a rotation scheme that allows you to eat through your storage and add new beans each year.
True Long-Term Storage
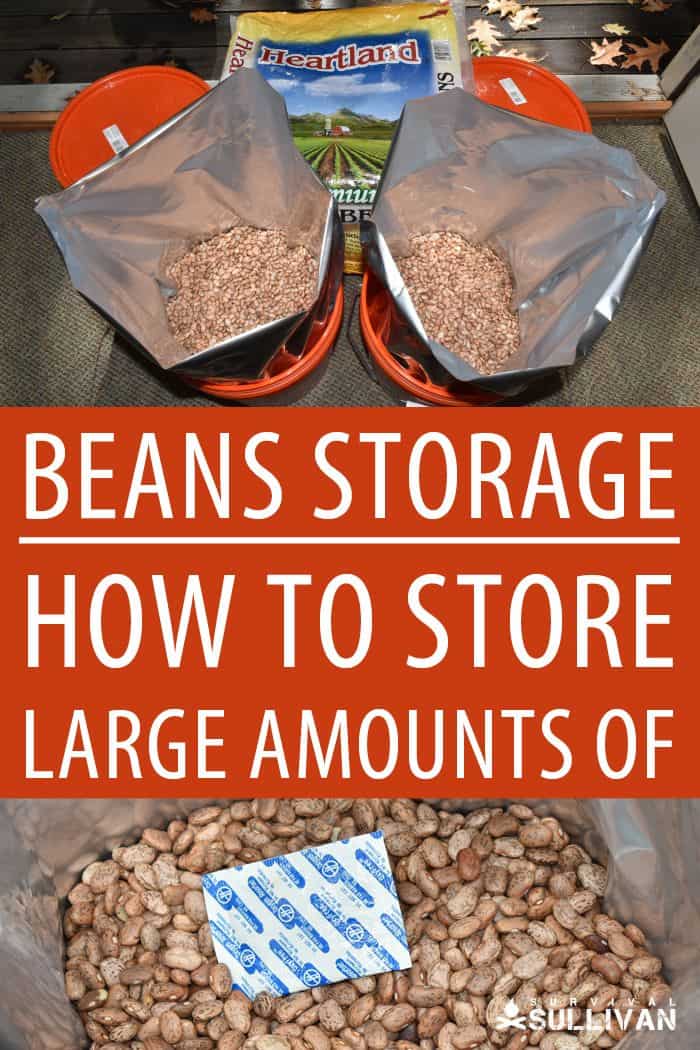
Time for the end-all and be-all of prepper storage. Buckets and Mylar are the long-term prepper staple. This method checks off all the boxes. You block light, seal out moisture, remove oxygen, and keep out pests.
For this method, you will need mylar bags. These thick plastic bags include a vapor-thin metal coating on the plastic that blocks light and the elements. They are available online. You can even purchase them with oxygen absorbers.
If you are packaging during the damp season, use a few desiccant packets with this process.
First, clean and dry your bucket. Then place a mylar bag in the bucket. Place one of your O2 absorbers in the bottom then fill the bucket halfway with beans. This should be about 15 pounds of beans.
Then, place another absorber and desiccant pack if you are using them. Fill the bag within an inch or two of the top of the bucket and add the last of your O2 absorbers.
If you are using 2000cc absorbers, just add one at the top and one the bottom.
You are now ready to seal up the mylar bag. You will need to heat the bag just enough to melt and weld the bag shut. This takes either specialized equipment or a little practice.
You can use a dedicated tool designed to seal Mylar bags. If you choose to save on this expense, you can use a household iron and a dowel. Press out as much air as possible, then pull the top of the bag over the dowel. Run your iron over the bag and it will weld shut.
Try this on a few scrap pieces to get used to the cadence. You’ll get the feel of it within a few tries. I recommend sealing several sections for redundant protection. Better safe than sorry.
Over the next few days, the bag will collapse on the beans. and become hard as a rock. This is a sign of a good seal and a tight vacuum.
If it doesn’t tighten up within a week, cut open the bag, add a few new O2 absorbers, then re-seal. Depending on where you sealed the bag, you may need to transfer the beans to a new Mylar bag.
This method is great and should get you over 25 years of storage. Again, every few years open and use a bucket just for quality control. You should always check your buckets annually.
Other Ways to Store Beans Long Term
There are a variety of ways to store your beans long-term, some expensive and others not so much. Here are some additional methods you can use in your home today with the right equipment.
Vacuum Sealing
Much like heat sealing a Mylar pouch, vacuum sealing eliminates any oxygen within the container itself.
Depending on what you purchase, some bags may be resealable while others need to be discarded after breaking the seal. Vacuum sealing your beans will give them a shelf life of 5+ years.
Mason Jars
Mason jars offer an airtight container solution that can keep pests and insect eggs out. Keeping an oxygen absorber inside the jar will eliminate any remaining oxygen inside.
Ensuring the jars are kept in the dark will maximize the shelf life. Expect to get around 5 years of shelf life using a sealed mason jar in the proper environment.
Freezing
People store beans, peas, lentils, and other legumes in freezer bags all of the time because it’s effective for a few important reasons.
First, the deep freeze will kill any lurking insect eggs that may be in your batch of beans. Additionally, you don’t need any special equipment aside from a freezer and some freezer bags. Lastly, freezing your beans locks in all of the vitamins and minerals found inside.
The downside is that if your freezer stops working then you will need to quickly use up your stock before it goes bad.
A great way to store beans is to grind up the dried beans into bean flour and then store that in your freezer. You can easily bake with it or make up some refried beans for your favorite Mexican dish.
Oxygen Absorber Packets
The best way to get rid of air in your stored goods is to use an oxygen absorber alongside your preferred storage method.
Oxygen absorbers are little packets full of iron filings that react to air by turning to rust. This chemical reaction removes the oxygen from the package and replaces it with nitrogen, which is inert and harmless to the beans.
How To Tell if Dried Beans Have Gone Bad
Determining whether your dried beans are good or bad is a relatively easy task. Insects such as weevils can infiltrate the original packaging and lay their eggs.
Unsuspecting customers may open up their stash to realize that there are little flying insects fluttering within. Any signs of insects inside your dried beans is a clear indicator that you need to throw your beans out.
Mold is identifiable by smell or sight as it will start to eat away at the bean itself. If you see any black or white fuzz it is time to dispose of the beans. Additionally, any sign of discoloration or rancidity through smell is a clear sign to ditch the old beans.
Start Stockpiling Beans Today
Carbohydrates store easily however proteins are a challenge. There are only so many ways to preserve meat for the long-term, and all of them are expensive. With dry beans, you can stack up this vital nutrient for little money and less effort.
Store them in large numbers. I recommend that you store one bucket of beans for every two buckets of rice. This ratio matches my recipe for rice and beans. Two cups of rice, and one cup of beans.
Not that you can only cook them with rice, that is. There are a variety of recipes that help beans fill their full potential. Give these storage methods a try to find your preferred method. Once you have it mastered, I promise you it won’t take much, buy and store in bulk.

My passion is empowering people with the knowledge to prepare for personal, local, and regional emergencies. I went to school for engineering and computer science and spend my days in the security industry.
You didn’t mention kidney beans or lima beans. Both of these are really good beans. As for beans and rice, we fix red kidney beans and rice. Yum. There are so many more beans than either of us mentioned.
He mentioned the beans he uses. He also mentioned there were many other types. Most people me included don’t store every type of bean out there . I store some kidney beans but no lima beans
We cook pintos with browned ground beef, and taco seasoning. Sometimes we add rice as well. There are so many way to cook beans. When I fix Lima beans, I like to cook cabbage with them. Yum, I’m making myself hungry.
subject comes up frequently about making a mixed bean long term storage bucket using the smaller mylar bags ….
a 500CC 02 absorber handles both the 1/2 and 1 gallon sized mylars – gallon holds approx 4 pounds of loose beans …
the gallon size stack flat nicely thru the center of a 5-gallon bucket – the 1/2 gallons slip into the sides >>> it’s a good solid pack in the bucket with small sections of void – before closing the bucket fill the voids with loose small beans like a lentil or use loose rice or possibly popcorn kernels (old old shipping trick) ….
I always add a bag or two of rice along with the bean bucket – a complete dinner pack that way ….
One thing I hear all the time is to soak your old beans in baking soda! I have done this several times with the same result. The beans always taste like soap! (crap) No matter how many times you rinse them. Pressure cooking is the best remedy for old hard beans. (I use the Instant Pot) Another option I use is an Immersion blender. This purees the bean into a more potato/leek soup consistency. As far as saving beans over meat, I love a filet, however after a year or so you can still plant the beans and feed your family!
Beans have amino acid Lysine but low in Methionine which is more present in grains (originally grass seeds), which in turn are low in Lysine; hence all ancient vegetarian diets (Chinese, Indian, American natives etc.) consisting of rice/wheat/maize/grain and beans to complete amino acids for humans. Diary adds extra Tryptophan. I am physician.
Rather than O2 absorbers, I installed Schraeder Valves on my dry goods containers, then purge the container with compressed Nitrogen. Dried Beans stored in Nitrogen can last 50+ years. Setting the system up is expensive, but once set up, Nitrogen is one of the cheapest gases to buy.
AND – you’re not using mylar bagging – which is why gas purging using tanked inert gases or the dry ice method died 25 years ago ….
save one VERY questionable professional food packer >>> everyone is using the food grade bucket/mylar/02 absorber long storage method ….