Making a survival bow is a challenge that many preppers and survivalists want to master for the purpose of survival. Not only that, but the actual process is just plain fun!
The idea behind making a survival bow is that you will be able to find the right materials in the wild and you will know how to shape those materials and put them together to create a weapon using “primitive skills” that will both feed and protect you and your family.
Choosing the Right Wood
The first step is choosing the right wood for your bow. You can’t just pick up any old branch and call it a day. Any hardwood will do for making a survival bow. The type of hardwood will depend on where you live, but include woods such as maple, beech, oak, ash, yew, hickory, black locust, and orange.
When you are out in the forest, you might not know what types of trees are around you. In this case, you will have to know how to identify good bow wood. You can test the branches of trees as follows:
- Choose a branch about half an inch thick.
- Bend the branch a little and let go. It should snap back into place quickly.
- Bend the branch into the shape of a ‘C’ and determine whether it does so easily and whether it stays intact.
- Break the branch. If it snaps, then the quality is not good enough. If it breaks but in a way that bends the fibrous interior of the branch, it is ideal for bow-making.
Once you find the right wood, you need to find a good piece of it. The best survival bow will be made from a sapling or branch that is:
- 5 feet long
- 5-2 inches thick
- Has no major twists or knots
- No major cracks in the wood
When you have cut the branch or sapling, what you have to work with is called your bow stave. One end will already ideally be tapered to half an inch, but you will need to shape the other end to match.
Shaping the Bow
It’s important to work with the natural shape and tendencies of the wood. Your branch will have its own way of moving and bending and when learning how to make a survival bow, you need to familiarize yourself with the natural tendencies of your wood.
Place one end of the branch on the ground and place your hand on the other end. Gently hold the top of the branch and push on the center. The branch will rotate until you find the natural bend. The inner part of that bend is called the belly of the curve and outer part of the bend is called the back.
Once you found the natural curve of the branch, mark three inches on either side of the center of the branch. This will be the handhold area of your homemade bow. Then place one end of the branch on the ground and hold the other end and push the handle of the branch.
Anywhere along the end of the branch closest to the ground does not bend easily, use a sharp knife to whittle away the wood from the belly until the right bend is achieved. Flip the branch to shape the curve of the other end.
It is critical to strip away only wood form the belly and sides of the branch, never from the back as this will compromise the strength of the branch and could cause the branch to break.
Be sure to remove any wood from the belly slowly, rechecking the curve often to ensure the shape is correct. The ends of the branch and the handhold area should bend very little. The final result should be a branch on which both ends bend evenly to form the shape of a parabolic curve (think satellite dish).
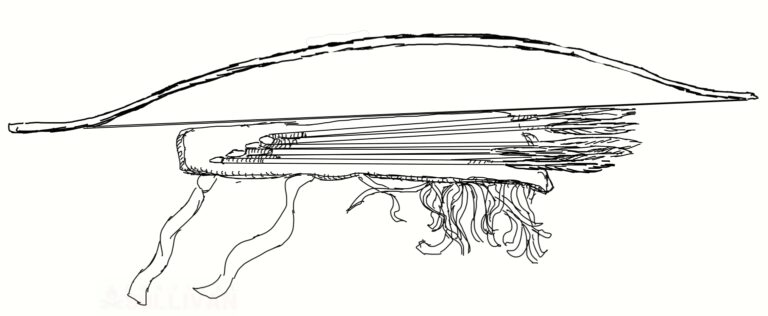
Finally, when learning how to make a survival bow, you will need to know where to place your notches to hold the bow cord. Place a notch on each side of the bow close to each end of the bow. The notches should be made at a 45 degree angle toward the handhold and be deep enough to ensure the bow cord stays in place.
Adding Bow Cord
The best survival bow cord can be made with any small-diameter synthetic material and choosing the right cord is important when learning how to make a survival bow. The less stretch the cord has to it, the better.
If you do not have synthetic material at your disposal, then there are a number of natural materials that will work well, including cords made from sinew or dead plants, such as milkweed, dogbane, nettle, or yucca.
Once your bow cord has been strung, it should be 5-6 inches from the handhold of the bow. Next you should go through the final shaping process. You must tiller the bow, which is one of the most important parts of learning how to make a survival bow.
To tiller the bow, hang it horizontally on a tree branch by its handhold. Pull down on the bow cord and watch the bend of each end. If the ends do not bend by the same amount, then you will need to remove wood from the belly on the limb that bends less.
Check repeatedly, drawing further each time, to ensure both ends bend evenly. Once you get to your maximum draw weight and both ends flex evenly, you are done shaping the bow.
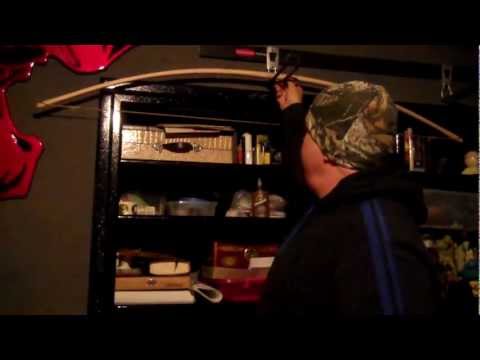
Testing the Poundage of the Bow
Part of learning how to make a survival bow is learning how to determine if it has the desired draw weight. You will need either a bathroom scale or hanging scale to measure the draw weight with accuracy.
With a bathroom scale and a 2×4 piece of lumber, you can place one end of the 2×4 on the scale and place your bow horizontally on the other end by its string. Pull down on the bow until you reach its full draw. The weight registered on the scale is the draw weight of the bow.
You can also hang the bow the same way you did to tiller it and hang a hanging scale on the bow cord. Then pull down on the scale until you reach full draw.
The scale will register the draw weight. Here is a video that shows you how to measure the draw weight of your homemade bow:
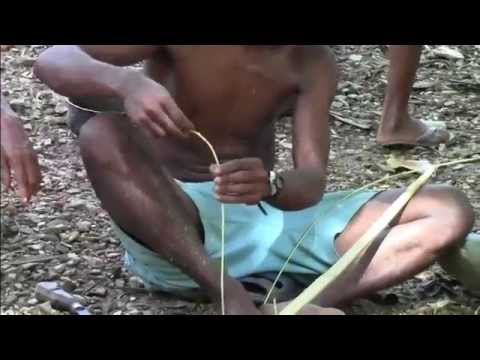
Making Good Arrows
When learning how to make a survival bow, you need to be able to make good arrows to go with it. You can have the best survival bow in the world, but if your arrows aren’t good, the bow won’t matter. Fortunately, arrows can be made easily out of any number of wood types, such as many fruit trees, willow, maple, or dogwood.
Any wood that has straight-grained shoots or branches will work. The ideal thickness is between ¼ inch and ½ inch. Any thinner and they will be too weak to be of use and any thicker and they will be too heavy.
Just as when learning how to make a survival bow, when making arrows you have to make sure the shoot or branch is straight and doesn’t have a lot of knots or branches.
Ensure the narrow end of the shoot is wide enough to be notched for the bow cord without compromising the integrity of the wood. You can use a knife or sharp stone to cut off any branches and smooth out any bumps on the shoot.
The first thing you need to do with the shoot is remove the bark. If you have time, the preferred method is to let the shafts dry for a month, after which the bark will flake off. If you need your arrows more quickly, then strip the bark off it using your knife or a sharp-edged stone.
Just be careful not to remove the white material under the bark or make the arrow too thin in the process. If you have been able to dry the shoot, then sanding it will be easy and should be done with medium-grained sandpaper.
The shoot must be absolutely straight so you will need to remove any bends in the wood, no matter how slight. If you look down the length of the arrow you are making, you can judge if there are any bends, even slight ones, in it.
These bends are removed with the use of heat, so you’re going to need a fire. Follow these steps to straighten each crooked spot on the arrow and wear gloves if possible:
- Prepare a fire that will give you a concentrated area of heat about 4-6 inches wide.
- Heat the bend, but not to the point that it gets scorched.
- While hot, bend in the direction opposite to the natural bend until it is slightly past straight.
- Hold the arrow in place until it cools, which takes about 1-2 minutes, and it will stay in the new position.
- Continue to look down the arrow’s length to check its straightness.
Once the arrow is straight, you can cut it to the desired length, which is 3-4 inches longer than the draw length of your bow.
You can then sharpen the end of the arrow with a knife or sharp stone so that it forms a sharp point. However, if you want to take out anything bigger than a rabbit, you will need a stronger point.
If you are making arrows at home and have access to steel, you can make awesome arrows heads with that. There are also plenty of materials in the wild you can use to make an arrowhead, such as rock, bones, and seashells.
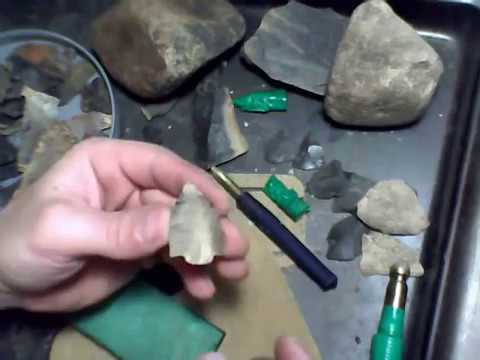
Choose your material and the use a knife or saw to help shape the arrowhead. It takes time to master this skill so it is good to start practicing now. You will want the measurements of the arrowhead to be as follows:
- Whole arrowhead is 1 ½ inches long and 1/8 inches thick
- Shank (part that is inserted into the arrow shaft) is 5/8 inches long
- Shank is same width as arrow shaft (so it is flat and wide)
- Base of point is 5/8 inches wide
- Point length is remainder of the 1 ½ inches
Notch the thick end of the shaft. A small saw is ideal for this, but you can manage with any sharp tool as long as you are careful not to split to wood. Make the notch the same length as the length of the arrowhead shank, 5/8 inches.
Insert the shank of the arrowhead and use some sort of light cord, such as fine twine or something made of plant fibers or sinew, to wrap around and secure the notch holding the arrowhead shank.
To wrap the cordage, start at the base of the arrowhead and wrap tightly down about 1/8 inches, go back up, and then go down and up two more times. You can use pitch from a tree to glue the end of the cordage down. Finally, notch the arrow about 1/8 inches at the narrow end can so that the bow cord can fit snuggly into it.
Now you can fletch the arrow. Feathers are the best, but bunches of pine needles will do as well. In a pinch, you can lash the feathers or needles to the arrow shaft at the narrow end just below the notch for the bow cord. When working with feathers and securing them in the traditional manner, follow these steps:
- Lay the feather flat and use a sharp blade to cut down the center of the quill.
- Get three portions of feather, each at least ½ inch wide and 4-5 inches long, and leave just enough of the quill to hold the feather part in place.
- Use something to cut the feathers back to they are all the same width.
- Strip the feather portion off ½ inch of each end of the quill in all three pieces.
- If you have access to glue, you can use it to attach the feathers to the shaft, but in the wild you likely won’t have this, although you can use pitch from a tree. Use the light cordage you used to secure the arrowhead to lash the quills to the shaft. Make sure the flair of the feathers point toward the end with the bow cord notch.
Check out this video to see how to make a Native American Comanche arrow:
Bow Care
Now you have learned how to make a survival bow and the arrows to go with it. You can have the best survival bow in the world, but unless you take care of it properly, it won’t be of service to you over the long term. Here are some final tips on taking care of your homemade bow:
- Never dry-fire the bow, meaning don’t fire it without an arrow, because it can break it.
- Sand the belly of the bow and apply a light oil, such as linseed or tung oil.
- Shoot and oil the bow regularly.
- Tiller as needed.

An urban prepper and rural wannabe, Karen has been working as a freelance writer for a decade and prepping for about half that time. She has gathered a wealth of knowledge on preparing for SHTF, but there is always more to learn and she has a passion for gathering and sharing that knowledge with other like-minded folk. Karen lives in London, Canada with her two children and plethora of cats.
This is what I’ve been looking for! Looks to be somewhat in in my range of handyness. At least I hope so!🤔