Making a survival bow is a challenge that many preppers and survivalists want to master for the purpose of survival. Not only that, but the actual process is just plain fun!
The idea behind making a survival bow is that you will be able to find the right materials in the wild and you will know how to shape those materials and put them together to create a weapon using “primitive skills” that will both feed and protect you and your family.
What You’ll Need
You don’t need a lot to craft a good primitive bow in the wild, in terms of materials or tools, but you’ll have to supply plenty of elbow grease and know-how. Gather the following and you’ll be ready to begin.
For the Bow:
One Large Hardwood Branch: this is the heart of the bow, and you can do everything else exactly correct but if you choose the wrong kind of wood or just a poor branch, your bow project is doomed to end in failure.
I’ll tell you more about selecting the right kind of branch in the following section, but for now familiarize yourself with maple, beech, oak, ash, yew, hickory, black locust, and orange varieties; are all good choices for bowmaking and you’ll be able to find one or the other pretty much everywhere.
Cordage for Bowstring: the other critical component of any bow, especially a good bow, is the bow string. To make a good bow string for a primitive bow, you can use synthetic fibers or cord, sinew, or go with natural fibers such as milkweed, dogbane, nettle, or yucca.
Obviously, crafting cordage from primitive materials is going to add even more time and it difficulty to the project, and it is a skill set unto itself. Making cordage is beyond the confines of this article, so familiarize yourself with that if you are intent on truly handcrafting your bow from scratch.
For the Arrows:
Small Wood Sticks: you can shoot any old stick through your bow but the results are going to be disappointed.
Taking the time to find and harvest the right kind of stick from fruit trees, willow, maple, dogwood and others will greatly improve your projectiles and make your bow more accurate.
Any stick that you choose for arrow making should be at a consistent size and very straight. I’ll go into a lot more detail on choosing, improving and finishing arrow shafts in the walkthrough.
Material for Arrowheads: a sharp and stick can make a serviceable arrow but that’s only for practice or taking out the smallest game. Truly deadly arrows that can bring down man and beast will need an arrowhead for strength and deep penetration.
Steel or other metal, rock, bones, antlers, obsidian, seashells, and other hard, sharpenable materials are all viable and have been used historically by cultures around the world for arrowheads. If you’re able to scavenge man-made materials, circuit boards, hard plastic and even wire can be crafted into a good substitute.
Fletching Material: fletching is a necessity to improve the flight characteristics of an arrow. It’s not just for decoration! Probably done, fletching will stabilize an arrow and increase both its range and accuracy.
Feathers, plastic or pine needles can all be put to use as fletching for your arrows, but each individual fletch must be identical and consistent, or as close as you can make it, for best results.
Thin Cordage for Lashing: you won’t have the luxury of modern, screw-on arrowheads. After you’re done crafting the arrowheads themselves, you’ll need to secure them to the individual shafts using thin but strong and lightweight cord.
Fine twine, fishing line, plant fibers, sinew and the gutted inner strands of paracord all make good arrowhead lashing..
Glue: to add maximum strength to your arrowheads you should glue them down after you have lashed them. This will help prevent loss in case of a miss and also keep them true and aligned with the shaft to improve penetration when you hit the target.
If you have little bottles of super glue in your survival kit, now is definitely the time to use them. Otherwise, you can use tree pitch or tar for the same purpose.
Tools and Other Gear
Axe or Hatchet: an ax or hatchet can help you cut down a suitable branch or even a small tree to harvest materials. Kept very sharp, it’s also useful for shaping the bow and other tasks that will come up. If you’ve got room in your BBOB or survival kit, these are really come in handy.
Small Saw: a small, fine saw is just the ticket for cleanly cutting arrow shafts to length, notching for arrowheads and creating the knock in the opposite end for mounting the arrow to the bowstring.
If you have a Swiss army knife or multi-tool with a built-in saw, these are perfect. Otherwise a thin knife that has serrations or a folding campsaw is usually about the right size.
Sharp Knife: you can use any knife you want for the various steps in the following walkthrough, from whittling away the belly of the bow to smooth them and trimming arrow shafts. A really sharp knife can also be used for notching. Thinner is definitely better here.
Sandpaper: not strictly necessary, sandpaper will though help you make your bow the best it can be. A couple of small pieces of 120 grit in your survival kit will come in handy for this job. If you don’t have sandpaper, it’s possible to use fine, sifted sand and simply rub down the bow and shafts with it when required. Not quite as good, but works in a pinch.
Fire: a small campfire will help you straighten out your arrows so they will fly perfectly straight. Assuming, of course, you do your part! You don’t need a roaring or big one; a nice fire that is about 5 in in diameter is fine.
Gloves: lastly, gloves are a must if you have them for protecting your hands. You’ll be making lots of it and sometimes risky cuts to fashion the bow and the arrows, and working up close to your tool for maximum control.
Gloves might spare you a serious injury. I also come in handy when handling the arrows over the fire, mentioned previously.
Light Oil: optional, and you might not have it in the middle of a survival situation but if you do linseed or tung oil for bow maintenance will help your bow last longer and resist the elements.
Choosing the Right Wood
As mentioned, choosing the right wood for your bow is paramount for your success. You can’t just pick up any old branch and call it a day.
Any hardwood will do for making a survival bow. The type of hardwood will depend on where you live, but include woods such as maple, beech, oak, ash, yew, hickory, black locust, and orange.
When you are out in the forest, you might not know what types of trees are around you. In this case, you will have to know how to identify good bow wood. You can test the branches of trees as follows:
- Choose a branch about half an inch thick.
- Bend the branch a little and let go. It should snap back into place quickly.
- Bend the branch into the shape of a ‘C’ and determine whether it does so easily and whether it stays intact.
- Break the branch. If it snaps, then the quality is not good enough. If it breaks but in a way that bends the fibrous interior of the branch, it is ideal for bow-making.
Once you find the right wood, you need to find a good piece of it. The best survival bow will be made from a sapling or branch that is:
- 5 feet long
- 5-2 inches thick
- Has no major twists or knots
- No major cracks in the wood
When you have cut the branch or sapling, what you have to work with is called your bow stave. One end will already ideally be tapered to half an inch, but you will need to shape the other end to match.
Making Your Primitive Bow and Arrows, Step by Step
Before you begin, read through these steps several times to get acquainted with the process. Also, it’s crucial to work with the natural shape and tendencies of the wood.
Your branch and sticks will have its own way of moving and bending and when learning how to make a survival bow, you need to familiarize yourself with the natural tendencies of your wood.
Step 1: Find centerpoint of bend in bow.
Place one end of the branch on the ground and place your hand on the other end. Gently hold the top of the branch and push on the center. The branch will rotate until you find the natural bend. The inner part of that bend is called the belly of the curve and outer part of the bend is called the back.
Step 2: Mark off handgrip.
Once you found the natural curve of the branch, mark three inches on either side of the center of the branch. This will be the handhold area of your homemade bow.
It is critical to strip away only wood form the belly and sides of the branch, never from the back as this will compromise the strength of the branch and could cause the branch to break.
Step 3: Start Shaping.
Place one end of the branch on the ground and hold the other end and push the handle of the branch.
Anywhere along the end of the branch closest to the ground does not bend easily, use a sharp knife to whittle away the wood from the belly until the right bend is achieved. Flip the branch to shape the curve of the other end in the same way.
Step 4: Proceed with shaping slowly.
Be sure to remove any wood from the belly slowly, rechecking the curve often to ensure the shape is correct. The ends of the branch and the handhold area should bend very little. The final result should be a branch on which both ends bend evenly to form the shape of a parabolic curve (think satellite dish).
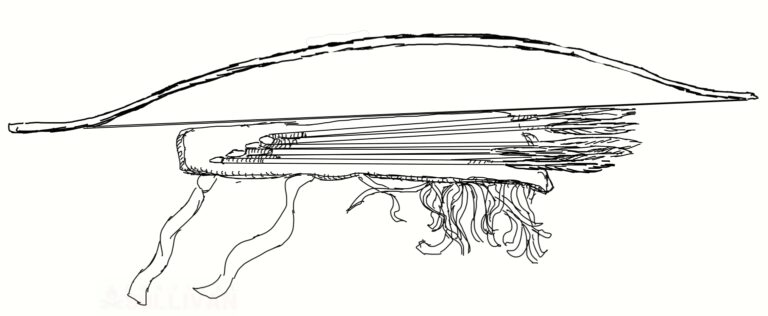
Step 5: Carve notches for string.
Place a notch on each side of the bow close to each end of the bow. The notches should be made at a 45 degree angle toward the handhold and be deep enough to ensure the bow cord stays in place. Don’t cut them too deep or you will compromise the strength of the bow and snap off the ends.
Step 6: String the bow.
With the bow at rest, tie on your cordage at both ends in the notches you just carved. Use a bowstring knot at both ends. Here is a good video showing you how to tie it quickly and easily.
The best survival bow cord can be made with any small-diameter synthetic material and choosing the right cord is important when learning how to make a survival bow. The less stretch the cord has to it, the better.
If you do not have synthetic material at your disposal, use cords made from sinew or dead plants, such as milkweed, dogbane, nettle, or yucca.
Step 7: Check and adjust tiller.
Once your bow cord has been strung, check to see how far it is from the handgrip, a measurement called tiller; it should measure about 5 or 6 inches at most from the handhold of the bow when at rest.
Step 8: Complete shaping.
Next you should go through the final shaping process. To finish tillering the bow, hang it horizontally on a stout tree branch or other firmpoint by its handhold.
Pull down on the bow cord and watch the bend of each end. If the ends do not bend by the same amount, then you will need to remove wood from the belly on the limb that bends less.
Work methodically, and check repeatedly drawing further each time. Ensure both ends bend evenly. Once you get to your maximum draw and both ends flex evenly, you are done shaping the bow.
Step 9: Make arrows.
Your bow needs good arrows to go with it. You can have the best survival bow in the world, but if your arrows aren’t good, the bow won’t matter. Arrows can be made easily out of any number of wood types, such as many fruit trees, willow, maple, or dogwood.
Step 10: Harvest good sticks for arrow shafts.
Any wood that is straight-grained will work. The ideal thickness is between ¼ inch and ½ inch at the most. Any thinner and they will be too weak to be of use and any thicker and they will be too heavy and show poor ballistics.
Choose sticks that are straight and doesn’t have a lot of knots or branches. Ensure the narrow end of the shaft is wide enough to be notched for the bow cord without becoming weak.
Step 11: Process shafts.
Use a knife or sharp stone to cut off any branches and smooth down any bumps on the shaft. Remove the bark entirely. If you have time and opportunity let the shafts dry for a month, after which the bark will flake off.
If you need your arrows more quickly, strip the bark using your knife or a sharp-edged stone. Just be careful not to remove the white material under the bark or make the arrow too thin in the process.
Step 12: Sand shafts.
If you dry shafts, sanding it will be easy and should be done with medium-grained sandpaper. You can also repeatedly rub coarse sand over the shaft to smooth it.
Step 13: Check shafts for trueness.
The shaft must be absolutely straight so you will need to remove any bends in the wood, no matter how slight. If you look down the length of the arrow you are making, you can judge if there are any bends, even slight ones, in it. Bendy shafts make for inaccurate arrows!
Step 14: Straighten shafts with heat.
For otherwise good shafts that are just a little out of true, bends are removed with the use of heat. Build a fire and wear gloves if possible. Your fire should produce a concentrated area of heat about 4-6 inches wide. Heat the bend in the shaft, but not to the point that it gets scorched.
While hot, bend in the direction opposite to the natural bend until it is slightly past straight.
Hold the arrow in place until it cools, which takes about 1-2 minutes, and it will stay in the new position. Recheck its straightness once totally cool.
Step 15: Trim shafts to length.
Once the arrow is straight, you can cut it to the desired length, which is 3-4 inches longer than the max draw length of your bow. Cut carefully and cleanly, taking care to keep it square and prevent splitting or warping.
Step 16: Carve field point, if using.
You can then sharpen the end of the arrow shaft with a knife or sharp stone so that it forms a sharp point. However, if you want to take out anything bigger than a rabbit, you will need a proper arrowhead.
Step 17: Craft arrowheads.
If you have access to steel or other metal, you can make awesome arrowsheads with that by folding and sharpening them with rocks or a sharpening stone.
Other materials found in the wild you can use to make good arrowheads include rock, bones, and seashells. Also, try using a circuit board from wrecked electronics! Those are super sharp and very light.
Step 18: Shape arrowheads.
Choose your material and the use a knife or saw to help shape the arrowhead. It takes time to master this skill so it is good to start practicing now.
The ends result you want is an arrowhead that is 1 ½ inches long and about 1/8 of an inch thick. The shank, part that is inserted into the arrow shaft, is 5/8 inches long and the same width as the arrow shaft; so flat and wide.
Step 19: Carve point.
The base of the point is 5/8 inches wide. You want that classic, tapering shape for maximum penetration and strength.
Step 20: Notch the shaft for arrowhead.
A small, fine saw is ideal for this, but you can manage with any sharp knife as long as you are careful not to split to wood. Make the notch the same length as the length of the arrowhead shank, 5/8 inches.
Step 21: Lash and glue arrowhead.
Insert the shank of the arrowhead and use some sort of light cord, such as fine twine or something made of plant fibers or sinew, to wrap around and secure the notch holding the arrowhead shank. Paracord inner guts work well, as does fishing line.
To wrap the cordage, start at the base of the arrowhead and wrap tightly down about 1/8 inches, go back up, and then go down and up two more times. Use pitch from a tree to glue the end of the cordage down.
Step 22: Create nock in arrow shaft.
Finally, notch the arrow on the opposite end to a depth of about 1/8 inches. This allows the bow cord to fit snuggly into it for shooting.
Step 23: Prepare fletching to arrows.
Now you can fletch the arrow. Feathers are the best, but bunches of pine needles will do as will cut plastic bottles. In a pinch, you can lash the feathers or needles to the arrow shaft at the narrow end just below the notch for the bow cord.
When working with feathers, securing them in the traditional manner By laying the feather flat and use a sharp blade to cut down the center of the quill. Get three portions of feather, each at least ½ inch wide and 4-5 inches long, and leave just enough of the quill to hold the feather part in place.
Use something really sharp to cut the feathers back to they are all the same width. Strip the feather portion off ½ inch of each end of the quill in all three pieces.
Step 24: Attach fletching.
If you have access to glue or pitch, use it to attach the feathers to the shaft taking care not to contaminate the pinions.
Mount the fletches evenly around the trailing end of the shaft, long ends pointing to the rear. Use the light cordage you used to secure the arrowhead to lash the quills to the shaft. Check out this video to see how to make a Native American Comanche arrow:
Step 25: Finish arrows.
Repeat previous steps until all arrows are ready.
Step 26: Done!
And that’s it! You’ve successfully made your own primitive bow and arrows the old fashioned way.
Bow Care
Now you’ve learned how to make a survival bow and the arrows to go with it. You can have the best survival bow in the world, but unless you take care of it properly, it won’t be of service to you over the long term. Here are some final tips on taking care of your homemade bow:
- Never dry-fire the bow, meaning don’t fire it without an arrow, because it can break it.
- Apply a light oil, such as linseed or tung oil, for weather resistance and greater life.
- Shoot and oil the bow regularly.
- Adjust as needed.

An urban prepper and rural wannabe, Karen has been working as a freelance writer for a decade and prepping for about half that time. She has gathered a wealth of knowledge on preparing for SHTF, but there is always more to learn and she has a passion for gathering and sharing that knowledge with other like-minded folk. Karen lives in London, Canada with her two children and plethora of cats.
This is what I’ve been looking for! Looks to be somewhat in in my range of handyness. At least I hope so!?