The ability to get across a river without the use of a bridge is a critical survival skill that needs to be practiced repeatedly. Even experienced hikers, doing everything right, can get into trouble when crossing a river.
In an emergency, bridges along the route you’re trying to take may be destroyed, or unstable and unsafe to use, and crossing a river without one when you’ve not practiced it can be dangerous to say the least.
Drowning deaths are more common than many people think and fatalities as a result of crossing a river outweigh deaths by snake bite each year in the United States.
Most people take time to learn about dangerous snakes in their area and what to do to stay safe, but they don’t think about all the skills and dangers involved in crossing a river without a bridge until it’s too late.
Table of Contents
Do NOT Cross a River…
Crossing a river may not always be possible. Here are a few times you should definitely not cross a river:
- Following a snowfall that was particularly heavy or when one occurred later than usual during the season.
- If you can see that big chunks of debris such as branches, logs, or bigger items are being swept along by the current.
- When the river is flowing at a depth that is above your knees. The only time you should wade into deep water is if you can verify (using a floating stick) that there is no current.
- Anytime a river appears to be “running high” or flooded.
- Before you have taken some time to scout ahead for a bridge and/or a ford (shallower water).
- If you are unsure whether you can cross safely.
These tips and tricks, and most important of all, the safety rules, for crossing rivers will stand you in good stead on hiking trips as well as in SHTF situations, when your life may depend on your skills.
Ropes and carabiners, should you choose to cross using them, must be mountain climbing quality – you don’t want to trust your life to inferior equipment.
If crossing a fairly large river it is best to have a river guide who will know where the obstacles, eddies, holes and currents are. A guide’s experience is invaluable. This article is divided into two sections:
Finding the Right Place to Cross
Scout the river
Get to the highest point possible – either climb a hill or a tree, so you check out what is happening downstream and upstream – this way you can see possible crossing points, places where the river narrows and possible rapids or waterfalls.
Look for game trails
For hundreds if not thousands of years animals will have been checking out the river and worked out the safest points to cross.
If you can see tracks heading to the river and emerging on the other side then you have found an animal crossing point and it will bear checking out.
Remember that moose and elk are much heavier and have the advantage of four feet for balance, so don’t follow their trails blindly but follow the checks listed below before attempting to cross.
Check out the opposite bank
There should be a fairly long stretch where you can go ashore safely as you need to consider that you may be pushed downstream by the current.
Go against the current to reach the opposite bank – angling up stream at around 45 degrees so that if you are pushed down you’ll land where you actually wanted to.
Cross at the straightest point
Try to cross at the straightest point on a river. Avoid bends, as when it flows around bends the outside bank will usually be undercut and difficult to exit as it will be steep. Plus the current can be strong and suck downwards.
Check the current first
Throw a stick into the river and check the direction – is the stick being pulled to the outer or inner bank.
To check the speed of the current, see if you can keep pace at a walking speed with the stick – if you can’t, don’t cross there – find another spot where the current is not as strong.
Narrow areas are appealing – avoid them
Just a few steps and you think you will be across soon, but this is where water pressure builds as it is forced into a narrow area and the currents can be treacherous.
Choose wider sections of the river
When a river’s gradient decreases the river will become wider and shallow, often making braided channels giving you a chance to cross the smaller channels to the temporary islands called braid bars where you can rest before tackling the next channel.
Avoid crossing in water deeper than your knees
If you lose your footing in deeper water you could get washed away. This is hard to gauge as the river may get deeper suddenly when you are already half way across.
Use a pebble to try gauge the depth by throwing it into the middle of the river. If there is a hollow sound the water may be too deep. The force of water is not to be underestimated so be very careful of entering water – always try gauge the current first.
Avoid debris
Pieces of wood, rafts of weed and tree branches in the river can cause you to get tangled or make you lose your footing, or cause injuries. Imagine being hit on the shin by a log or getting your foot caught in tree branches.
Look out for small islands or sandbars
These are good spots to take a break when crossing a fairly wide river but remember currents form around a permanent island so check the flow carefully before starting out.
Look for gravel bars
Gravel bars indicate that a mature river is changing to a steeper gradient below the gravel bar – so try to cross upstream of the gravel bar.
Avoid big rocks
The current flows strongly against the upstream side of rocks and if you try to reach the rock you may be pinned against the rock by the current, however on the downstream side in contrast there will be an eddy flowing upstream and if you avoid the upstream side and get to the downstream eddy you can rest a while.
High altitude river crossings
Be up early and ready to cross streams and rivers fed by snowmelt soon after sunrise, before the heat of the sun causes snow to melt and the level of the water rises.
Wear shorts and footwear
Long pants that will get waterlogged and weigh you down, also providing more water resistance. You can even remove your shorts and cross in underwear for less water resistance – plus your clothes will be dry on the other side if packed into your backpack with proper waterproofing.
Use a spare pair of sandals or a diver’s bootees so your hiking boots don’t get wet. If you try crossing barefoot you run the risk of cutting your feet on sharp rocks and will have less grip, so if you have no alternative footwear you’ll have to use your boots.
Loosen the straps on your backpack
Make sure in case of emergency your backpack can be easily removed if you fall – loosen shoulder straps and unclip the waist clip so it can be shrugged off easily before entering the river. It is better to lose your backpack than your life.
If you want to be really well prepared, attach a colorful float to your backpack so you can search for it down stream later once you have crossed safely, and make sure the contents of your backpack are packed in waterproof bags.
Improvised floats can be made from empty plastic containers that have the lid screwed on securely, or a piece of wood.
Eyes ahead
Keep your eyes on the shore instead of risking being mesmerized by the swirling water, as it could make you dizzy. Do keep a watch out for rocks and debris but do not focus only on the river – the shore is your objective so keep an eye on it to make sure you are not being forced downstream without knowing it.
What to do if you fall and can’t get back up
Should you lose your footing and cannot get back up, don’t panic. Get rid of your pack if you have one.
Turn onto your back, and float, toes pointing downstream and keep your arms out so you are in a T shape, your arms will increase the drag slowing you down while you look ahead to see where it may be possible to get ashore safely.
Also, in this position your feet will strike any projecting rocks rather than your head or back and you can use your feet to push them off and steer. You will eventually fetch up on the shore or the river will guide you into stiller water where you can regain your footing.
Avoid using submerged rocks
Submerged rocks are tricky – you are tempted to use them because you won’t get as wet but they can be dangerous. You can easily slip off the rocks as they tend to be slimy.
Stick to making your way across a sandy or gravel bottom if you can see it, or using your pole to tell you where the sand or rocks are situated Some rocks may be loose and tip, pitching you off balance and into the water, possibly resulting in a sprained ankle or worse if you hit a rock with your head.
Know when to give up
If the current is too strong or the river too deep then turn back. Rather live to try another crossing at a different point a few hours later or even the next day, than risk your life.
Always determine whether you absolutely HAVE to cross the river, and before any crossing establish how well members of the group can swim. It may be better to hike upstream until you find a safe place to cross.
Know your river
Make sure you have a map of the river and have planned your route – you don’t want to risk crossing if there are rapids and waterfalls downstream.
You also need to know what kind of animals you may encounter – in parts of Africa and Australia it may be crocodiles, in the USA it could be bears or alligators, in South America piranhas.
Should it be a SHTF situation and you are fleeing for your life without a planned route, then common sense would dictate your actions.
Avoid the point of the V
When a river forms a V, avoid crossing anywhere near the point of the V as this is where all the force of the water is concentrated and rushing into a narrower channel. Aim for the widest point of the V for the safest crossing.
Do not cross where there are rapids
The power of water is scary and whirlpools form when the current fetches up against an obstacle like a rock that is concave and the force of the water can suck you down and hold you against the rock. For the short time it occurs it is terrifying and can occur in quite shallow water.
Hand signals
Before the group attempts crossing, work out the hand signals you are going to use, as voices may be drowned by the sound of water, or distance may make it difficult to hear. Establish signals for upstream, downstream, help needed, stop, go ahead, caution, etc.
Crossing a River Alone
If you are dead set on crossing the river and are hyper aware of the hazards then proceeding with extreme caution will be necessary in order to execute. If you know you’re going to be in an area with a river then try as best you can to prepare accordingly with effective footwear (hiking sandals or even Crocs) and check the weather conditions before you embark.
Here are the steps you should follow in order to cross a river as safely and efficiently as possible without a life jacket or flotation device:
Step 1. Assess the river conditions – Observe the river in front of you; keep an eye out for things like the width of the river and how fast the water is running. Knowing how far down the river bottom is can help you determine if you’re going to have to change out of wet clothes after crossing to avoid hypothermia.
Avoid walking in water that flows above your knee or thigh as you have a higher chance of being swept away from the current. Remember, you’re looking for river breaks and a clear exit point on the other side.
Step 2. Walk slowly and use hiking poles or a sturdy stick – Take each step slowly while using the trekking poles to feel the bottom in front of you.
This way it provides stability around any boulders and gives you a heads up if the riverbed starts to slope downward. Shuffling your feet slowly forward is the best approach as raising your feet too high can affect your balance and cause you to fall.
Step 3. Maintain eye contact with the far bank – You might come across an easier straight section which leads to a more accessible safe spot on the far riverbank. Once you’ve crossed the halfway point it may be quite difficult to retreat.
Use a trekking pole
When crossing make sure you have a sturdy trekking pole or stick that is around 5 to 6-foot-long to improve your balance and to probe ahead for holes and depth so you aren’t crossing blind.
Always maintain two points of contact with the river bed so there is less chance of stumbling and falling. One foot and the pole, or two feet while the pole probes ahead.
The pole should slant at a roughly 45 degree angle to your body, close to your shoulder so you are not leaning forward onto it and risk losing balance.
Lessening water resistance
Walk against the flow of the river at a slight angle upstream and slide feet forward rather than lifting them too high – this is to minimize water resistance and make sure your footing is stable.
Swimming
When planning a crossing that involves swimming, decide on the position you want to come ashore on the opposite bank, check the current, then move a considerable way upstream so you can swim down with the current and end up on the opposite shore.
Rather, overestimate than underestimate the current – if you reach the shore upstream of the designated landing spot you can always float down with the current, but if you miss the landing point it is very difficult to swim upstream.
Keep your head up when swimming to scout for obstacles and keep yourself on course using the freestyle stroke.
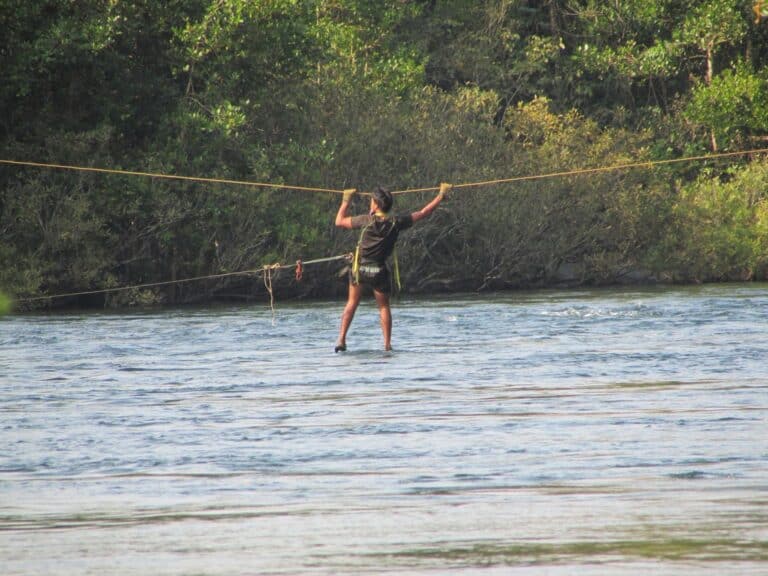
Using a rope
It is tempting for people to use a rope to cross a river, however this can be dangerous depending how it is done. Do not rope everyone together then head into the water.
The strongest and best swimmer in the group fastens the rope under the armpits and heads out while the other end of the rope is held by at least 2 to 3 people.
Should the person lose footing and be swept downstream those 2- 3 people will need to move downstream quickly and pull the person out with the current.
If you pull them against the current upstream you risk drowning them. When using a rope make sure the river is free flowing and there are no rocks or trees the rope could snag on as this can drag a person down.
Once the first person has made the crossing then the rope can be fastened to a tree or the first person can hold it while the next person (the lightest in the group) wades their way across hanging on to the now taut rope with a carabiner to a rope under the armpits so if they lose their grip on the rope the carabiner and safety rope will hold them until they can be hauled in.
Get everyone across this way until the last person has to go in which case it will be like the first person going across except everyone will now be on the new shore.
You may not have enough carabiners and waist rope for everyone in which case you’ll need a long piece of paracord to pull the carabiner and securing rope back to be reused, but you’ll have to be careful the person crossing doesn’t get tangled in it.
Crossing a River with a Group
Having a group that needs to cross a river is a different beast altogether. People have different skill sets, fears, and physical prowess that could inhibit your ability to cross water ways safely. This means you’ll need strong leadership, teamwork, and planning if you want to make it across with your group members.
Here are the steps for crossing a river with more than one person:
1. Assess the river and figure out how you’ll cross – If you are in a group of 1-3 then you can form a triangle for more stability as you cross the river. Any more than that and you’ll have to split into groups as forming a line can be dangerous if the current is too strong.
2. Start on the riverbank and link arms with your group – This works well with 3-4 people as you can form a tripod of sorts where your balance is not strengthened by those in your group. Keep in mind that you won’t have your hiking poles handy so you’ll be relying on these people you’re attached to.
3. Walk slowly and talk often about what’s around you – Communication is necessary to keep an eye out for your fellow members.
Verbally pointing out any rocks, logs, dips or other adverse possibilities keeps the group aware. If someone needs to stop, you stop. Tensions may be high and open communication keeps everyone informed and builds teamwork.
Why Locking Arms is Important
If the current is strong, lockstrong lock arms – preferably hands around the next person’s shoulder or wrist so fingers don’t slip as when you are simply hand in hand. Put the strongest person in front of the linked group to break the current while the others follow.
The Human tripod is Effective for River Crossing
If the river current is strong and you have no option but to try crossing then form groups of three people into a tripod, arms linked, faces towards the inner part of the circle.
This is the way army personnel are taught to cross rivers. There are always at least 3 points of contact if you have three people maneuvering across the river.
Creating a one rope crossing
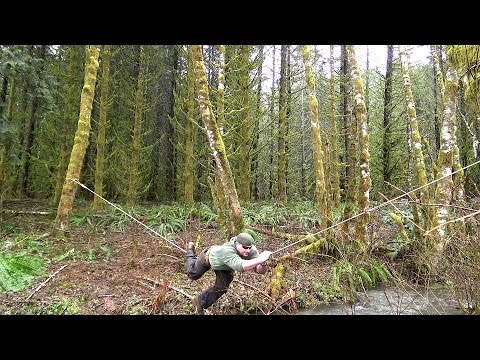
It’s not easy and requires balance and patience. Close-fitting gloves are suggested for protecting the hands from the rope as you haul yourself across.
If you have people who can’t swim, or who are so light they may be washed downstream, then this method will help as the strongest person will wade across first to set up the rope crossing.
There are two ways to cross – either balancing on top of the rope commando style or hanging underneath with legs crossed over the rope for safety and pulling yourself across with your hands.
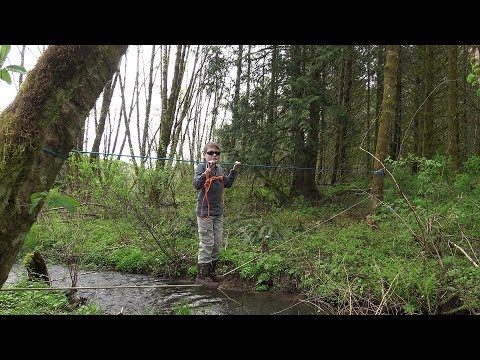
Creating a two-rope crossing
The two-rope crossing or postman’s bridge requires some skill in getting it set up but it will get people, including kids, across fairly safely. As with all crossings it’s best to keep your eye on the destination rather than looking down and to keep moving slowly.
If you are planning on using these techniques perhaps practice first with small creeks before attempting the big river crossings so you can hone your skills and establish which method feels most comfortable.
Every river is different and it is best to be familiar with a number of crossing methods so you can apply the one considered the safest for the crossing you may be confronted with and the skills and ages of the people involved in the crossing.
Final Thoughts
Crossing a river can be dangerous, whether from inexperience or simply bad timing. It’s best to avoid crossing them all together, and most trails follow rivers so you can just cross at a point closer together.
However, there are situations where that may not be the course of action, and crossing becomes a necessity. Taking your time, using proper techniques, and knowing when it’s not safe to cross can really make the difference.
River Crossing FAQ
Here are some of the most asked questions we get about crossing a river alone or in a group…
You should never cross a fast flowing river as currents on top could be different than currents below and you could get swept up in the undertow.
Crossing a river alone or in a group usually involves slowly walking across with trekking poles in both hands for added stability. They are minimal risk but still, you should be alert.
Wearing gaiters that go up past your knees are the way to avoid getting wet while crossing a river.

Traveler, photographer, writer. I’m eternally curious, in love with the natural world. How people can survive in harmony with nature has fueled my food safety and survival gardening practices.
At the age of 12, I found a newspaper advertisement for a 155-acre farm at a really good price and showed my parents one Sunday morning. They bought it and I happily started planting vegetables, peanuts, maize and keeping bees with the help of the local labor.
Once I married wherever we moved it was all about planting food, keeping chickens and ducks, permaculture and creating micro-climates. I learned how to build wooden cabins and outdoor furniture from pallets, and baked and cooked home-grown produce, developing recipes as I went along.
12 paces or approx 3′, 6 paces or approx 1.5′??? Consistent, but hopelessly wrong.
What little steps you take!
I’m very glad that I’m not blindly following these instructions SHTF!
Survival Training from VN era…river crossing with very good current..we .used flotation rafts made of dry grasses, leaves, brush to make a tiff package of water resistant material…..handhold on the package and determined effort swill get you across but be very careful of the package wrap…the more waterproof your envelope is, the better your chances of a safe water crossing became….
One factor to consider when gauging the depth of the river, especially on coastal rivers, is the tide. Inevitably, that raises and lowers the level of the rivers substantially.
Nice rope work…of course in real wilderness there may be no trees or too far fot a rope…!
In BC, Yukon and Alaska (even Kodiak Isle) I usex a staff took boots off and waded to lose feeling from knees down water was so cold….but great fishing…lol…!