There are a number of challenges to living off the grid, and in a disaster situation, there is unfortunately no way to get around having to deal with them. A lot of everyday conveniences that we take for granted require electricity and gas. In such situations, simple tasks can become much more difficult.

One thing that we commonly take for granted is air conditioning. For those of us in hotter areas, like Arizona or Nevada, living without it is unthinkable, but if SHTF, that may be one of the first things you have to give up. The power draw of an air conditioning system can be too much to sustain privately, especially when you may have other things you need to power to survive.
Luckily, there are a few options for cooling your home to solve this problem. There are a lot of ways to make very low power air conditioning units by yourself. Some of them run on rechargeable batteries, while some even run directly on solar power.
Here are a few DIY air conditioners that will keep you cool even without a lot of power usage.
Table of Contents
Eco-Cooler (No Electricity)
If you need something that is absolutely zero power; then one such method can be seen in action here:.
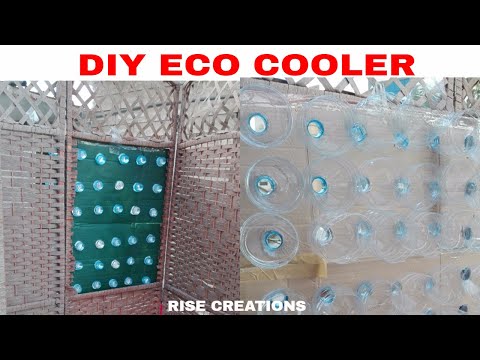
This cooler requires no power whatsoever, and uses parts that are easily accessible for most people. It is based on the idea that moving air reduces the temperature. All you have to do is install it in a window and enjoy the breeze.
The first thing to note about the Eco-Cooler is that it’s more a fan than a true air conditioner. It makes your home feel cooler by increasing the velocity of the air passing through it – like a fan. However, unlike regular house fans, the Eco-Cooler uses zero electricity.
The Eco-Cooler is extremely simple and requires very minimal materials – in fact, only two. The first material you will need is a board cut to the size of one of your windows. Before starting this project, you should choose a window that gets the best wind flow during the hotter seasons.
Your board should be about two millimeters thick, and made of a sturdy material. After all, this is going in the window of your house, so anything that can’t stand up to a little rain in the summer probably will not work very well.
One type of material that works really well is white foam board. Part of the reason this feels cooler in the summer is simply the fact that the white board insulates the home, so the ambient air temperature in your home won’t be as hot as without it.
The next step is to collect plastic bottles of about the same size. Supposedly, the larger the difference between the circumference of the bottleneck and the body of the bottle is better, so two-liter soda bottles will work well.
Next, cut the base of the bottles off so that you have homemade plastic funnels. Cut holes in the white foam board to the size of the rim of the bottle; then push the bottles through the foam board at evenly spaced intervals.
When you’re finished, the body of the bottles should be close enough to touch each other, and the entire board should have bottles sticking out of it (see the video above for reference).
Next, cut the top part of the caps off (but not so much that they can no longer screw on). The point is to make an opening about as large as the opening of the bottle. Screw the caps on to secure them to the board (this might work better doing them one by one instead of screwing on all the caps at once so you don’t mix up caps).
Finally, install the board with the body of the bottles on the outside of the house. The wind passing through the bottles will be compressed through the bottleneck (which heats the air slightly), and then as it expands into the home, it will cool.
You can do this pretty easily with your mouth. First, blow some air with your mouth wide open (hold your hand in front of your mouth to feel the temperature). At the same rate, blow air out with your lips pursed.
In this scenario (as in the case with the Eco-Cooler), your mouth is acting as a throttle for the air passing through it. The increased velocity of the air makes it feel cooler on your skin as it passes by. It’s better if the board is installed on a side of the home that has more shade, and better wind flow.
Currently, there is a lot of debate about the actual effects of this system. While it may not do the job of your expensive HVAC system, it certainly will feel better when it’s hot outside. The video claims a 5 degree Celsius difference in temperature, though this may be an exaggeration.
Part of why this works so well in India is because many of the homes are made from corrugated tin, which means that on summer days, the inside of the home is hotter than the outside (much like leaving your car in the sun).
Circulating outside air through the home has a much more pronounced effect in these types of homes because the temperature difference is so drastic.
If your home is not made of corrugated tin (which it likely isn’t), you will probably not notice as great an effect with the Eco-Cooler.
At the very least, however, the Eco-Cooler provides a no-cost fan for hot days that will amplify even a slight breeze because of the design. In disaster situations, this may be a great option for cooling the home, especially since the materials are easy to come by.
Hang Wet Towels or Sheets
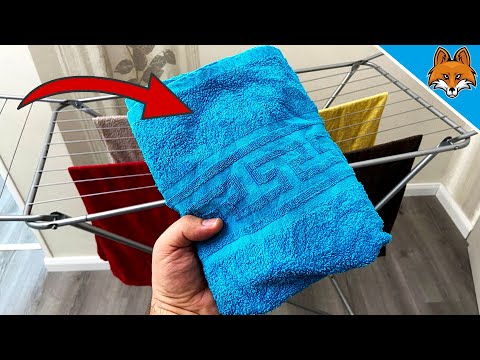
This is an old trick but a really good one. You can wet towels, sheets or other cloth goods and then hang them up and any room that needs cooling or, even better, in a window or doorway to take advantage of air circulation.
As the water in the cloth evaporates it cools the air around it, and you’ll notice a marked improvement in air temperature, especially in smaller rooms that benefit from a draft or breeze.
Obviously, you don’t want to make a dripping wet mess, so you want to ring out the sheets or towels thoroughly so they are still wet but not sopping wet.
You can use a clothes rack, clothesline, or anything else you might have to position the cloth for best effect. All you need to do to “recharge” your AC, if you want to think of it that way, is wet down the cloth again as before.
The type of cloth matters, as each has different thermal densities and hydrophilic (or hydrophobic) qualities. Far and away the very best material is cotton, as it can make people (and air) downright chilly when soaked! If you have some older all-cotton sheets or towels keep them set aside for this use.
Wrap a Wet Bandana Around Your Head

This is more of a variation on the above technique that a completely distinct one, but it is still one that you should employ when you need a personal AC.
Most folks know about this one already, but if you don’t it’s high time that you learn. If you wet down a cotton bandana or other article of clothing and then wrap it loosely around your head or neck it can rapidly cool you down by evaporation.
This should be your first order of business if you have to be outside and work in hot temperatures, but the cool kiss of a bandana or other compress even when you are lounging around inside on a hot day without AC can keep you a whole lot more comfortable.
Use a Manually Powered Fan
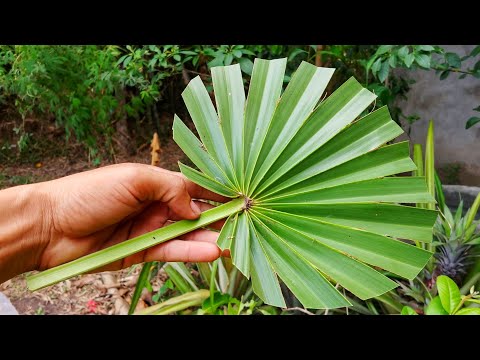
You ever seen those old movies, usually set in ancient Egypt or in the Middle East, where attendants are standing around some member of royalty, fanning them with those giant palm fronds? It looks quaint, even cliche, but you should know that that technique is absolutely viable and effective.
If you need to stir the air around to prevent it from becoming too stifling, blow hot air out of a space, or move in cooler air from elsewhere, you might be shocked at how effective old-fashioned manual fanning can be.
You can use a palm frond if you want to keep it really primitive, and make a good fan in any size that you need as shown here, or try a modern update on the technique by taking a panel of light but rigid foam poster board to really get a lot of air moving quickly.
You can make the process even easier and less fatiguing by gluing a thin, light handle to the middle of the foam board.
And make no mistake, you don’t have to flap like you’re trying to achieve liftoff, either: gentle, steady, up-and-down fanning using this technique will move a ton of air and provide substantial cooling, especially if used in conjunction with the wet towel trick above.
If you have family members or a group of people to help, everyone can serve a short shift on “aircon” duty to prevent exhaustion and keep temperatures manageable.
Electric DIY Air Conditioners
Styrofoam Ice Chest Air Conditioner (Battery-Powered)
This air conditioning unit is super easy to assemble, and get the parts for it. In fact, you do not need anything more than the following:
- Styrofoam ice chest
- Ice or frozen bottles of water to fill the chest
- A knife
- A piece of dryer tubing
- A battery-powered fan with a diameter smaller than the lid of the cooler.
- Batteries for the fan.
So long as you have some supply of batteries, preferably rechargeable, on hand, even in a disaster situation this is a great option for cooling small areas of your home.
When we say fan, we mean just a regular old blade fan encased in wire. Again, it needs to be small enough to fit comfortably within the rectangular-shaped lid of the cooler.
The amount of cooling this provides will depend mostly on the width of the tube and the size of the cooler. A larger cooler will blow cold air for longer because you can use more ice or frozen bottles of water, which will take longer to melt. Using the frozen bottles of water means you can refreeze them later to use again. The wider the tube, more air can blow out of it.
The setup for this cooler is pretty predictable. First, you fill the cooler with ice or frozen bottles of water, but not so much that it’s totally full. You will want a little bit of space between the lid of the cooler and the ice when you close the lid (we will explain why later).
Next, cut a hole the size of the dryer tube in the lid of the cooler, off to one side. Next, cut a hole only slightly smaller than the diameter of the battery-powered fan close to the center of the lid.
The fan will be resting atop this hole, so it should not be so big that the fan falls inside the cooler. The fan should be stationary too. Oscillating fans would not work for this project.
Insert the dryer tube into its hole, and turn it on and rest the fan on top of the hole that you cut for it. Ideally, the fan will be small enough that it doesn’t rest over the side of the cooler. You want as much of the fan blowing into the cooler as possible.
What happens is the ice cools the air in the cooler, and the fan circulates it out of the cooler through the dryer tube. You need enough space for air in the cooler so that it can actually become colder, so you don’t want to overfill it with ice.
These can cool a small to medium sized room depending on the size of the dryer tube. The cool air will last as long as the ice (and fan battery) does.
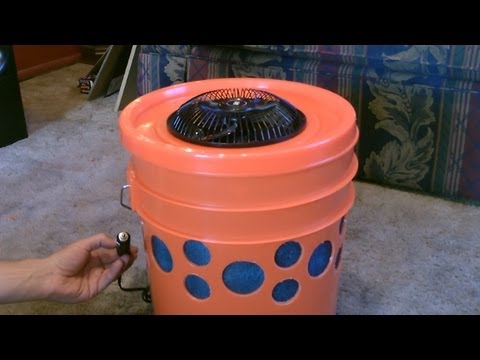
Bucket Air Conditioner (Battery-Powered)
This air conditioner is a very similar concept to the Styrofoam cooler air conditioner, except that it operates in a bucket and can provide cool air for much longer.
For this you’ll need any old five-gallon bucket, Styrofoam (a strip thin enough to line the bucket completely), a battery-powered fan (smaller in diameter than the lid of the bucket) PVC pipe (about a foot), a knife, a two-gallon jug of water, and a hole saw.
First, cut three holes the width of your PVC pipe on the side of the bucket with the hole saw. Line the bucket with the Styrofoam, and re-cut the holes in the same position. Leave the Styrofoam lining the bucket.
Next, cut a hole in the top of the bucket about the diameter of the fan, but not so large that the fan falls into the bucket. You should be able to secure the fan in the hole without movement. Your next step is to cut the PVC pipe into three equal pieces, and fit the pieces into the three holes that you cut.
The final step is just to freeze your jug of water, and then place it in the bucket. All you have to do is secure the lid of the bucket and turn on the fan. The air conditioner will last as long as the water in the jug is frozen and as long as the battery in the fan lasts.
Much like the previous suggestion, this air conditioner works by circulating the cooled air around the frozen water jug. Unlike the previous air conditioner, this one works for around six hours. It can last longer if you can achieve a better seal around the PVC pipe and the fan.
DIY Swamp Cooler
Aside from these, however, there are many other tutorials on building more complicated low-power swamp coolers. Below is one such air conditioner.
Most of these swamp coolers require significantly more equipment and explanation; however, it’s fairly easy to find solar-powered versions and even battery-powered versions. If you’re looking for a cooler that might hold out a bit better over time, these sorts of air conditioners might work better for you.
Have Some Fun This Saturday With These Projects!
While air conditioning may seem like a luxury considering how much energy it uses, there are plenty of low-power options for disaster situations, or even for those who want to save a little money on air conditioning.
With our options, the most power you’ll need is enough to freeze ice and a few batteries. Otherwise, there are plenty of tutorials for building air conditioning using solar power. There’s no need to worry about extreme heat with these DIY options. You can use no power, batteries, or even the sun.

My name is Teresa Fikes. I am a Homesteader, survivalist, prepper, historian, and writer plus much more all in one package deal. I was raised on a small family farm were I was taught at an early age to survive off the land without the help of modern conveniences. I am a writer by profession and a Homesteader by Blood, Sweat, and Tears.