We hear a lot about the famous Bug Out Bag (BOB), but not as much about the get-home bag (GHB) or its other variants. The GHB is perhaps more important than the BOB.
You might not ever need your BOB (best to have one in case) because not every disaster is going to require that you bug out. No matter what event hits your region, there is a high likelihood you will be away from home when it happens.
Think about it. What if a natural disaster strikes when you are on the highway driving back into town?
What if an EMP, natural or man-made, hits when you are at work? How will you get home? By car, this is a one-hour commute? How long is it via the sneaker express?
What if something happens and you are out of town, traveling for work or pleasure, and you need to get your family home?
With a GHB, you will have the essential items that will keep you hydrated, fed, informed, and safe. All this while you make your way home while others panic and scramble.
I will talk briefly about what goes into a GHB (this has been thoroughly covered here), but more importantly, I want to talk about how you pack a one.
Keep this in mind as you pack your INCH (I’m Never Coming Home) bag, your GOOD (Get Out of Dodge) bag, car bag, or even a small EDC (Every Day Carry) bag. The concepts remain the same even if the contents and purpose change.
I will focus on a trip that takes at least one long break allowing you to rest. This will require a shelter to get out of the weather, a change of clothes and enough calories to get you home.
Let’s get started on packing your GHB.
Table of Contents
What Goes In
This will be brief. There are so many things you can, and should, pack in your GHB.
The foundation of survival gear is the selection of items you have on your person at all times. Critical equipment that you can use in a pinch if you have to. These are your everyday carry or EDC items.
Then again two is one and one is none. Layers of equipment, as long as they don’t weigh you down, are good.
For efficiency be sure to select multipurpose items where possible (e.g, hand sanitizer – hygiene and fire starter). This will allow you to reduce weight while improving efficiency.
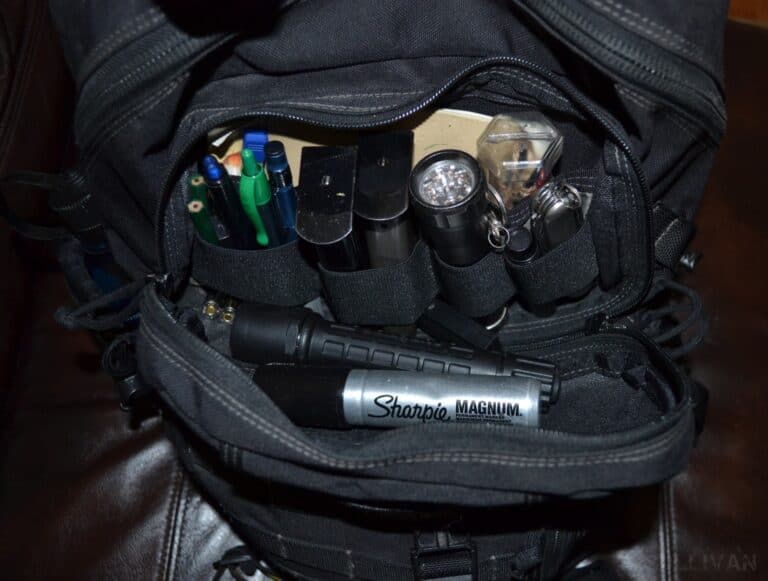
Here’s the short list of essentials for your GHB:
- Water
- Food (energy bars, trail mix, MREs, freeze-dried meals, etc.)
- Cash
- Important documents
- Small first-aid kit
- Trauma kit
- Lighter
- Portable radio
- Folding knife
- Rope or paracord
- Portable phone charger
- Pen and paper
- Sharpie
- Hat
- Water purification tablets
- Map and compass
- Change of clothes
- Shelter (modest, enough for one night’s stay)
Ideally, you should have a bag that is easy to carry, functional, and has pockets or outer compartments. Be covert where possible avoiding military-style bags.
Also, a note about food and water. During daily life, you won’t need any more than enough to get you by for a few hours.
That changes with an emergency trip home. Dehydration will take you out of the game quicker than you realize.
You will need to judge your situation when it comes to water. If you work in a separate town or have a very long commute, then a more comprehensive GHB supply of water will be necessary.
If you need to carry these types of items depends on where you live and how far you tend to travel away from home. I commute over 50 miles to work and 50 back home. I expect a minimum 5-day hike. My GHB is loaded.
The First Thing You Should Do
This is what I want to focus on. Figuring out how to pack your GHB is as important as what you put into it. Efficiency rules the day when you are limited on space.
If your bag is too big you won’t bring it with you and you won’t practice with it. Both will doom it to the basement or the garage. Neither is a good location for this critical resource.
If it is too small you will be forced to leave critical supplies at home. This may cause a critical failure on the road. Effective use of the space that you have ensures that you find the right mix of size and stuff.
The first thing that needs to be said is that your GHB should not be as big as your BOB. Neither should it have as gear in it. The goal of the BOB is to help you survive for an extended period of time if you have to get out of dodge.
The goal of a GHB is simply to get you home. You need only the supplies required to get from wherever you are to home. It must do this as efficiently, as quickly, and as safely as possible.
When you have chosen your bag and have gathered a huge pile of gear it’s time to pack. The hard part is determining how to go about packing everything into your GHB.
First (if you already have a BOB – if not, skip this), to make life a little easier, throw 10% out. Now go through it again and toss another 10 percent. It’s amazing how under scrutiny, “required” items drop off the list.
Now pack and give it a trial hike. Did you find the result is a top-heavy bag that’s awkward to lift? Was carrying it uncomfortable?
If you were lucky you discovered the basic formula for packing. Heavier and less frequently used items go on the bottom. Lighter, more frequently used items go at the top.
At the very least, I bet you threw out another 10%.
Sort It Out
Now it’s time to get serious. First, sort your gear into four piles. Pile one is your bulky essentials that required only when you stop for the night or take a long pause.
Examples include a tent, tarp, or hammock, sleeping bag, spare boots/shoes, and changes of clothes.
Pile two is to be situated in the center of the pack. These should mostly be heavy and dense. These are items that will be frequently used but aren’t accessed every stop.
This includes meals (not snacks), cook gear, and spare water. Again, these are the things that you won’t need to pull out of your GHB right away, just on a semi-regular basis.
Next, organize your regular-use supplies in the third pile. These are the supplies that you will need to access easily and more often. This is what you will need if it takes more than three hours to make your way home.
Examples in this pile you weather layers (fleece jacket, windbreaker, raincoat), water treatment supplies (filter, purification tablets), toilet paper, maps, and first aid kit.
The final pile is your urgent supplies. These are the things you must have access to right away when disaster strikes. These items are necessary no matter how long it takes you to get home.
What Goes Where
These piles are the start of your bag organization. Each pile will have a very specific home in your bag. The key from here on out is organization.
The better you assemble this jigsaw puzzle the greater your chances of having and finding, your gear at a critical time.
Bottom of the Bag
You might have guessed by now pile one is the essentials of your GHB gear. These are the items you don’t need right away and don’t need access to regularly.
They go at the bottom of the bag. These are also the items that tend to be bulkier and having them at the bottom will help cushion your pack.
Your shelter gear and spare clothes are reserved for when you stop for the night. You do not want to have to dig to the bottom of your pack every time you stop. This layer is only for when you stop for a long rest or the night.
Your Core
Once you’ve packed the bottom of your GHB, organize the middle section of your bag. This is the core and the section that should be the densest. Centering the weight off your lower back stabilizes both you and the load as you travel over uneven ground.
These are the items you need regularly, i.e. more than once per day. Add to your food and cooking gear any tools you might have.
This should include your knife, hatchet, or saw. If you choose to carry a firearm this is a good spot for a collapsible rifle and spare mags and ammo.
If you feel you don’t need some or all of the above items, then remove them. If you won’t use them until you stop for a while then demote them to the bottom layer of your GHB.
Top of the Bag
The top layer is for frequent use items. If you stop and need to get something you want it first in the queue of gear. In addition to thermal\weather layers, this includes the essentials.
Dedicate this layer to your emergency radio, map, rope, cell phone (if it still functions), first-aid kit, cash, important documents, flashlight, lighter or matches.
Again, this layer contains anything that will be needed often and/or immediately. These also happen to be the lightest items you have, which are ideal to have at the top of the pack.
The top of the bag is for storage of extra EDC items. Before you start, open the top and promote some of these items to your accessory pockets as well as on your person.
The knife goes on the belt, the compass goes around the neck, and the map goes in a pocket. Anything that is an urgent need goes on your person.
Accessory Pockets and Lash Points
If you have a standard hiking or rucking backpack, then you most likely have some outer pockets to make use of. Some of the most often used items should be stored in these, rather than the top of the pack. For example, your water bottle is best stored within easy reach in a side pouch.
Some packs make it possible to attach larger items to the outside of the pack on lash points. A blanket or a bedroll might be better attached to the outside of the bag rather than stored inside.
Just make sure that these don’t block access to any of the pouches and are properly wrapped to stay dry.
Keep it Modular, Keep it Organized
The number of times that I’ve searched my bag for something only to find it in the wrong layer is exceeded only by the number of times I’ve failed to put something back where I got it from. On the trail you are always thinking of what’s next not what is right in front of you.
To conquer the lost and found cycle modularize your bag. Whether you use Ziplocs, zippered bags from the dollar store, or Goruck utility pouches, these are all lifesavers.
Set one aside for each main survival function. Have a fire pouch, a water purification pouch, a bag of clothes, and a larger bag of shelter materials.
Color code the bags and/or write/paint an indicator of what’s inside. Just like the white cross of a first aid kit, make the icon memorable. That way you aren’t wasting precious time rooting around.
If you wish to take organization to the next level include an inventory slip in each pouch. Second this with a total inventory list in an admin pocket in the bag. This will make your seasonal review quick and efficient. You do set time aside for a seasonal review, right?
The absolute best Go Bag I ever saw was at a GoRuck event. The cadre opened his bag and it was like a prepper Jenga game. Multicolor utility bags each labeled with flames, water drops, white crosses, etc.
He could not have fit another item in the bag if his life depended upon it. I strive to have my bag be like that one day.
Things to Keep in Mind
Every bag, every prepper, every situation is unique. As much as the online Go-Bag salesmen wants you to think, it’s simply not a one-size-fits-all situation.
Treat the above as recommendations, well-founded and tested ones, but recommendations. Only you can configure the perfect GHB or car GHB. With that in mind here are a few other suggestions that will keen the edge of your GHB.
Pack Light
First, you don’t want your bag to be too heavy. It should NOT weigh more than 20 % of your body weight. It is best if it is between 10%-15%. A GHB for a child should max out at 10%.
Remember, this is not a BOB. You don’t need everything including the kitchen sink. It shouldn’t be big and heavy. Pack only the minimum items necessary for your trip.
If it is heavy on your test runs, then you need to rethink what you have put into your GHB. Go ahead, throw out another 10%. We’ve all been there. We’ve all done it.
Pack with a Purpose
Give serious thought to your travel patterns. Where do you go during your week? What do you need in your GHB?
If you work ten blocks from home, you don’t need to prioritize shelter or a change of clothes. Live in an outlying community and work in the city? That instantly translates to a multi-day walk.
Pack Dry
You need to protect what you’re packing from moisture. The last thing you want is to pull out your extra pair of socks to find them as wet as the ones on your feet.
Even if you have utility bags, make use of Ziploc bags to seal your important items. This adds a much-needed layer of protection in the case of rain or other water threats.
Add the water-resistant packaging to any critical items. These include cash, documents, maps, cell phone, other electronics, matches.
Pack with a Purpose
Finally, be sure to think ahead to determine the types of events that could happen. Build your bag around those. You will want to be sure that your GHB is something you can effortlessly take to and from work with you.
You don’t want to leave it in your car because you can’t be certain you will be able to get to your vehicle during an emergency.
Having your GHB with you at all times and ensuring it is fully equipped ensures you have the means to keep yourself safe. Safe, so you can get home as rapidly as possible no matter what emergency or disaster occurs.
Be purposeful in your get home plan. Be purposeful in the contents of your GHB. Most importantly be purposeful when the time comes. Have the mindset to get you and your family to a position of safety.
Wrapping it Up
The prepping and survival community fixates on stuff. Guns, food, gadgets, and bags. We have INCH bags, FU kits, Go Bags, GOOD bags, and GHB bags.
There is a tremendous amount of overlap between them. For gear junkies, you could spend a lifetime equipping yourself to move from point A to point B.
All things considered we spend a lot of time away from our home. We go shopping. We go to work. We go out to dinner. We go to see our relatives. Each time we leave the confines of our home we are leaving a considerable amount of safety and assurance behind.
When you leave your home, it is your responsibility to leave with the mindset, the plan, and the gear to get you back to that sanctuary. A well thought out and well packed Get Home Bag is exactly the tool you need.

An urban prepper and rural wannabe, Karen has been working as a freelance writer for a decade and prepping for about half that time. She has gathered a wealth of knowledge on preparing for SHTF, but there is always more to learn and she has a passion for gathering and sharing that knowledge with other like-minded folk. Karen lives in London, Canada with her two children and plethora of cats.
Completely agree with Hal about keeping the “probably important” stuff easily reachable in the bag.
Karen, you may have already been alluding to the following suggestion under the item called “important documents”…but if not, one more item in my “top tier” is a very lightweight TP Kit consisting of the following:
-A Ziploc bag, containing
-3 sets of nitrile gloves,
-A small, pocket-or-purse-size tube of petroleum jelly, and
-A quantity of toilet paper (only you can decide how much.)
One TP Kit “sits high” in each of my EDC, GHB, BOB, and INCH Bags, as well in each of my vehicles — bicycle and motorcycle included. It’s definitely something I don’t want to “need and not have” any less than the flashlight or other “high priority” items in those bags.
One particular thing I have in my GHB is a good pair of waterproof, lightweight hikers. I am one of those people that frequently work an hour or more from home, plus, I am in rugged terrain. So, instead of trying to hike thru the woods, across rocky terrain and up steep inclines with my work boots, I would slip on my hikers and make that journey much more bearable. My pack is made of a durable and rugged cordura. Probably not the lightest weight pack, but I would rather know that its not getting torn and ripped open when going thru trees, rocks, etc. Also, throw in a couple of the inexpensive light sticks in your GHB.
Good article, great info!
Good idea except bringing it into work. Some employers might be upset if their worker brings a backpack with a hatchet, tarp, and rope.
Your employer doesn’t need to know what is in it unless you have to go through a metal detector. Who needs a hatchet in a get home bag anyway?
I have had a “Get Home Bag” for many years and I am always “tinkering” with its contents. For my water, I do have 2 water bottles but also a Life Straw for refills as necessary (unfortunately I live over 50 miles from work but can follow a river most the way home). Additionally, I am an Amateur (Ham) Radio operator so I include a 2-Way radio for talking to family members (and members of my SHTF team). Last but certainly not least, we have all practiced this scenario where we are all at work and make it back to our home (temporary base) before making the decision whether to move on to our more permanent base… It’s great weekend fun and learning.
One last note… Consider your surroundings, terrain and multiple ways to get home. As for me, I have an ugly plastic Kayak hidden under some brush by the river about 5 miles from my work. No one has ever bothered to steal it in the 3 plus years it has been there and makes my trek home much easier. That being said, I have also “practiced” getting home strictly on foot.
My 2 cents.
I think back to the tv coverage of workers in NYC heading home as the twin towers collapsed. Women in high heels & tight skirts probably wishing for their gym shoes, comfortable sox, trackpants, etc. People wishing they had a dust mask, or even a bandanna. How many walked without water to clear their throats, or walked a long time without their essential medications for heart rythym and /or bloodpressure, or blood glucose (altho diabetics usually plan well beyond their next meal)
We could learn something from their stories…..