Bread universally represents nourishment. Since the beginning of time, man has depended on it for survival. It was not always possible for one to purchase bread at the local grocery store. So, what did people do? They made bread from scratch.

Bannock bread is referenced in historical writings as early as the year 1000. While the word “bannock” is Scottish in origin, the bread is known to also have been used by Native North Americans, native Australians, and Tibetans. In fact, almost every group of people worldwide seems to have its own recipe and method for a quick, easy bread.
In modern-day America, it is easy for every prepper to have a reliable bannock bread recipe in his or her arsenal of emergency meals. With long shelf-life ingredients and the simplicity of the recipe, bannock bread also makes a great food item to bring on camping trips.
Since bannock bread has been around for so long, there are many variations of the recipe. In any of the recipes listed below, the dry ingredients can be combined together into a sealable plastic bag (or an air-tight environmentally friendly container) and kept on hand until needed.
Some of the recipes listed here are not as camp-friendly as others. Meaning, it would be easier to follow these particular recipes in the comfort of your home, with access to kitchen appliances. These will be included since it is likely that a scenario could come up where bannock bread would need to be made at home.
Also, some people enjoy bannock bread and make it for regular use. These recipes can be a great alternative for someone wanting to cut out the GMO ingredients commonly found in commercially produced breads (depending on your ingredients sources).
Quick Tips
You’ll notice that these recipes include essentially the same ingredients, just in different ratios. So here are a few tips as you decide which route to take your bannock bread. First, use baking powder, not baking soda. The baking powder is a better leavening agent and will give you a lighter consistency and texture.
Also, use warm water (if available) instead of cold. Warm water will assist the leavening properties of the baking powder. And as far as shortening goes, anything goes. Bear fat has been touted as a tasty addition to the bread, although bacon fat seems to be the more popular choice.
If neither are available and you are looking for a more long-lasting shortening in your kitchen pantry, use a type of vegetable shortening that does not require refrigeration.
Just remember, the ingredients will mix better if you cut the shortening into the dry ingredients with a pastry cutter or knife before adding water.
Also, while there are many types of flour available to use (particularly if you grow your own), these recipes are assuming that you will use regular white or wheat flour from the grocery store. If you choose to go a different route with the flour, you may find that you need to switch up the ratios of the other ingredients.
Finally, you can create a variety of bannock breads with your add-ins. Create a potato bannock with instant potato flakes, a fruit bannock with mixed berries, Italian bannock with some Italian dressing and herbs, or oatmeal bannock with instant oatmeal packets.
Then honey, brown sugar, and/or cinnamon can be used to top off your warm, crusty piece of homemade bannock.
Bannock Bread Ingredients
This first recipe is fairly basic, although it does include a lot of powdered dry milk. This addition would make the bread a little sweeter than other recipes.

Along with the ¼ cup of dry milk, you combine:
- 1 teaspoon baking powder
- 1/3 teaspoon salt
- 1 tablespoon shortening
- 1 cup of either a white flour or wheat and white flour combined (if you attempt to make it entirely with wheat flour, the bread will be too heavy. A ratio of 1 part white to 1 part wheat flour is the highest that would work with this bread)
- a third of a cup of water (70 ml)
These are the ingredients that you would combine in your airtight container ahead of time. If possible, cut the shortening into the rest of the dry ingredients with a pastry cutter or fork. This will make the dough smoother and help it cook more consistently throughout.
Basic Recipe with More Flour Variation
This next recipe calls for significantly more flour than the previous recipe. That, along with the lack of powdered milk, will give you a more “bready” and less sweet product, which would pair well with a savory dinner of stew or venison. If you are a die-hard sweets fan; it is possible to top the bread with a little sugar at the end.
In your airtight container, combine:
- ½ teaspoons salt
- 2 teaspoons baking powder
- ½ teaspoons sugar
- 2 ½ cups flour
This recipe deviates from most other recipes by the addition of 1 cup of water and 3 tablespoons of oil when you are ready to prepare the dough. When you see the addition of oil in a bannock bread recipe, it is simply assuming that you are intending to use the frying pan cooking method.
3rd Variation
The third recipe mixes up the ingredient ratios yet again, allowing for a slightly different flavor/taste than the previous two…
The dry ingredients for the container are:
- 2 tablespoons powdered milk (optional for this recipe)
- ¼ teaspoons salt
- 1 teaspoon baking powder
- 1 tablespoon shortening
- 1 cup flour
Any other additions at your disposal (berries, cinnamon and sugar, raisins).
For this one, start off with adding 1/3 cup of water, mix it in, then add more if necessary. Be cautious with adding in water because it is easier to add more, than it is to take out. The thinnest that you would want your dough is the consistency of muffin batter.
Bannock Bread with Milk Variation
The fourth method includes milk. However you want to go about that is fine, but if you are someone who is trying to prep emergency rations or meals for an extended camping trip, this may not be the best choice.
The dry ingredients are:
- 1 teaspoon salt
- 2 tablespoons baking powder
- 2 cups flour
This recipe then calls for ¾ cup of milk to be added to the dry ingredients, instead of water. However, if have dry powdered milk on hand, you could simply add in an appropriate amount and still use water.
Next, it is suggested to fry the dough with about ¼ of an inch of oil in a frying pan. So if you wanted to use one of the other cooking methods discussed later, you would need to adjust the quantities of liquids in the dough to get an appropriate consistency.
Variation with Melted Shortening
A final variation calls for the shortening (specifically, lard in this case) to be melted, cooled a little, then poured into the middle of the mixed dry ingredients:
- 3 teaspoons baking powder
- 4 cups flour
- ¼ cup sugar
- 1/2 cups oil (preferably olive oil)
- 1 teaspoon salt
Then, add up to 3 cups of cool water (just until the dough is firm, but not sticky). You can use milk instead of water, or even both – so long as the total amount of liquid you add is around those 3 cups.
If you end up adding too much water, just add in more flour. This recipe is intended to be made with any of the cooking methods described just below…
Once you have your dough prepared, the mixture can be baked one of three ways: on a cooking surface, wrapped around a stick, or directly on the coals…
Traditional Bannock Bread Recipe
If you have access to a frying pan/hearth and a source of heat, this method seems to produce a tastier, pancake-like version (frying ANYTHING makes it taste better, right?).
Ideally, the cooking surface would not be so hot that the oil is smoking. If the pan is too hot, then the outside of the bread will cook too quickly, leaving you with a crusty shell and gooey inside.
However, this method does require some patience. Depending on which recipe you choose (and whether or not a leavening agent is used), the bread may need to rise a little first on the cooktop before it starts to slowly cook. It will, depending on how much water you added, range from an actual fried “pancake” to a loaf-like cake.
The Steps
Step 1. Mix all of the dry ingredients in a bowl or some other container. Be sure not to use all of the flour. You will need some in a few minutes to roll the dough in it:

Step 2. Add a little water to the mix:

Step 3. Now add the oil, and keep mixing with a spoon – until you reach a dough-like consistency:

Step 3. Sprinkle the remaining flour on a cutting board.
Step 4. Place the dough you just made on the cutting board. You can split the dough to make several pieces of bannock roughly 4 inches in diameter (if you want)…
Step 5. Spread the dough out but don’t make it too thin. A half an inch thickness should suffice. Use a rolling pin and make sure you get a nice, round shape.
Step 6. Start heating up the frying pan.
Step 7. Add a little bit of oil to the pan.

Step 8. Start frying the dough on both sides.

And that’s it! Now onto the recipe variations that you can make… in the bush!
Variations
The following two methods are really simple, but don’t just skim them. Remember the steps as this recpe may be the only way to get some comfort and a warm meal when SHTF…
Wrapped Around a Stick Recipe
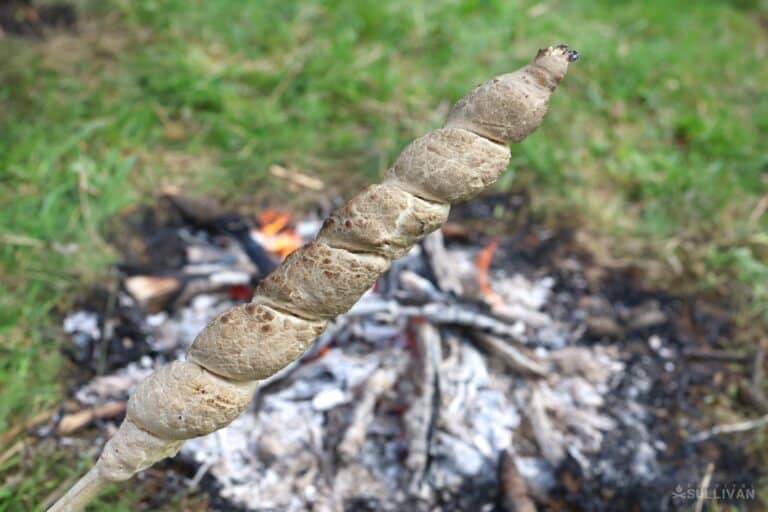
This adaptation works really well if you’re in the bush with minimal equipment. All you need are flour, water, a stick, and a pot to mix them in. And a working fire. Check the steps here.

Straight on Coals or Ashes
The third method, the least popular method, is placing the dough straight onto the campfire’s coals. This method finds its origins in the Australian Outback. This results in an ash-covered “Damper Bread” which can be buried in smoldering coals to cook.
The difficulty in successfully cooking the bread without burning it makes this the least favorite and least practical method. Especially if you find yourself in a dangerous situation where you are dipping into limited resources, you may want to avoid this potentially wasteful approach.
Check out the recipe here.
An Essential Staple for Every Prepper?
Now that you are an expert on the various ingredient ratios and cooking methods for bannock bread, you’ll be more prepared for any situation. This filling bread would be an asset to any prepper’s stockpile. The ingredients have extensive shelf lives, it is simple and easy to make, and does not necessarily need any tools or utensils.
For those experienced with bannock bread, what is your favorite recipe and/or cooking method? Is this food item something that you would consider? If you have any extra tips or tricks to share, please comment!


My name is Teresa Fikes. I am a Homesteader, survivalist, prepper, historian, and writer plus much more all in one package deal. I was raised on a small family farm were I was taught at an early age to survive off the land without the help of modern conveniences. I am a writer by profession and a Homesteader by Blood, Sweat, and Tears.
Thanks for the alternative ways to make Bannock. The only one I had previously was:
Bannock
½ cup white flour – brimming
½ cup wheat flour – brimming
3 tablespoons powdered milk
1 teaspoon baking powder
½ teaspoon salt
Water
Mix the dry ingredients together -can be placed in a plastic bag to make at camp- or thoroughly if at home. Dribble in the water a little at a time to make a sticky dough. Divide into 4 parts, fry in a lightly oiled pan over a medium high heat until golden brown on both sides.
Variations
Millet, sesame seeds, sunflower seeds, cinnamon and sugar, powdered butter or honey, chives, garlic, try various to sit you. Our don t divide and cook dough to make a camp pizza.
like #1 would be my choice cooked in a cast iron skillet. sounds good think I’ll make some . have done it with corn meal (corn cakes) as for me no gmo the real deal period.