When you find yourself in a survival situation, every resource you have must be used to its maximum potential. You will often find that the best survival items are those that have multiple purposes. Clay pots are one of those items. In addition to having several uses, you can even make your own clay pots if needed.
I was able to recently incorporate a small clay pot into a survival challenge. This was a long distance challenge last fall that required me to lug my pack across 34 miles of mountainous terrain. Keeping my pack small and light was a huge priority, so I did not want to bring a full sized metal pot for cooking. However, I needed a way to cook any food I was able to find.
The solution I decided to try was a small clay pot. It was only a few inches across and about an inch deep, but it was large enough to cook small amounts of food.
Late in the first day I was able to find some leftover corn cobs from the end of the harvest. The corn was hard and dry, so I wanted to soften it before eating. The clay pot was perfect to add a little water and boil the corn for a snack.
In this article I will cover several of the most useful ways to incorporate a clay pot into your survival plan. If you are ever in a SHTF situation, these techniques should be able to help you keep going.
1. Clay Pot Refrigerator
For years I have looked for a way to keep food cold without electricity. This was the method for which I was looking. This device works on the same principle as an electric refrigerator. As water evaporates from the pots, the process cools your food by as much as 30 degrees versus the outside temperature. This is often enough to help preserve your food from spoilage.
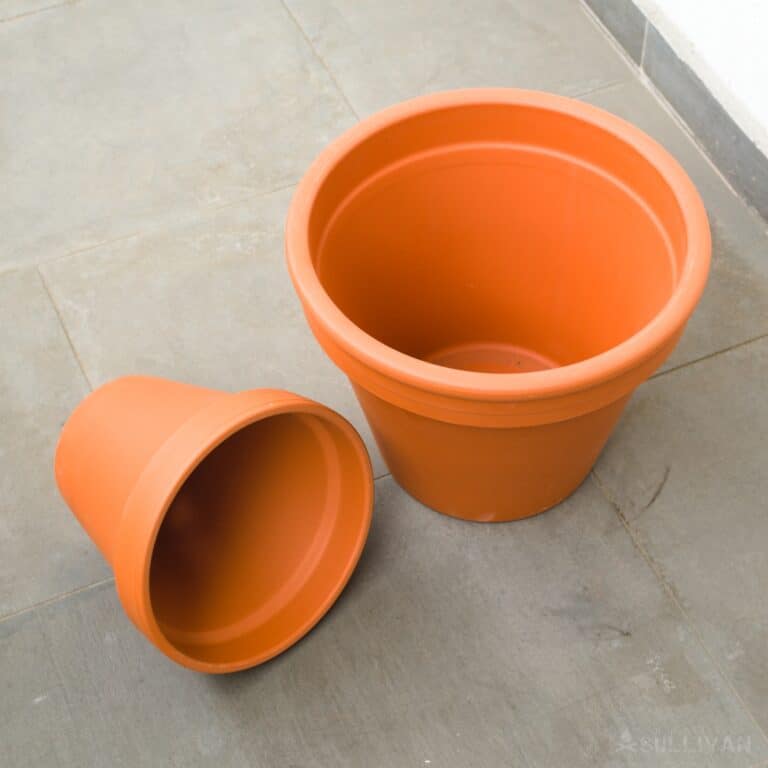
To build this device (also called a zeer pot) you need two large clay pots with one slightly smaller than the other. Put down a layer of sand in the bottom of the larger pot. It needs to be a few inches thick.
Next, put the smaller pot inside of the larger pot. Then fill the gap along the sides with sand all the way to the top.
Douse the sand with water so that it is moist to the touch all the way around. Then put your food inside the smaller pot and cover the whole thing with a damp towel.
As the water in the sand evaporates, it cools the air around it which keeps your food colder. It is important that you continually add water to the sand so that the evaporation process is constant.
It is also important that you keep it in a cool dry area so the inside temperatures gets low enough to keep your food fresh. Be aware that this device does nothing to protect your food from animals, so you may want to keep it up high.
2. Clay Pot Smoker
Clay is an excellent insulator which makes it ideal for a smoker or a grill. For this design you will start with two large clay pots of equal size. You will want to add a heat source to the bottom of one of the pots.
You can use a hot plate if you have access to electricity or you can put charcoal in the bottom and light it. Next you will want to lay down a circular grate and place your food on the grate. Then place the other pot on top but upside down to act as a lid.
This design is not much different than my Big Green Egg smoker which works well. There are a few tweaks that can be made for better results. If you are using charcoal you will get a little smoky flavor, but wood chunks will take it to the next level.
Soak your wood chunks in water for a few hours and then add them to the hot coals before placing your grate in the grill. Use fruit woods like apple or cherry for pork or chicken. Use mesquite or hickory for beef.
You can also add a water pan to keep the meat more moist. Use a metal pan and either suspend it above the coals or place it directly on the grate. In addition, you can duct tape over the holes in the lid to partially or completely cover them.
This will allow you to control the air flow and the temperature inside. You can add an oven thermometer to monitor the temperature. You can also add foam strips along the seam between the two pots to give yourself a better seal when it is closed.
3. Clay Pot Garden
Especially if you live in an urban area or an area with poor soil, planting vegetables in large clay pots may be the best option. I know many people that plant their green beans, lettuce, spinach, tomatoes, potatoes, and herbs in clay pots with great success.
Just mix some potting soil, peat moss, and manure together, and plant your according to the instructions on the package. Keep the seed bed moist until you see germination and then water one to two inches per week after that. These can be grown outdoors in direct sunlight or inside on a windowsill.
4. Clay Pot Heater
Clay pots do an excellent job of absorbing and evenly radiating heat. If you place several pots in layers with air in between, they will radiate heat like a space heater.
To make a terracotta pot heater you will need one long bolt, some appropriately sized nuts and washers, and three pots with each being a different size.
Run the bolt upwards through the center hole of the largest pot with a washer on each side and a nut on the inside of the pot. This should hold the bolt straight up at the center of the pot.
Add another nut and washer an inch or two higher and place your next sized pot on the bolt. Secure it the same way. Repeat the process for the last pot.
You should now have three pots of varying sizes secured in place with air gaps in between each.
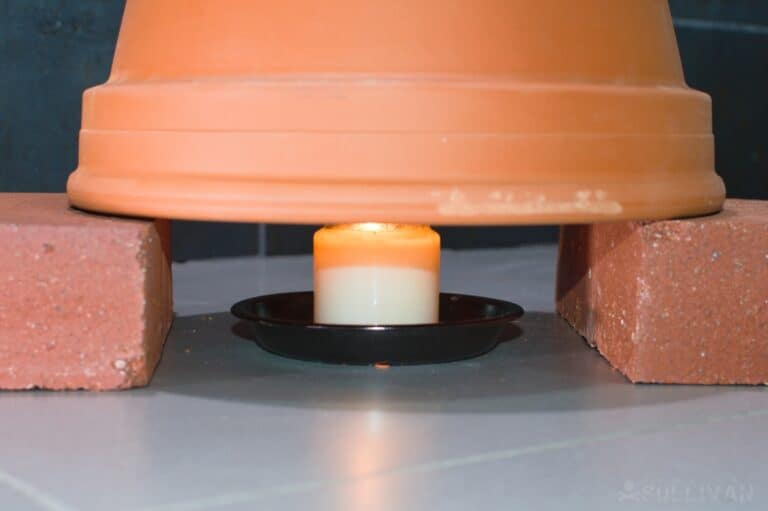
To use the heater, light a single candle or several candles. Use a spacer on each size to leave a small gap between the flames and the lip of the pots. Place the pots upside down on your spacer so that the heat from the candles is flowing straight up into the pots.
This should keep your area warm for as long as the candles are burning. To keep the room extra warm, pick a small room and close it off as best you can. Use blankets around windows and doors to prevent any heat from escaping.
5. Ferment or Cure Foods
If you have sealed and glazed pots, they work great for preserving or fermenting foods. You will need a tight lid as some of these processes require a lack of fresh oxygen. You can make sauerkraut, wine, pickles, corned beef, or any other food that has to sit in fluids.
You will need a dark, dry, cool place to store these pots and will need to read up on how long to let them sit. This can be an excellent way to build up your emergency food supply.
6. Clay Pot Bread Oven
Again, clay works well with almost every type of cooking you might need to do. Breads, crackers, and biscuits are great survival foods as the carbohydrates and calories will fuel the work you need to complete. For this project you will need a square paving tile, a large clay pot, and a raised grate if possible.
To use this method you will need to use a ceramic saw to cut an opening in the pot large enough to fit the items you would like to cook. Save the piece you cut out to use as a door to your oven. Place the square tile in a safe area and start a wood or charcoal fire on top.
Once everything burns down to coals, place the grate on top and then the pot upside down on top of that. If you do not have a raised grate, just move the coals to the sides leaving a space for your food in the middle.
If possible, use an oven thermometer to monitor the temperature and get it between 350F and 400F. Use your door to keep the front closed off, and use duct tape to adjust the opening on top. This will help you control the temperature. Place your bread on the grate and watch it cook.
In Conclusion
In a survival situation, every resource is valuable. Even something as simple as a clay pot can have functions that could save your life. If you get creative, I am sure you could think of even more ways that clay pots could be incorporated into your survival strategy.
When you have time, try out a few of these projects so you can be better prepared if you are ever forced to use them.

My name is Ryan Dotson and I am a survivalist, prepper, writer, and photographer. I grew up in the Ozark Mountains and in the foothills of the Pocono Mountains. My interest in survival started when I was in Boy Scouts and continued as my father, uncle, and grandfather taught me to hunt and fish. In the last few years I have started taking on survival challenges and have started writing about my experiences. I currently live in Mid-Missouri with my wife Lauren and three year old son Andrew.