Long-term food storage is a concern for many preppers, and there are at least fifty methods of storing food for long-term disasters. Most of these methods are very well and good, but they require in many cases some special skills (such as canning and vacuum sealing) that make them unsuitable for new preppers looking to start storing food ASAP.
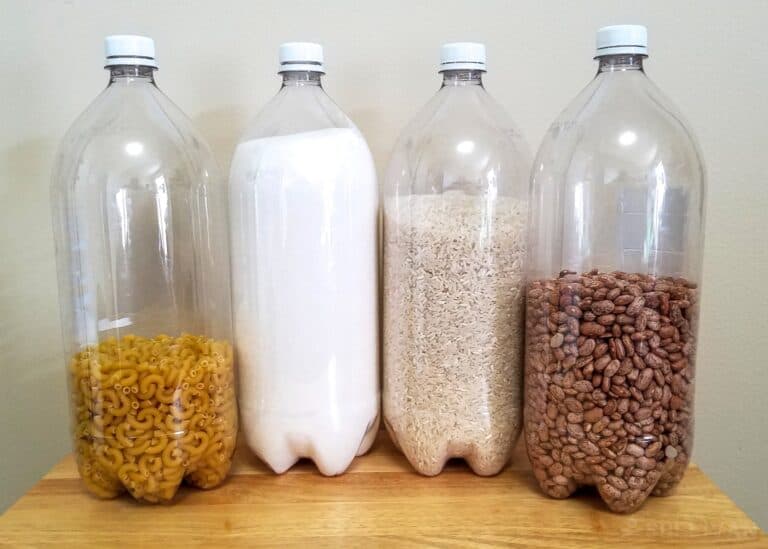
Storing food in 2 liter PETE bottles is a cheap way of storing food in bulk while keeping the amount manageable enough that you can rotate it as often as it is needed.
The reason to use water bottles is that they are made out of PET (polyethylene terephthalate), which is a non-porous plastic.
PET bottles provide adequate protection against moisture, and they are an excellent oxygen barrier so coupled with oxygen absorbers they make for an unmatchable food storage unit.
Storing food in such containers, as long as you follow the instructions below, will allow you to keep it safe for at least five years and up to 10. With the lightweight container you can add a few of these to your BOB as well as storing them in your cellar for when TSHTF.
What Kind of Food Can I Store?
You might think it is easy to think that you would be able to store any food if you have oxygen absorbers; some kinds of food that will not keep well if they are not stored in more specialized containers such as Mylar bags. The kind of food that you can store in water or soda bottle is dry food, that means storing grains, salt, and even sugar.
Because of the leaching effect, it is not advisable to store water for a long time in these bottles. You must remember that water can be very aggressive, and it will degrade plastic little by little; this is why even water bottles have a best-by date.
PET stands for polyethylene terephthalate which in tame degrades and leach chemicals such as antimony into the water which is a metallic element similar to lead that in small doses can cause dizziness and nausea and has the potential to be fatal in larger amounts.
There are safer ways to store water and just because bottled water is widely regarded as safer to drink it does not mean it is true.
Foods with high fat or oil content will not keep well in PET bottles; it is also inadvisable to store products that contain leavening. Remember when thinking about storing food in PET bottles is you want them to be as dry as possible.
Doing this will stop the food from going stale quickly, or become oily, and moist products such as whole grain flours, granola, brown rice and whole grain cereals will not keep well with this method due to the naturally high oil and moisture levels.
While you can store flour, you will want to avoid pancake mixes and biscuit mixes as they contain leavenings that produce gasses over time, these build up, and you may have an exploding PET bottle in your hands. There are better ways to store leavening containing food products.
There is debate over whether or not it is advisable to store dehydrated fruits and vegetables in this way. The problem is even dehydrated fruits, and vegetables contain a certain amount of water that will spoil them over time.
This could potentially result in botulism poisoning; you can store them if you can make sure that the moisture content is very low, dry food bulk suppliers tend to be able to tell you the moisture content in their products.
A rule of thumb is to check if they snap when you break them, if they do then they are dry enough to store. The advised fruits and vegetables to store in this way are apples, onions, carrots, and potatoes.
If you are thinking about storing powdered, dry milk in this way, you must make sure that it is low-fat. Otherwise, the fat will have the same effect as moisture and will not allow you to extend the shelf life of your product. You may store regular and instant low fat dry milk in this way.
Here’s a list of what you can store in this way:
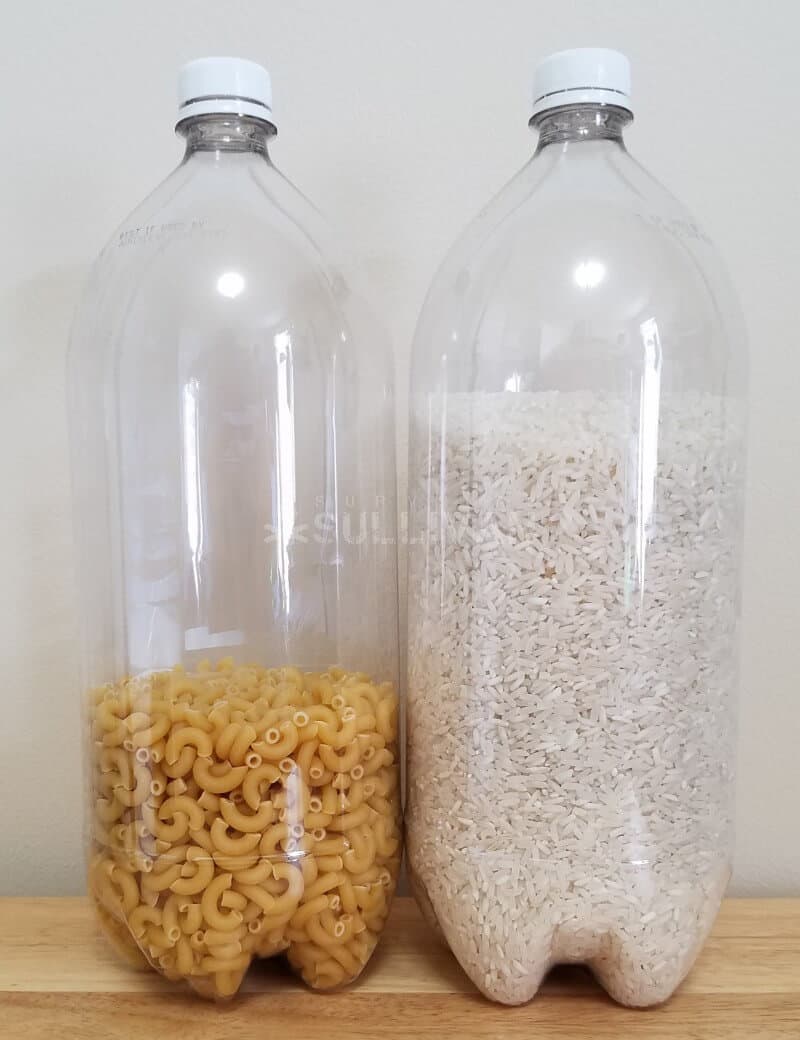
- Grains (popcorn, rice, lentils, beans, wheat)
- Low-fat dry milk
- Dehydrated fruit and vegetables (low moisture content)
- Oats (rolled or steel cut)
- Pasta
- Salt (Pack with rice or desiccant packs to absorb moisture)
- Sugar (pack with rice or desiccant packs to absorb moisture)
Advantages
There are many advantages to storing food in this way, the first of which is that it is very cheap, the only real investment you are making is in oxygen absorbers and desiccants.
Another excellent reason to store food in this way is that it is a very lightweight, low-maintenance method, making it a perfect addition to your BOB. The bottles are incredibly durable and resistant, and once they are empty you can easily use them to store water (just not long-term). Think about adding one of these plastic bottles filled with pasta or dried bean soup to your BOB.
A lot of preppers advise that you stay away from PET when storing for the long term citing concerns over the chemicals used to treat PET. It is advised to can your food yourself by sealing them in mason jars. It is good advice, but there are a few problems with these methods too.
The problem with canning and vacuum sealing in mason jars is once you open them, the seal is broken and you will need to consume the food quickly. This does not happen with PET storage since the oxygen absorbers will maintain a low percentage of oxygen once you reseal the bottle, all you need to do is close the lid again.
If you decide to seal with silicon, then you can easily cut the bottle easily whereas in a jar you would have to smash the jar open if you can’t open it, which is dangerous.
Disadvantages
There are not many disadvantages with storing food in this way. The main one is that bottles do not stack very well so they might be harder to store than mason jars or cans; you can easily find the delivery trays which have been designed to allow you to stack them up.
Another disadvantage is that, since the mouth of the bottles is quite small, there is a cap to the kind of food you can store to grains and powder. You may try using 3-liter bottles, which have a larger mouth or gallon juice bottles, which tend to have a larger opening.
Moist foods stored in oxygen deprived packages can increase the risk of botulism poisoning which is a concern for many preppers thinking about using this method as long as you make sure that your bottles are dry and your food contains less than 10% moisture, storing them in this way is perfectly safe.
The Steps
The method is quite simple; there are some things you must make sure to do to prolong the shelf life of your product.
Start saving bottles, you can use any PET bottle on hand, but it is advisable only to use bottles that were used to store food and water so that no contamination occurs and you can be sure that it is safe to eat the food then. Here is a step-by-step overview of what the packaging and storage method is.
Step 1: Preparing the Bottles
You want to wash the bottles as soon as possible when the original contents are gone. This will safeguard that there will be no remains stored in the natural pores of plastic.
It is not just about removing any traces; you want to make sure that the bottles are sterilized so that your food can last longer without spoiling or oxidizing (in the case of rice).
The traditional method of sterilizing food containers is placing them in boiling water for a few minutes to kill all the bacteria that might be nesting there.
PET is quite flimsy when it gets hot, so it will not retain its original form, it may also get thinner in certain points which will make the bottle less durable than usual.
Because of this, it is advisable to mix one tablespoon of bleach in half a cup of water and then swish it around inside the bottles, after that’s done you want to rinse each bottle well (so that you do not end up eating chlorine down the line) with clean water.
You also need to make sure that the bottles can still be properly sealed, to do this you can close them up tightly with their caps and submerge them in water.
If air bubbles escape it means that it is not sealed, try tightening the cap, and if bubbles still escape then your bottle might not be appropriate for this use, still you can set it aside for longer-term storage and simply use silicon to seal it.
Another thing you want to make sure of is that the bottles are perfectly dry before storing anything in them for the reasons listed above.
Allowing them to dry naturally is the best choice, just placing them upside down in the dish drainer and waiting is a good way to do this but it might not work so you might want to leave them to dry in the sun with the caps off and some rice to absorb the extra moisture.
If you live in an area that does not get a lot of sun then you can use a food dehydrator for this purpose, just take the trays out and place the bottles inside on low heat for a few hours.
Step 2: Preparing the Food
No matter how well you clean the bottles, if the food itself is not clean, then all the preparation will be for nothing. You can rinse the grains to wash off grime as long as you make sure that they are completely dry before packing.
With dry powdered milk, you will not have this problem since the industrial process alone will rid the powder of dangerous bacteria.
For the products that you cannot rinse you may try freezing them in Ziploc bags for a week, then taking them out to thaw before freezing them again, make sure there is no moisture left in the food while you are packing them.
Step 3: Get Oxygen Absorbers
Air is composed of many different gasses, but mainly nitrogen and oxygen. Nitrogen does not harm food or promote the growth of insects.
Oxygen makes up around 20% of the air and is conducive to life and oxidation, which is why you want to invest on some oxygen absorbers, which will diminish the oxygen in the container to less than 1%.
You cannot obtain this amount of oxygen reduction with vacuum packaging, which is why oxygen absorbers have become so popular. Most oxygen absorbers will need water to be activated, but your food contains enough of, to activate it so do not add extra water.
An oxygen absorber packet (300cc) can service a PET bottle of anything up to a gallon capacity so that one will do per bottle.
Step 4: Pack the Food
Place an oxygen absorber at the bottom of the bottle to allow you to utilize the space available better and pack your food in tight, as well as allow you to use the packet’s reserve capacity to its full extent when you start using the food and reclosing the bottle.
Now fill the bottle with your chosen product. Since the mouth of two litter bottles is quite small, you will need to use a funnel, or it will take forever to fill the entire bottle.
Every time you fill it give the bottle a little bang on the table so that the grains or powder will settle, thus allowing you to pack the food in tightly.
Before sealing the bottle make sure that the cap is dry and clean. Seal the lid, making sure it is tight. If you are not using the product anytime soon, then you might want to seal the cap with silicon to ensure nothing goes in or out.
The problem of sealing it with silicon is that you will have to cut the bottle open when you want to use it, which might not be ideal. You can also use duct tape for this purpose but it will not be as efficient as silicon, and unlike silicon, duct tape will not make up for a poor seal.
Step 5: Storing the Packed Food
Now, as with any packed food, you want to keep them in a cool, dry place and away from light. This applies to anything you want to pack for a long time. You can paint the bottles black to ensure that less light hits the food (you want to do this before packing the food), thus increasing the shelf life.
Place your PET bottles in a box and keep it away from the ground so that moisture will not get to it. You will need to protect the bottles against vermin, so it is better not to use a cardboard box.
Remember to label each bottle appropriately with the date of packing, especially if you painted the bottles black.
Wrap-Up
All that remains to say in closing is that while long-term storage of food can be hard to manage and the process may be quite daunting for any inexperienced prepper, there are ways to start and this method is cheap and easy. You can also consider this method of storage if you are about to go camping since you can use smaller PET bottles for storing smaller amounts of food.
You can find dozens of ways to repurpose and reuse water bottles here.

My name is Teresa Fikes. I am a Homesteader, survivalist, prepper, historian, and writer plus much more all in one package deal. I was raised on a small family farm were I was taught at an early age to survive off the land without the help of modern conveniences. I am a writer by profession and a Homesteader by Blood, Sweat, and Tears.
PET bottles are not meant for long term re-use – toxins leach into your food/water when the PET breakdowns. PET bottles usually have an expiry of 2 yrs.
Agreed, there are better ways to store food. However, one can put other, non-edible things in them… Also, you can use glass bottles, as they don’t have this problem.
Mice and rats eat right through the bottles. They love the little standing nubs on the bottom.