Most preppers know that a natural disaster or severe storm typically means the power will go out at least for a short period of time and many have prepared ways to live without refrigeration for several days until power is restored.
But what if following an SHTF event, the power just doesn’t come back on after several days? What if the power still doesn’t come on after several weeks, months, or even years?
We can plan to grow our own food and raise our own livestock but let’s face it: many of us are not prepared to use salt or smoke to preserve butchered for long periods of time.
And cooking it all at once doesn’t really help much if there is no way to keep leftovers from spoiling before they can be eaten. The same is true for dairy products such as yogurt, cheese, butter, and fresh milk. It just needs to be kept cool to keep it from spoiling in the hot weather.
Table of Contents
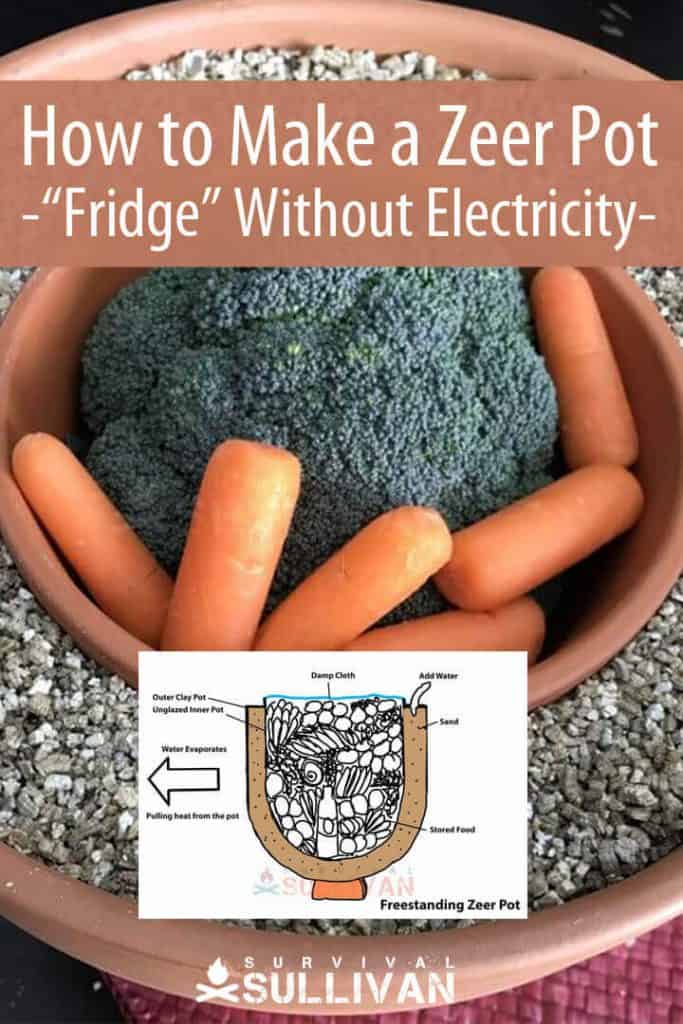
What’s a Zeer Pot?
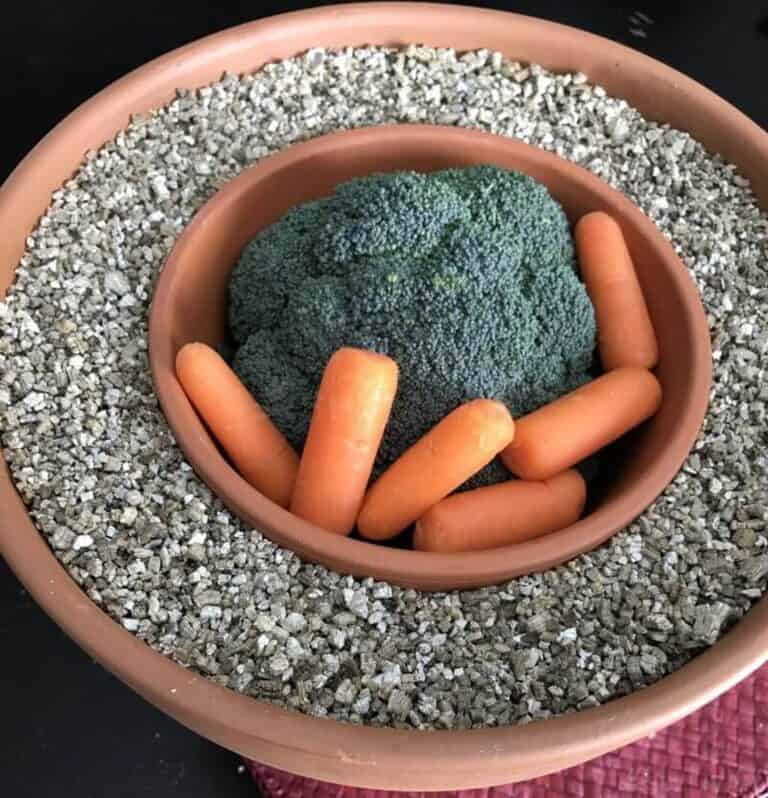
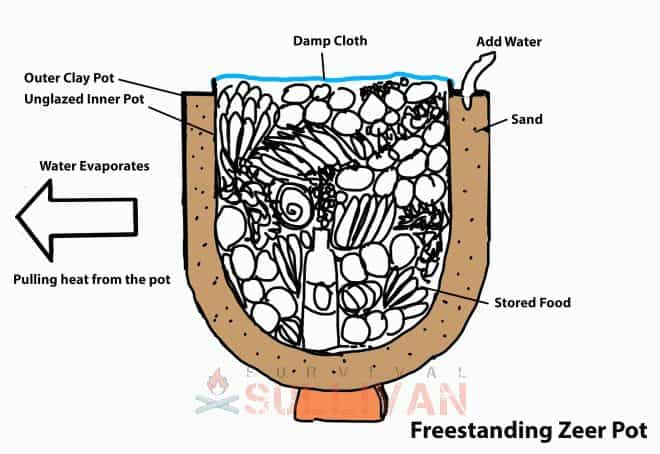
A zeer pot, also known as a pot-in-pot refrigerator, is a simple system composed of two terracotta pots, some sand, and some water that can maintain a cool temperature to preserve fruits and veggies.
It’s not the same as having a fridge, but given it doesn’t require electricity, this could be an excellent backup for people looking to become more self-reliant.
Zeer is an Arabic word that translates as large pots. The concept of evaporation for cooling purposes existed as far back as Ancient Egypt, where water was kept cold in large clay pots. The zeer pot is an evaporative cooling device, re-invented in Africa by a Nigerian teacher, Mohammed Bah Abba.
Residents of cool, dry climates will find that with a continual breeze blowing on the pot, they can even get the internal temperature to 40 degrees Fahrenheit, very much like an electric-powered refrigerator.
In fact, unless you live in a very hot and humid climate, the zeer pot will work surprisingly well. When done properly, it can extend the shelf life of food anywhere from 5 to 10 times when compared to room temperature storage.
How to Make a Zeer Pot
Ingredients
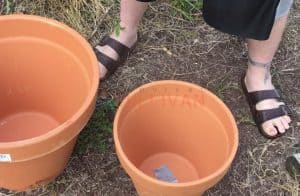
- 2 terracota pots one should be slightly larger than the other
- 1 bag sand
- water
Instructions
- Find, purchase, or make two pots from terracotta or clay. Use only unglazed pots, the sides must be sufficiently porous to allow for evaporation. Glaze on the inside of the smaller pot is okay. One pot should be large enough for the other pot to fit inside it and have at least an inch to an inch and a half space all the way around. If you found or purchased pot has a hole in the bottom, plug it with duct tape tape or even better use a 4” long bolt along with nuts and washers to bolt the smaller pot to the large pot and then seal with silicone.
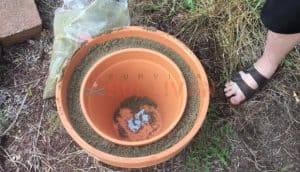
- Add an inch of coarse sand to the bottom of the larger pot. You want to create a base so that when the smaller pot sits on it, the top of the two pots are level with one another.

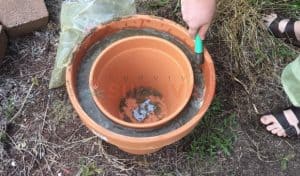
- Once you have the smaller of the pots positioned on the base of sand, fill the space between the two pots with sand until you have only a small gap around the top edge.
- Gradually add water, preferably cold, over the sand between the pots until it’s thoroughly wet and unable to absorb any more.
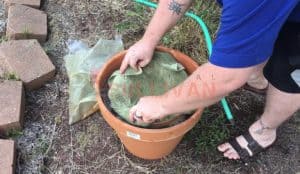
- Cover the top of the smaller pot completely with a wet towel or cloth.
- The smaller pot should start to cool down. You can use a thermometer placed inside the small pot to measure the temperature difference.
- Place your fruits and vegetables or other items needing refrigeration into the smaller pot and replace the wet towel over the top.
- Store the zeer pot in a dry place that is well-ventilated, which will encourage the water to evaporate . Placing it on a stand will allow for increased air circulation beneath the pot.
- Check the pot regularly, at least twice daily, to make sure that the sand between the two pots is still damp. Add more water frequently to prevent the sand from drying out and to maintain the evaporation process which keeps the inner pot cool.
How It Works
If you think back to the last time you went swimming on a day where it was hot and dry but still a little breezy, you may have felt comfortable while you were in the pool but once you got out soaking wet and that breeze hit you, the chill set in.
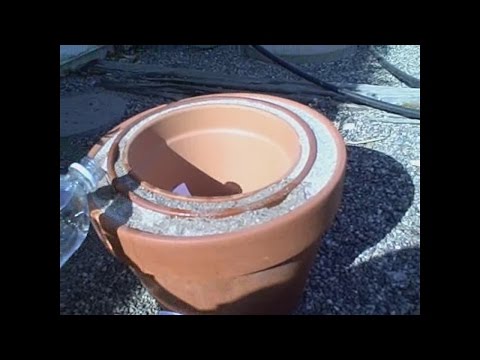
As soon as you toweled off and had a few minutes to dry out in the sun, you were hot again and ready for another cool dip in the water. A zeer fridge works in a similar way as demonstrated in this video:
The wet sand between the two pots creates a thermal mass which maintains the cold temperature inside the smaller pot and also serves to wick the moisture up the sides of the pot.
When stored in a shaded, well-ventilated area, the water evaporating off the outside pot cools the pot. On days when a good breeze is unavailable or when storing the zeer pot indoors, you can use a solar-powered fan and keep the pot cold.
Benefits
- Keeps food cool without need for power
- Keeps insects away
- Fresh vegetables last longer in than in typical hot climates
- Can be portable depending on size of pots used
Weaknesses
- You must keep a careful eye on the internal temperature to ensure that your items on being stored at a consistent temperature.
- Food items stored in a zeer pot much be checked frequently for any signs of spoilage. The life of fruits and vegetables is extended but it does vary greatly for each type of fruit or vegetable.
- The pot must be checked at least twice daily and water added to ensure the sand stays damp.
- Sunlight shining directly on the zeer pot even for a short period of time will negate the cooling effects. It must be kept in the shade and thus small in size and portable so they can be moved if needed.
- You may have to use several different ones in order to store meat, dairy, and fruits and vegetables as the interior space of the pots is quite a bit smaller than regular refrigerators.
What Can Be Stored in It
- Meat up to 14 days compared to several hours
- Fruits and Vegetables for varying amounts of time (check frequently for spoilage)
- Liquids and beverages that are better when cool.
- Millets and Sorghum to prevent growth of fungi and guard against humidity
Variants for the Zeer Pot
Above we spoke of the Zeer pot with a wet towel on top, but there are a few variations you can use to enhance performance or if it is for the long haul during a season, or using the method to cool a cupboard.
Limitations of the Pot
As it was mentioned, it functions best in low humidity. This means that places where you have high humidity like in the southern USA or Appalachian mountain regions, or even in the Ozarks, it’s not going to be the miracle it was for the part of the hemisphere where developed it for the people there.
A refrigeration unit’s core temperature is about 35F-38F degrees. You are not going to achieve this. You will not get that ice-cold beverage temperature. You may get a 40F degree difference from the outside.
When I lived in Arizona and it was 122 a lot one summer, these were wonderful to transport things and keep things pretty cool on picnics and such. 80F-90F degrees is cooler than 120F. But, to most Americans, that’s still pretty warm, so go into it with realistic expectations.
If you are anywhere with humidity, do not use milk, leftovers, or any kind of liquid in the pot. If you notice, most pictures are of veggies, or fruits, and not things that can spoil quickly.
Unless you are in humidity less than 10%, foodstuffs that can spoil quickly will not get to that internal temperature and stay there to provide safe food, so I would not change it on perishables. Things that are better cool and served cool, like cheese, cooked meats, fruits, non-dairy drinks, vegetables, and breads are ideal.
The original zeer pot was made in Africa and we need to remember that if we live in non-African type climates, or non-middle east climates it may not work as well. There are a few things we can do to enhance the science behind it and get it to work somewhat better.
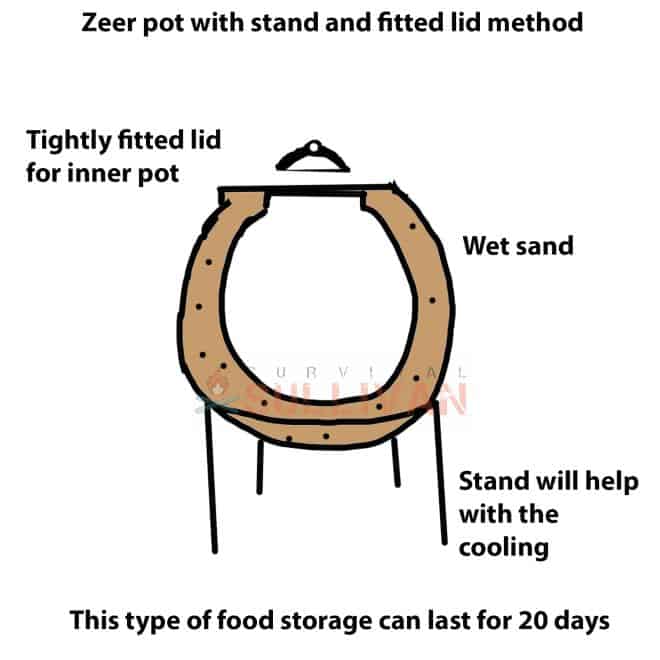
Lidded Variant
The original Zeer pot also had a lid when it was first published in “Science in Africa.” We also need to remember it needs to have circulation, so up on legs with a tighter fitting lid may help retain some of the coolness that would evaporate through the wet towel.
This is best if you have moist vegetables inside, as they already have some moisture to them. Dry veggies would pull the water from the sides and towel, so I like a lidded variant best for this type of Zeer pot.
Evidently, one job in ancient Egypt was fanning the clay pots like this, so if you haven’t any slaves to do this, the incorporation of fans is a must for the cooling. I used 2 fans, one on either side for the utmost coolness.
If only one side is getting the breeze, then it makes sense it will be cooler with 2. The water must be maintained and I would add water hourly with this method. It never got really low, but I wanted to keep it as high a level as the water could be for optimum efficiency.
The lids can be:
- Unglazed terracotta, but to me, that was almost the same as a wet towel.
- Metal was a good material but sweats.
- Glass was the best lid I think, and you can see the coolness and evaporation when it was working, so it had visual appeal for me.
Zeolits and Surface Area
I wanted to note the pots used and their construction. In almost every publication and online source I saw, terracotta pots from the local hardware store were used. Some with success if the climate were ideal, some with doubts on the science involved, and this got me doing some research.
Clay pots for storage have been around for centuries. Off-the-grid non-refrigeration Zeer pots were constructed in Africa during the and from clay made from cow dung and local sand, rocks, etc., and distributed to farmers and families to preserve food.
This handmade variety left a much-roughened surface with big dips and thumb-sized indentions and crevices, not holes, but a rough texture. Not perfectly smooth terracotta.
An extremely large surface area with carved, roughened, rugged, or chiseled surface is what I was seeing. I read a few articles saying to decorate it for appearance with lines and squiggles, to make it seem “African.”
These carved decorations were not for just appearance, they are zeolits, which actually increase evaporation as to the rough or carved surfaces. The carvings and roughening by chisels actually gave it an extremely enhanced method of catching the breezes in a desert.
These pots were developed for farmers to get things to market in a relatively cool container, and not experience spoilage on the bad roads and harsh ride there.
The secondary people were the families needing to keep their food from spoiling when they brought it home from the market and needed to keep it from spoiling for a few days. It was also one of the only ways that missionaries could store medicine like insulin when visiting village to village, as insulin needs to be in about 85-degree temperatures at “room temperature” so a way was needed to transport it in the African heat.
Sand Efficiency
I saw a huge number of articles just saying “use sand” but coming from living in a desert to a place that has sandy beaches and ponds here, well let me tell you there is a world of difference in sand.
So I wanted to add a few notes on the use of sand and what to use that can help your pot get to the lowest temperatures possible with the Zeer method.
You may also want to take note of this is you use “playground sand” and its dangers.
For water evaporation to occur in a Zeer pot, you want the watered sand to cool the interior of the inner pot by evaporation. This means as the water between the sand evaporates, the cool air goes up into the pot by the breeze. So you want smooth sand that acts as spacers in the water, allowing for evaporation.
Playsand
I thought would be safer for food as it is good for children, correct? Nope. It actually is made by quarrying rock and quartz rock making coarse, sharp, and dusty particles that have a high ratio of silicon dioxide. Yep, the stuff they add to food and packets to whisk away moisture.
So if your sand if soaking up the cool water, and then on one side warming by being in contact to the warming outer layer, that’s not going to help. That’s making an insulated area preventing cool air from coming through!
Plus, although made for kids I read this is dusty and so fine it can get into your lungs and cause respiratory illnesses that can last a lifetime! Plus it has carcinogens imbedded it in.
To be honest, in Arizona we had a big sandbox and used this, my son had asthma for a few years. I have to wonder at this and its use now!! There was beige sand everywhere, but we thought this was safer!
Beach Sand
Beach sand is good BUT if you choose to use this, you need to rinse it well and let it dry before using. It contains salt. The salt will make a saline solution with the water and with osmosis as it filters into the pot, it will indeed filter out the salt making a buildup.
This build-up will affect the amount of air and water able to cool inside the inner pot, so you are in essence making a seal to keep cooling airs out. To keep the Zeer pot at its most effective, get that salt out with beach sand.
Natural Sand
This sand is made by erosion, so all the little particles are nice and smooth. It is a fine-grained particle with nicely round edges. The white beach sands contain finely ground limestone, and the purest whiter sands from New Mexico are made of mostly gypsum and very soft feeling.
Arkose Sand
Arkose sand is the ideal sand as its granite feldspar, and granite feels cool to the touch, so of all the sand you can buy this would be my choice.
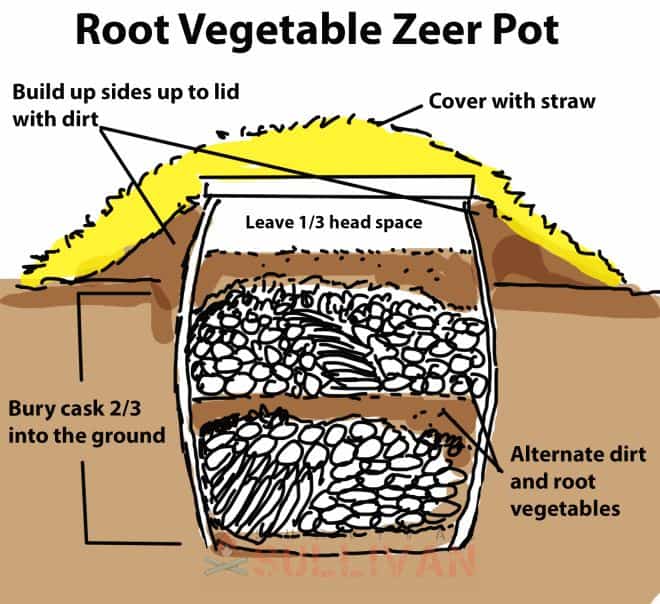
Root Cellar Zeer Style
It predates the Zeer method by native cultures, but we can use it here as the same principle applies with insulated cooling. To store vegetables in the fall when the ground is cool, you can use the pot-in-pot method to make a mini-root cellar.
You bury the pot as in the diagram and the cool ground will keep the vegetables. Root vegetables would be ideal.
This keeps bugs and other predators from them while protecting them from spoilage in the heat and microorganisms growing on them as it gets very cool in fall. This is good for a season.
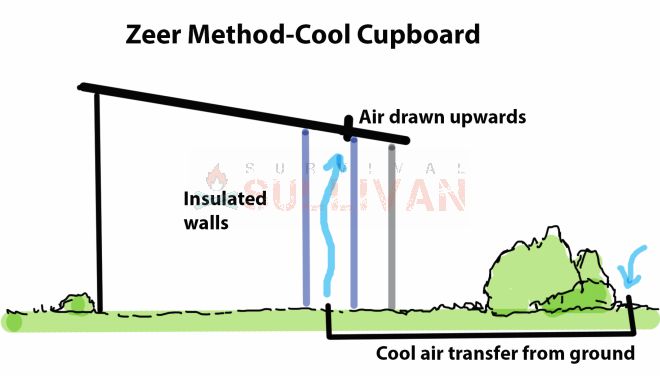
Using the Zeer Method to Cool a Room
A quick overview is using the ground’s lower temperatures to pull air into a “natural cupboard” or room for cooling.
Probably not a good idea because you might not have enough of when SHTF. Even today, it would incur an extra cost that would not make it worthwhile.
Water is best, and you can even use unfiltered rainwater because you’re not going to drink it, and it won’t come into contact with the food.
No. Direct sunlight will compensate for the cooling effect. Best to keep it somewhere in the shade.
Ready to Make Yours?
No matter what type of event you are preparing for, the chances are that traditional electric-powered refrigeration will be either unavailable or sporadic at best.
If you want to be prepared to store your more delicate food items such as meats, dairy, and fruits and vegetables, consider a zeer pot as an alternative cooling device.
co-author: Dyann Joyce

Born and raised in NE Ohio, with early memories that include grandpa teaching her to bait a hook and watching her mom, aunts, and grandmothers garden, sew, and can food, Megan is a true farm girl at heart.
For Megan, the 2003 blackout, the events of 911, and the increasing frequency of natural disasters like Hurricane Katrina, spurred a desire to be more prepared. Soon to be living off-grid, this mother of four and grandmother of ten is learning everything she can about preparedness, survival, and homesteading.
Years ago I was homeless and I was gifted a small Travel trailer with no services available I bought a 12 ft Tarp and two 4 inch diameter Thin walled sewer pipe. with a couple three 45 degree connectors. I made a trench under the trailer placed a cutting of the tarp to hold water in it and placed a layer of small rocks and sand for the pipe to lay on it. I then covered the pipe with the sand and rock mix as well as lifted the sides of the tarp to act as a water basin. I had to shore it up with larger rocks to ensure the basin was high enough to hold the water but at the same time the top was open for evaporation. I routed it into the Trailer where the heater used to be. It worked as an effective air cooler to lower the temperature about 10 degrees. This is similar to your cool a room method. I later gained 3 more Sewer pipes and connectors to make a radiator, The Farmer who gifted me the trailer told me that if I placed it outside the footprint of the trailer and did the same thing with the setup, and then put Turf over it it would more likely cool down even more. If I recall it did so to about 15 degrees cooler than the outside temperature. He then suggested I place a Tarp above, not on the Trailer to allow an air flow over the top and opened the vent it would also increase the cooling effect, While I felt even cooler, I thing that the temperature difference wasn’t that much but it was more consistent at all levels. All you needed to do is water the grass (Turf) a couple times a day.
Thanks Dan ! Very thorough & well presented. Easy to understand. Kudos !!
Many thanks l live in England and we used to use this method but with water not sand when l lived in France
its relatively simple to distill alcohol from just about anything. wouldnt that be more efficient for evaporative cooling? vapors could be an unpleasant issue but there should be ways to address that i would think.
Wondering if using the REALLY big clay pots with a slightly smaller one inside would be as effective or if the really big one with a much smaller one inside would work better? I have a couple of the really large – like 20 gallon pots that aren’t being used and considering keeping them for this purpose.
Thanks for your feed back!
What would the results be if you placed the 2 into a larger pot that contains only water with fans blowing on the 3?