In a survival situation, water can be one of the most difficult items to obtain. Seeing as it is the most important key to surviving if one were to become lost in the wild, it is a good idea to learn ways of obtaining it. One method that you can utilize to obtain water in a survival situation is by making a solar still.
The key word here is CONDENSATION. I’m sure you have made yourself a glass of a cool drink of some type on a hot day, and the outside of the glass gets droplets of water on it. That’s condensation, and that’s the key to obtaining water from a solar still.
Making a solar still in a survival situation depends on three factors:
- Do you have ANY source of water?
- Do you have any vessel for collecting water?
- Do you have a piece of plastic, preferably clear?
- Is there SUN in the sky?
Mandatory: Do You Have Enough Sunlight?
It’s actually hard to make a solar still in a cloudy region. Ironically, while you are stranded and in dire need of water, you need the brightest sun there is for the best results as the sun’s energy is what will make our distiller function. Hot days often mean cool nights.
These weather conditions allow for another method of water collection that we can mention in less detail, a Dew Catcher or Overnight Collector, as the focus of this article is distilling water by means of a solar still. For either method, if you happen to have a piece of plastic, then you are halfway there.
Will a Solar Still Treat Contaminated Water?
Yes, it will. One of the biggest advantages of a solar still, of any design, is that it produces clean water which is invariably very pure so long as you take care to avoid contamination.
That’s because when water turns into steam it leaves behind pretty much every contaminant you can think of, from bacteria and other germs to solids and heavy metals, minerals like salt, and more.
When the water condenses back into liquid, it won’t have any of those contaminants in it, and if the surfaces that it touches in the form of the plastic wrap and your collection container are clean this is going to be your best bet for truly pure water in an austere environment.
Considering that you can collect and purify water in one step using a solar still, it can be a huge value proposition even if you only have minimal materials to work with. The downside of a solar still is that, even in ideal conditions, it takes a long time to collect any significant amount of water.
For this reason, if you have plenty of materials, time, and opportunity you should definitely consider setting up multiple solar stills to increase the net yield of potable water from them.
Tools and Materials
Probably the best thing about a solar still is that it is easy to make with minimal tools and materials. You will need a sheet of transparent plastic, or some other transparent water impermeable material, but everything else you can make do with using natural items found in the environment.
- Plastic Sheeting: This is the single most important component of your solar still. You don’t need much plastic sheeting to make a functional solar still, but the larger sheet you are able to procure, and the larger hole you are able to cover, the more water you’ll collect, to a point. Ideally, this sheeting will be very clean and clear to allow full-value sunlight to pass through. This will make the process more efficient. You can use plastic grocery bags, painters plastic or even a plastic 2-liter bottle that is cut up into sheets.
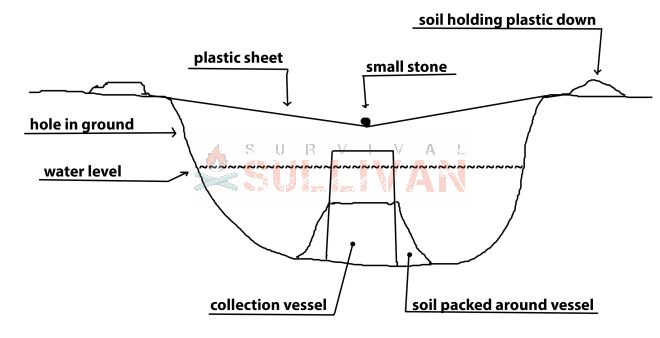
- Rocks: Rocks are a simple part of a solar still, but they play an important part. You will use rocks around the perimeter of your plastic sheet to help secure the plastic in place before you cover it up with soil. You’ll also need a pebble or a small rock, depending on the size of your still, to place in the center of the plastic directly over your collection container. This will give the condensed water droplets a path to follow so they will be reliably collected.
- Loose Soil or Sand: You want to have loose, clean soil or sand on hand to seal the edges of your plastic sheet. This will prevent water loss when steam rises as it evaporates. If you don’t have the edges of your plastic sealed, this steam can escape out the sides meaning you will be losing water that you could have been collecting. You should have plenty on hand after excavating your hole, but you need to gather a little bit of extra to make sure you can completely seal the edges of the plastic.
- Container: Another critical part of a solar still is the collection container. This is the container that the water will actually drip into after it has evaporated and then condensed on the plastic, pure and fresh and ready for drinking. You can use anything for the purpose as long as it is watertight, from a mug or can to a small tray or anything else. Obviously something that is easier to handle without spilling your precious water is better. In a pinch, you can form a collection container with a ziplock bag that you prop open or even a spare piece of plastic by forming a second depression inside the larger one to hold it. Make sure any of them are as clean as possible to prevent contamination!
- Water Source: The last thing you’ll need is a source of water to distill. This can be absolutely anything, from a pond or river water to collected rain and even salt water. Distillation will purify it all. One thing to keep in mind is that if at all possible you should pre-filter dirty or cloudy water if possible; the cleaner and clearer the water is, visually, the better the process will work.
And that’s all you need. Now let’s get to the procedure.
Solar Still in the Bush
Do the following to quickly and easily build your own survival solar still pretty much anywhere you can dig.
Step 1. Dig the hole and set the removed dirt, or sand, near the hole as you will need it for a later step. If you happen to have a very large sheet of plastic, you may have better results making a couple of smaller stills rather than one large one.
Step 2. Place your collection vessel in the center of the hole, and fix it firmly by packing some of the loose soil or sand around it.
Step 3: Pour your water into the hole around the collection vessel, but not in it. Make sure to pour gently, to make sure you don’t splash dirty water into your collection vessel.
Step 4. Cover the hole with the plastic, leaving it slightly slack.
Step 5. Seal the outer edges with the soil or sand from digging the hole. Place a dirt clump, or a little sand, or a small stone in the center of the plastic to cause it to dip down so that the point is directly above your collection vessel.
Step 6: All you have to do now is wait…
For the evaporation and condensation cycle to complete. What happens is that the sun shining into the plastic creates the greenhouse effect and the temperature inside the hole rises. This causes water vapor to condensate onto the bottom of the plastic sheet.
The water droplets will run down to the point made by placing a rock etc. on top of the plastic and subsequently drip into the collection vessel.
Step 7: Check. Be sure that your still is functioning properly. Inspect the edges for gaps, and look to see if the water droplets are actually collecting in the container.
Step 8: Finished. From here on your collected distilled water is free of contaminants and impurities and is fit for drinking.
If you wish to take the extra precaution of boiling the water you can. Usually, you don’t really get a lot from a solar still in this manner, so you might not want to risk wasting it by boiling it.
DIY Solar Still at Home
You don’t have to be outdoors to want to make a solar still. Oftentimes, the tap water that is supplied to your home has “acceptable levels” of chemicals, including lead, that you don’t want to drink.
Using a water filter at the tap or a filter pitcher can remove a lot of these unwanted elements. But you can also use a more refined DIY solar still to distill your water and make it more pure.
Tools and Materials
- Casing Material: This is the material you’ll build the solar still box from. You can use almost anything in a pinch, but it should really be as waterproof as possible. Stainless steel is good, or all-weather plywood that is treated with your paint and silicone that we’ll get to in a minute.
- Glass Pane: You’ll need a pane of glass to install on the lid of your box. Allowing sunlight to directly heat the interior will get the process going much quicker.
- PEX Tubing: You’ll need PEX tubing or some other food-grade equivalent to make the collection tube from. This is what will route your collected water droplets to your collection container.
- Gaskets (optional): Unless you want to use huge globs of silicone caulk, get a couple of gaskets that will fit your chosen PEX tubing. You’ll need one that is slightly bigger and outside diameter than the tubing itself for the box, and another, potentially specialized one that will connect to your collection bottle or container.
- Silicone Caulk: food grade, silicone caulk. This will help you seal up your container to prevent loss of steam and water, and also fix certain components in place.
- Silicone Weather Stripping: Thin silicone weather stripping will go around the connecting edges on the halves of your box to help prevent water loss.
- High-Temp Paint (black): High-temperature paint used to coat the inside of your box. This will help to raise the inside temperature, promoting the evaporation of the water which will turn into steam. It also provides a measure of weather resistance. You can use brush-on or sprays, but whichever you use make sure you give it plenty of time to cure before you use your still for the first time.
- Collection Container: the container you will collect your distilled water in. This could be as large or as small as you like, but make sure you can connect your tubing to it one way or the other and also seal it up to keep contaminants out and water in.
- Trays: broad, shallow trays of water are the best thing to use with this type of solar still. I like using metal baking trays because they will further retain heat and also promote evaporation compared to cups or jars.
- Drill: You’ll need a corded or cordless drill to make a hole in one side of the box for routing your tubing, and potentially in your connection for your collection container.
- Box Cutter: a box cutter or other sturdy work- or craft knife will be needed to make precise, clean cuts in your PEX tubing.
- Screws: you’ll need appropriate, weatherproof screws for assembling the components of your box. Make sure you have appropriate driver bits to secure them.
- Hinge: a set of sturdy hinges and hardware to connect the upper and lower parts of your box. Generally makes it a little easier to handle and access when operating it.

Step-by-Step
Step 1. Building the box. The size depends on how much water you wish to distil. The box should have a bottom half and top half. You may hinge the top half to make it easier to access. The top half will be slanted downward at a decent angle, about 30 degrees, and it will have a glass cover.
Add weather stripping to the edges where the halves connect. If you wish to paint the box a dark color to help it retain heat, do so now, but give it plenty fo time to fully cure.
Step 2: Drill hole for PEX tubing. At the lower end of the lid you will drill a hole for the collection tube that extends to the outside of the box with a hose to an external collection vessel.
The hole should be placed below the top edge of the upper half of the box, at the lower end. See diagram for insight. Drill this hole sized for the PEX tubing with gasket that you chose.
Step 3: Prepare PEX tube. Measure the inside width of your box. Make a straight line that length along the PEX tube and split it with your knife, being careful not to pierce both sides of the tube. Make a second cut the same length as the first and remove about 1/3 of the diameter of the tube.
Step 4: Install PEX tube. To install the collection pipe, insert the tube, cut-side first, with gasket into the hole you drilled. Run the pipe to the far side of the box toward the upper corner, making sure that the cut edge of the tubing is in contact with the glass. This will act as a drip edge to catch the condensation and route it to your container.
Step 5: Seal it up. Use silicone caulk to seal the hole, and to glue the pipe into place along the top inside the box. Attach appropriate fittings to the end of the pipe that extends out of the box, and into the collection container.
Step 6: Connect to container. Connect your collection tube to the container you’ll use for storing water. This must likewise be tightly sealed and connections (where appropriate) caulked to prevent evaporation.
Step 7: Add water and wait. Place your trays full of water in the box, and put it in the sun.
The evaporated water will condense on the underside of the glass, and then run down into the collection pipe, as the pipe fills the water will run out of the collection hose into your collection vessel.
Step 8: Finished. Your collected water is pure and ready to drink (although it might be a little warm).
You may wish to collect the water and refrigerate it to have a cool drink of pure water later, or you can collect it into gallon jugs with tightly sealing lids and store it for your prepper stockpile of water.
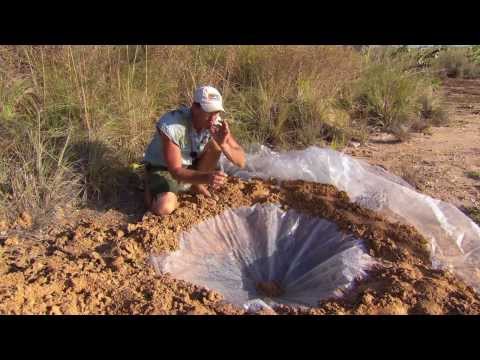
Here’s a video of a survival solar still:
Mentioned in Passing: Overnight Collection
If you have that sheet of plastic that you intend to use for your solar still during the day, you can also put it to use collecting dew overnight or when the weather is not optimum for solar collecting. Especially in a wooded area during warm, or hot, weather.
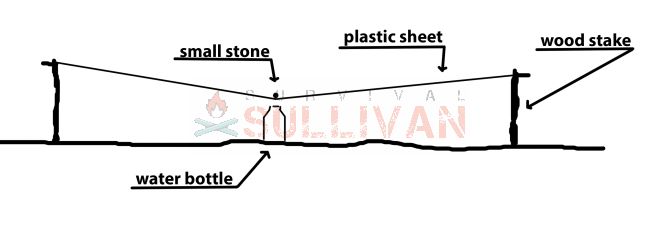
Stake out the plastic sheet up off the ground a couple of feet. Leave some slack in the plastic. Take a small, clean stone and place it in the middle of the sheet to cause in to sag down in the middle, about a foot deep. Overnight condensation will form on the sheet of plastic, and roll down into the dip you made with the stone.
When you wake up in the morning, you will have a little water to drink. The amount of water you will collect depends on the humidity conditions. The water will collect on the top side of the plastic. If you have that vessel handy, it’s not a bad idea to put it under the plastic to catch water that may form on the underside.
Water will run down, and drip off the plastic into your collection vessel. If you have to use a piece of the plastic to collect the water, simply dig a small hole directly under the point of the plastic sheet. Place the smaller piece of plastic in the hole to catch the water drops.
While this is not a solar still, it works on the same principle of condensation. The difference is that with the solar still you are, in effect, forcing condensation to occur. Whereas, in this method, it is occurring naturally.
The Overnight Collector collects dew, so it actually works when a solar distiller is not ideal, or the conditions are not ideal, for using the sun.
Final Words
Have you ever made a solar still? Did you do anything different? Did you have surprises with it? let us know in the comments below!

Eric Eichenberger is an avid outdoorsman, skilled marksman, and former certified range officer and instructor with nearly 40 years experience handling and repairing firearms.
A skilled craftsman with a strong love for working with his hands, Eric spent 20 years as a carpenter and custom woodworker in high end homes. As a gold and silversmith he has created hundreds of pieces of jewelry over the years using the lost wax casting method.
The grandson of humble country folk, he was raised with the “do it yourself” mentality and so is accustomed to coming up with unique solutions to problems utilizing materials at hand.
What is the advantage of cutting the pipe only 1/3 vs 1/2?