As a child, I would marvel at the canning exhibits at agricultural shows with my mother. The peaches, plums and apricots in the jars displaying the blue ribbons, were perfectly positioned and the color seemed to capture the essence of summer sun-ripened fruit.
I could only imagine the taste of the contents of those award-winning jars that only the judges were lucky enough to experience.
Preservation techniques have been used to keep food for lean times, off-seasonal cooking, and trading with friends and neighbors.
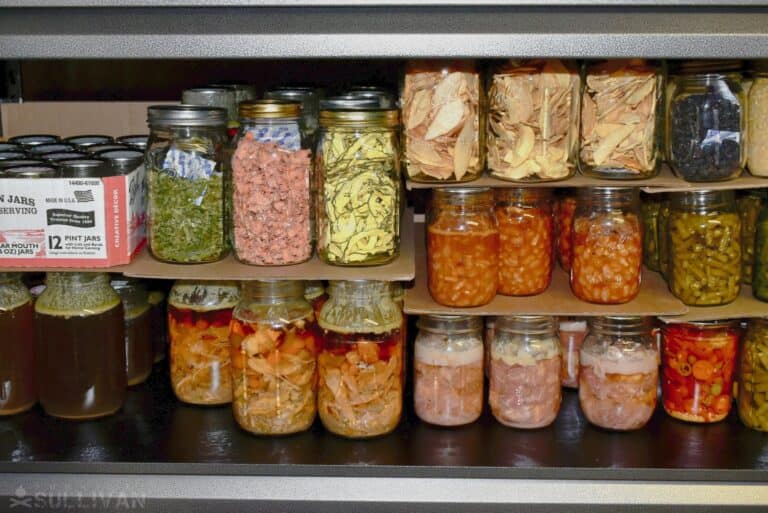
The home canning method is excellent to fill a root cellar and there are hundreds of canning recipes on the internet to fill your inventory with.
You could be a simple canner and preserve things like tomato sauce, carrots, and green beans but this article will try and show you the true potential you can have with canning.
Reaching that pinnacle of home canning isn’t so hard. It is something like medicine – to succeed as a doctor you follow procedures, and the most important of all is sterilization and scrupulous attention to hygiene.
Secondly you need the right tools – the saying that ”a workman is only as good as his tools”, holds true for canning too.
So, with those two points top of mind here is the list of canning tips if you want a pantry full of “fruit with ripeness to the core”, as John Keats wrote in his famous poem, Ode to Autumn. All through the icy, blustery days of winter you will be able to enjoy the richness of the balmy days of summer.
#1. Choose the right jars
Mason jars have been tried and trusted for decades – for good reason – they are made to withstand the process of pressure canning. They also have a nice wide mouth for getting the product into the jar.
Although we are all into recycling, please don’t re-use a jar you bought from the supermarket for either hot water bath canning or pressure canning. Those jars have their place for storage of dry goods or making pesto and salsas that will be used within a day or so. Re-used under heat and pressure, they may break.
The lids are not meant to be re-used. Spend a little on buying proper canning jars – it will save time and wasted produce in the long run. In addition, you won’t run the risk of poisoning someone with a can of preserves that is spoiled.
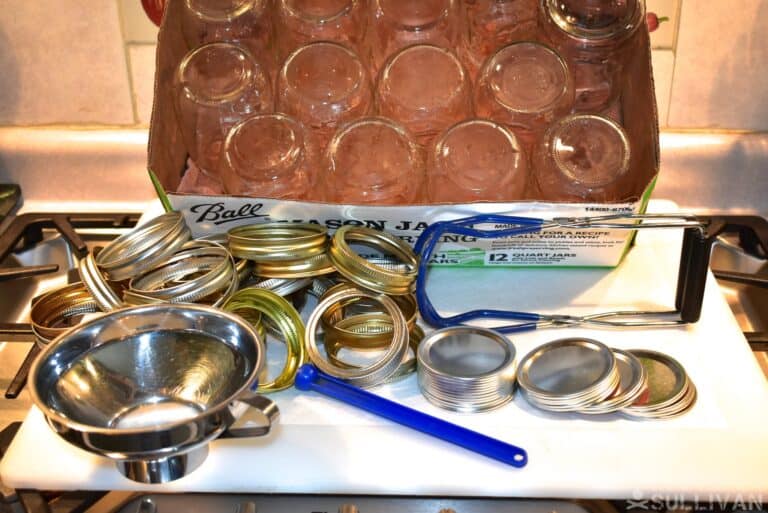
#2. Always use new lids
Don’t reuse the lids for your mason jars – they come in two parts, the flat piece and the screw on band. Keep the screw on piece as long as it isn’t rusty or bent.
This is something that beginners may not think impactful to the end product, but the end result could be ruined if not followed.
Rust creates pitting on the inside of the screw on part, which can prevent a good seal and if they are slightly bent out of shape, it will prevent obtaining an airtight seal.
The metal snap lids are created for once off use only as the red rubbery seal can be heated and cooled once – after that the seal will be worn and you can’t be certain it will make the same quality seal.
This could introduce bacteria into your canned food which could make people sick.
#3. Choose a good pressure canner
Pressure canning is the only method recommended by the US Department of Agriculture (USDA) as safe for canning produce, which includes vegetables, poultry, meat and seafood.
Why? According to the USDA’s Complete Guide to Home Canning, Agriculture Bulletin No 539:
“The bacterium Clostridium botulinum is destroyed in low-acid foods when they are processed at the correct time and pressure in pressure canners. Using boiling water canners for these foods poses a real risk of botulism poisoning.”
https://www.fsis.usda.gov/
As the World Health Organization (WHO) points out in the fact sheet, ‘Botulism’ that was updated in December 2016, consuming processed food that hasn’t been properly processed can cause foodborne botulism. Although it is rare, botulism poisoning is potentially fatal unless diagnosed and treated with antitoxin within a short space of time.
“Homemade canned, preserved or fermented foodstuffs are a common source of foodborne botulism and their preparation requires extra caution,” cautions the WHO factsheet on Botulism.”
This is why you need a reliable pressure canner – and one with a pressure dial gauge that indicates the full range of processing pressures. This is very important when adjusting the pressure for higher altitudes. It includes a canning/cooking rack and a complete recipe and instruction booklet.
#4. Clean your jars and lids really well
When you receive your box of shiny new canning jars don’t be tempted to just fill them – they may have been created under sterile conditions but they still need to be sterilized before use, and this includes the lids.
This also helps with making sure the jars are warm before you put your hot product into them. Cracking can occur due to the sudden change in temperature if you don’t do this.
Ensure that you look at the rims of the jars as well while you’re cleaning. Any kind of crack or pit in the glass could cause a shattering incident involving your filled jars.
#5. Use a canning funnel
When filling the jars use a canning funnel and remember to sterilize it before use. I prefer the stainless steel type rather than the plastic type. The difference is only a couple of dollars. Using the canning funnel helps avoid spills on the jar.
#6. Use canning tongs
The price of a visit to a doctor for burn treatment will be far more expensive than your HIC canning tongs.
When you are moving hot jars around, lifting them from the steam bath or from the pressure canner you need these! They keep your hands safely away from the steam and heat and provide a secure grip.
You might also find them called jar lifters in some stores and they’ll look like really wide tongs. These ensure a strong grip[ on the neck of your pint jars.
#7. Check for cracks / chips before sterilization
Factories have rigorous procedures for quality checking but in the journey to the shop and from there home, chips can occur. Before sterilizing jars check for imperfections that could affect your jars during the canning process.
A small chip, especially near the rim, can affect the sealing. Similarly, inspect the lids for imperfections in the seal ring. After the pressure canning also check for cracks before storing your product – which brings us to the next point.
#8. Keep an even temperature
Treat your jars like babies: no sudden changes in temperature. From the sterilization to the filling, to taking them out of the canner, try to avoid big temperature changes.
For example when you take the jars out of the canner don’t place them directly on a cold surface – cover the counter top with a towel so the temperature doesn’t drop excessively and make sure you are not in an environment where icy wind can swirl in, as cracks can occur in the glass.
#9. Headspace
This refers to the space between the top of the product in the jar and the underside of the lid. Measuring and double-checking the headspace is important in getting a good vacuum seal. Some products tend to swell taking up some of the headspace after processing – beans for example.
When you’re using a hot water bath for canning then just ¼ inch for jams and jellies, and ½ an inch for other high acid foods is fine.
For the pressure canner you need to leave more head space because air expands when heated and you need to leave room for the air in the food itself to expand during processing – the higher the temperature the greater the expansion.
#10. Removing air bubbles
Use a plastic spatula or knife to slide between the product and the side of the jar to release any trapped air bubbles even if they are invisible, as they may be trapped between pieces of food. Don’t forget this step and do it thoroughly around the sides of the jar as trapped air can lead to spoilage.
If the level of product in the jar has gone down a bit after releasing the air bubbles then fill to the correct headspace with a little more product. A plastic utensil is better than steel as the metal could damage the jars – remember they are hot, and glass when heated can be weakened, resulting in breakages.
#11. Getting a good seal
Check the top of the jar particularly carefully to ensure no product has caught in the ridges otherwise the lids will not seal properly and you’ll have spoiled products.
Always have a damp sterile cloth that has been dipped in some Milton’s or other germ-killing product to wipe carefully around the tops of the jars before adding the lids.
12. Temperature regulation
The boiling water bath method can be used for high acid foods like fruit, tomatoes and pickles, but even then citric acid will need to be added to some produce to increase the acidity, but all other food should be processed in the steam canner.
Never can your food in simmering water as a gentle simmer won’t be enough to force the air out of the can for a seal.
Where the boiling water method can only reach 212 degrees F at sea level, the steam canner reaches 240 degrees F. When using a boiling water bath the general rule is to boil for an extra minute for every 1000 feet above sea level.
#13. Maintaining pressure
When canning with a steam canner don’t set the burner on high otherwise it becomes difficult to regulate the pressure. The processing time starts from the time the pressure is reached. Stay in the kitchen to monitor the progress – if the pressure rises do not fiddle with the vent – simply turn down the burner until the pressure is correct.
If the pressure drops too low you need to start retiming from the start. To kill the organisms that cause spoilage the pressure must remain constant for the set amount of time in your pressure and processing guide.
#14. Don’t substitute sugar
There is a move towards using less sugar in a bid to reduce calories, but sugar has an important part to play in canning. Like salt, sugar acts as a preservative.
The Chair of the Nutrition and Food Science Department of Maryland University, Mickey Parish, explains in an article for Scientific American how sugar draws water from the inside of the fruit replacing the water with sugar molecules, in this way inhibiting the growth of microbes by weakening their DNA structure.
To inhibit the growth of molds and yeasts as Parish points out in the article the product water activity (aw) needs to be as low as 0.80. In fresh fruit it is 0.99.
So the lesson here is that if the recipe calls for a certain amount of sugar don’t try to reduce the sugar or use artificial sweeteners – they will not have the same chemical reaction and you could end up with products that are spoiled or can make people severely ill if they eat them.
Artificial sweeteners are possibly even worse than sugar for you, anyway.
If you are worried about sugar, make sure to spread a little less jam or jelly on bread and reduce the portions of canned fruit served or find a recipe that uses honey. Incidentally, honey lasts so long because the bees make sure that they only cap off the honeycombs when the moisture content is around 17% to 18%.
If beekeepers remove the honey before this stage then the water content may be higher and could result in fermentation. Make sure you use honey from a reliable source. The exception to this is clover honey, which has a moisture content of around 23% but is still fine to use.
#15. Prick your pickles
This follows on from Point #7 where the aim it to get the sugar or vinegar to the core of the product. In order to ensure the vinegar or sugar get to the center of harder fruit or vegetables the produce should be pricked all over with a sterilized fork.
Nice firm pickles will result from this. I remember hours spent in the kitchen with my mom preparing watermelon preserve – taking all those pieces and pricking them all over before they were processed further into a sweet concoction.
#16. Follow recipe instructions to the letter
Recipes are a blueprint for success – ensure the ones you use have been thoroughly tested. If they are not from a reliable source, don’t use them.
Don’t be tempted to skip stages – like sterilizing, or pricking the pickles, or substituting products. The ratios have been worked out so do your best to follow the instructions correctly if you want a successful batch.
#17. Know when to remove jars from the pressure canner
If the instructions say the jars must be removed from the canner then don’t leave them to cool off there overnight. Once the process is finished switch off the heat source and leave the jars in the canner for ten minutes or so. Do not try to cool them off by putting the pressure canner in cold water or fiddling with the vent.
When the pressure gauge is at 0 wait for at least 2 minutes before attempting to open, if it’s one of those with the metal bit that drops down wait until it drops then give a test by lifting slightly – any sign of hissing means leave it alone to cool further.
Once the lid is off – and take care at this stage that steam does not get in your face – then allow the jars to cool off for a further 10 minutes or so before removing them with the canning tongs – and wear gloves too. The jars, product and water in the canner will still be very hot.
#18. The product is only as good as the produce
If the recipe says “select nice, firm fruit” then do so. Trying to use fruit that is a little overripe means decay has already set in and will only waste time and materials.
It’s best to choose produce and other canning ingredients at local stores since they have seen the least time in transit. THe best time to can is at the peak of freshness as then all of the vital nutrients inside the food will be preserved without the worry of bacteria creating mold.
Additionally, supporting local farmers stimulates the local economy which opens up the doors of additional ingredients being farmed for even more canning possibilities.
#19. Don’t double batches
The ratios are worked out quite precisely in recipes so doubling batching means a slower reaction time for the larger quantities of ingredients and a delay in heating which can affect the reaction, resulting in products not setting well, particularly jams and jellies.
It is better to set two pots side by side and make two separate batches rather than use a huge pot for one batch.
#20. Check the seal of each jar
Once the jars are cool – this could take between 12 to 24 hours – remove the screw bands and lift by the lid to check if the seal is strong.
If any of the jars did not seal correctly then put that product aside to be re-processed the same day or put it in the fridge to use within the next day or so. The product can also be frozen if suitable for freezing.
#21. Label each jar
Wipe down the jars to ensure they are dry and non-sticky before putting on the labels. Every label should show the month and year, and possibly even the particular day the batch was processed to ensure you use cans in the correct rotation.
This video takes you through the basics of home canning:

If you bear these tips in mind and follow tried and trusted recipes then you’ll be able to bask in the glory of divine jars of food that will have everyone around the dinner table clamoring for more and have gifts to give to friends. What a wonderful way of sharing the bounty of summer!

Traveler, photographer, writer. I’m eternally curious, in love with the natural world. How people can survive in harmony with nature has fueled my food safety and survival gardening practices.
At the age of 12, I found a newspaper advertisement for a 155-acre farm at a really good price and showed my parents one Sunday morning. They bought it and I happily started planting vegetables, peanuts, maize and keeping bees with the help of the local labor.
Once I married wherever we moved it was all about planting food, keeping chickens and ducks, permaculture and creating micro-climates. I learned how to build wooden cabins and outdoor furniture from pallets, and baked and cooked home-grown produce, developing recipes as I went along.
How tight do you screw down the lids prior to pressure canning, and why?
I don’t like to see ANY encouragement for a canning person to stock non-“Mason” jars – keeping old mayonnaise and pickle jars around is just asking for trouble down the line – having one of them bust open with lava hot tomato sauce is a lesson best avoided ….